TLS Certificates
Creating KEY and CSR - Certificate Signing Request
To generate a Certificate Signing Request (CSR), you will need to create a key pair for your server. These two items are a digital certificate key pair and cannot be separated. If you lose your public/private key file or your password and generate a new one, your TLS Certificate will no longer match. You will have to request a new TLS Certificate and may be charged by the TLS Issuing company to do this.
Step 1: Generate a KEY Pair
The utility "openssl" could be used to generate the key and CSR. This utility comes with the OpenSSL package and is usually installed under /usr/local/ssl/bin. The following instructions will use the openssl that is installed with the standard Apache installation on an OS-X computer.- Open Terminal
- At the command prompt, type: cd /Library/TLS to navigate to the desired folder where the files will be generated
- At the command prompt, type: openssl genrsa -out server.key 4096 to create a key file with 4096 bit encryption
- Wait for the server.key file to finish being created in Terminal The process is complete when Terminal returns to the command prompt. A server.key file will now appear in the /Library/TLS folder from above.
The server.key file (first part of the "key pair" files) has now have been created in the /Library/TLS folder. This RSA private key file is a digital file that will be used to decrypt messages sent to Apache. It has a public component which is distributed (via the Certificate file) which allows people to encrypt those messages to Apache.
Step 2: Generate the CSR
- If you have moved from the current directory from Step 1 above, at the command prompt, type: cd /Library/TLS
- At the command prompt, type: openssl req -new -key server.key -out server.csr to enter the server.csr setup process This creates the server.csr linked to the server.key file for security purposes.
- Enter the following details:
- Country Name (2 letter code) [AU]: the two-letter code without punctuation for country Enter US (for USA) or CA (for Canada).
- State or Province Name (full name) [Some-State]: the full name of the State or Province Do not abbreviate the state or province name.
- Locality Name (eg, city) []: the City name
- Organization Name (eg, company) [Internet Widgits Pty Ltd]: the full legal Company Name If the company or department has an &, @, or any other symbol using the shift key in its name, you must spell out the symbol or omit it to enroll. Example: XY & Z Corporation would be XYZ Corporation or XY and Z Corporation.
- Organization Unit Name (eg, section) []: this can be left blank This field is optional; but can be used to help identify certificates registered to an organization. The Organizational Unit (OU) field is the name of the department or organization unit making the request.
- Common Name (eg, YOUR name) []: the primary domain name the TLS Certificate will be generated for Enter the tickets.myvenue.org URL for the web sales ticketing site. Do not prefix it with http:// or https://. This name must match EXACTLY to what will be used for the https://tickets.myvenue.org online ticketing site.
- Email Address []: the registered domain approval email address This can be one of the five email addresses approved by GeoTrust or the email address registered to the domain.
- A Challenge Password []: do not enter a password for the TLS Certificate Entering a password means the Theatre Manager Server will not be able to start Nginx as the password is required during startup and is not supported at this time.
- An Optional Company Name []: this can be left blank
-
A server.csr file will now appear in the /Library/TLS folder from above.
A public/private key pair has now been created. The private key (server.key) is stored locally on the server machine and is used for decryption. The public portion, in the form of a Certificate Signing Request (server.csr), will be for certificate enrollment.
Step 3: Generate the Diffie-Helman
- If you have moved from the current directory from Step 1 and 2 above, at the command prompt, type: cd /Library/TLS
- At the command prompt, type: sudo openssl dhparam -out dhparam.pem 4096 This creates the Diffie-Helman file.
- Wait for the dhparam.pem file to finish being created in Terminal This process will take some time and is complete when Terminal returns to the command prompt. A dhparam.pem file will now appear in the /Library/TLS folder from above.
The server.csr file (second part of the "key pair" files) has now have been created in the /Library/TLS folder.
The /Library/TLS folder now contains the necessary starting files for the TLS Certificate. The next step is to submit the CSR file for certificate creation.
Submitting CSR for TLS Certificate Creation
To submit the request for TLS Certificate Creation, you will need the Certificate Signing Request (CSR) file called server.crt created from the previous step.
Submitting CSR for TLS Certificate - NameCheap
Step 1: Access GeoTrust's Vendor Portal
- Access the NameCheap vendor portal via https://www.namecheap.com/myaccount/login.aspx?ReturnUrl=%2f
- Enter user name artsman
- Enter password refer to Daylite
- Click Sign in and Continue
Step 2: Place Order for Certificate - PositiveSSL Multi-Domain
- Click Security >> TLS Certificates.
- Click the Buy Now button under the PositiveSSL Multi-Domain option.
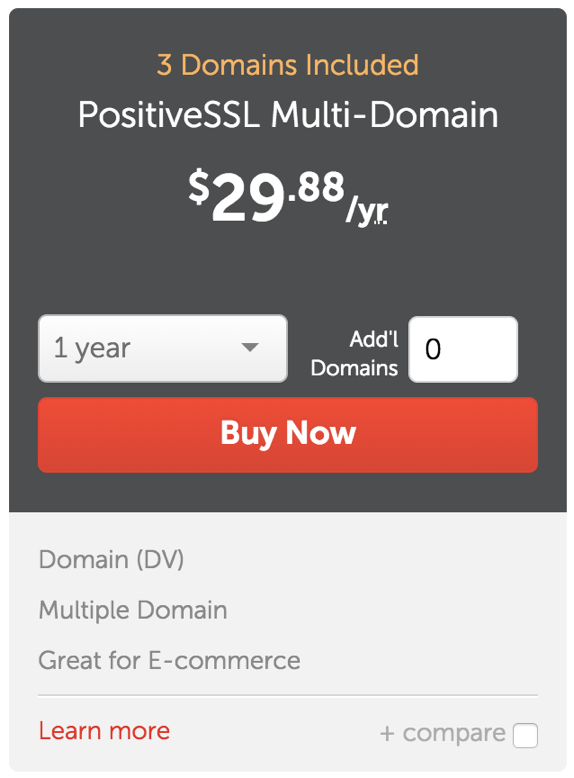
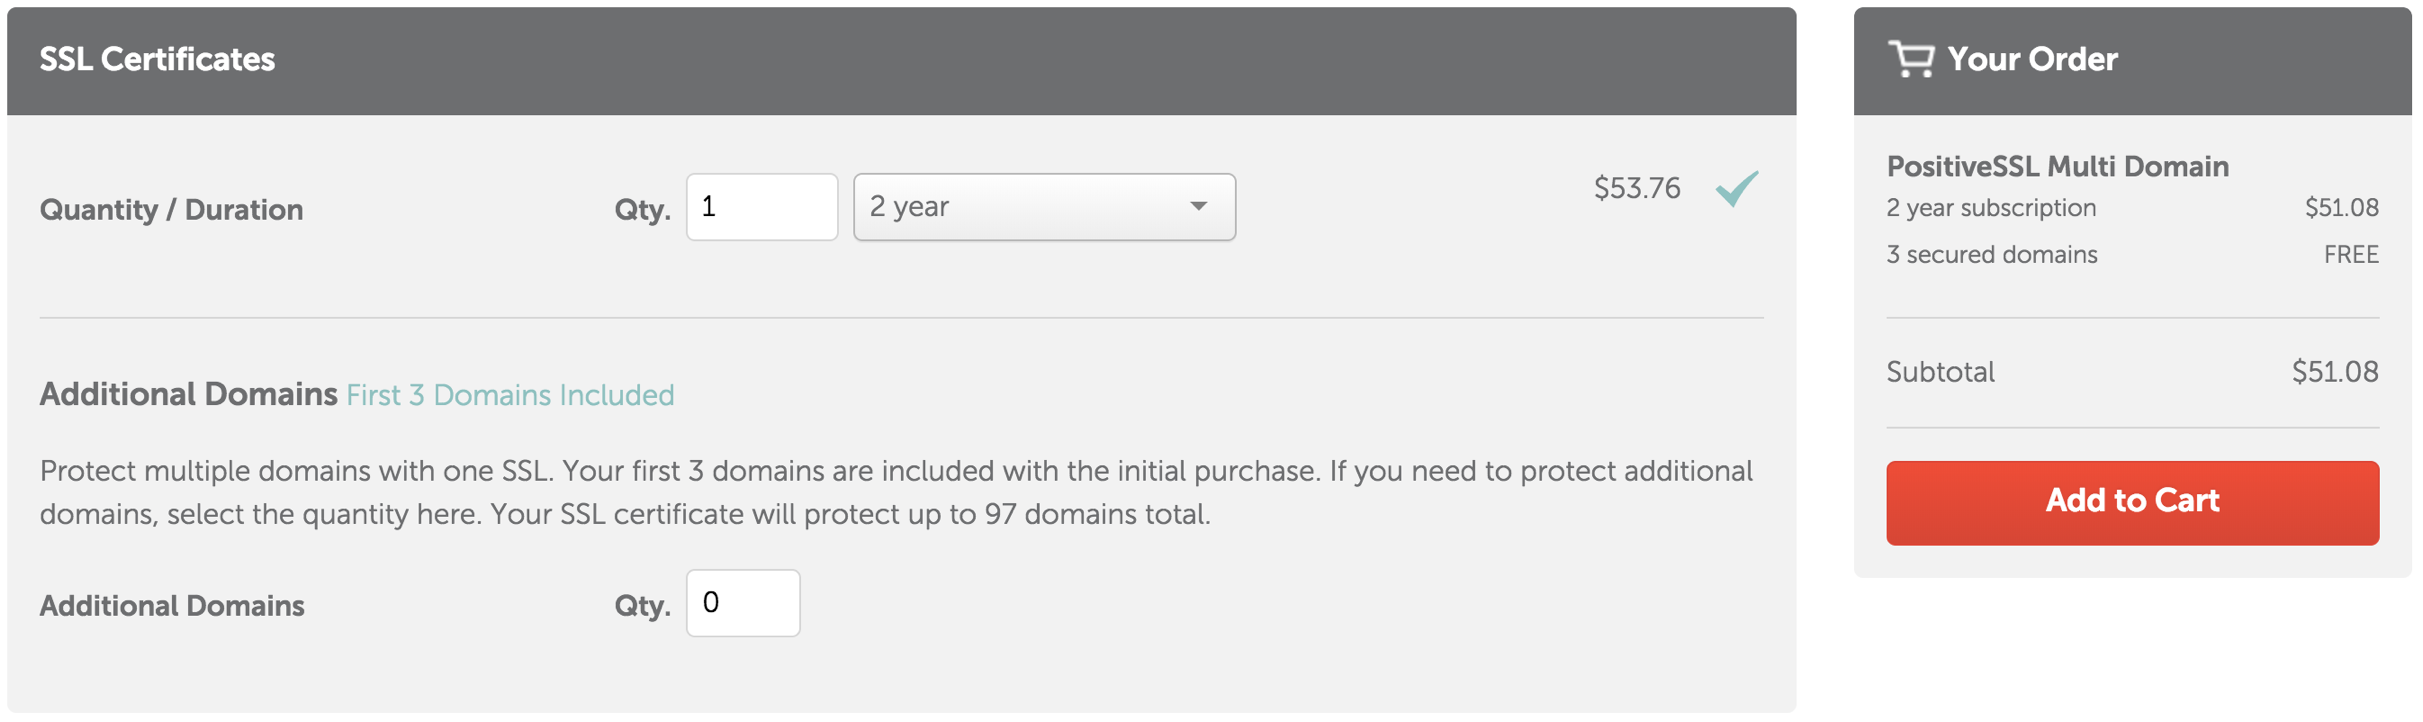
- Select the number of years the TLS purchase will be valid for. Most clients purchase for 2 years.
- Click the Add to Cart button.
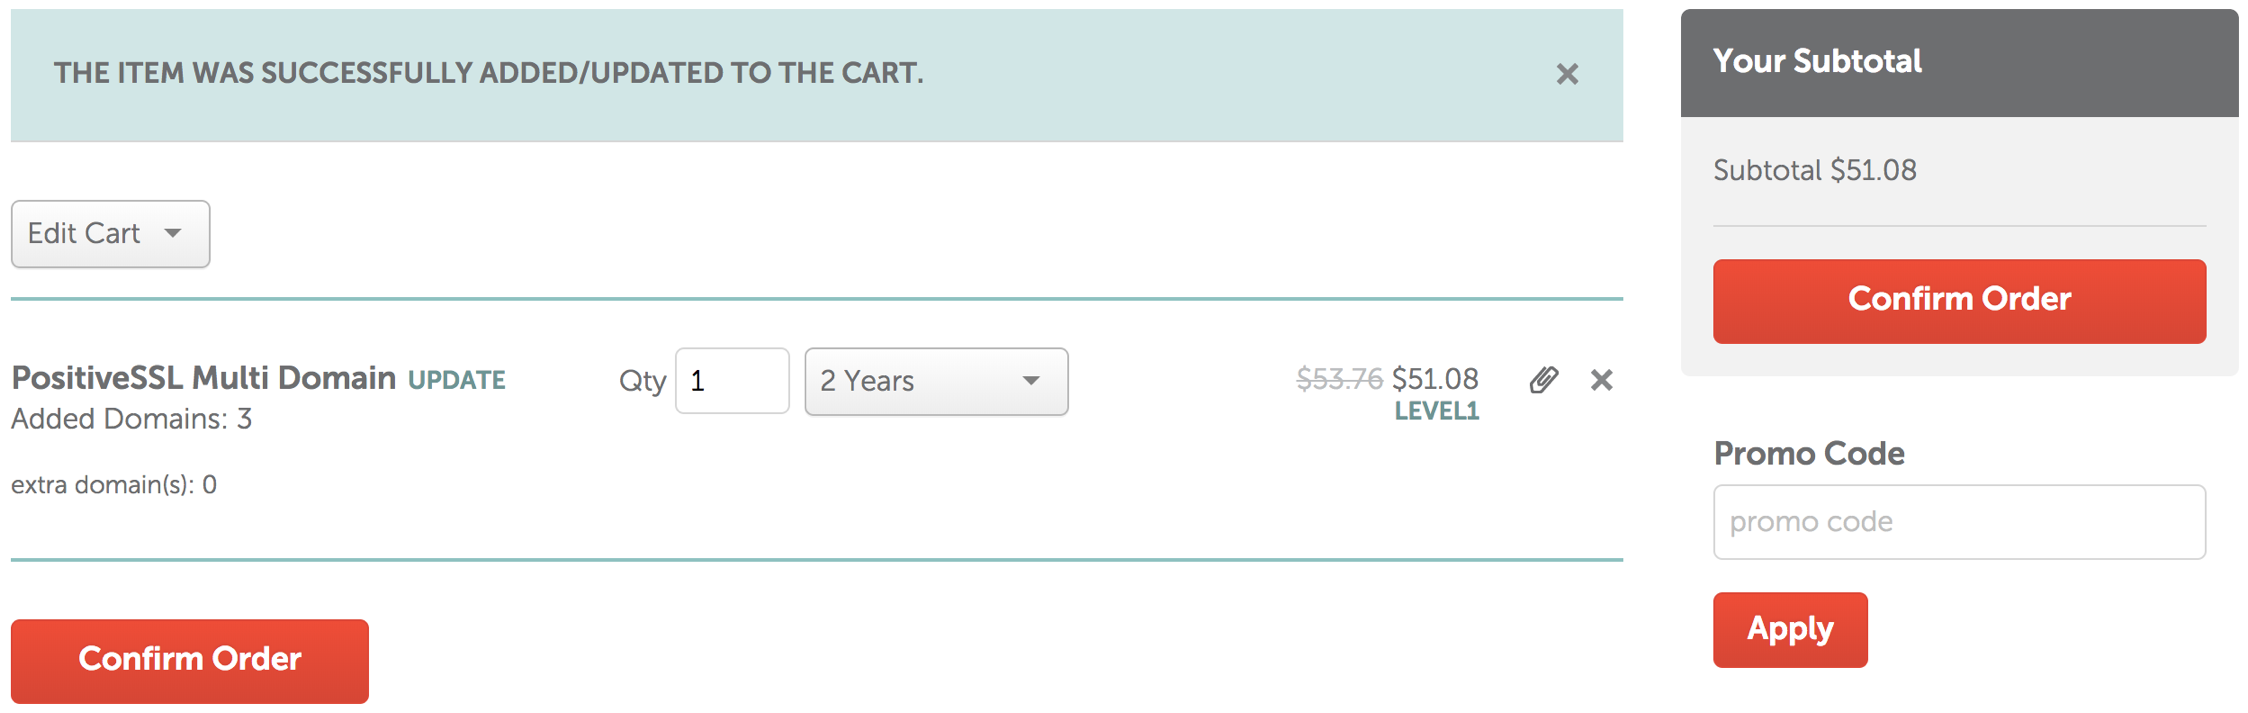
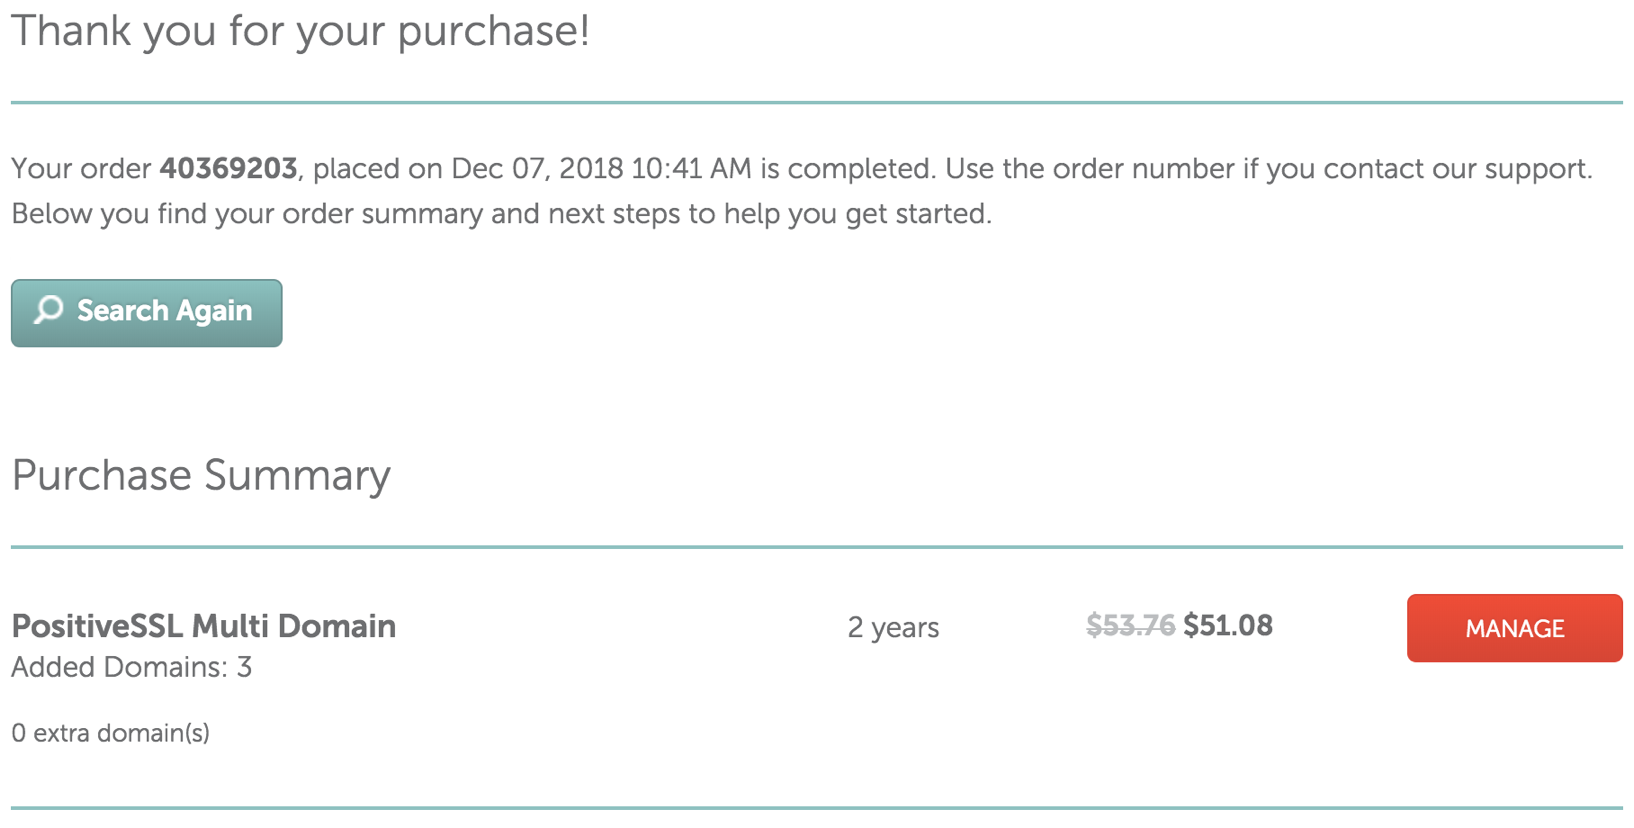
- After reviewing the order details are correct, click the Confirm Order button.
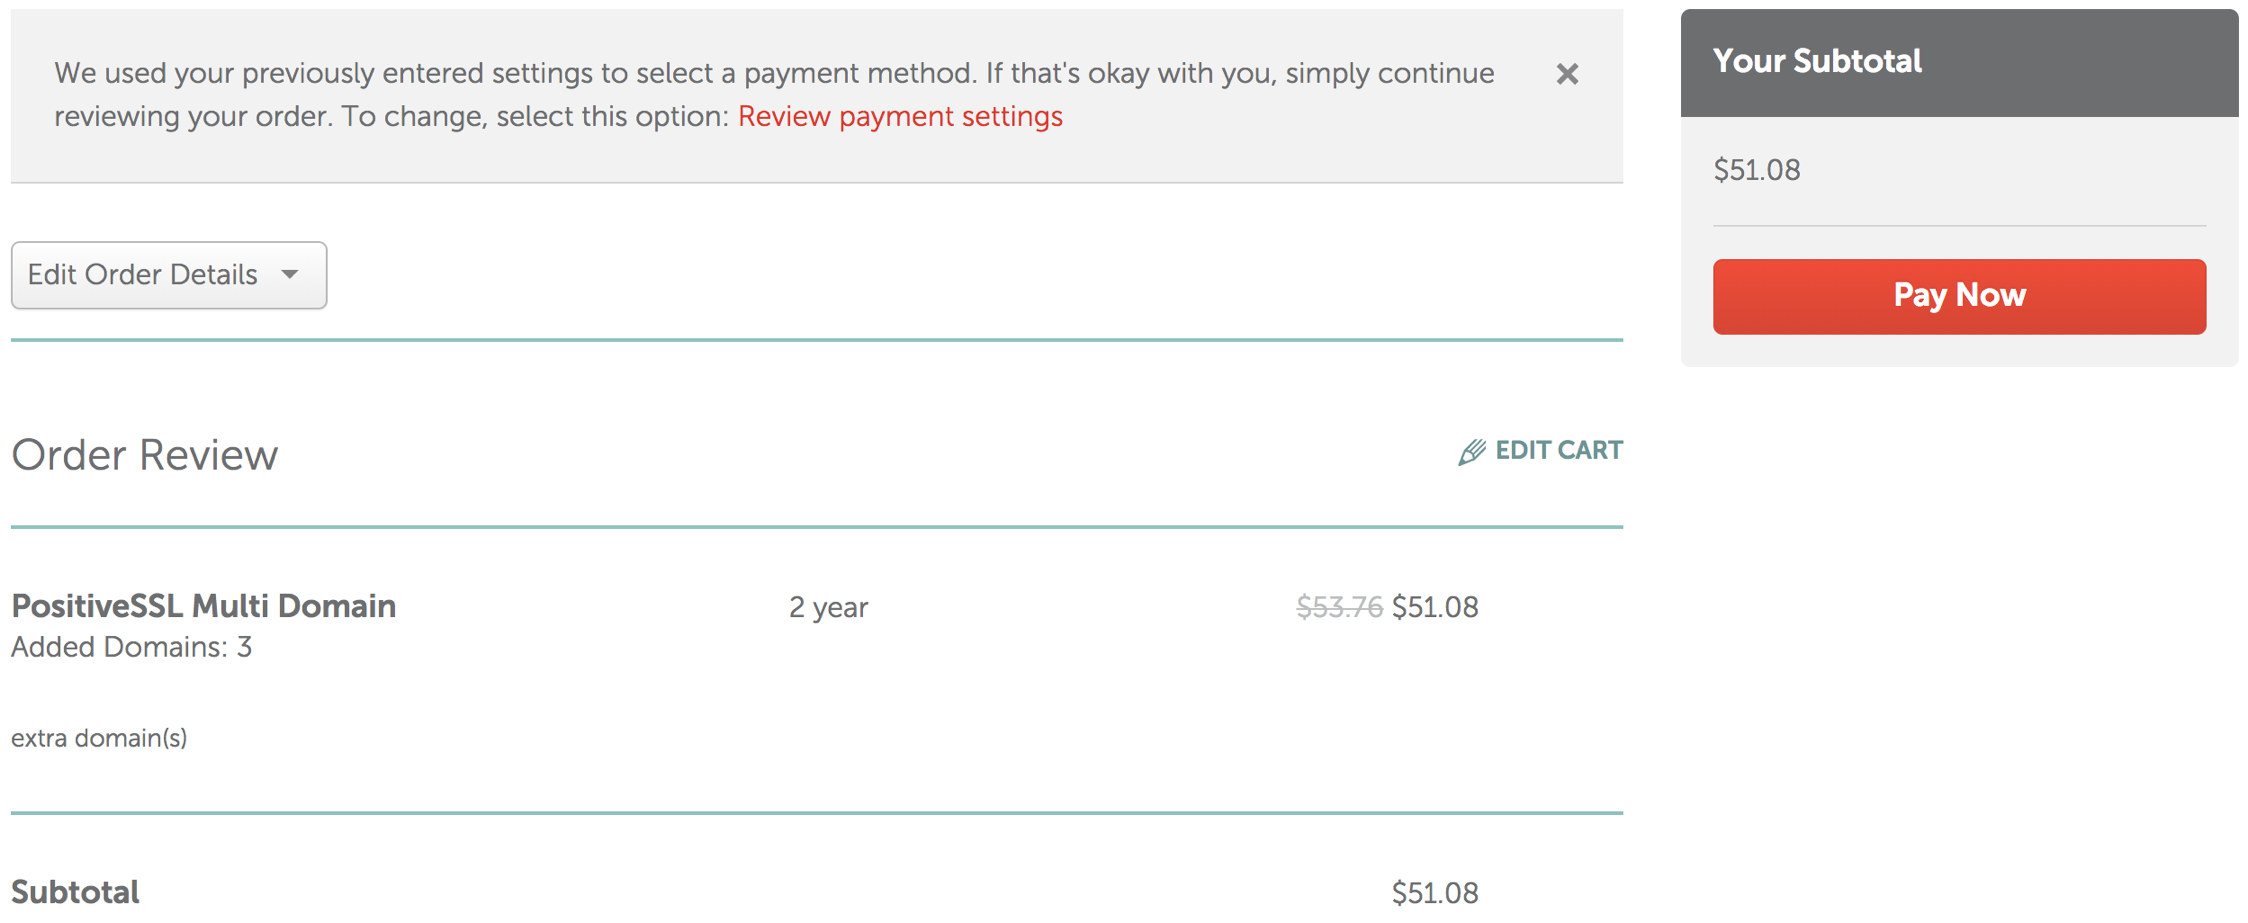
- Click the Pay Now button to purchase the PositiveSSL Multi-Domain SSL.
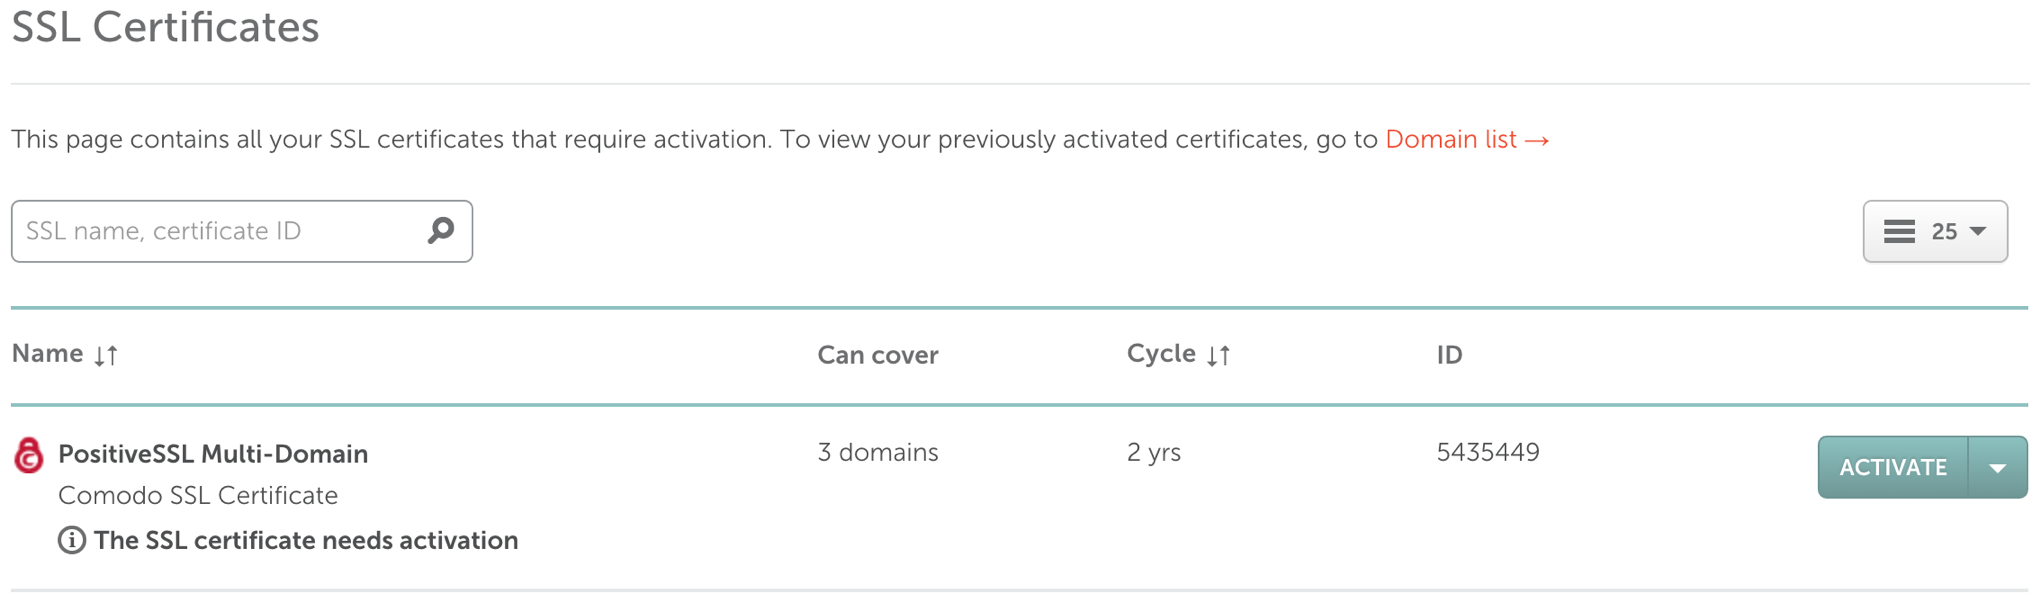
Step 3: Activate the TLS Certificate - PositiveSSL Multi-Domain
- Click the Manage button in the Purchase Summary window.
- Click the Activiate button to start the activation process.
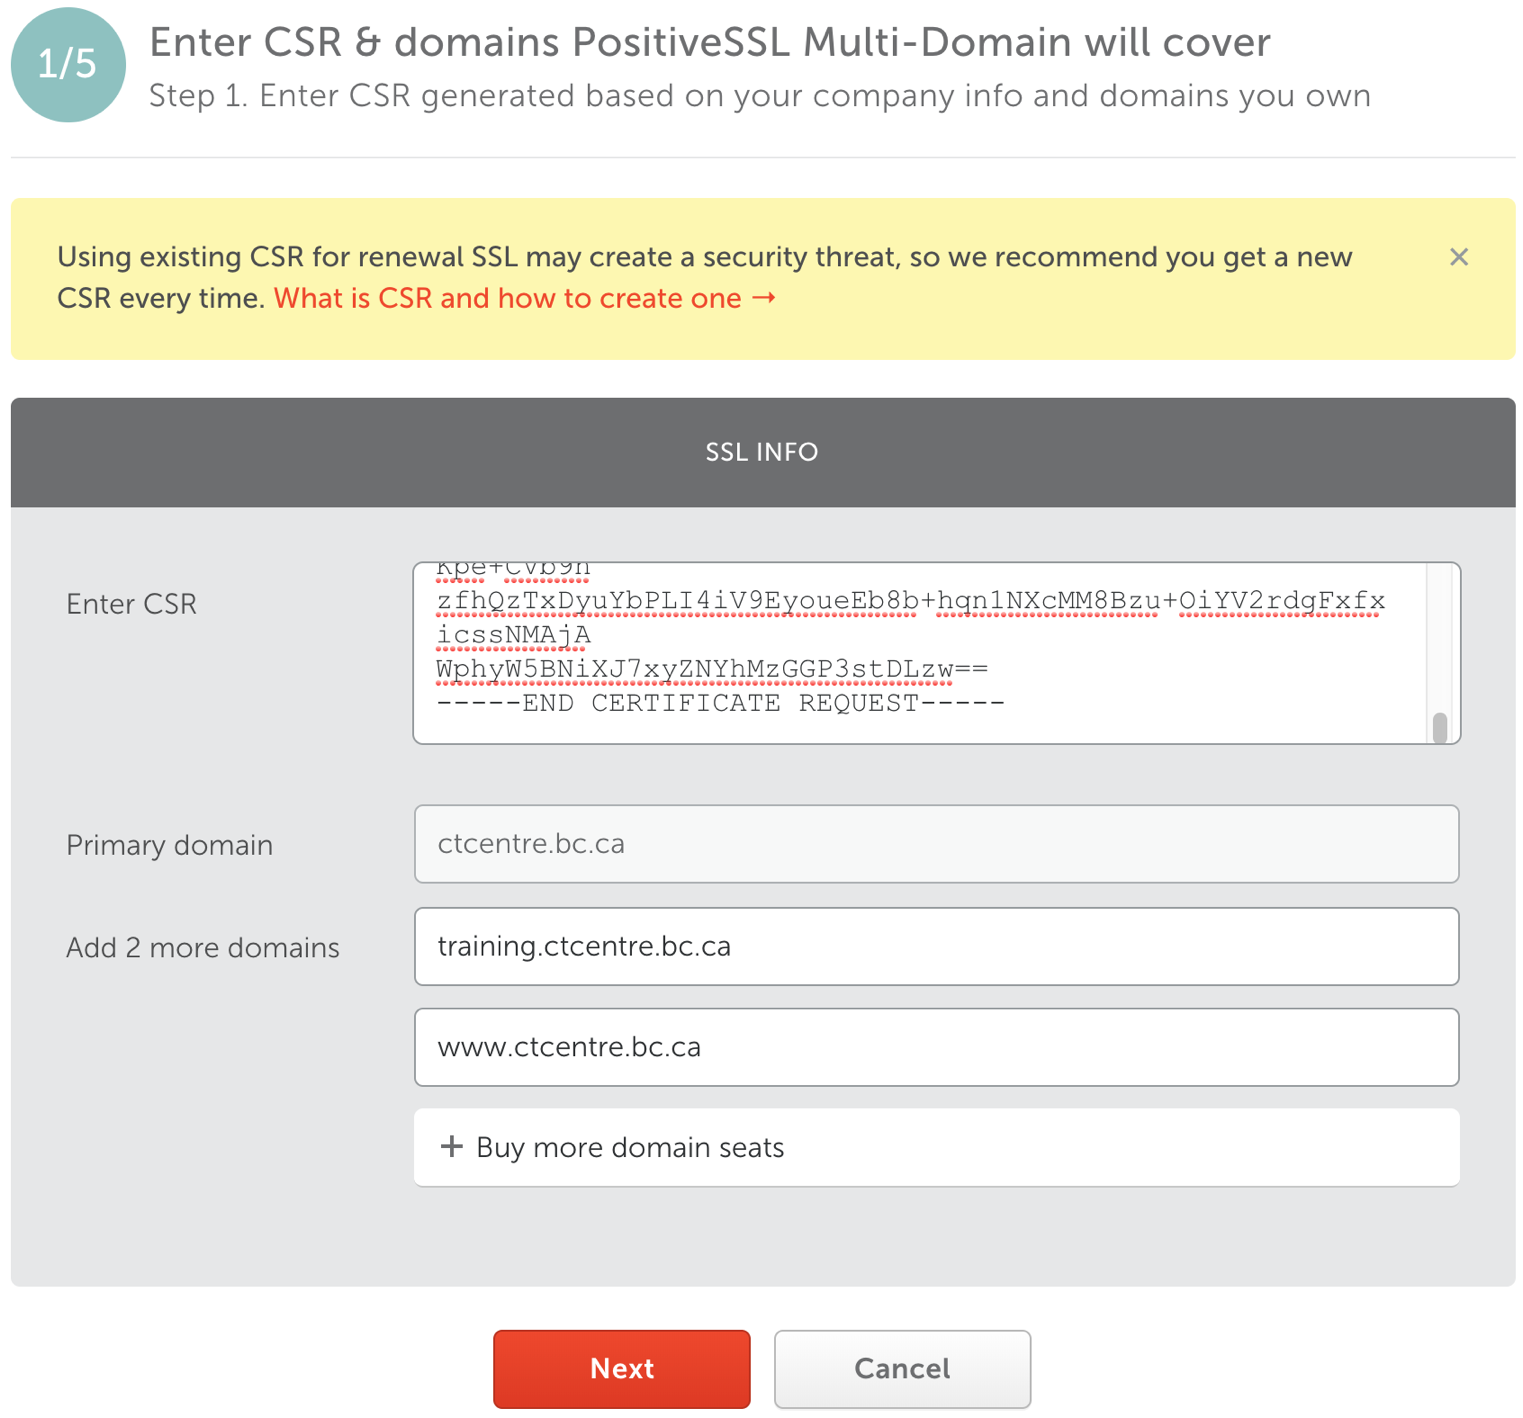
- Step 1: Enter CSR & domains PositiveSSL Multi-Domain will cover
- Copy and Paste the content from the .CSR file into the Enter CSR field. The Primary Domain field will populate with the domain name.
- Enter the additional domain names in the Add 2 more domains fields.
- Click the Next button.
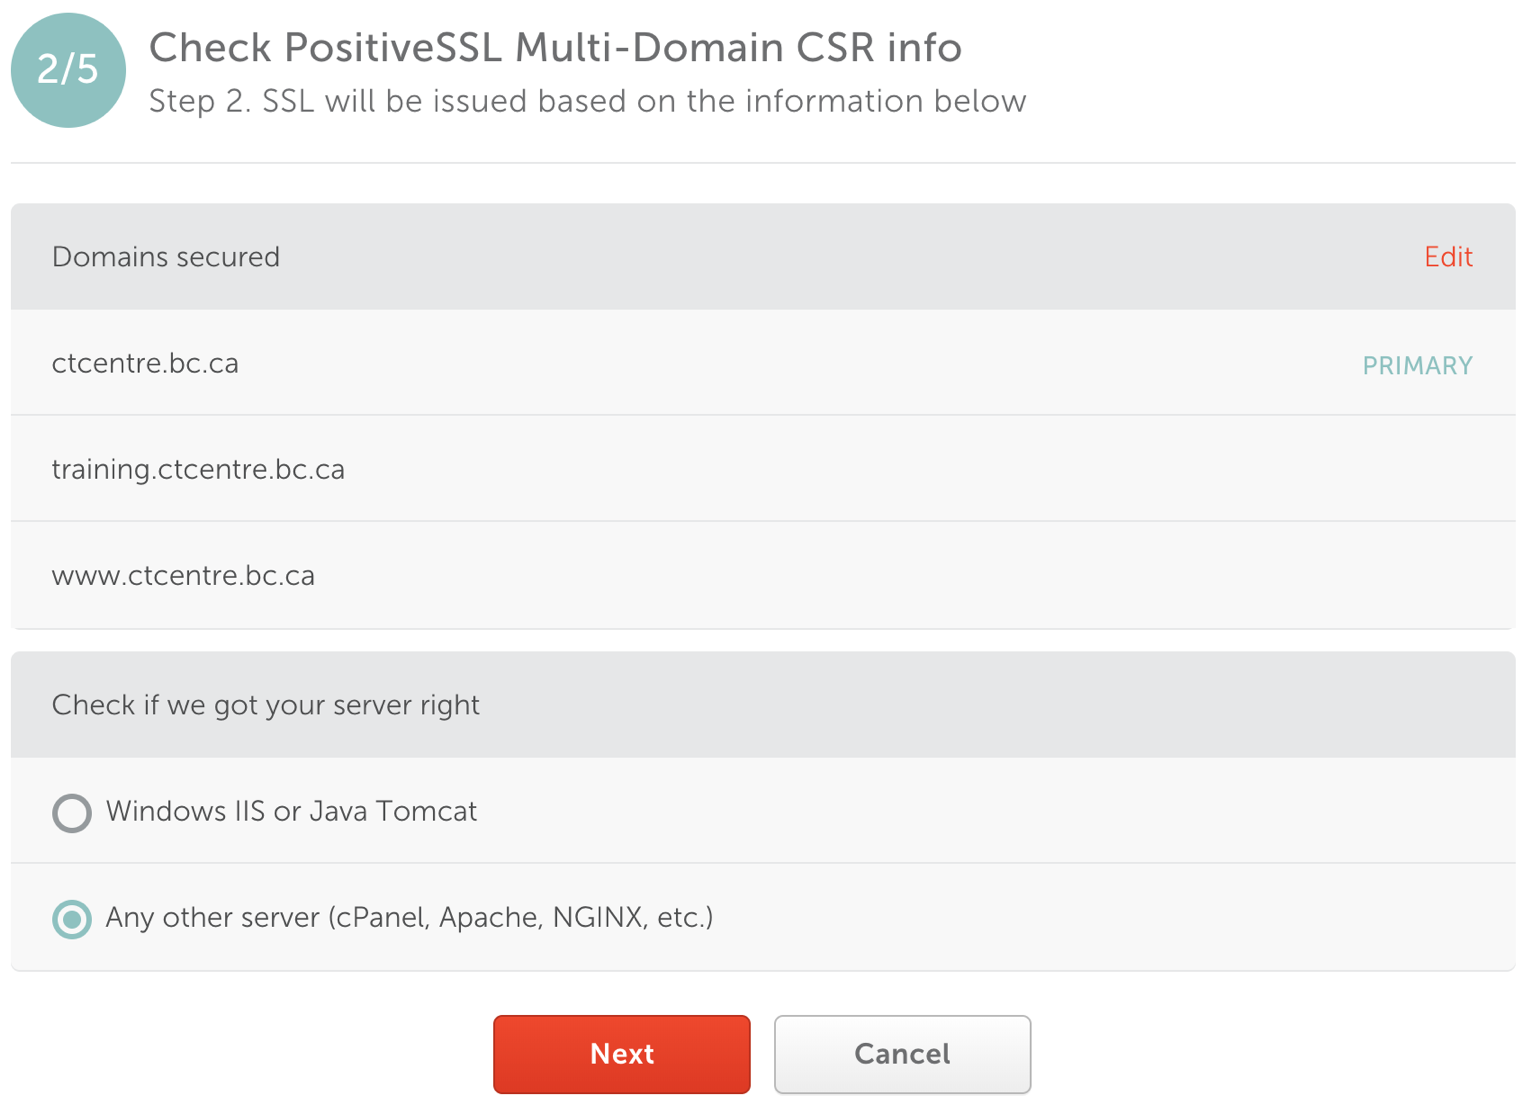
- Step 2: Check PostiveSSL Multi-Domain CSR info
- Review the Domain names.
- Select the web server. This is usually set to Any other server (cPanel, Apache, NGINX, etc.).
- Click the Next button.
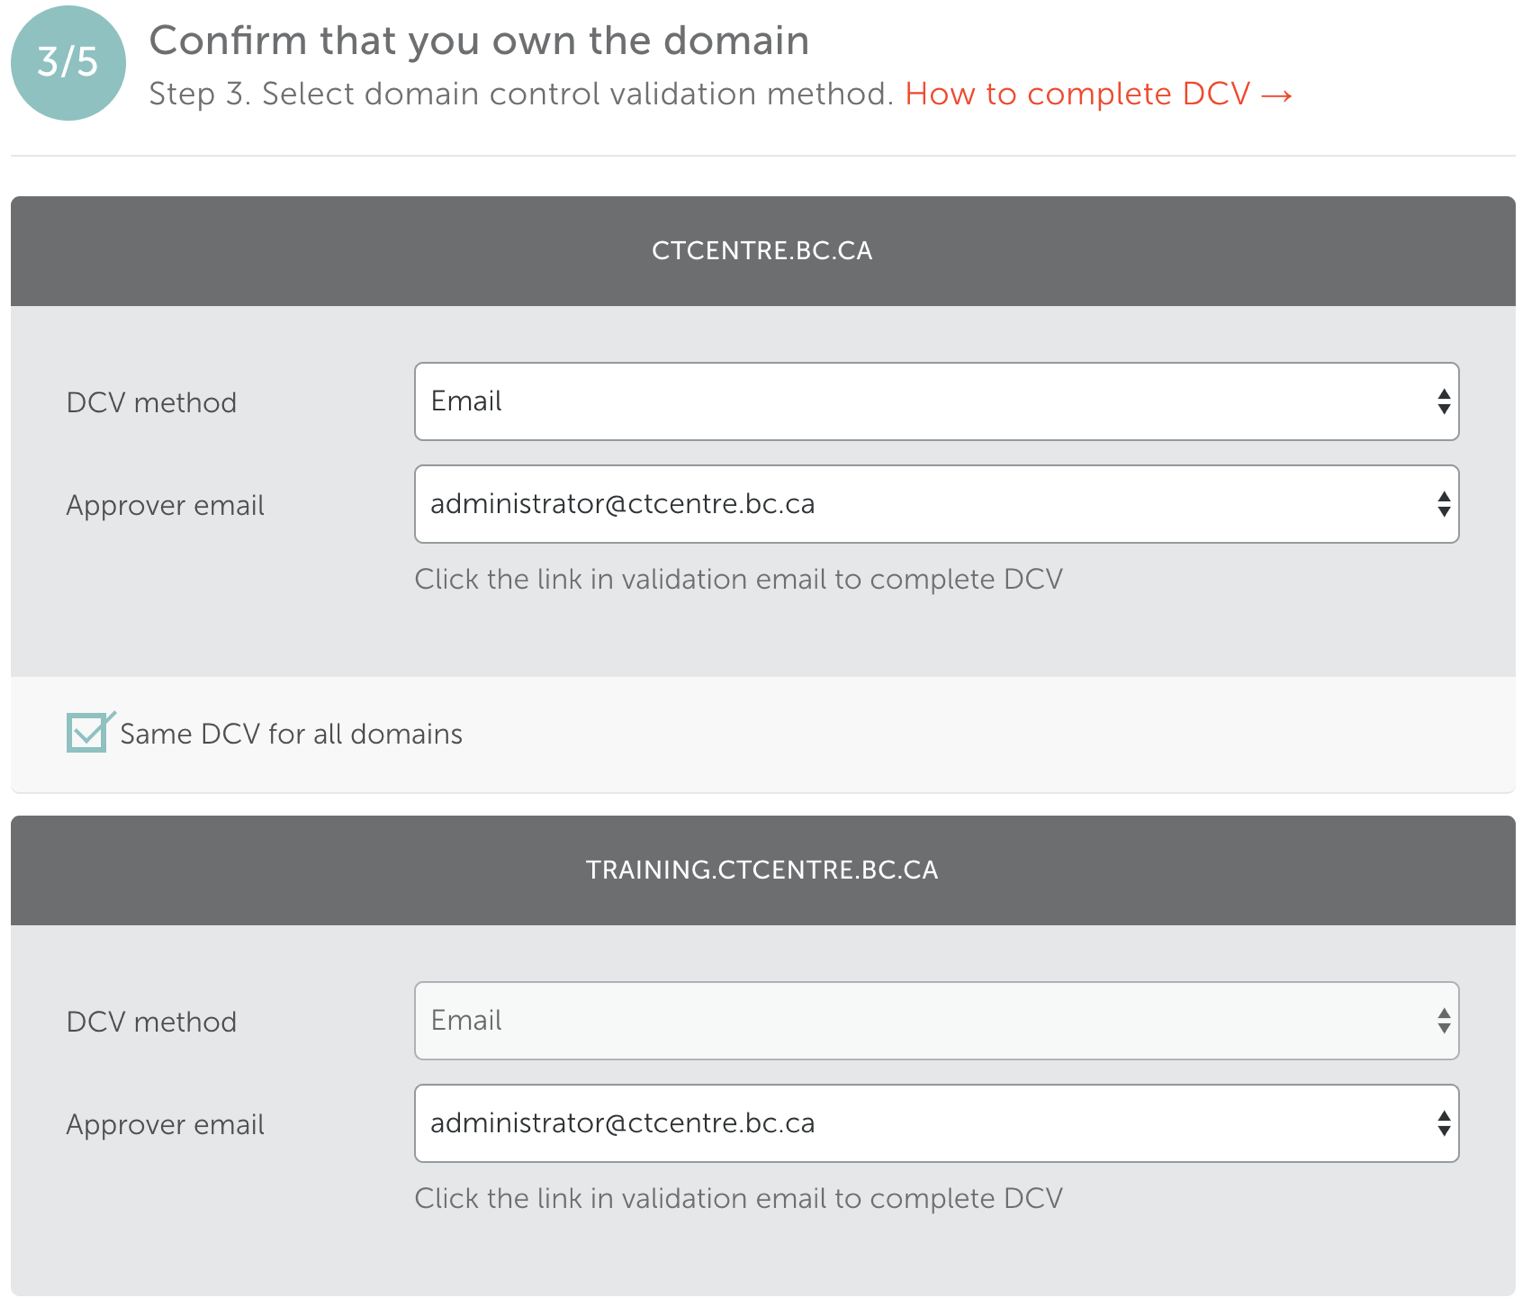
- Step 3: Confirm that you own the domain
- Choose the Approver emailfrom the drop down for the domain.
- Check the Same DCV for all domains box. This will ensure one email goes to the client to approve all three domain names.
- Select the same email Approver email address for the remaining domains.
- Click the Next button.
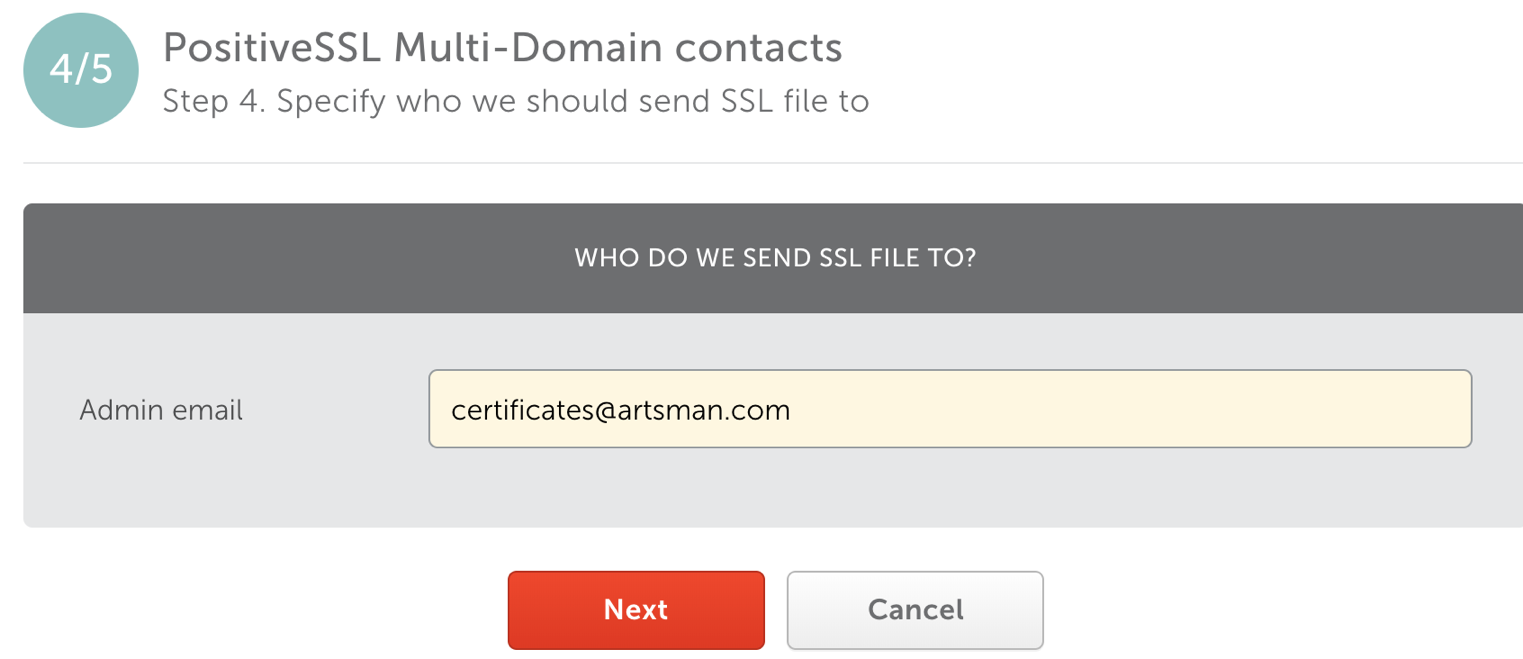
- Step 4: PostiveSSL Multi-Domain contacts
- Edit the Admin email to be certificates@artsman.com. This is the email the .crt file will be sent to.
- Click the Next button.
- Step 5: Review & submit
- Review the TLS details to ensure they are correct.
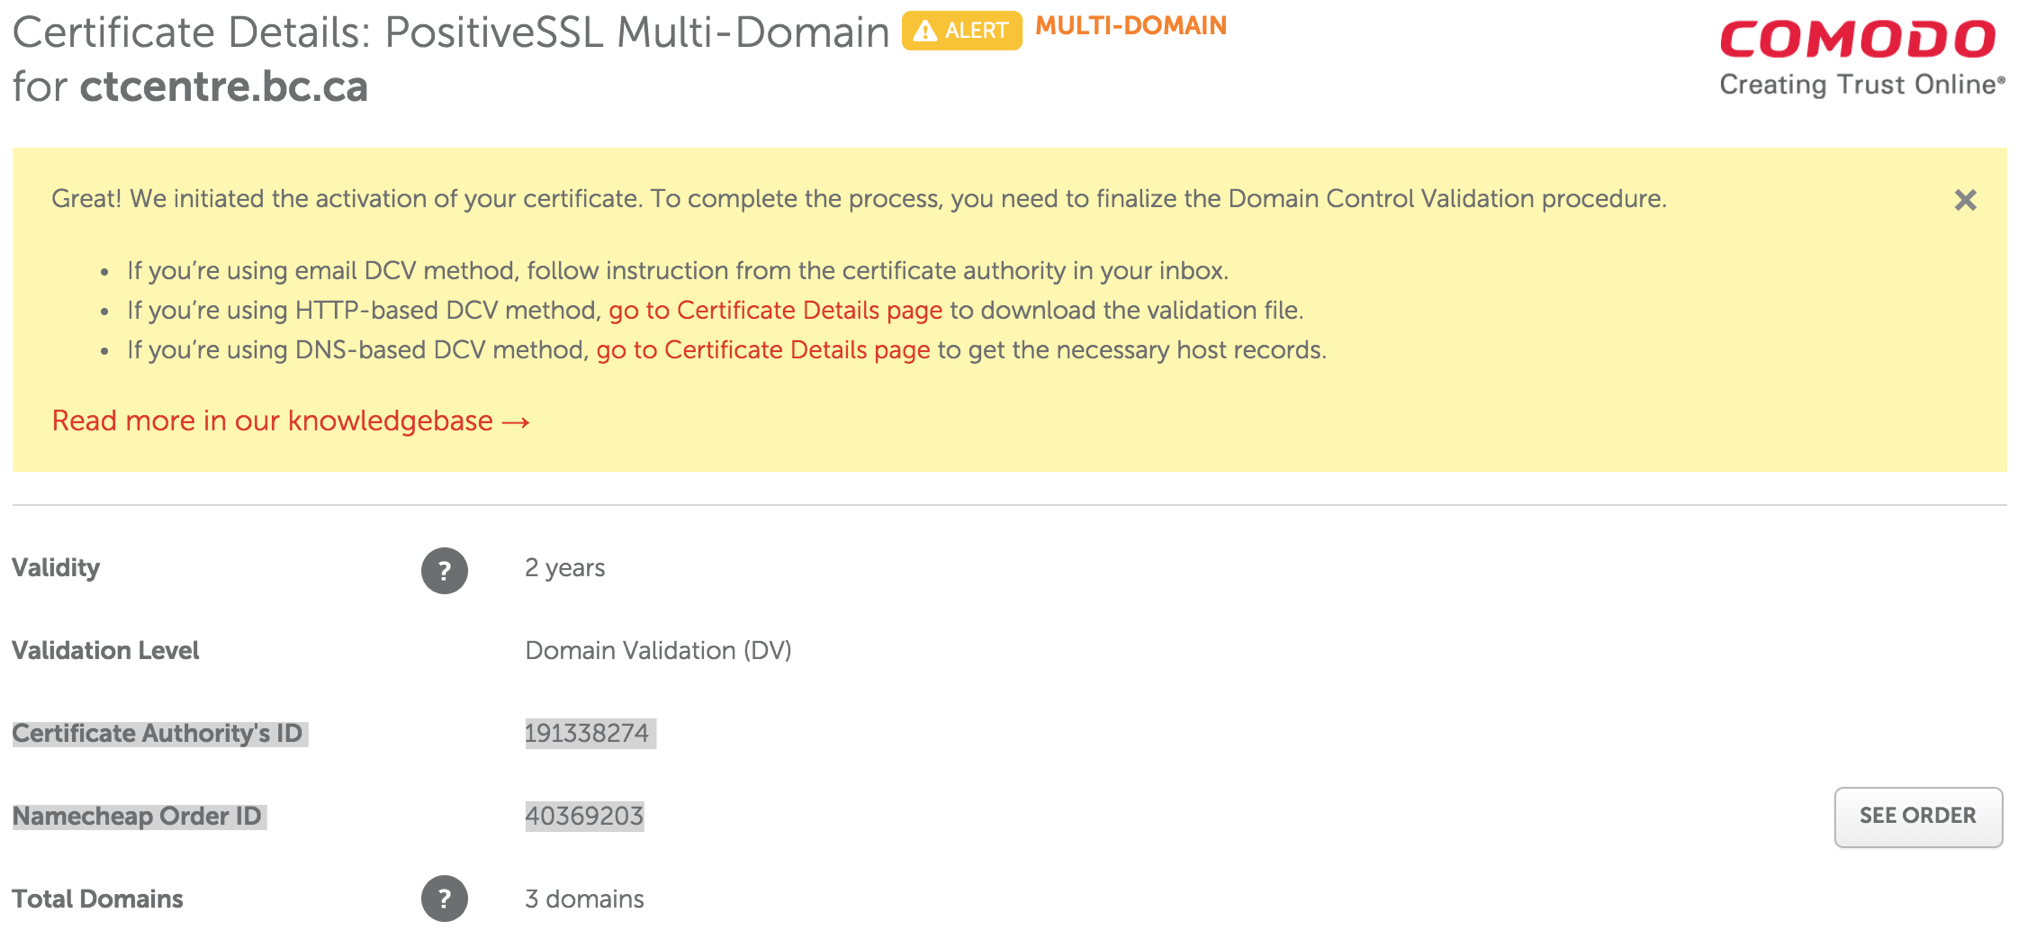
- Click the Submit button.
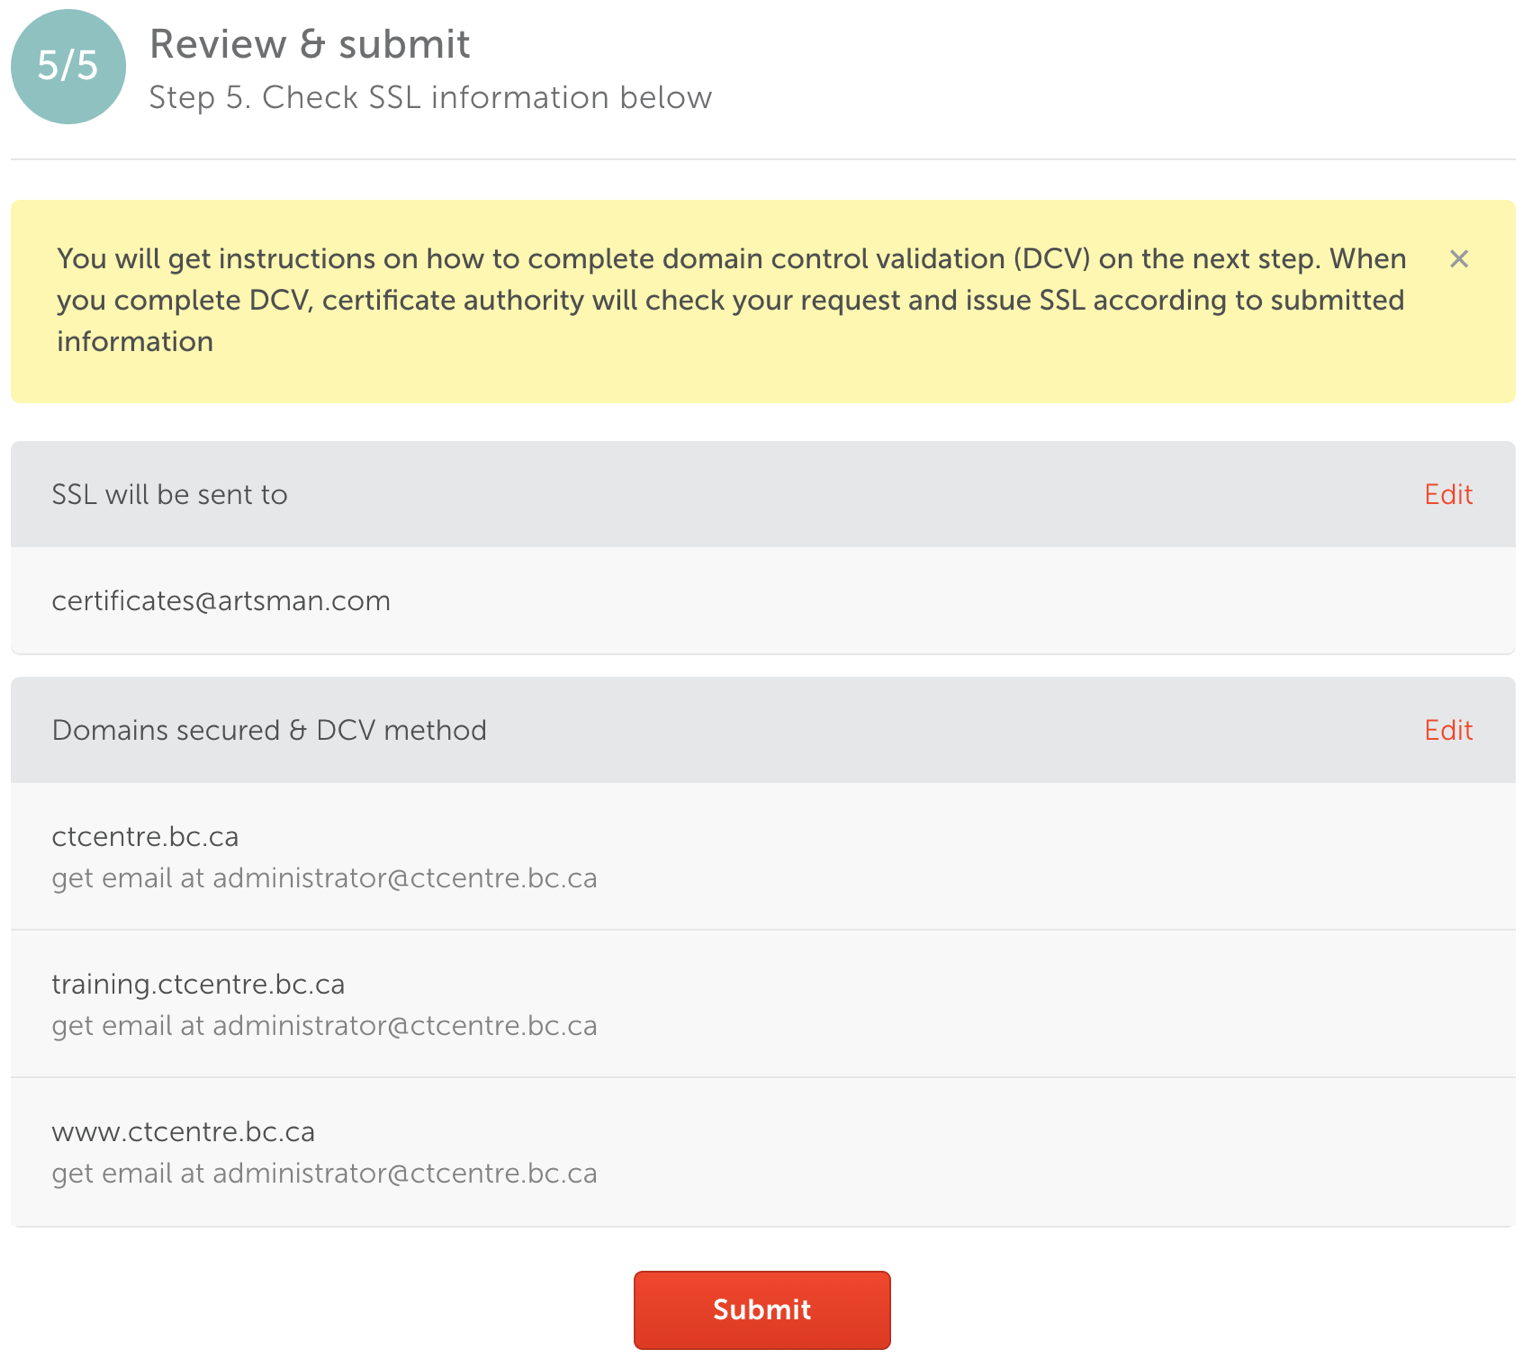
- Copy and Paste the Certificate Authority's ID and Namecheap Order ID details along with the date into the Daylite Order/Install TLS Task.
Submitting CSR for TLS - GeoTrust
 |
Geotrust TLS certificates are no longer used - refer to Name Cheap TLS Certificates instead. |
Step 1: Access GeoTrust's Vendor Portal
- Access GeoTrust's vendor portal via
- Enter user name artsman
- Enter password refer to Doug, Darwin or Dave for the password
- Click Log on
Step 2: Place Order for Certificate - QuickSSL Premium Enrollment
- Click Order Certificates in the left side navigation bar.
- Click Place Order for the ACTIVE QuickSSL Premium contract.
- Validity Periods
Select Validity Period (1 year, 2 years, 3 years, etc) based on what the client purchased in their signed Letter of Confirmation (LoC). Wait for the window to reload before proceeding.
- Renewal
Select Initial Order or Renewal. If renewal is selected, they MUST BE renewing a previous TLS Certificate that was issued from GeoTrust.
- Competitive Replacement
In most cases, select No, I can't take advantage of this offer. Select Yes in the case where we would be renewing an existing tickets.myvenue.org TLS Certificate that was originally issued from another Certificate provider other then GeoTrust.
- Special Instructions
Leave this field empty.
- Click Continue
- Open up /Library/Apache2/bin/server.csr in BBedit.
- Enter CSR
Copy the entire contents of server.csr file (including the BEGIN CERTIFICATE REQUEST and END CERTIFICATE REQUEST tag lines) into Certificate Signing Request field.
- Click Continue
- Leave the Add Additional Domains field blank.
Adding to this field will increase the cost of the TLS Certificate.
- Click Continue
- Verify Server URL
Review information on the page for accuracy.
- Click Continue
- Site Administrator Contact Information
Enter in Site Administrator contact information from the clients information as per instructions
- Technical Contact Information
Enter in Technical Contact information as:
First Name: David
Last Name: McKeonoe
Title: Director of Development
email: as per current email
Phone Number: 403-536-1214
- Click Continue
- Approval of Your Certificate Request
Select Approval Email address from the clients information as per instructions
- Click Continue
- Order Summary
Review information on the page for accuracy.
- Check the box "I agree to this Subscriber Agreement" at the bottom of the page.
- Click Submit Order
Inform the AMS Installer or the client contact that the TLS Certificate has been submitted and is now awaiting for their approval.
Approving TLS for Creation
The approval of the TLS Certificate is performed by the client. The client is required to reply to the email sent to them by Comodo in order to continue with the process.
The process for approving the TLS Certificate for creation is as follows:- Client (Site Administrator Email Address) will receive the 1st email from Comodo (orderprocessing@geotrust.com) indicating that the TLS Certificate has been submitted for creation.
- Client (Approval Email Address) will receive the 2nd email from Comodo asking for approval for TLS Certificate to be created at the specified authorization email address provided to approve the TLS Certificate.
- Client (Approval Email Address) will respond to 2nd email from Comodo approving the creation of the TLS Certificate by clicking on the acceptance link within that email.
- Upon approval from the client to create the TLS Certificate, Comodo will create the TLS Certificate.
- Client (Site Administrator Email Address) and Technical Contact (certificates@artsman.com) will receive the 3rd email from Comodo containing the actual TLS Certificate information.
The final email may arrive anywhere from 10 minutes to 12 hours after email #2 was accepted by the client (Approval Email Address) depending upon the next processing cycle by Comodo.
If the 2nd email is NOT received by the client at the Approval Email Address, it may be caused by that email account is not working correctly. Test to see if the email account they have provided to use for the Approval Email Address is able to receive 'normal' emails.
Creating CRT Certificate Files
After AMS has received the TLS certificate email from Comodo that contains the Web Server Certificate and the Intermediate-CA Certificate, AMS will make the TLS certificate files to put it into the Theatre Manager Server on the Web Server for the client. The following steps outline how to create the remaining files that will complete the TLS certificate installation.
Step 1: Create the certificate CRT file
- From the Comodo Order confirmation email, move the .zip file to the desktop.
- Extract the .zip file.
- Open the two files in the extracted folder using BBEdit.
- Copy the entire contents of the .crt Web Server Certificate (including the BEGIN CERTIFICATE and END CERTIFICATE tags).
- Paste the content into an new BBedit document.
- Copy the first bundle in the .ca-bundle file (from the first BEGIN CERTIFICATE to the first END CERTIFICATE tag). Do not include the upside down question mark.
- Paste the content on a new line under the .crt.
- In BBedit, go to File >> Save As...
Location: Desktop
Filename: server.crt
Line Breaks: Unix (LF)
Installing TLS Certificate
Installing TLS Certificate For Theatre Manager Server
Placing the TLS Certificate.
The Theatre Manager Server checks for updated approximately every 30 minutes. During this process it also looks for new TLS Certificate files. Placing the TLS Certificate files in the correct location on the server will ensure the next time the Theatre Manager Server checks for updates it pulls down the new TLS Certificate. This works successfully as long as the client is not blocking the connection or has automatic updates turned off.
- SMB to the certificates folder on smb://smb.west.artsman.com.
- Open the folder with the domain name matching the TLS Certificate.
- Create a new folder titled Replaced followed by the date. An example would be Replaced20210714.
- Drag and drop the content of the folder into the new replaced folder.
- Copy the TLS Certificate files created including the .csr, .key, .crt and .pem files into the certificate folder.
Manually placing the TLS Certificate.
- Gain access to the Web Server computer. This will be the machine in the DMZ if a DMZ is present.
- Open the Theatre Manager Server in a browser by navigating to 127.0.0.1:3012
- Select the Configure tab at the top of the window.
- Scroll down to the Transport Layer Security (TLS) section of the page.
- Drag and drop the TLS Certificate .crt, .key and .pem files onto the highlighted section.
- Click Save at the bottom of the page.
Testing TLS Certificate
Once the TLS certificate files have been places and Nginx restarted, the certificate can be tested.
Use Qualys TLS Certificate Test to test the TLS Certificate.
Alternate method using firefox: Testing the TLS Certificate
- Open the Firefox browser.
- Enter the full site address in the address bar.
This would the https://tickets.yourvenue.com/TheatreManager/1/login&event=0.
- Click enter on the keyboard for the site to display.
- Click the lock next to the address in the address bar.
This should be done after the site has finished loading. A box will appear indicating the status of the TLS Certificate.

- Click the More Information button. The Page Info window will open.

- Select the Security tab in the Page Info window.
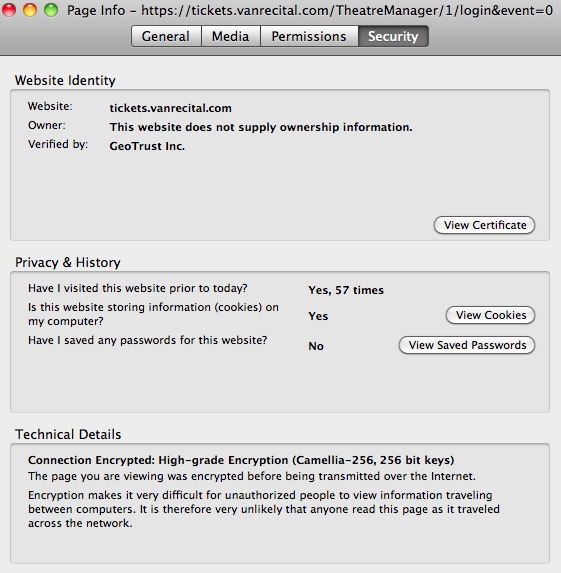
- Click the View Certificate button. The Certificate Viewer will open to the general tab.
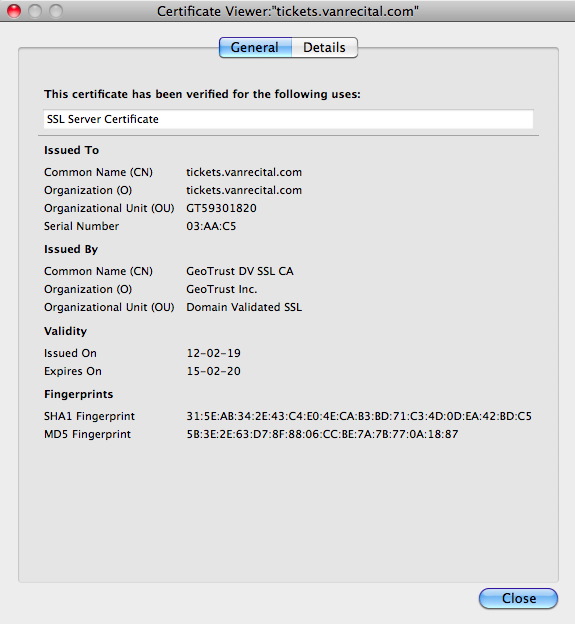
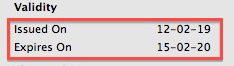
- Review the Issued On and Expiry Date in the Validity section of the viewer. If the TLS certificate has been installed correctly the date should be equal to the number of months purchased for the certificate
- Go to http://www.sslshopper.com/ssl-checker.html.
- Enter the domain the TLS certificate was created for (exp. tickets.myvenue.com).
- Review the details to ensure there are no broken red arrows in the chain files.
A broken red arrow means the server chain is not correct. This is the chain added to the .crt file after the certificate. It is either not being read or is not up to date.
Troubleshooting TLS Certificates
TLS on Router
The TLS certificate associated with the ticketing site may not always be the only TLS certiificate in the network. The TLS certificate in Nginx may have installed correctly without error or warnings. The web pages appear correctly within the network. However, when attempting to access the site externally, the web pages do not display. The web site looks like it may be pointing to IIS or another application. The network setup will appear correct and everything on the Web Server machine is running. Reviewing a test of the TLS Certificate does not display the Comodo Logo.
In this situation an TLS may be built into the router. The IT person will need to locate the TLS Certificate and disable it.
TLS doesn't appear on HTTP
When visiting the ticketing site the address starts with http rather then https. The style sheets are missing and the buttons do not appear.
This is caused by a missing S from https in the Web Server URL field under the Director tab of Setup >> Company Preferences.
The site can be accessed using https but not http
When accessing the ticketing site using http rather then https the Web Pages are not displayed. The ticketing site is replaced by another website, application or login. The link will not redirect to https automatically but rather needs to be altered to include the S.
Port 443 governs https by default. Port 80 is reserved for http. Some organizations use port 80 for other applications such as web mail. In cases like this all direct links to the ticketing site will need to start with https.