Ticket Printers
Theatre Manager works with Practical Automation, Boca, Boca Dual, Datamax Allegro, some Datamax S-Class, and Microcom FGL printers by default. This section will deal with steps for setting up a printer to work within your network.
- For information on setting up a Practical Automation printer, click here.
The website for Practical Automation can be found at
http://www.practicalautomation.com. - For information on setting up a Boca printer, click here. The website for Boca can be found at http://www.bocasystems.com.
High Performance Ticket Printers
All the ticket printers produce an image on a thermal ticket by means of direct heat transfer from printhead elements to thermal stock. The ticket stock is moved through the printer by a stepper motor, and ticket stock position is detected by two sensors which detect absorption/reflection of light on the back side of the stock. Registration marks located on the back side of the tickets will position the print area, and cut location accordingly.
As the ticket moves through the printer, control and print data received over the printer's interface are interpreted by the printer's controller. This controller activates the heat elements on the printhead. The activated heat elements cause a chemical reaction with the coating of the ticket stock, thereby producing black dot images on the ticket. Data is printed column by column. When all ticket data has been printed, the ticket is cut and stacked.
For more than 10-Years ArtsMan has distributed Practical Automation's robust product line of thermal ticket printers.
eITX-2002 High Speed Direct Thermal Printer with Internal Ticket Supply
This desktop printer is recommended for venues selling more than 20,000 tickets per year. This high speed/volume, direct feed thermal printer is designed to output between 2000 & 3000 tickets per hour.
Key features include:
• Network ready Ethernet IP data port
• 200 dpi printing (optional 300 dpi printheads are available)
• Ticket cutter with ejector
• Lockable internal ticket stock storage
• External power supply
Practical Automation Printer Setup
Depending on the ticket printer and the operating system there will be different confirmation windows before the tickets are printed.
 |
NEVER INSTALL a practical automation printer driver on a computer even if suggested by the operating system. If a practical automation printer driver has been installed, remove it.
When using ticket printers with parallel ports, there should be no printer driver assigned to LPT1. |
|
Finding out Practical Automation Ticket printer current IP address
|
Changing IP Address on Practical Automation Printers
- Use a web browser to talk to the printer. This may not work with some browsers (Firefox is most reliable)
- Use a special application to access the printer and change a number of settings. This method always works and is the preferred method.
 |
We recommend that you provide a static IP address to the thermal ticket printer.
This ensures each time the ticket printer is turned on, the Theatre Manager's workstations will be able to communicate properly with it |
|
It is a good idea to stick a label with the printer's IP address directly onto the printer. |
|
If you change the printer's IP address, make sure to update its Device Record with the new ip address. |
|
Finding out Practical Automation Ticket printer current IP address
|
Option #1 - Using the Practical Automation Tool
- Download the installer for the Practical Automation Tool from http://www2.artsman.com/Software/PANetworkUtilityVB-1.1.zip.
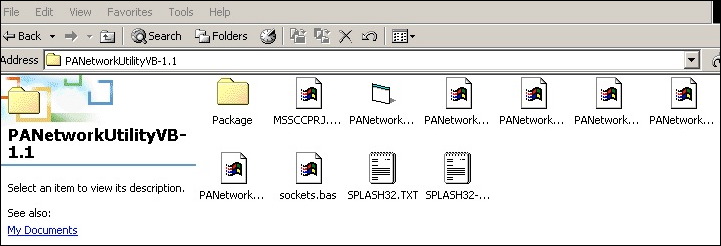
- When the download is complete, extract the ZIP file into a new folder anywhere that is easily accessible.
- Open the folder.
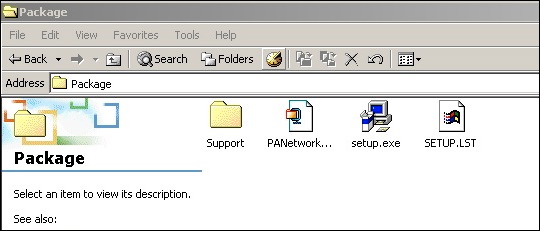
There will be a number of files.
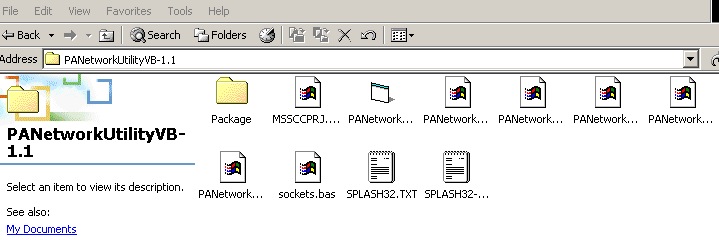
- Open the folder labeled Package and find the file labeled setup.exe.
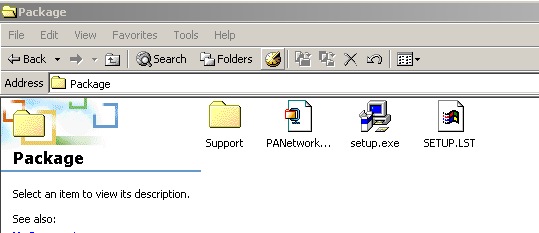
- Double click on the setup file to run it, and complete the installation.
- After the installation is complete, return the previous level in the folder that the Practical Automation Tool was extracted to.
Do this by pressing the Back button or the Up button.
- Setup the Practical Automation Printer, power it up, and connect it to the network via a hub, switch or router.
If a hub, switch, or router is not available, a crossover cable between another computer and the printer will be needed. A crossover cable is not a standard ethernet cable. It has a different pin configuration and is used to connect servers to servers or routers to routers - not machines or printers to routers. Macintosh computers can auto-negotiate standard ethernet cables into crossover cables, but Windows machines cannot. If at all possible, use a hub, switch or small router to create your own small network of computer to router / router to printer configuration.
The default address of the printer is 192.168.1.1, (which is a commonly used IP address). Make sure that the printer will not conflict with something else on the network before powering it up. If another device is using the same IP address, it is recommended that you use a crossover cable to another computer rather than hooking the printer into the network.
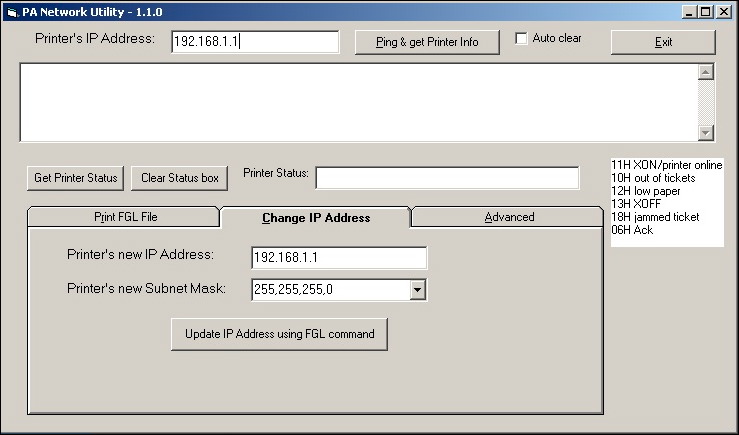
- In the Practical Automation Tool folder, double click on the PANetwork program to start it.
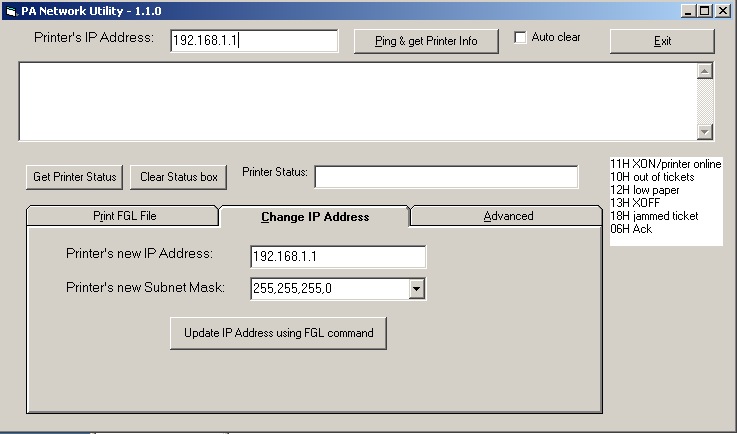
- At the top of the screen, enter the IP address 192.168.1.1, and then click the Ping & Get Printer Info button.
This will connect you to the printer.
- Near the bottom of the screen, click on the Change IP Address tab.
- Change the IP address and subnet mask as necessary.
- Click the Update IP Address using FGL Command button.
Once the settings are saved, the IP address at the top of the program will need to be changed to reflect the new IP address, and to re-connect to the printer.
- To verify the settings, turn off the printer. Hold down the F0 button and turn the printer on.
A ticket will print containing the IP address of the printer.
- Once everything is set, each user will need to be adjusted in Theatre Manager to connect to the new printer.
Click here for more information on changing a user's ticket printer settings.
Option #2 - Using a Web Browser
- Change the IP address of the computer temporarily to 192.168.1.xx where xx is anything you want except 1 (for the ticket printer is using 192.168.1.1). You may want to take a screenshot or write down your existing settings so you can reset them after you are finished.
Arts Management recommends that you provide a static IP address to the thermal ticket printer. This can be obtained from your IT Support. Having a static IP address ensures each time the ticket printer is turned off and back on again, the Theatre Manager's workstations will be able to communicate properly with it.
a) On a Macintosh go to Apple >> System Prefs >> Network,
b) On a PC go to Network Places >> Properties >> Local Area Connection >> Properties >> TCP/IP >> Properties
c) Set your Built-In Ethernet to become Manually set at 192.168.1.2 (anything but 192.168.1.1) and subnet of 255.255.255.0
d) Turn off your wireless connection
- Setup the Practical Automation Printer, power it up, and connect it to the network via a hub, switch or router.
If a hub, switch, or router is not available, a crossover cable between another computer and the printer will be needed.

The default address of the printer is 192.168.1.1, (which is a commonly used IP address). Make sure that the printer will not conflict with something else on the network before powering it up. If another device is using the same IP address, it is recommended that you use a crossover cable to another computer rather than hooking the printer into the network.
- Open the computer's web browser, typically either Internet Explorer or Mozilla Firefox or Chrome. Do not use Safari as it will not be effective.
- In the address bar of the web browser enter the following IP address: http://192.168.1.1 and press the Enter key.
A prompt for user name and password should appear. Leave these fields blank and press the Enter key.
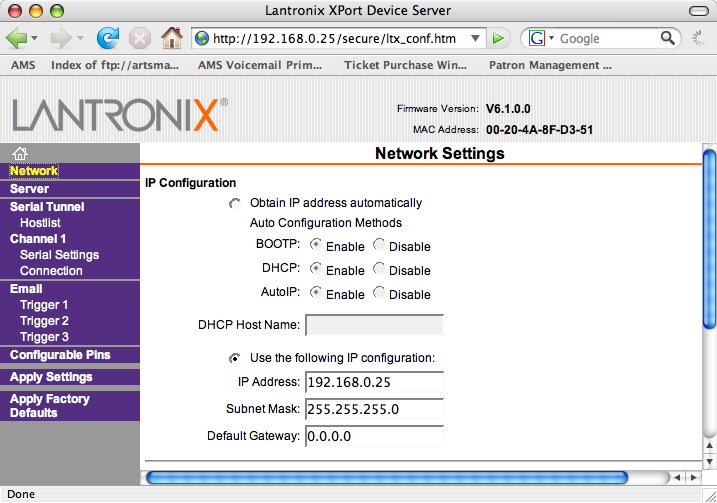
A new page will open showing the Printer Configuration.
- Click on the link labeled 'Network' to adjust the IP configuration.
- Change the IP to the new static address, and adjust the subnet if necessary.
- Click the OK button at the bottom of the screen.
The word 'Done' should appear to the right of the button confirming the settings are saved.
- Click the Apply Settings button to update the printer.
The printer should reset once the settings have been updated.
- Turn the printer off and back on one time to ensure that the settings have correctly updated.
- To verify the settings, turn off the printer. Hold down the F0 button and turn the printer on.
A ticket will print containing the IP address of the printer.
- Once everything is set, each user will need to be adjusted in Theatre Manager to connect to the new printer.
Click here for more information on changing a user's ticket printer settings.
- Reset the IP settings for your computer to what they were before you started.
Reset the Printer to Factory Defaults
To reset the printer EEPROM settings to factory default, Press the following key sequence:
- On power up, press [F1] to enter Diagnostics.
- Press [F0] for Special Functions.
- Press and hold [F1] for 5 seconds until 5 rapid beeps are heard.
- Release the button and cycle the power.
|
Click the icon to download the ITX 3000/2000 Printer User Manual. |

Disable SNMP on Practical Automation Ticket Printer
 |
Disabling any unused service from the network, as per PCI DSS standard 2.2.2, may require you to disable the SNMP service from the ticket printer. This would only apply to 'Ethernet' ticket printers as parallel, serial, and USB cabled ticket printers do not offer the SNMP service. |
If you are required to disable the SNMP service, there is an application/utility called the "Device Installer" that will allow you to make these changes. You can find this utility at http://www.lantronix.com under Support/Downloads. Download this application/utility to update the software within the ticket printer.
Please contact your local IT department for assistance making this change.
IP Ticket Printing Setup - Mac
|
Finding out Practical Automation Ticket printer current IP address
|
Mac OS
For the Mac OS, you perform the following steps:
- Connect the printer to the computer using a crossover cable or to the network by connecting through a hub.
- Temporarily change the computer's IP address to 192.168.1.xx where xx is anything other then 1 (the ticket printer default is 1).
- Go to Apple >> System Preferences.
- Select Network.
- Double click Built-in Ethernet.
- Change the IP Address to 192.168.1.2 (anything other then 192.168.1.1) and the Subnet to 255.255.255.0
- Close the window and save changes.
- Open a web browser and enter the address for the router (http://192.168.1.1).
- When prompted for a user name and password leave then blank and login.
The configuration page opens.
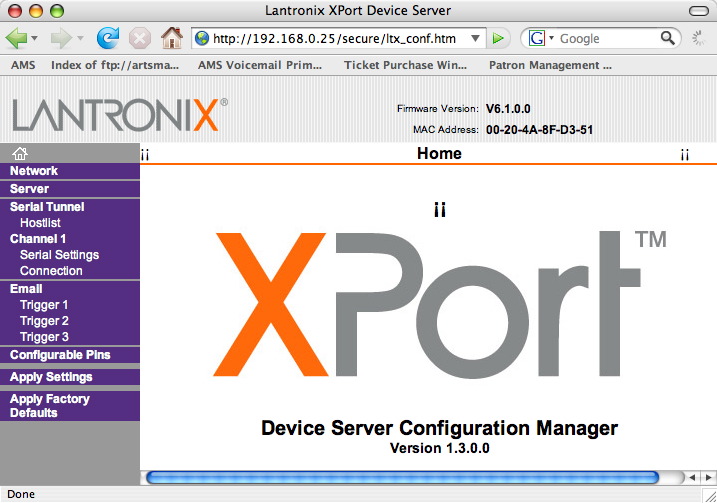
- Click Network in the top left side of the window.
The IP Address and Subnet Mask for the ticket printer will be displayed.
- Change the IP Address and Subnet Mask.
- Click the Ok
 button at the bottom of the screen.
The work done will appear next to the OK button.
- Click Apply Settings in the lower left side of the window.
Wait for the settings to take effect.
- Close the web browser.
- Turn the ticket printer off and on.
- Change the computer IP Address back to it's original setting.
- Turn the ticket printer off and on.
- Login to Theatre Manager.
- Go to Setup >> Users and Access >> Employee Preferences. Click the
Ticket Printer tab.
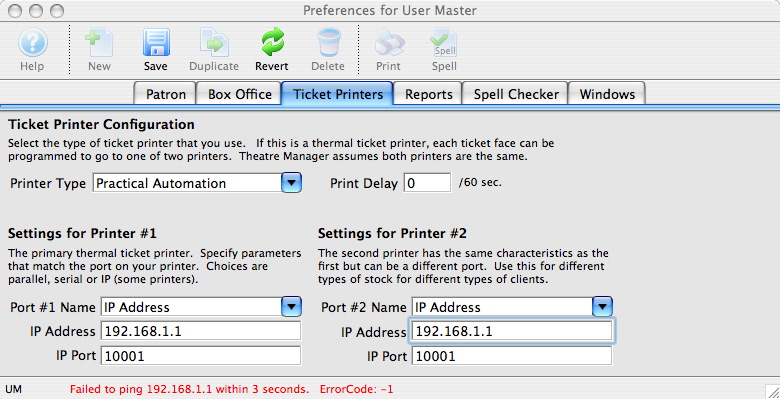
- Change the ticket printer IP Address.
- Click the Save
 button.
The ticket printer has now been set for this user and is ready to print. The Employee Preference window can be closed. Each user will need to see the ticket printer under Employee Preferences.
Practical Automation/BOCA Printer
The first time printing tickets since logging onto Theatre Manager for that session, a confirmation window will appear, otherwise the tickets will automatically print.
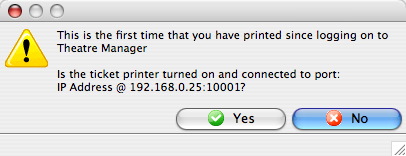
- Verify the printer is turned on and connected to the computer.
- Click the Yes
 button.
IP Ticket Printing Setup - Windows
Windows OS
To configure a printer for the Windows operating system, you perform the following steps:
- Connect the printer to the computer using a crossover cable or to the network by connecting through a hub.
- Turn the ticket printer on holding down the [F0] button on the printer.
This prints a ticket with information about the printer and it's IP address. The factory default tends to be 192.168.1.1
- Download the installation file.
The installation file can be found at http://www2.artsman.com/Software/PANetworkUtilityVB-1.1.zip
- Extract the file from the zip archive.
- Open the Package folder and run the Setup.exe file.
Follow the prompts to complete the install.
- Temporarily change the computers IP address to 192.168.1.xx where xx is anything other then 1 (the ticket printer default is 1).
- Open Network Places.
- Right click and select Properties.
- Click Local Area Connection.
- Click Properties.
- Select TCP/IP.
- Click Properties.
- Change the IP Address to 192.168.1.2 (anything other than 192.168.1.1) and the Subnet to 255.255.255.0
- Click OK till the desktop is reached.
- Move back to the previous folder and run the PanNetwork file (Third from
the left).
- Enter the ticket printer IP address at the top of the window.
- Click the Change IP Address
 tab.
tab.
- Change the Printer's New IP Address and the Printer's New Subnet Mask.
- Click the Update IP Address Using FGL Command
 button.
- Change the computer IP Address back to it's original setting.
- Turn the ticket printer off and on.
If you disconnected this workstation from the primary network as noted above, reconnect it at this time.
- Login to Theatre Manager.
- Go to Setup->System Tables->Devices and search for a list of all devices you have.
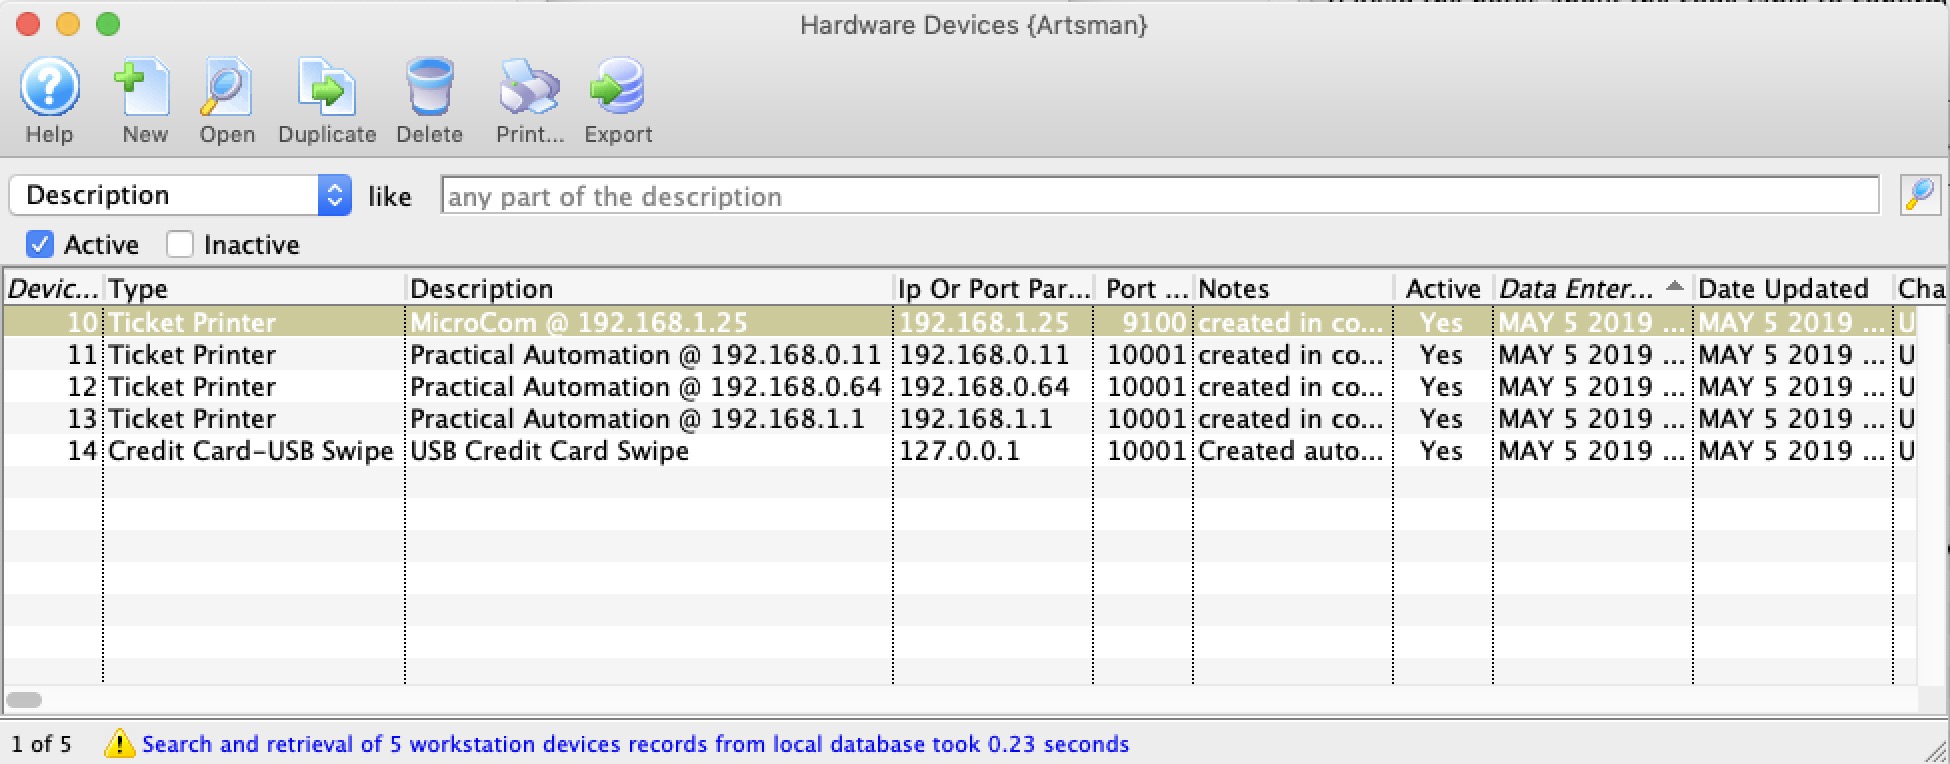
- If this printer is in the list of devices, then edit it. If not, insert a new printer device. Refer to Device setup for more information.
Change the IP address in the appropriate spot
- Any employee using that device in their hardware setup will now use the revised IP address - so it changes it for everybody.
|
If you are connecting through a hub (and not using a crossover cable), it may be necessary to use only the hub between the workstation and the printer - disconnecting the workstation from the primary network. Since the printer comes with a default IP of 192.168.1.1, this IP may already be in use by another router on your network. This will cause an IP conflict and you won't be able to affect the IP address of the printer. Be sure to download the PANetwork Utility prior to disconnecting from the network. |
Boca
- Power up the printer and connect it to the network via a hub, switch or router.
If a hub, switch, or router is not available, a crossover cable between another computer and the printer will be needed.
- Open the computer's web browser, typically either Internet Explorer, Mozilla Firefox, or Apple Safari.
- In the address bar of the web browser enter the IP address of a ticket printer.
You'll need to know this but it might look like
http://10.0.0.192 or http://192.168.1.1
and press the Enter key.
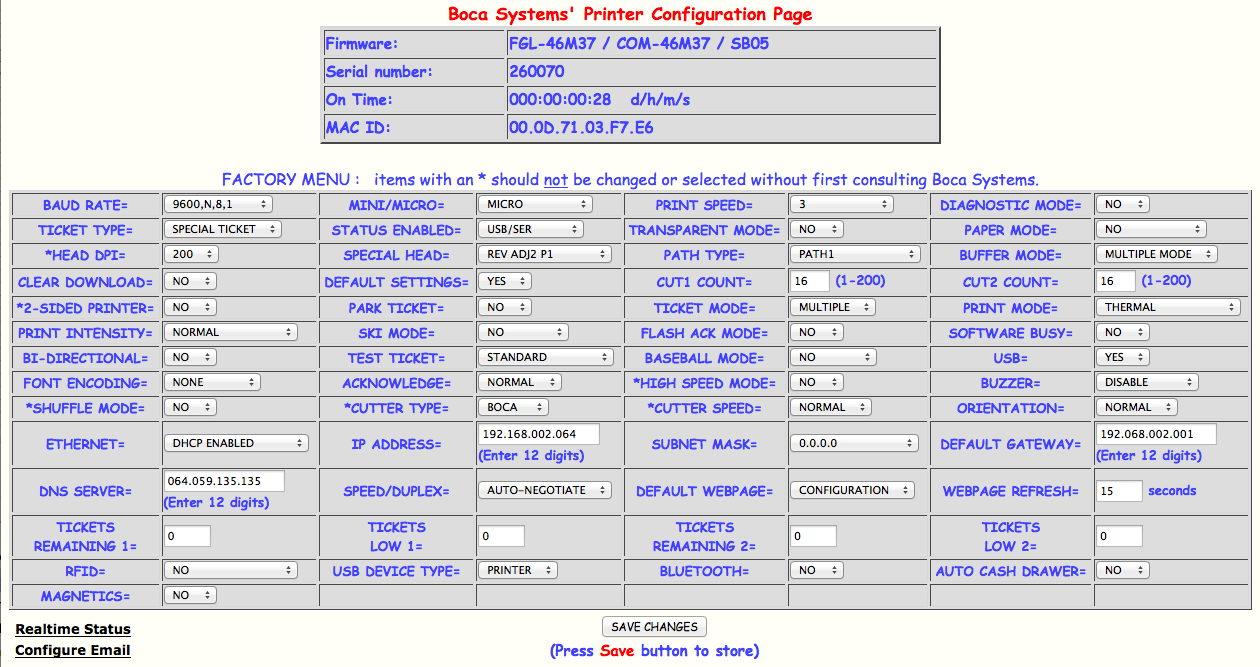
This should open the Boca Systems' Printer Configuration Page.
- Near the bottom of the first column of settings, use the drop down menu to change Ethernet from DHCP Enabled to Yes

- At the bottom of the second column of settings, set the IP address for the printer.
Typically leading zeros are not necessary in an IP address, but they are for this setting.

- At the bottom of the third column of settings, adjust the Subnet Mask if necessary.
- At the bottom of the fourth column of settings, set the Default Gateway for the network.
Again, it is necessary to include the leading zeros.

- Click the Save Changes button to finish the process.
The printer should now be able to be pinged at the new IP address. Also, the new IP address will print on a test ticket if the information is needed to be stored somewhere.
For information on connecting a user to the printer via Theatre Manager, click here.
Boca Lemur
- Power up the printer and connect it to the network via a hub, switch or router.
If a hub, switch, or router is not available, a crossover cable between another computer and the printer will be needed.
- Open the computer's web browser, typically either Internet Explorer, Mozilla Firefox, or Apple Safari.
- In the address bar of the web browser enter the following IP address: http://10.0.0.192 and press the Enter key.
The Boca Systems' Printer Configuration Page opens.
- Near the bottom of the first column of settings, use the drop down menu to change Ethernet from DHCP Enabled to Yes
- At the bottom of the second column of settings, set the IP address for the printer.
Typically leading zeros are not necessary in an IP address, but they are for this setting.
- At the bottom of the third column of settings, adjust the Subnet Mask if necessary.
- At the bottom of the fourth column of settings, set the Default Gateway for the network.
Again, it is necessary to include the leading zeros.
- Click the Save Changes button to finish the process.
The printer should now be able to be pinged at the new IP address. Also, the new IP address will print on a test ticket if the information is needed to be stored somewhere.
For information on connecting a user to the printer via Theatre Manager, click here.
Datamax S-Class
|
The Parallel version (for PC only) has been tested and confirmed to work with Theatre Manager. Ethernet connectivity has not been tested. USB is not supported. |
Microcom Ticket Printers
Artsman's Exclusive Thermal Ticket Printer Provider - Microcom
Artsman is proud to partner with Microcom to provide thermal ticket printing solutions, which are optimized for the ticketing market. Their heavy duty metal design and reliable mechanics will provide years of continuous, low maintenance printing. For more information and current pricing, please contact Artsman Sales.First Time Setup For Microcom Printers
|
Theatre Manager only connects to Microcom Thermal Ticket Printers via an Ethernet cable. This is designed so that all Theatre Manager users can connect to the ticket printer when on the same network. |
|
Microcom printers support QR codes on ticket faces |
| Unbox and Setup Printer |
 Unbox and setup the printer as per the steps below. You should only need to:
|
| Connect Ethernet Cable |
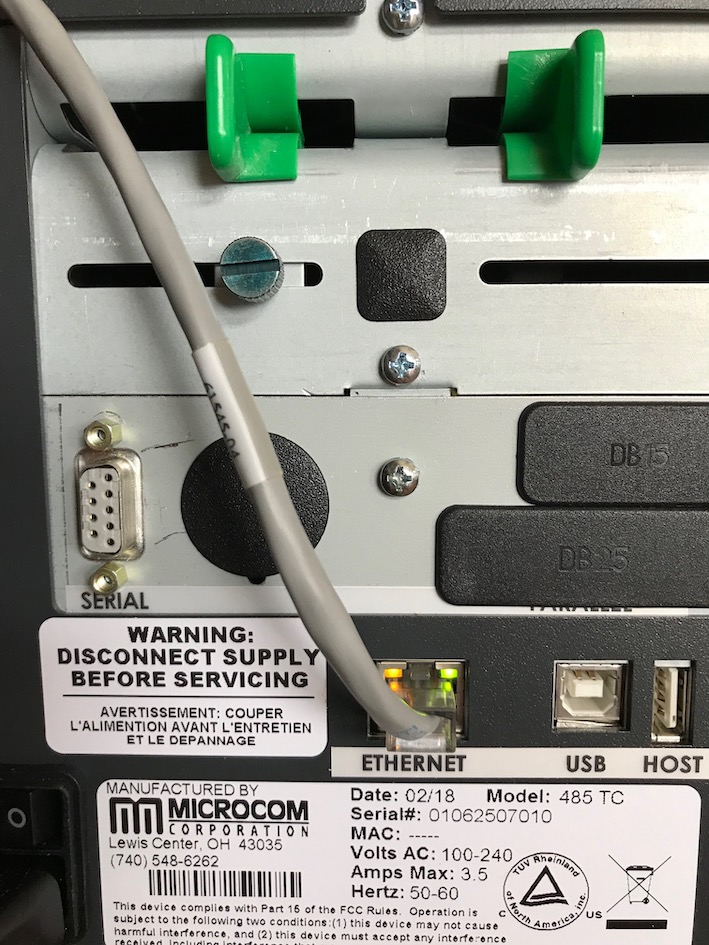 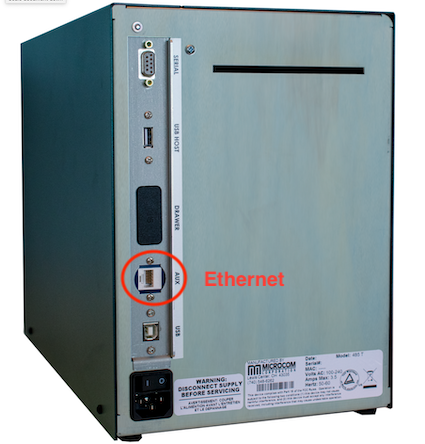 You will need to connect an ethernet cable to the back of your printer as per the diagram to the right.
The port should be labelled Ethernet - but it might be called Aux. Using the other ports like Parallel and Serial shoaled work - and will require support for those ports in your computer. Ethernet is the recommended and supported option. |
| Find Ethernet Address from Test Ticket |
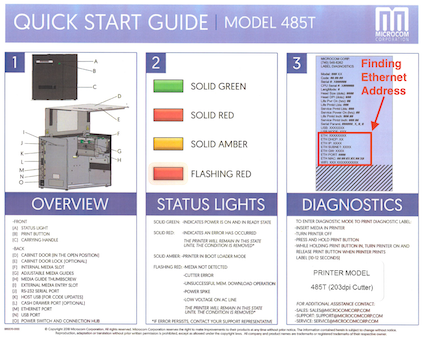 Use the instructions to print a test ticket and determine the printers current ethernet address. It will be required when setting up the device in Theatre Manager.
|
| Enter Device Communication Settings |
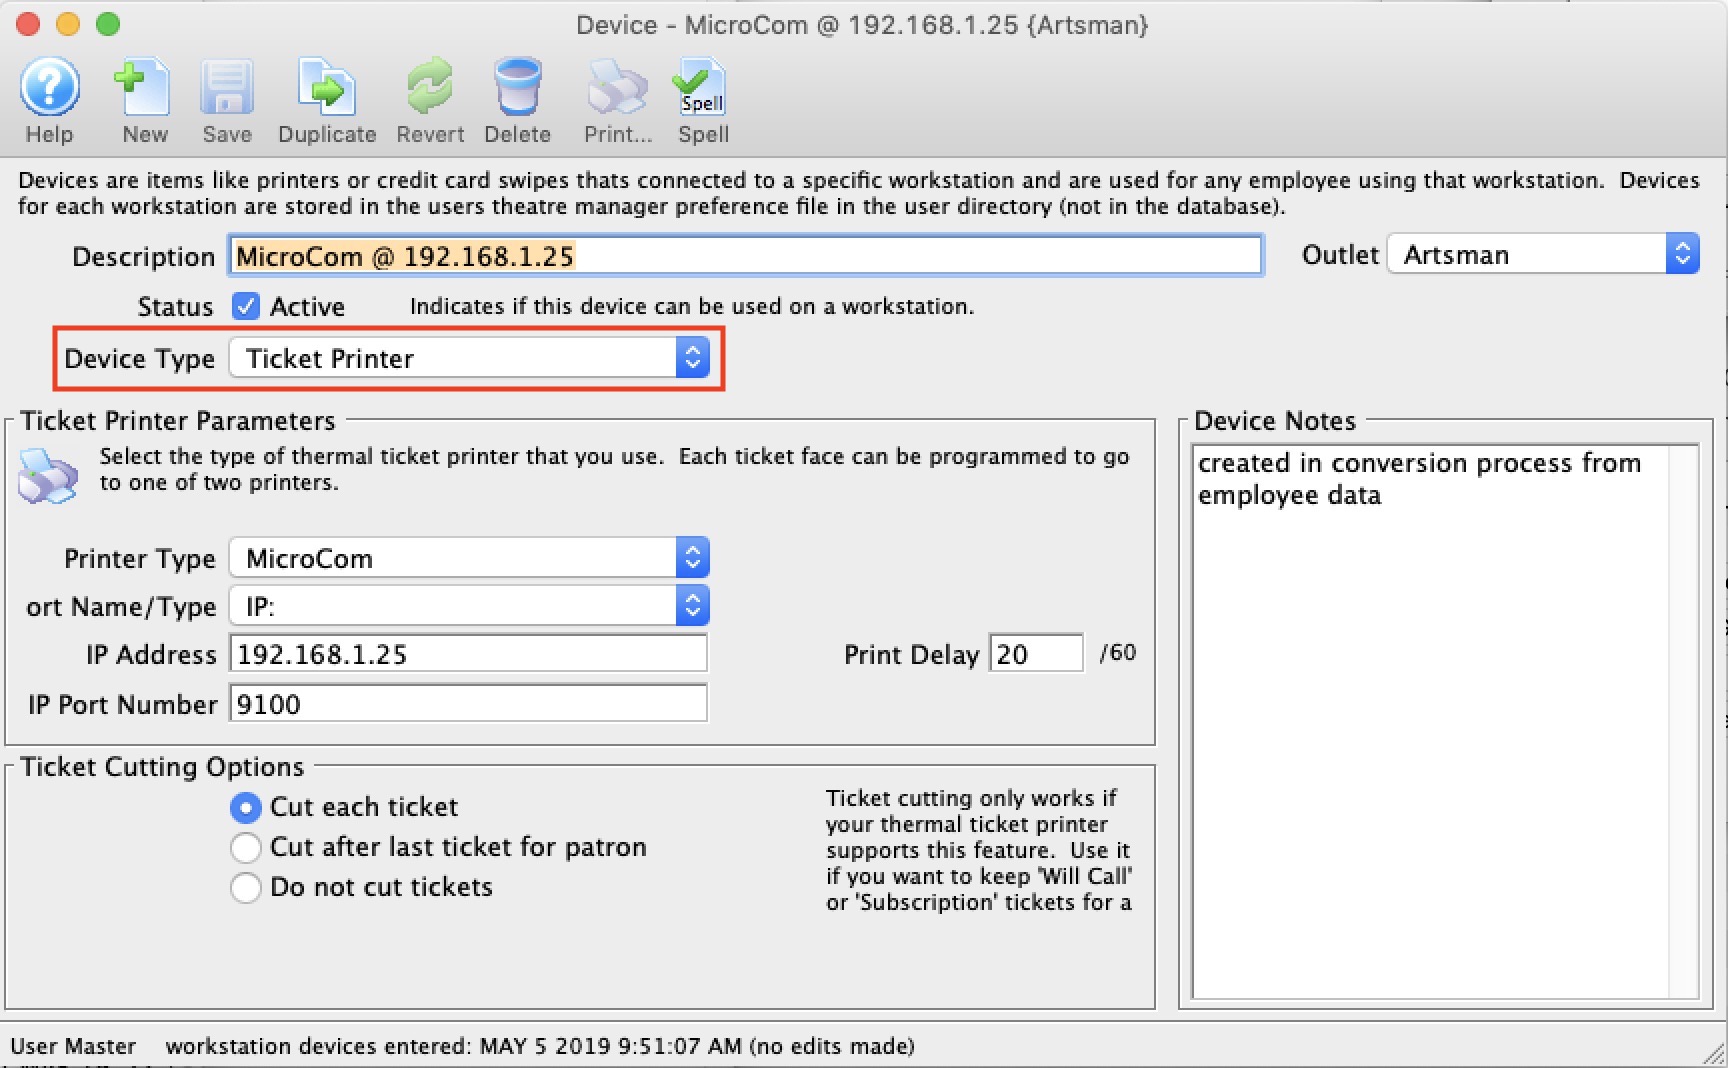
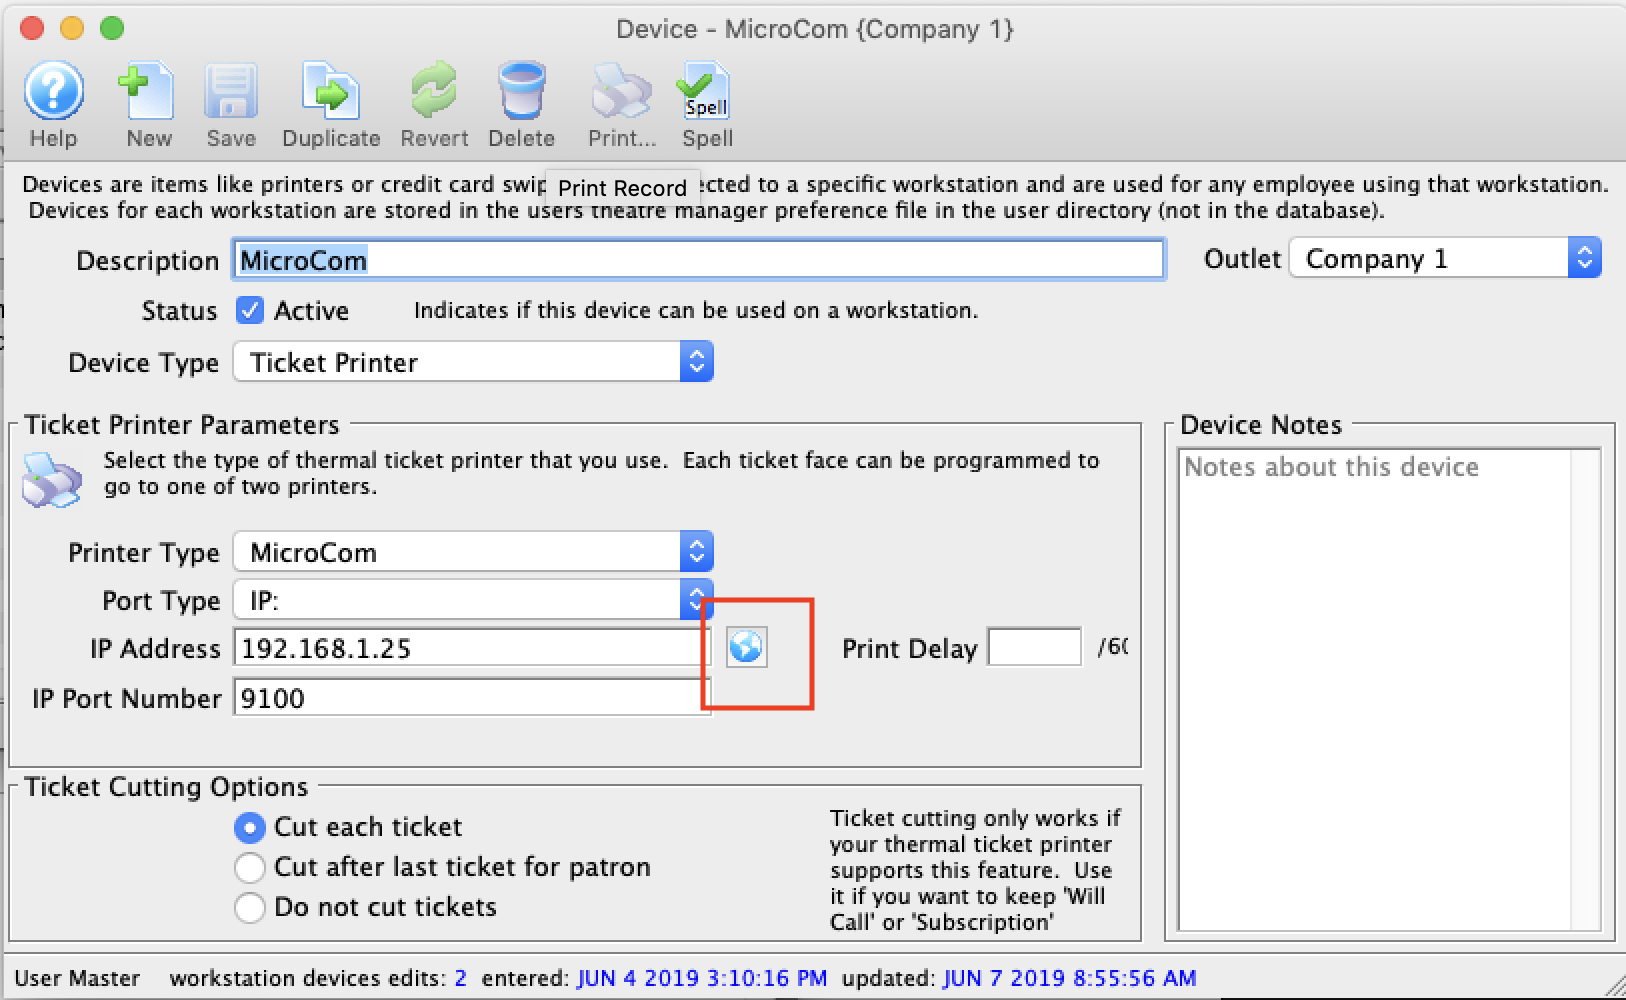 Add the MicroCom printer to the device table using device setup so that is it similar to the image to the right.
You will need to enter the IP address of the printer into this field. If it is not on the same subnet, you might have to make up a mini network and manually assign your computer an address to match the printers subnet in order to continue this process. If using serial or parallel printing, adjust the TM setup accordingly. |
| Connect to the Printer Status Page |
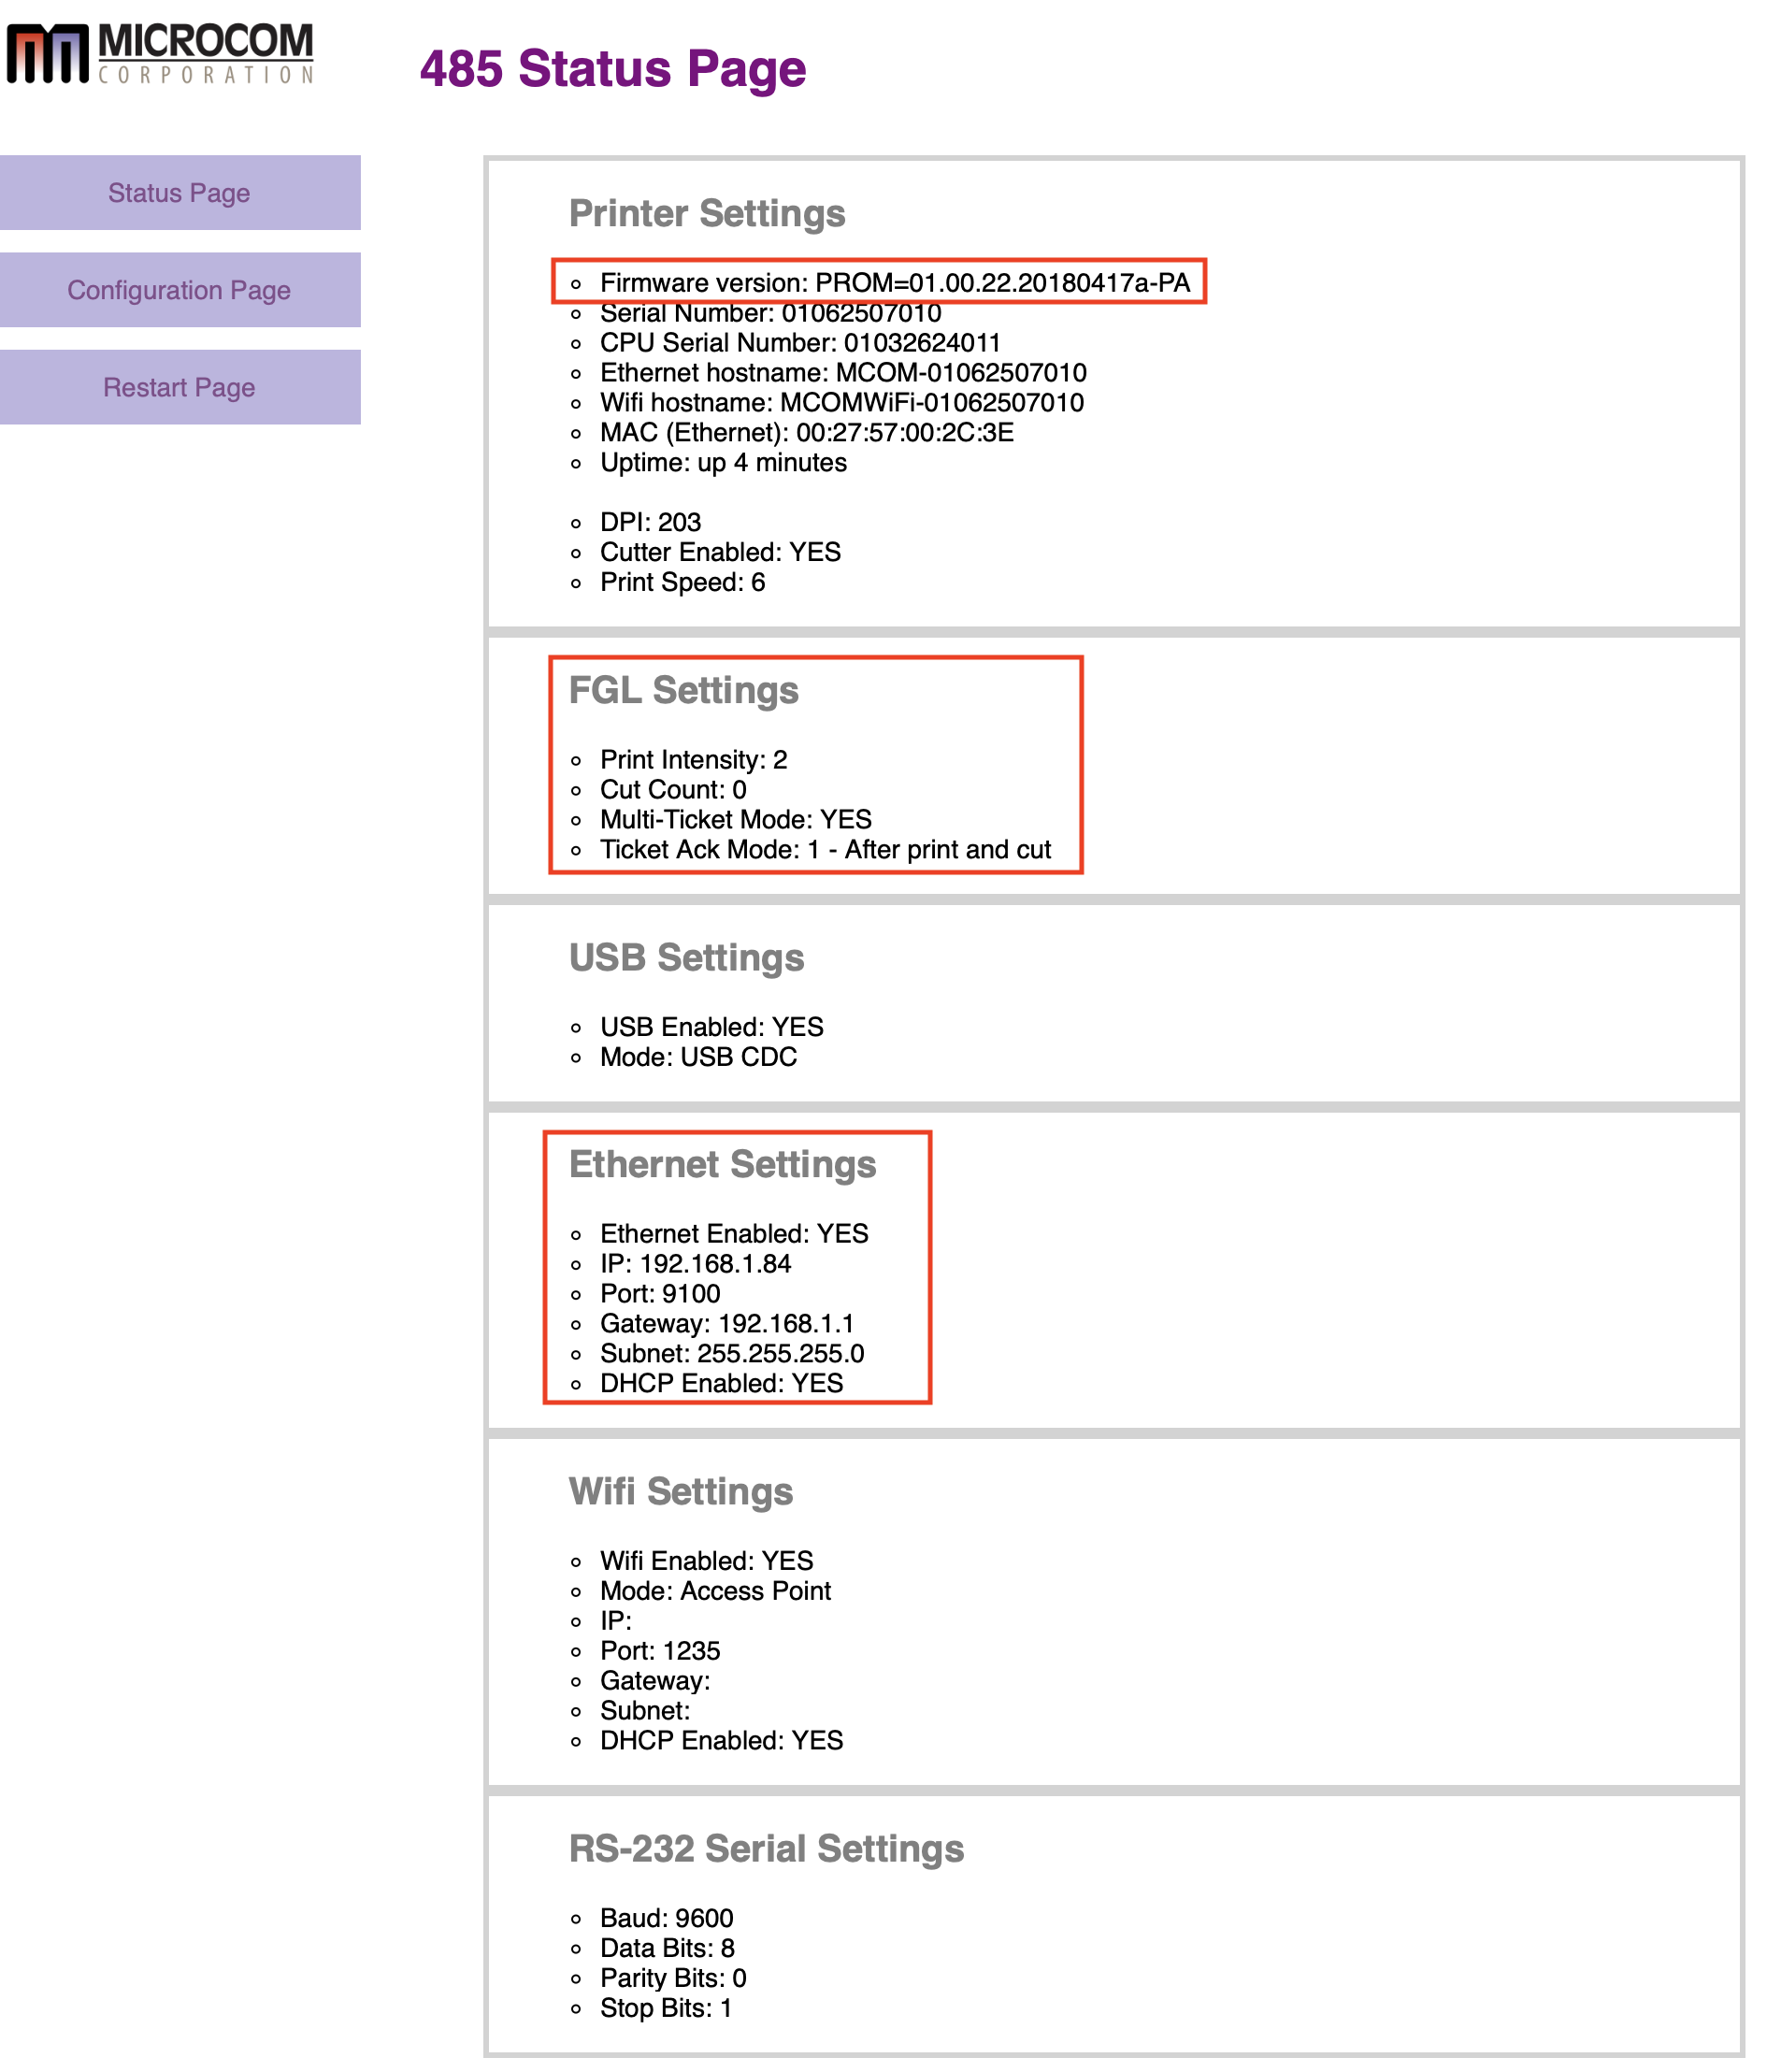 On the set-up page, if you enter an IP address, you can click the 'globe' icon to connect to the printer's status page. If you have the right ethernet address and are on the same subnet, you should see a page similar to the one on the right.
Of particular interest are:
|
| Configure Printer |
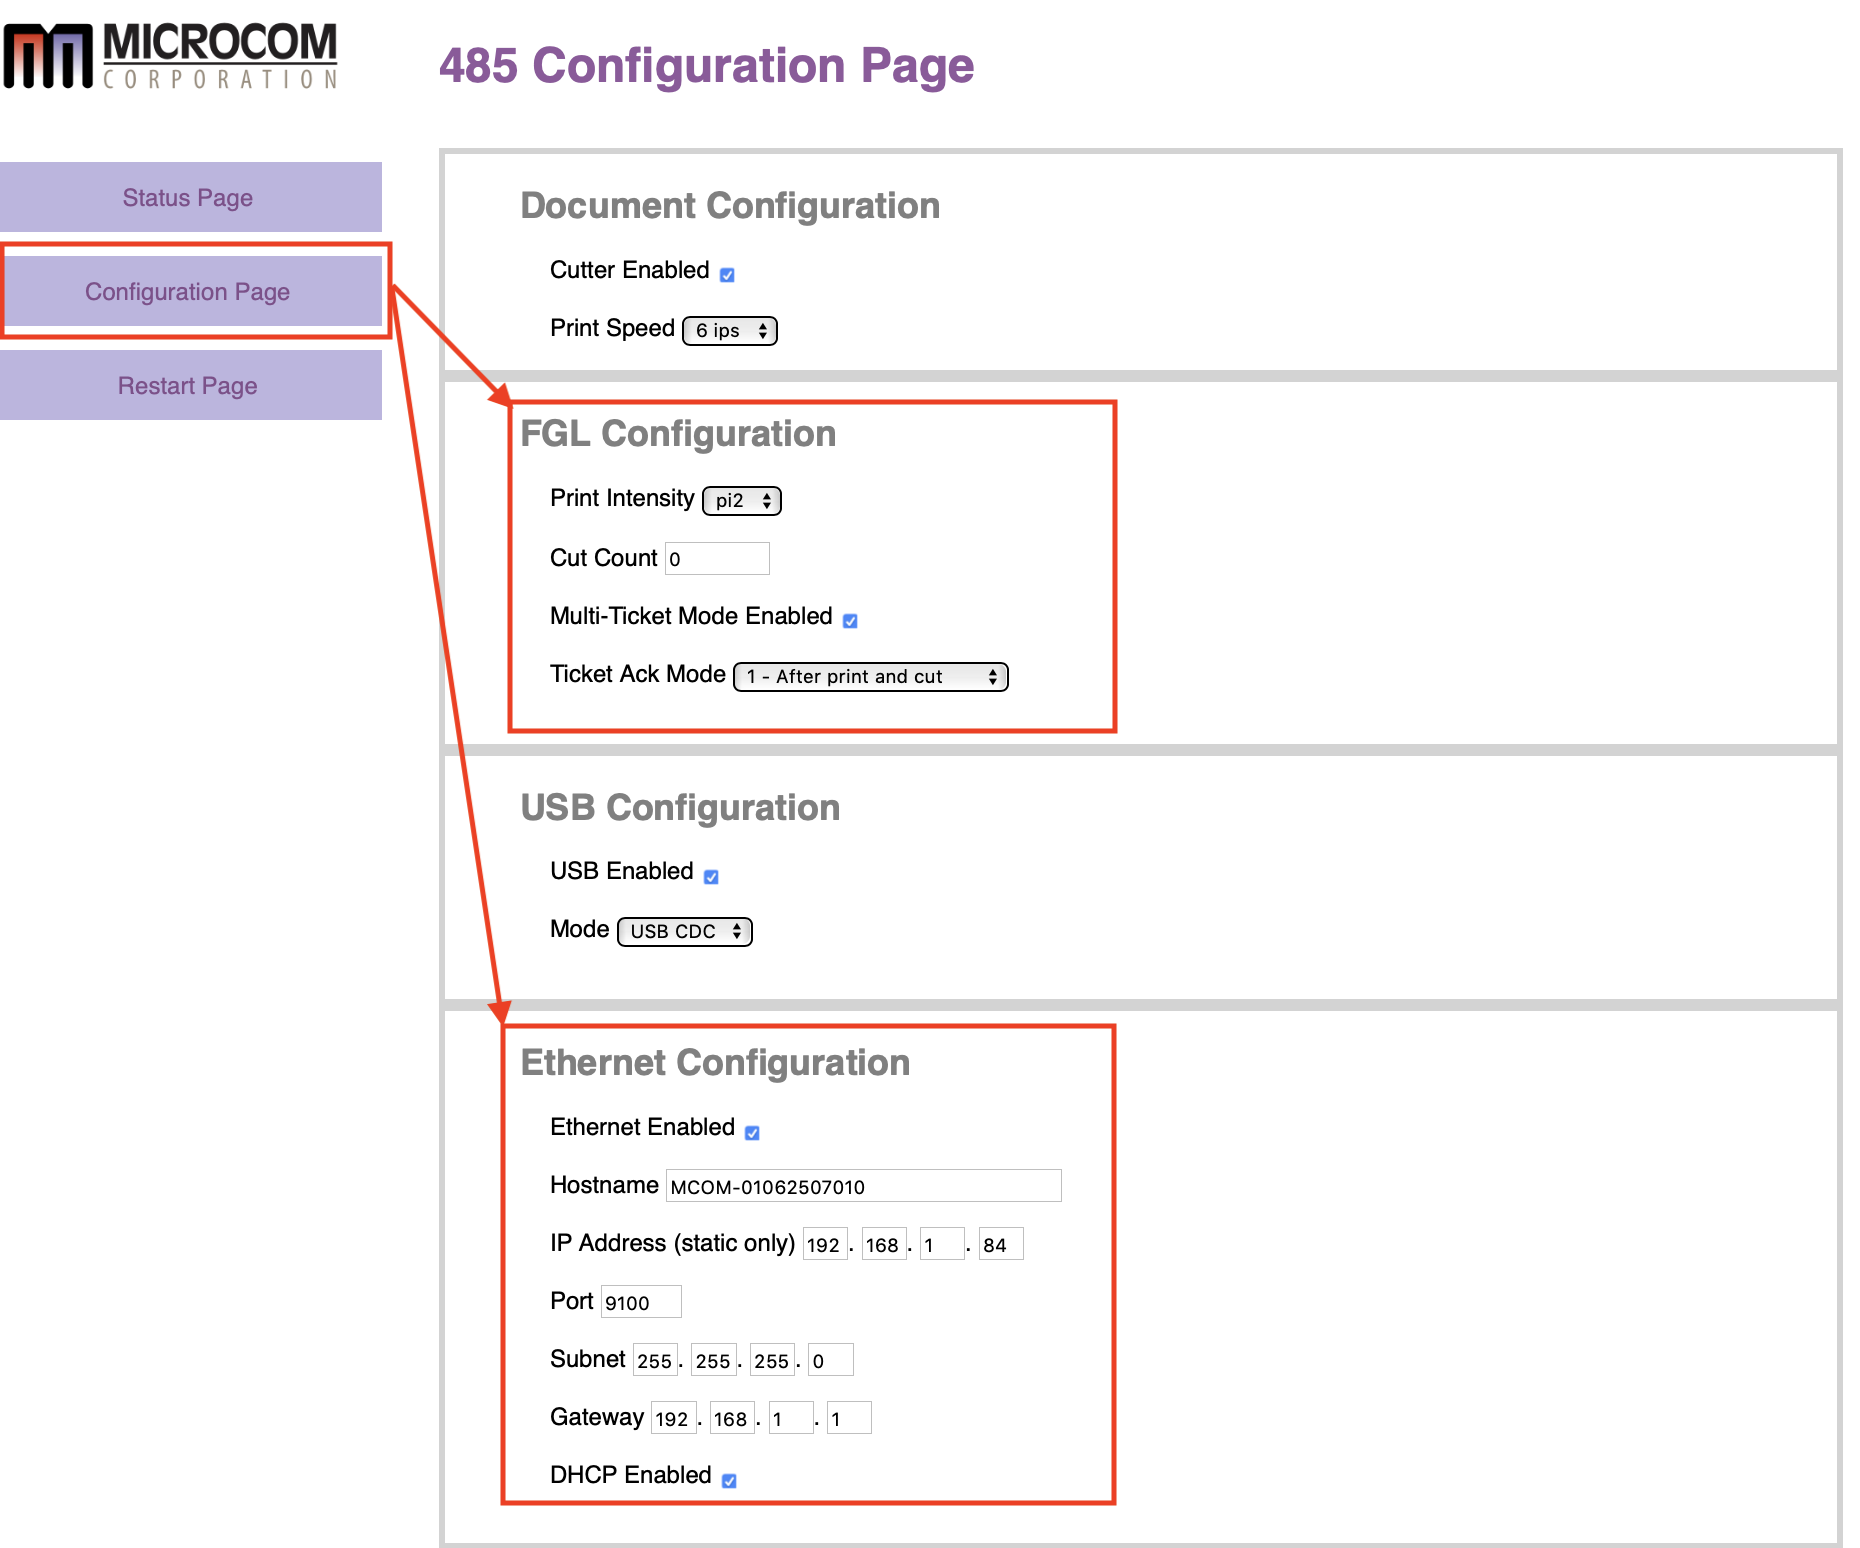 Click the Configuration Page button to change any settings you need for your network or FLG compatibility.
For ethernet setup:
|
| Configure Printer (Wifi) |
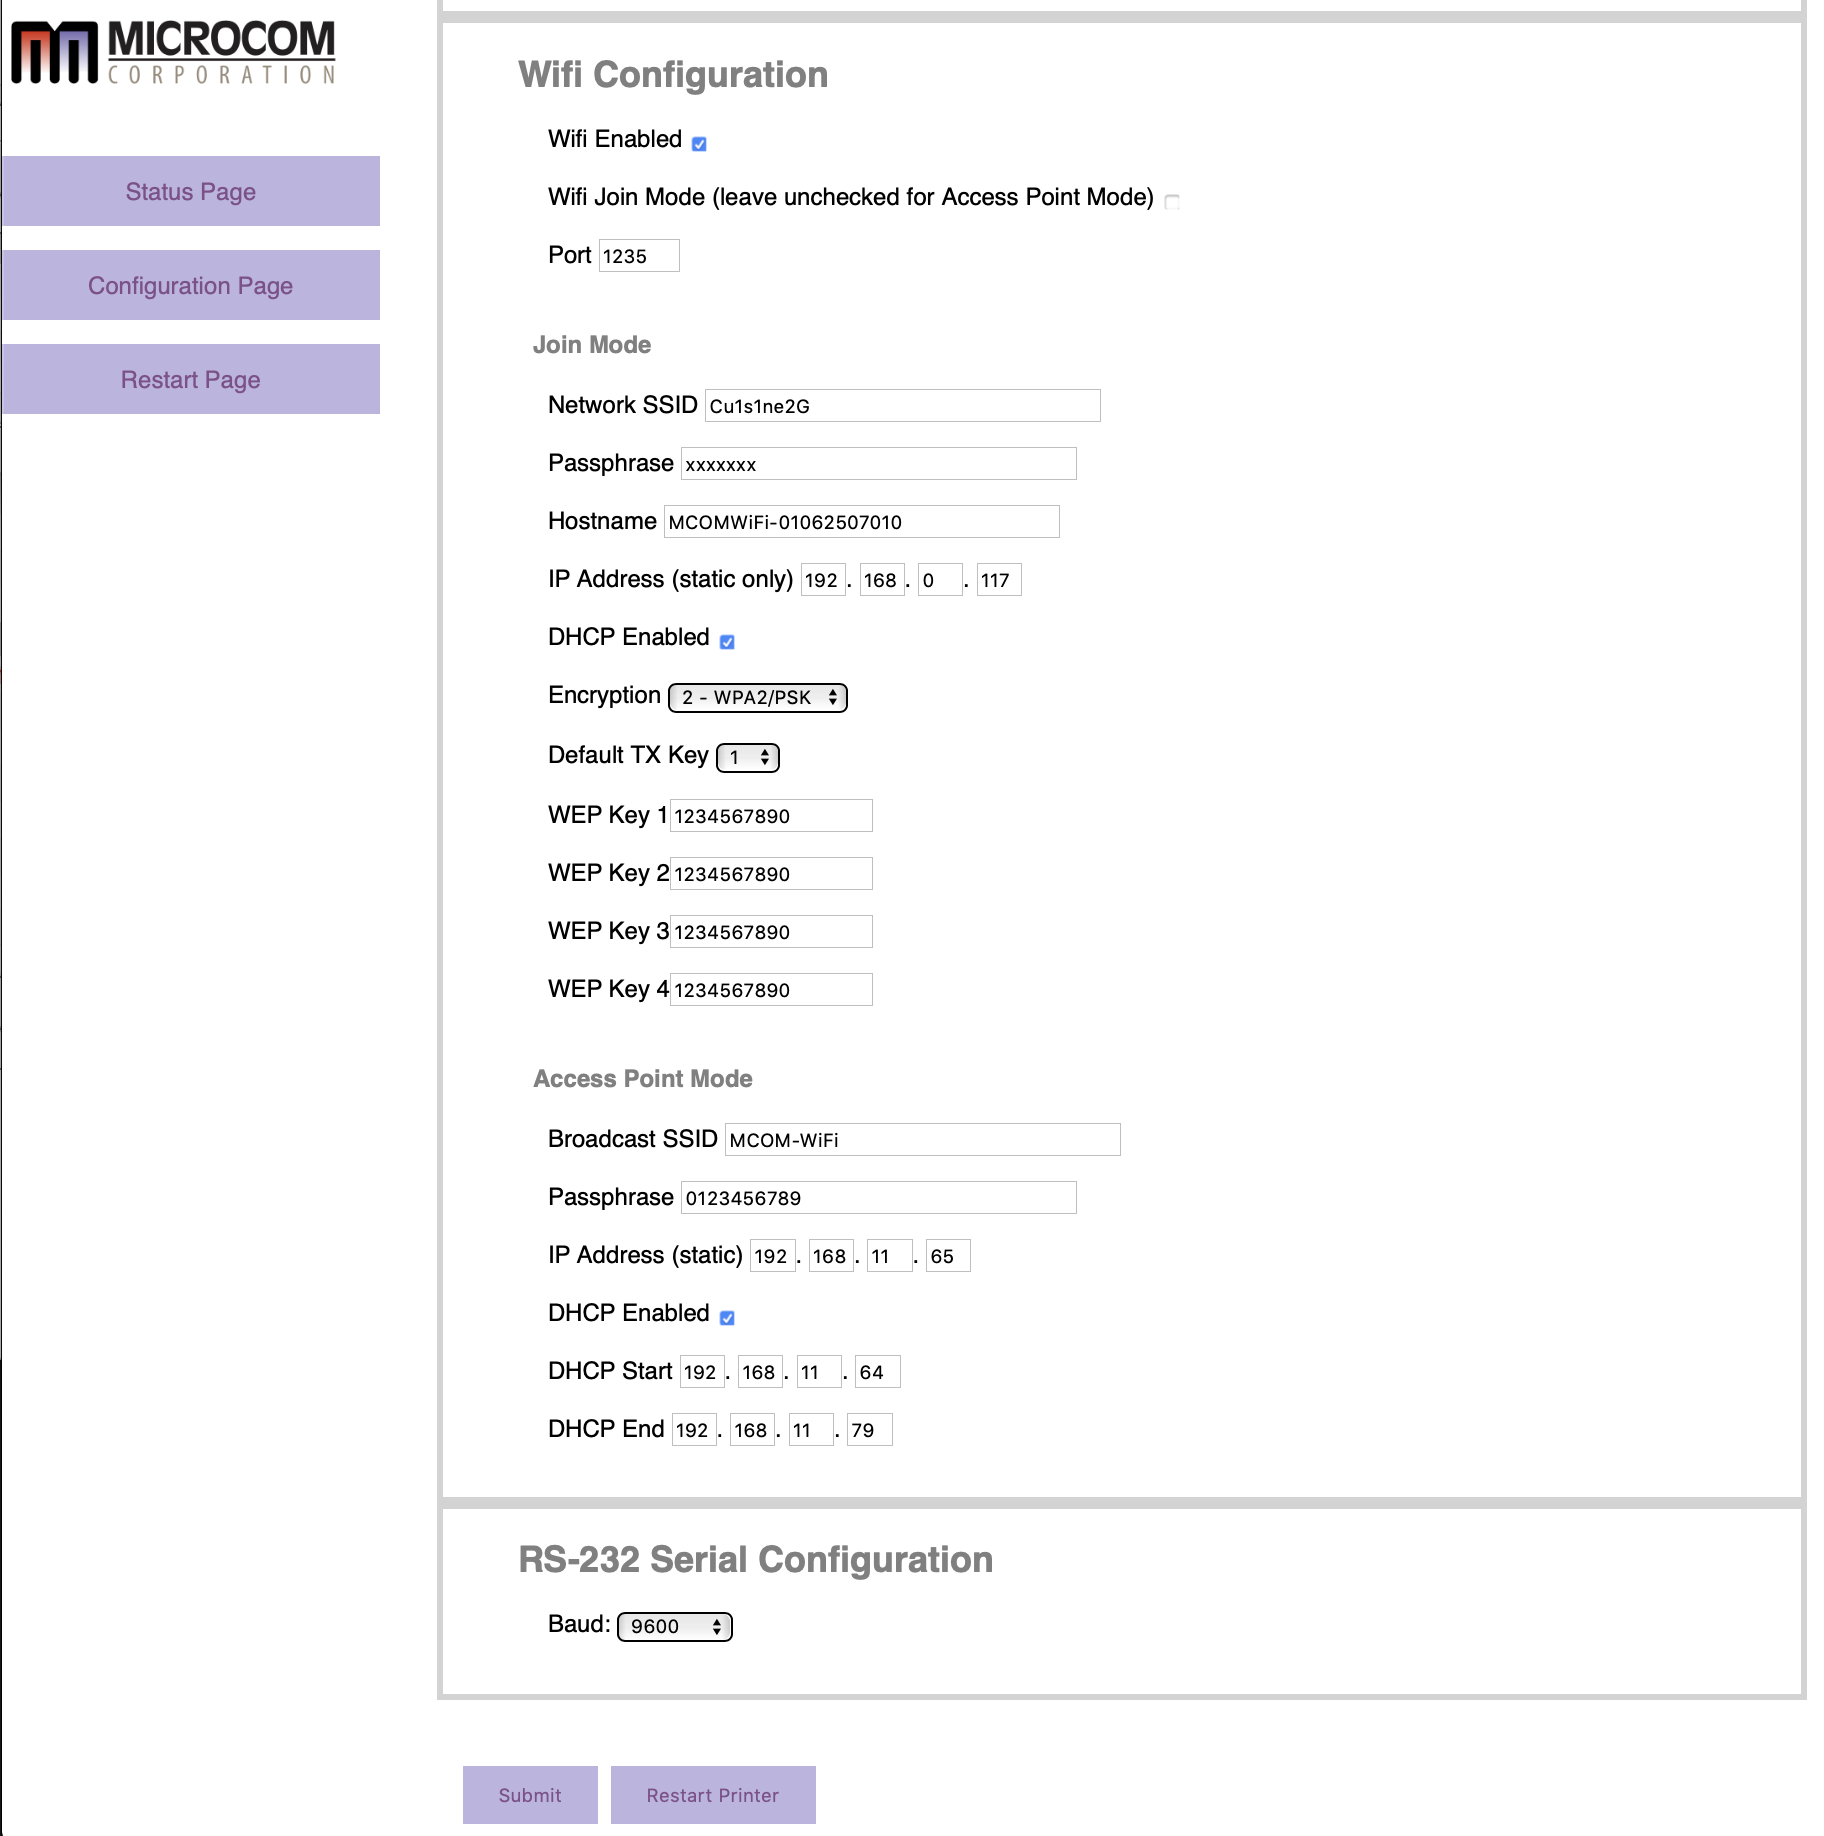 Lower on the Configuration Page are settings for enabling wifi. We generally recommend against wifi on your ticket sales network as that could create an exploitable part within your network and should be documented as per PCI compliance requirements.
If you wish to use wifi for connecting to the ticket printer, you can. It takes two approaches:
|
Microcom Printer Unboxing
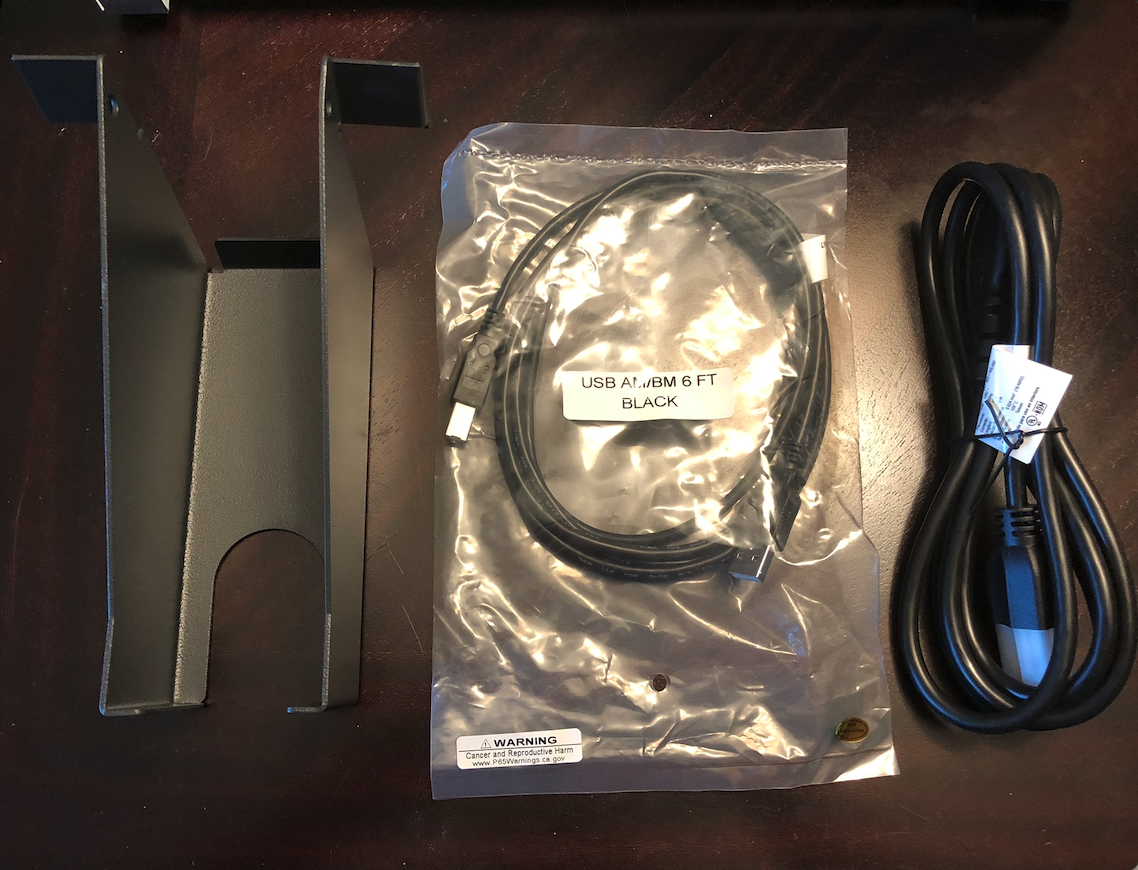
A Microcom printer ships with a print tray and power cable. You will need to supply ticket stock and an ethernet cable or pre-ordered Panda Wi-Fi dongle from Artsman.
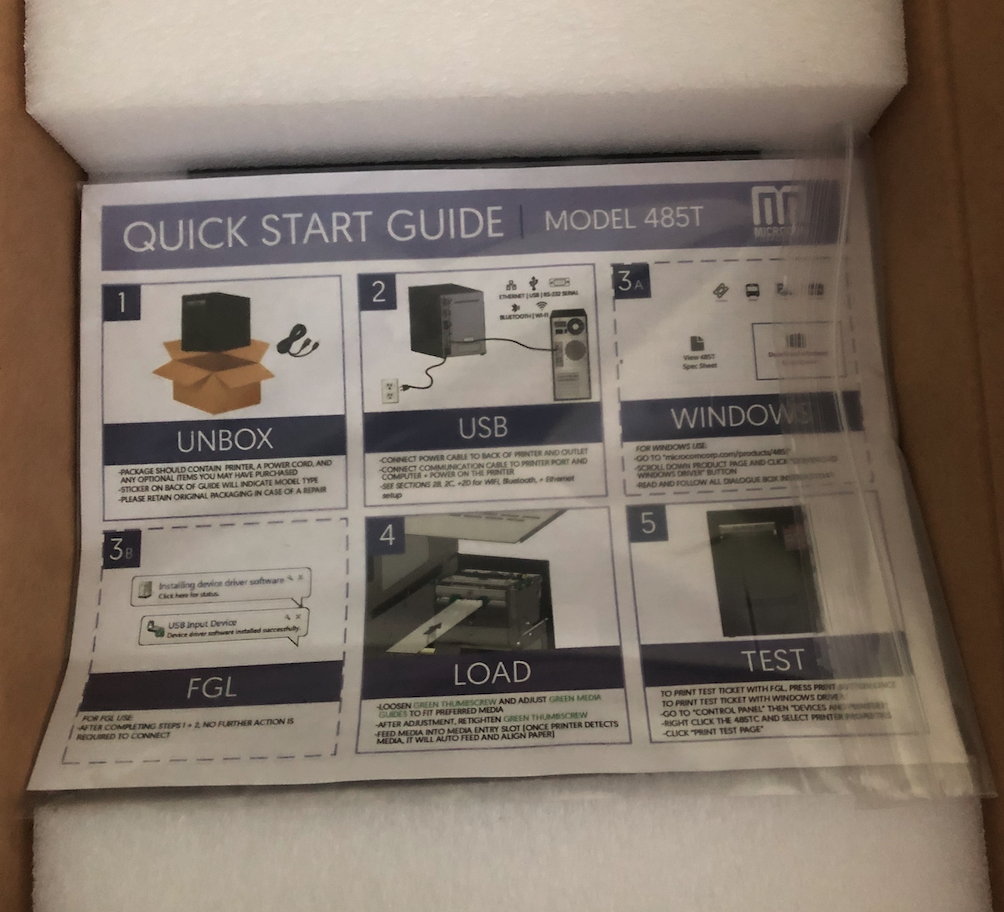
When opening the box you'll find a Quick Start Guide. Set this aside as these steps are not required.
Below the Quick Start Guild will be a yellow envelope containing the Key to open the printer. This envelope is taped to the plastic wrap encompassing the printer. The key will need to be used each time to unlock the side panel before the printer can be opened.
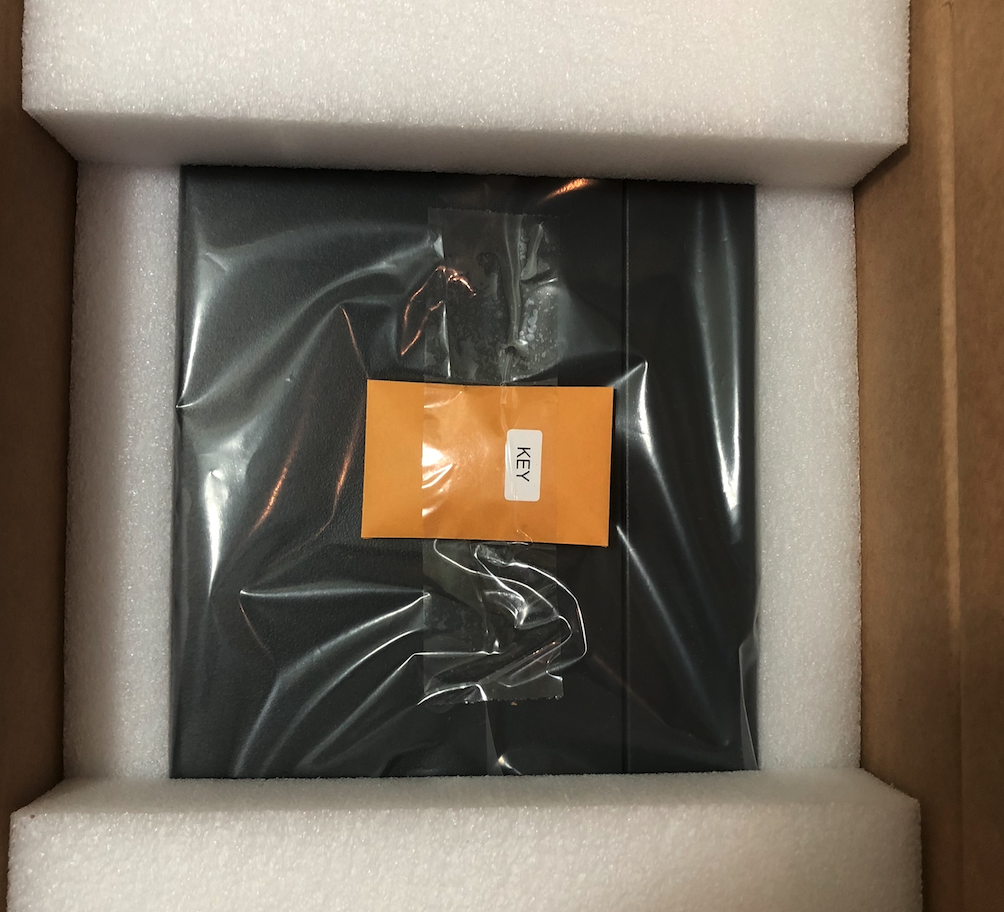
Open the side panel of the print (using the key) to access the Accessories box.
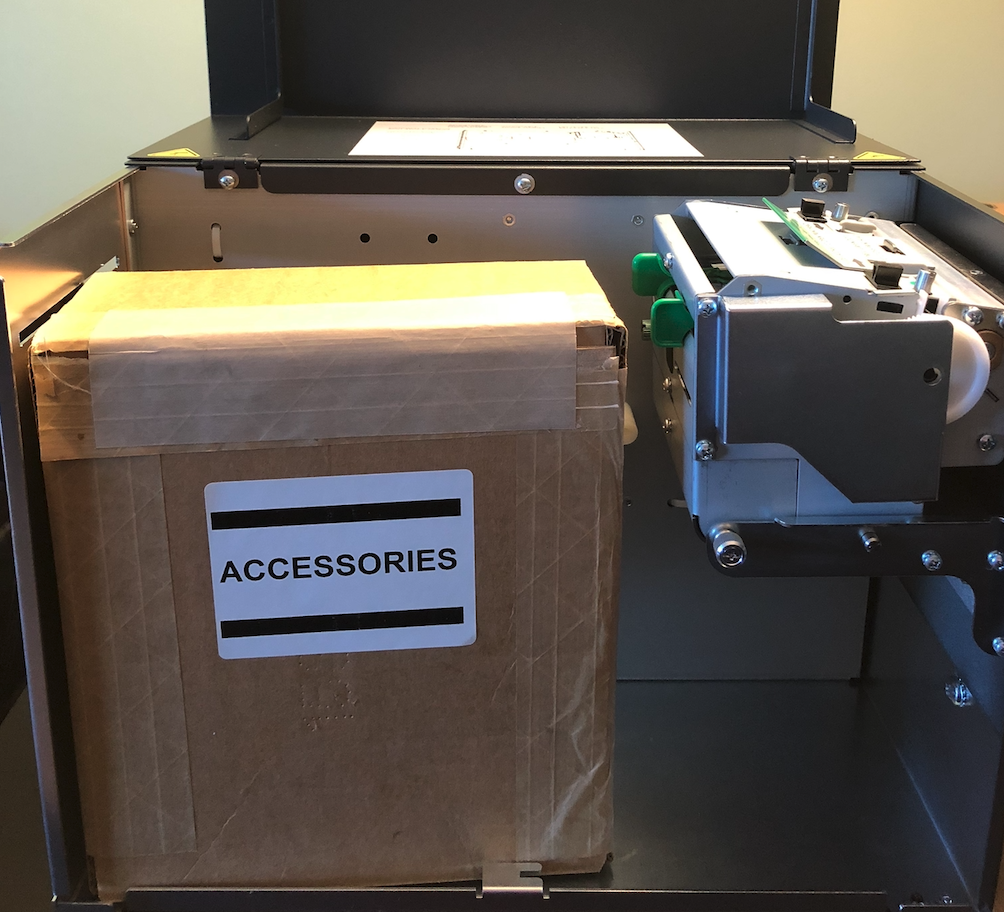
The Accessories box contains the print tray, a USB cable (this will not be used), and the power cable for the printer.
Updating Microcom Printer Firmware
The 485 series printer uses the USB HOST port found on the back of the printer to update the firmware in the printer. A USB flash drive that is greater than 1GB but less than 32GB formatted as a FAT32 file system is used during the update. Follow the instructions below for additional information.
Preparing the USB flash drive to update printer code
- The flash drive must be less than 32GB in size and formatted as a FAT32 file system.
- Connect the USB Flash Drive to a Windows-based PC.
- Open Explorer or type My Computer in the search bar of the task menu.
- Right-click on the flash drive and select Format from the menu that appears.
CAUTION: Verify that you are selecting the flash drive as this will erase the contents of the drive. If you have any doubt, disconnect the flash drive and it should no longer show up under the Devices and Driver section.
- In the Format window displayed, select FAT32 for the file system. Type in a label for the flash drive and then click Start.
- Once complete, the flash drive is ready for the code update files to be copied to it.
Copying Files to the formatted USB Flash Drive
Once formatted for the FAT32 file system on the flash drive, copy the updated file to the flash drive by doing the following.
- Download the code files located at:
Firmware Version 01.01.21 (Jan 2024)
- Unzip the files onto your PC.
- Copy the unzipped files onto the formatted flash drive.
- After the files are copied onto the flash drive, right-click on the drive, select Eject, and remove the drive from the PC.
485 Firmware Update Process
Follow these instructions using a flash drive that contains the code update files. Please make sure that ticket stock is installed in the printer before continuing.
- Turn the printer power OFF.
- Connect the flash drive to the USB HOST port on the back of the printer.
- Turn the printer ON.
- Observe the display on the front of the printer, it should look like this:
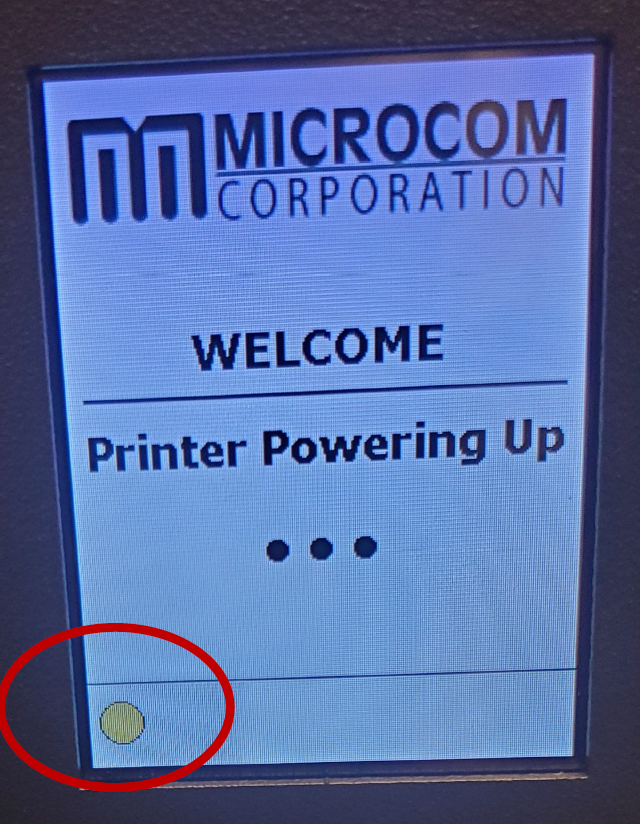
- Once the status light changes GREEN turn the printer off and remove the USB flash drive.
- Turn the printer ON and allow the update to complete. The Display code will now update. Once the light turns Green, the update is complete.
- Verify the code update by going to CONFIG\PRINTER INFO on the display.
Under the Code Ver should report 01.01.21. Led should turn green in color once the update is successful.
Updating Microcom Cutter Settings
There is Windows-based application that allows for connecting to any Micromcom printer currently on the local network. This tool can be used to update the cutter settings that may have been impacted following the installation of Firmware version 01.01.12.
Updating Cutter Settings
- Download the Microcom Confirmation Application from here:
https://www.microcomcorp.com/downloads/x85_configuration_application_for_windows.zip
- Unzip and install the application.
- Run the .exe file to start the configuration application.
- Connection the printer directly to the same PC.
- On the main screen towards the bottom, select the "CONNECT TO PRINTER" button and select the port of the printer that is being used (Enet or CDC USB).
- Select the port number of the connection.
- Select the "READ FROM PRINTER" button to load in the current printers configuration.
- Select the "BASIC CONFIG" on the side menu.
You should now see a CUTTER TYPE, select MICROCOM CUTTER
- Select the "SAVE TO PRINTER" button towards the bottom to send the command to the printer.
- Select "RESTART" to restart the printer and you may now exit the configuration app
- Test the printer once it reboots to verify that it now cuts properly.
Microcom Printer - Cutter Offset
If you are having Microcom Printer issues, in that your Tickets are not cutting at the exact line they should be, you can adjust the Cutter Offset.
|
NOTE: Do not cut right on the perforation. It will dull the cutting blade faster, causing more frequent blade replacement costs. New blade cutters are supplied directly by Microcom and are not covered by warranty. |
Setting Cutter Offset
- Press the Print Menu Button
On the Printer itself, click the Print Menu button.
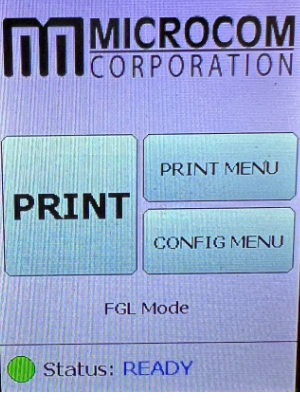
- Click the Next Button Twice
Click the Next button twice to get to the Cutter Offset option.

- Select the Cutter Offset Option
- Select the Offset Measurement
Use the plus + and minus - buttons to set your preferred offset measurement, which are calculated in pixels.
We recommend '-20' as a good starting point.
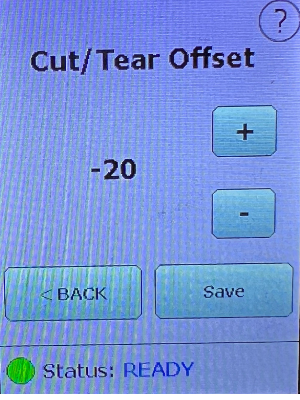
- Click Save
- Print a Test Ticket
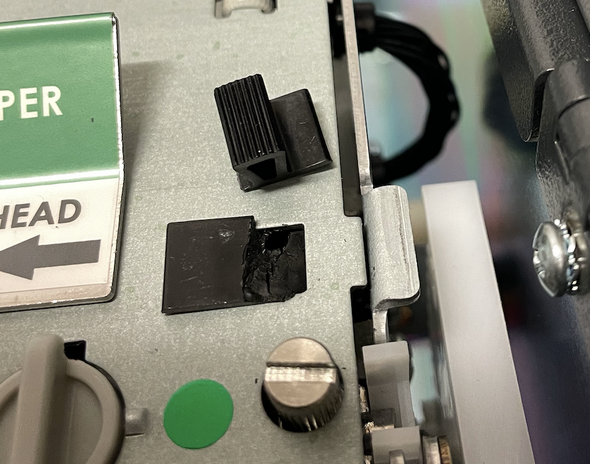
Replacing Latch for Microcom Printer
The latch sits inside the print head assembly. It holds the print head firmly in place ensuring it makes contact with the ticket stock at the time of printing. If the latch fails the head cannot burn content onto the ticket stock. It can look like one side of the printed ticket is "faded" or blank.
The latch has a smooth top with a nub that protrudes for easy movement. Below the flat surface, there are clasps on opposite sides of the latch. These are used to hold the latch in place. One side has a small pressure spring that allows for the clasps to be moved and makes for easy removal.

When the latch fails the nub disconnects from the top as seen below.
Removing the clasp
- Push in the spring-loaded side of the clasp with a flat head screwdriver.
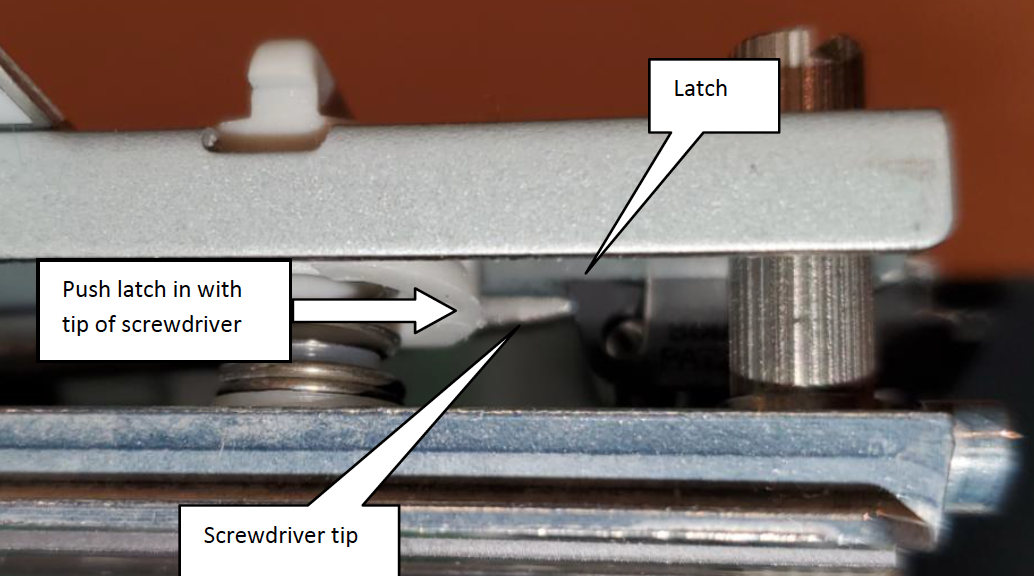
- While pushing in the clasp, pry up on the flat part of the latch on the top of the print head assembly.
- One side of the latch should release allowing for the broken latch to be removed.
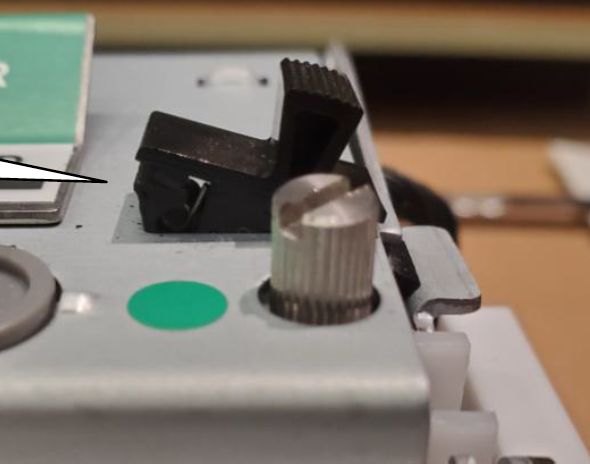
Inserting the clasp
- Gently slide the latch in non-spring loaded side first.
- Push the clasp on the spring loaded side in and down till it pops through the hole.
Microcom Printers and Wireless Printing
Microcom printers have the ability to print wirelessly using a Panda Wireless dongle. When the printer is unboxed the dongle can be inserted directly into the USB port and the printer configured to join the network using Wi-Fi.
For security, Wi-Fi printing should be set up on a private, secure network where only administrative staff have access. The speed of ticket printing will largely depend on the network speed. Wi-Fi printing may not be as effective for larger batch printing.
Connecting Microcom Printer to Wi-Fi
- Turn the printer Off using the rear panel power switch.
- Plug the Wi-Fi dongle into the USB port on the back of the printer.
The Wi-Fi dongle will not light up.
- Turn the printer On.
- Press the CONFIG MENU button on the printer display.
- Press Next until you see the OPTIONAL PORTS setting and press.
- Press the OPTIONAL PORTS button, select the WIFI bullet and click SAVE.
- Press Next until you get to the WIFI menu option.
- Press the WIFI button.
- Press the WIFI JOIN button, choose the JOIN setting, and click Save.
Use the Next button to continue navigating through the settings.
- Press WIFI SSID, enter the name of the wireless network to be joined, and click Save.
- Press WIFI PASSPHRASE, enter the wireless network password, and click Save.
- Press WIFI DHCP, select ENABLE, and click Save.
- Press WIFI PORT, enter 9100, and click Save.
- Press WIFI ENCRYPTION, select your Wi-Fi network encryption, and click Save.
The Wi-Fi dongle will light up once it's connected to the network. The printer will take approximately 30 seconds to retrieve a DHCP IP address from the network.
|
If the Microcom printer has previously been connected via an Ethernet cable or an Ethernet cable has been plugged into the printer you will not be able to simply plug the dongle in and configure the Wi-Fi settings. Follow the steps below to complete the wifi setup process.
|

Removing Ethernet Settings Before Using Wi-FI
- Turn the printer Off using the rear panel power switch.
- Unplug the Wi-Fi dongle and/or Ethernet cable from the printer.
- Turn the printer On.
- Press the CONFIG MENU button on the printer display.
- Press Next until you get to the ETHERNET menu option.
- Press the ETHERNET button.
- Press the DHCP button, select the DISABLE bullet, and press Save.
- Click the Next button to advance to the IP ADDRESS menu.
- Click the IP ADDRESS button, change each of the four numbers to 10, and press Save.
This removes the previously configured IP address from the ethernet connection and moves the settings back to default.
- Press EXIT and REBOOT NOW.
- Wait until the printer comes back online and you see the PRINT button.
- Turn the printer Off.
- Plug the Wi-Fi dongle back into the printer.
- Turn the printer On.
The printer will take up to 30 seconds to pull an IP address from the network. Use the Print button on the front of the printer to generate a test ticket. The IP address of the printer will appear on the test ticket. Use the Command prompt (Windows) or Terminal (Mac) to Ping the IP address on the ticket. The printer should respond.
Add the printer as a Device to Theatre Manager and set your Hardware Preferences to use the new printer. You should now be able to print to the printer using the Wi-Fi connection.
Sharing Ticket Printers
|
If you wish to share a ticket printer amongst Windows and/or Mac OSX machines, the recommended solution is a printer with an ethernet card built into it.
Note: Arts Management Systems only supports sharing ticket printers if they are IP based. We do not support sharing parallel printers using the Net Use technique for Vista or earlier. If you cannot get the technique to work, please contact Microsoft. |
Net Use for Parallel printers (not supported)
|
Net Use solution is NOT supported by Arts Management Systems. |
|
Note: this technique only works with NT, 2000, XP pro and Vista. It does not work with:
|
Historically, sharing can be done amongst Windows only computers with an LPT port using a feature called NET USE available in some versions of Windows older than Vista. Alternatively, you could print when two computers that are side by side in the box office using an electronic A/B switch (means it automatically switches LPT1 depending on who is printing).
If you opt for the software solution, it works like this:
- Give the computer a name like BoxOffice1 (notice, no spaces). each computer must have a unique name, so the other ones can be called BoxOffice2, etc.
- Set up a 'generic text/only' printer driver for LPT1 (or LPT2 or LPT3) on the machine with the ticket printer
- Make this printer shared and give it a convenient name like TixPrnt1 (8 characters and no spaces works best)
- On all other machines that are to print on this printer, start the 'DOS' command prompt and do a command that looks like:
net use lptx: \\ComputerWithPrinter\PrinterName /Persistent:yes
using the example above, the command would look like
net use lpt2: \\BoxOffce1\TixPrnt1 /Persistent:yes
This will redirect lpt2 on a computer to the machine with the ticket printer. The advantage of this is that is it easily configurable and you can use more than one of these commands on any machine to allow it to point to any ticket printer on the network.
- Now, in the employee preferences for the user of the second computer, you need to indicate that they print to LPT2. When a ticket is printed, it will be routed through the network to the BoxOffice1 computer. It is generally about that easy in practice.
To remove the ticket printer connection on a workstation
Using the example above
net use lptx: /delete
For more information on how the net use command works use the Windows help/ Go to start >> help. And do a search for "net use"
Ticket Printer Error Codes
Occasionally, you may receive a Thermal Ticket Printer Error Code in Theatre Manager when attempting to print a ticket. This message is not generated by Theatre Manager, but rather by the ticket printer itself, and then passed through Theatre Manager for you to see.
Thermal Ticket Printer Error Codes as provided by Practical Automation:
| CODE | DESCRIPTION |
| 1 | Printer out of paper |
| 2 | Jammed ticket |
| 3 | Printer offline |
| 4 | Printer failure |
| 5 | Low paper (roll ticket printers only). |
The following resources are also available from Practical Automation:
- Practical Automation Network Utility - to change IP address from a PC.
- ITX 3000/2000 & ITL 2000 Printer Series Programmer's Guide - refer to pages 3-3 to 3-6 for FGL commands if you wish to see them
Ticket Printer Error Codes as provided by BOCA:
| CODE | DESCRIPTION |
| 1 | REJECT BIN WARNING |
| 2 | REJECT BIN ERROR |
| 3 | PAPER JAM PATH 1 |
| 4 | PAPER JAM PATH 2 |
| 5 | TEST BUTTON TICKET ACK |
| 6 | TICKET ACK |
| 7 | WRONG FILE IDENTIFIER DURING UPDATE |
| 8 | INVALID CHECKSUM |
| 9 | VALID CHECKSUM |
| 10 | OUT OF PAPER PATH 1 |
| 11 | OUT OF PAPER PATH 2 |
| 12 | PAPER LOADED PATH 1 |
| 13 | PAPER LOADED PATH 2 |
| 14 | ESCROW JAM |
| 15 | LOW PAPER |
| 16 | OUT OF PAPER |
| 17 | X-ON |
| 18 | POWER ON |
| 19 | X-OFF |
| 20 | BAD FLASH MEMORY |
| 21 | NAK (illegal print command) |
| 22 | RIBBON LOW |
| 23 | RIBBON OUT |
| 24 | PAPER JAM |
| 25 | ILLEGAL DATA |
| 26 | POWERUP PROBLEM |
| 27 | DOWNLOADING ERROR |
| 28 | DOWNLOADING ERROR |
| 29 | CUTTER JAM |
| 30 | STUCK TICKET or CUTJAM PATH1 |
| 31 | CUTJAM PATH2 |
The BOCA Systems web site contains a variety of technical manuals for FGL programming and Owner's Manuals.