Hot Standby Server
 |
Replication is a feature of postgres and is automatically set up for cloud venues. Self service venues may set this up if they wish - the support team is unable to help you. |
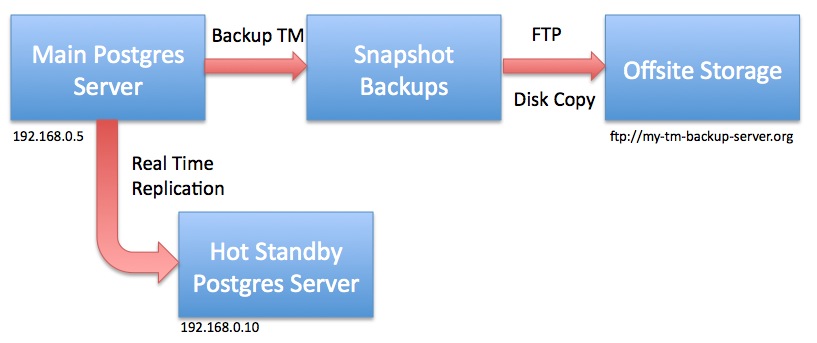
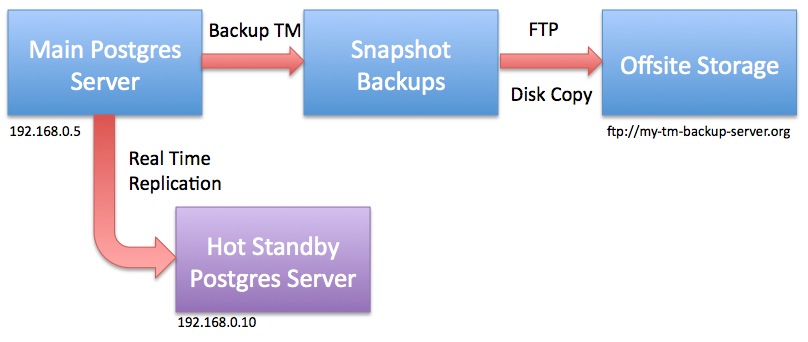
One of the features of Postgres is the ability to create a 'hot standby' database server as a way to introduce redundancy to the system. The notion is that if a catastrophic physical failure occurred to the database server (such as the drives died, the machine melted, it got doused in water or burnt in a fire) and was found to be non-recoverable, then it would be best to get to a backup as soon as possible.
The standard backup approach allows you to go back to a snapshot. If you do a number each day, that may mean going back a few hours and reconstructing what happened from the backup to the failure.
Replication means you have one (or more) standby servers that is shadowing the contents of the main server - and may be as close as seconds old. In the case of failure, you would turn off the replication feature and start using the standby database until your primary server gets fixed.
|
Do not use replication as the only means of backup - always set up snapshot and offsite copies of your database. |
|
We always recommend using the latest version of PostgreSQL for replication. These instructions were created for PostgreSQL version 10 |
|
If you do a minor level upgrade of PostgreSQL on the main database server (e.g. from PostgreSQL v9.6.x to v9.6.y), you must also upgrade the version of Postgres on the hot standby server at the same time. There is no need to migrate the database again.
However, if you do a major level revision, you will need to do ALL the steps to re-establish the hot standby. This will change the time it requires to upgrade (but having a hot backup is worth it). |
|
If you update your version of Theatre Manager, any changes to the data in the main database are also updated on the hot standby. You never have to update the backup server as all changes come from the main server |
The general steps for making a hot standby are:
- Set up the database on the main server starting at Step 1 and going through all the steps . If you are using Theatre Manager, this was already done.
- Set up Postgres on a standby machine using Step 1 and disabling any energy saving features.
- Adjust the configuration of the main database server
- Alter the configuration of the hot standby database server
- Migrate the initial database to the standby
- Start replication
- Monitor for issues
Many thanks to this insightful article by Bartek Ciszkowski for helping make the process on Linux which we adapted to OS X. You can also read more detail on the Postgres site regarding high availability servers for any of the technical details.
Replication can be done on windows per this tutorial and it implies that there are few differences, except how to get the WAL logs replicated from one machine to the other - using a file share.
Main Postgres Server Changes
|
Replication is a feature of postgres and is automatically set up for cloud venues. Self service venues may set this up if they wish - the support team is unable to help you. |
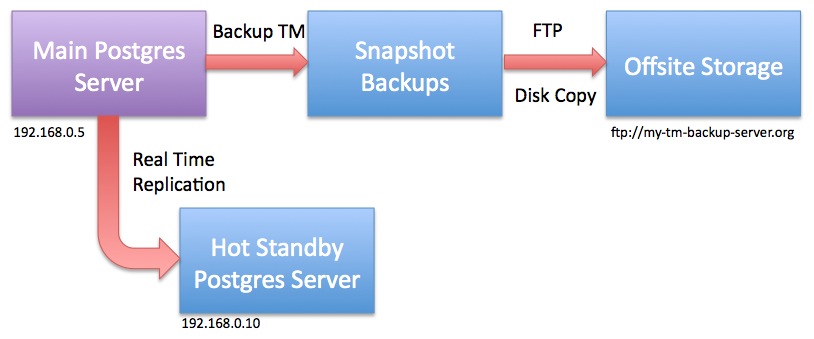
For the purposes of the example, let's assume per the diagram that
- the main database server is at 192.168.0.5 and
- the hot standby server is at 192.168.0.10
|
Do not restart any of the Postgres servers until told to do so. |
Changes to postgresql.conf
You can make these changes using PGAdmin ('Tools->Server Configuration') or by using Terminal and VI to navigate to the Data folder and edit the file. This assumes you know how to make these changes. Note that there are ' (quotes) around the RSYNC parameters below. In PGAdmin, you will not need to enter them - in VI, you will need to enter them.
These settings tell Postgres to send enough information from the master to the slave. You can read about these parameters in the official documentation and adjust them as needed.
|
wal_level = replica max_wal_senders = 10 wal_keep_segments = 32 archive_mode = on archive_command = 'rsync -aq %p postgres@192.168.0.10:/Library/PostgreSQL/10/archive/%f' archive_timeout = 60 |
Changes to pg_hba.conf
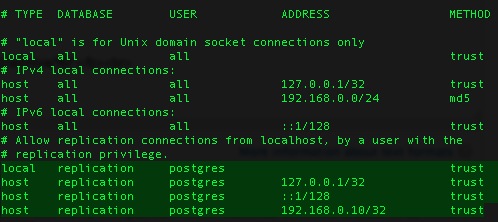
Edit the pg_hba.conf file and scroll down to the bottom. There should already be 3 lines that have replication in them which will need to be uncommented and permissions set to 'trust'. Add a line that tells the master server that the 'replication' server is at 192.168.0.10 as per the last line. Replace with the IP address of your hot standby server.
Ensuring rsync permissions work
You must to establish secure credentials between the main Postgres server and the standby server to enable rsync to transfer the files using the command above. It requires some Terminal commands and knowing what you are doing. It may be easier to have two Terminal sessions working.
| As Admin User |
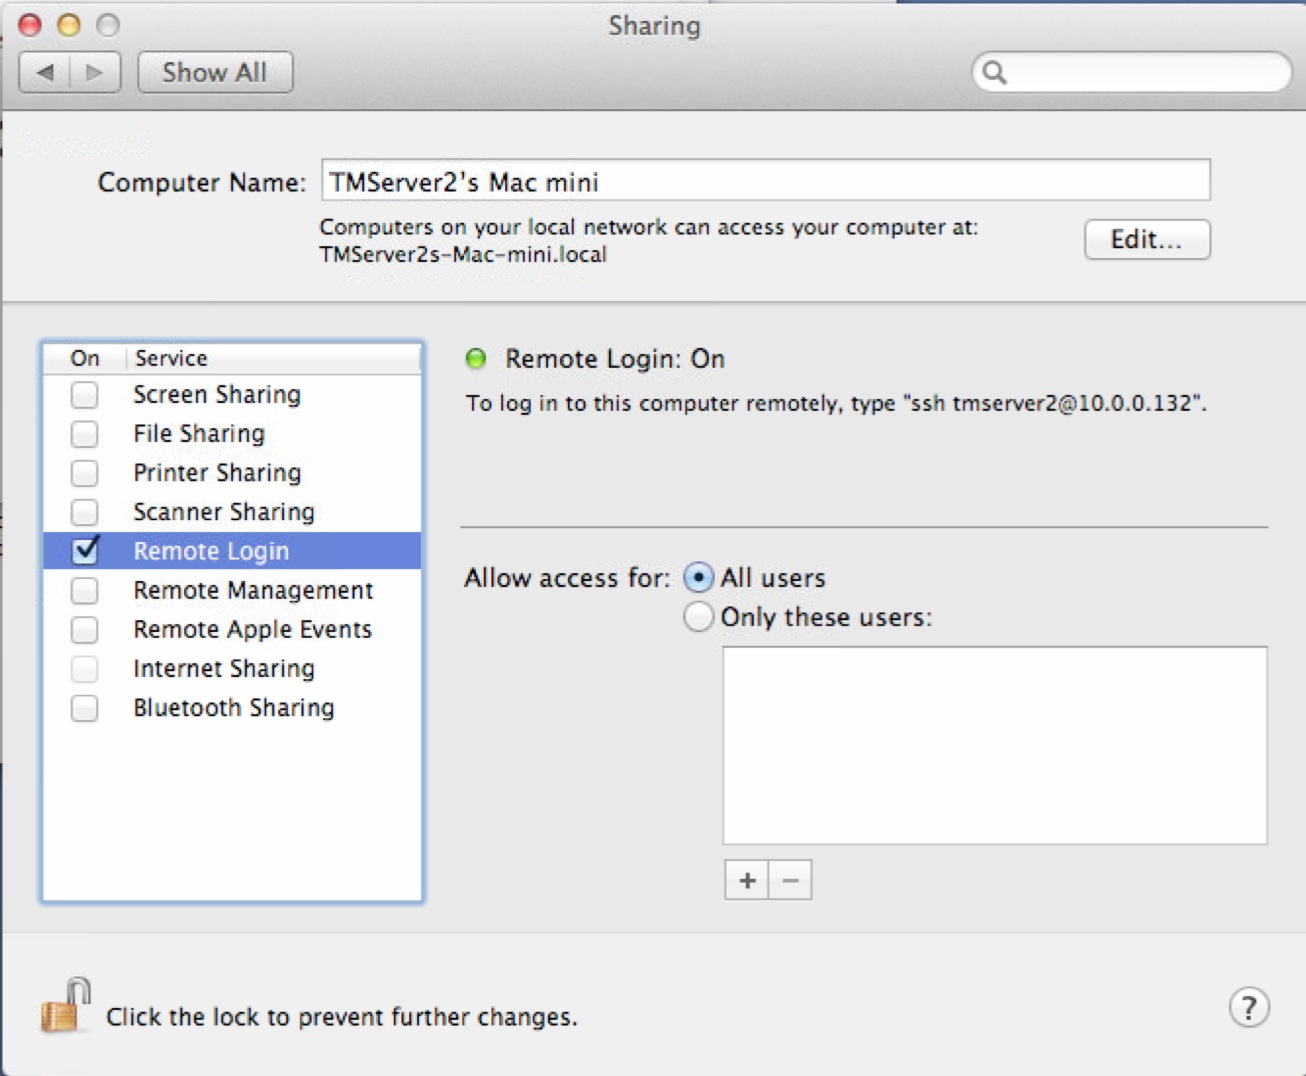
ON THE BACKUP SERVER, Open System Preferences and go to the 'Sharing'. Make sure 'Remote Login' is enabled. It can be set to all users -or- if you want to limit users, make sure the postgres user is in the list.
Make the '.ssh' folder and 'archive' folder for the postgres user in the postgres user's home directory /Library/PostgreSQL/10 and provide access to it. DO THE SAME four commands on the both the MAIN and on the HOT STANDBY server. |
|
sudo mkdir /Library/PostgreSQL/10/.ssh sudo chown postgres:daemon /Library/PostgreSQL/10/.ssh sudo chmod 700 /Library/PostgreSQL/10/.ssh |
(only postgres should have rwx access to the .ssh directory) |
|
sudo mkdir /Library/PostgreSQL/10/archive sudo chown postgres:daemon /Library/PostgreSQL/10/archive |
|
|
|
| As postgres User | ON THE MAIN SERVER,
use ssh-keygen to create a key/certificate file for SSH access and move it to the hot standby. Again, we are assuming that the hot standby will be 192.168.0.10 - replace with your hot standby IP address as required.
|
|
su - postgres cd /Library/PostgreSQL/10/.ssh/ ssh-keygen -b 4096 -t rsa -f id_rsa -P '' |
|
| (note: the end of the command is two single quotes in a row) | |
| you should get a response like:
Generating public/private rsa key pair. |
|
| touch authorized_keys cat id_rsa.pub >> authorized_keys chmod 400 id_rsa scp authorized_keys postgres@192.168.0.10:/Library/PostgreSQL/10/.ssh |
|
|
You should get a response as below
The authenticity of host '192.168.0.10 (192.168.0.10)' can't be established. Then type the following to SSH to the remote machine. You should no longer be asked for a password. If you cannot do this, then replication will not work. |
|
| ssh postgres@192.168.0.10 |
|
| It should respond with a prompt and you can type | |
| exit |
|
If you are not able to connect to the remote machine without typing a password, you may need to do one of:
|
Hot Standby Server Configuration
|
Replication is a feature of postgres and is automatically set up for cloud venues. Self service venues may set this up if they wish - the support team is unable to help you. |
For the purposes of the example, let's assume that:
- the main database server is at 192.168.0.5 and
- the hot standby server is at 192.168.0.10 as per the diagram
- the version of postgres you are using is 10 (otherwise change 10 to xx in all commands, depending on the version of postgres you are using)
|
Stop the Hot Standby server and do not restart it until told to do so.
Start Terminal, then sign on as the Postgres user via the following commands to stop the database:
|
Create recovery.conf
Create a file called 'recovery.conf' (which should not exist) in /Library/PostgreSQL/10 for safe keeping. We will be copying this file later on as Postgres expects to find it the 'data' folder in /Library/PostgreSQL/10/data. However, we cannot put it there yet as we will be deleting everything in that directory later. Replace 192.168.0.5 with the address of your primary database server.
Using Terminal as administrator of the machine, create and edit the recovery.conf since the Postgres user cannot create this file. Alternatively, copy the text and paste it into a BBedit file on the machine and use a copy command to put it into place.
| As admin User |
then enter the contents of the file by typing the yellow text below. (you can usually copy/paste into vi if in 'insert' mode)
|
Make sure that the archive directory exists
If you did not already do this command as part of the set up of the MASTER database, you will need to do so, so that the backup files can be received by the HOT STANDBY server.
| As admin User |
Make the '.ssh' folder and 'archive' folder for the postgres user in the postgres user's home directory /Library/PostgreSQL/10 and provide access to it. DO THE SAME two commands on the both the MAIN and on the HOT STANDBY server if you have not previously done so. |
|
sudo mkdir /Library/PostgreSQL/10/archive sudo chown postgres:daemon /Library/PostgreSQL/10/archive |
|
If you are re-establishing a hot-backup server, make sure to clear out all files from the 'archive' folder on the hot standby. In Terminal, type:
You do not need to stop the main server while setting up the hot standby as we will make a base backup to 'restore to a point in time'. |
Migrating the initial database
|
Replication is a feature of postgres and is automatically set up for cloud venues. Self service venues may set this up if they wish - the support team is unable to help you. |
|
Hot Standby ServerStop the Hot Standby server and do not restart it until told to do so (it should be stopped already). We don't want any data flowing from the main database to the Hot Standby while we are preparing the servers. In Terminal, as postgres user: |
| pg_ctl stop -m fast | |
|
Main Database ServerYou may need to use pg_ctl to stop and then start the main server to get the max_wal_server change to take effect before starting the pg_basebackup. Make sure nobody is using the database, then type in Terminal, as postgres user: |
|
pg_ctl stop -m fast pg_ctl start |
Now that the hot standby is configured, it’s necessary to get the contents of the main database onto it, so that replication can sync up. This is done using a handy command named pg_basebackup, which essentially copies the entire data directory of your main database into a location of your choice. It is also what we know as an online backup, as the main database can stay in use while the command copies all the data.
On the Main Database Server
Start the pg_basebackup command and put the backup file in some place that Postgres can access. The standard backup directory /Users/Shared/Backups should be fine. The base backup should take about as long as your normal backups take and progress is shown in the Terminal window.
Make sure that Postgres has read/write access on both the local machine and the remote machine to the directory you are using.
The scp command is used to copy the base backup to the same location on the hot standby server (replace 192.168.0.10 with your backup server IP). You could use a USB key or any other mechanism to transfer the file that you want. This may also take a long time and progress is shown in the Terminal window.
|
pg_basebackup -U postgres -v -D - -P -Ft | bzip2 > /Users/Shared/Backups/pg_basebackup.tar.bz2
scp /Users/Shared/Backups/pg_basebackup.tar.bz2 postgres@192.168.0.10:/Users/Shared/Backups |
NOTE: The bzip2 command can be quite CPU intensive and only uses a single core. If a multi-core processor is available you may wish to consider using the pigz compression program instead to get a significant speed-up to the backup. Be aware that using pigz requires separate installation and it also uses a different extension than the bzip2 method: .tar.gz vs. .tar.bz2.
|
pg_basebackup -U postgres -v -D - -P -Ft | pigz > /Users/Shared/Backups/pg_basebackup.tar.gz
scp /Users/Shared/Backups/pg_basebackup.tar.gz postgres@192.168.0.10:/Users/Shared/Backups |
On the Hot Standby Server
The hot standby server should already be stopped. We need to use Terminal (as the postgres user) and remove the entire data directory - if it exists.
|
su - postgres Enter the Postgres password pg_ctl stop -m fast (just to make sure Postgres is stopped on the backup server) cd /Library/PostgreSQL/9.6/data rm -rf * ls (There should be no files) |
| tar -xjvf /Users/Shared/Backups/pg_basebackup.tar.bz2 |
| chown -R postgres:daemon /Library/PostgreSQL/9.6/data |
| cp /Library/PostgreSQL/9.6/recovery.conf /Library/PostgreSQL/9.6/data/recovery.conf |
Changes to postgresql.conf on the Hot Standby Server
The expansion of the base backup database from the main server will also restore its postgresql.conf and pg_hba.conf file.
We now need to adjust them to ensure that they are set to be a hot standby database. You can make these changes using PGAdmin ('Tools->Server Configuration') or by using Terminal and VI to navigate to the Data folder and edit the postgresql.conf file.
The settings below tell Postgres that it is the slave machine. You can read about these parameters in the official documentation and adjust them as needed.
|
hot_standby = on wal_level = hot_standby max_wal_senders = 5 wal_keep_segments = 32 |
Look for the 'archive' settings that were restored from the base backup and comment them out by putting a '#' in front of the parameter.
|
#archive_mode = on #archive_command = 'rsync -aq %p postgres@192.168.0.10:/Library/PostgreSQL/9.6/archive/%f' #archive_timeout = 60 |
Changes to pg_hba.conf on the Hot Standby Server
Edit the pg_hba.conf file and scroll down to the bottom. There should already be 3 lines that have replication in them from the main database. If they are not uncommented, you will need to do so and set permissions to 'trust' (and go back and verify the contents of the same file in the main database).

Finally, start the database on the hot standby server
| pg_ctl start |
Cleanup after Replication is Confirmed to be Working
Please confirm replication is working before doing the next step to clean up the temporary base backup files.
The base backup file was created on both the main server and migrated to the hot standby machines. If you have a large database, this file could be sizeable itself and it is best to delete it. On both machines, you can navigate to the /Users/Shared/Backups directory and remove pg_baseBackup.tar.bz2.
Alternatively: in Terminal you can:
| rm -i /Users/Shared/Backups/pg_basebackup.tar.bz2 (you will be asked to confirm the deletion) |
Verifying that the database is replicating
|
Replication is a feature of postgres and is automatically set up for cloud venues. Self service venues may set this up if they wish - the support team is unable to help you. |
- Observe the Postgres log roll forward the changes
- Looking at the replication logs to see that they are created and then removed
- Make some changes to the main database and then using pgAdmin to verify that the changes are in the backup in real time
Using pgAdmin to see Replication Status
|
Replication is a feature of postgres and is automatically set up for cloud venues. Self service venues may set this up if they wish - the support team is unable to help you. |
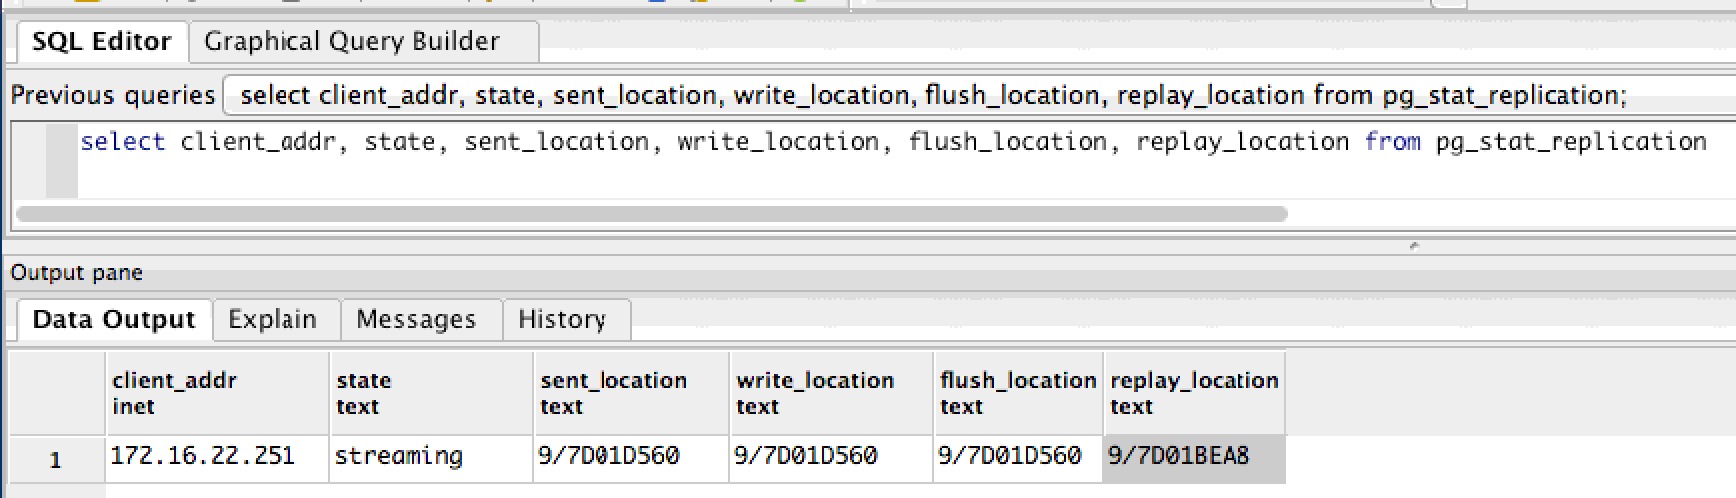
| select * from pg_stat_replication |
This should give a row back that says the server is 'streaming'. You can repeat the query and the numbers will change, indicating that replication is proceeding.
If you see a different result like:
- The status is 'catch-up', then the backup machine is not up to date with the main server, which may indicate issues.
- There is no row or data in response to this command, it means replication is not running, and your main disk will be slowly filling up -- you will run out of space. Get the properties of the disk on the main server to see how fast it it filling up and send us a support ticket. it often just means restarting one or both servers, or verifying ip addresses on the two machines.
|
If the query gives no rows back (or some other status), then things may not be set up right, or replication has not yet begun because archive log files are being recovered on the Hot Standby Server. |
Using pgAdmin to Watch Transactions
|
Replication is a feature of postgres and is automatically set up for cloud venues. Self service venues may set this up if they wish - the support team is unable to help you. |
Alternatives
Data replicates from the main server to the Hot Standby immediately. If there is a change to the main database, it should appear in the hot standby immediately after that.
|
One way to verify changes is to have the box office sell a ticket to a patron using Theatre Manager. Before the sale, there should be no transaction history for that order; after the sale, there should be some ticket transactions.
Perform this test daily or weekly to make sure that the database is replicating. |
|
Occasionally, if you take the standby down for maintenance, it may get a bit behind. In that case, you may not see changes until the archive files have been fully recovered and you may need to look at the standby server's Postgres log files for progress. The archives are created periodically as per the frequency that you set in the archive_timeout parameter) |
Verifying Simultaneous Activity on Both Servers
Follow these steps to see that data is being migrated:
- Start pgAdmin on the main server, point to the main database and start an SQL session
- Start pgAdmin on the Hot Standby server, point to the standby database (it is a different IP address) and start an SQL session
- On both machines, enter the SQL below into pgAdmin to verify the last 10 transactions
select * from f_transaction order by t_seq desc limit 10 - Log in to Theatre Manager on any workstation (or have anybody sell a ticket)
- in pgAdmin on the MAIN database, rerun the SQL above. There should now be a new login transaction or transactions that match the number of tickets sold.
- In pgAdmin on the Hot Standby database, rerun the SQL above.
- There should be the same transactions visible on the hot standby right away.
- That means the servers have replicated the data.
- In Theatre Manager, release the tickets or log out.
- in pgAdmin on the MAIN database, rerun the SQL above. There should now be MORE transactions representing your activity.
- In pgAdmin on the Hot Standby database, rerun the SQL above.
- You should see the new transactions on the standby server, meaning the servers have again replicated the data.
Reviewing Postgres Log File for Replication Entries
|
Replication is a feature of postgres and is automatically set up for cloud venues. Self service venues may set this up if they wish - the support team is unable to help you. |
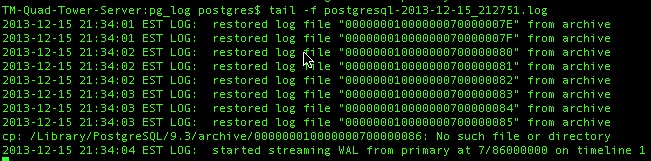
You should go to the log files once in a while and ensure that it is replicating and able to see/connect to the other database. After the tail command, you should see that the server entered standby mode and that is connecting to the main server.
Even after setting up the replication to the hot standby server, you should check this log periodically to make sure it continues to work.
|
su - postgres Enter the Postgres password cd /Library/PostgreSQL/9.6/data/pg_log ls -la (to see a list of logs) tail -f name-of-most-recent-log-file |
The example below shows the startup of the standby server after first being created (or being stopped for a period of time). The log files are consumed and, finally, replication starts. Once replication starts, no further 'restore' messages will appear in the logs -- you can then use the pgAdmin query method to view the status of replication on the main server.
Inspect the Archive Directory
|
Replication is a feature of postgres and is automatically set up for cloud venues. Self service venues may set this up if they wish - the support team is unable to help you. |
You can go to the replication folder and see that new files appear once a minute and old ones go away.
|
cd /Library/PostgreSQL/9.6/archive ls -la (to see a list of recovery files). |
For example:
- 000000010000000000000055 will have as the next file 000000010000000000000056 - about 60 seconds later or whatever time period you set in the archive_timeout command
- Eventually 000000010000000000000055 will disappear as it is processed by the hot standby
- Generally, on the server, there should be only a few of these files (5 to 10). if there are more, the server may be a little busy. If they do not decrease, replication is not working right or the server is overloaded.
- and the above will repeat.
Promoting a Standby to the Main server
|
Replication is a feature of postgres and is automatically set up for cloud venues. Self service venues may set this up if they wish - the support team is unable to help you. |
- Shut down, turn off, unplug and/or remove the main server from the network so that it is no longer active
- On the backup server, create the failover trigger file using the primary failover methodology (described in detail below):
sudo touch /tmp/pg_failover_trigger - The hot standby is now your main server.
- You may need to change the pg_hba.conf file as required to allow workstations to access the database.
It is probably okay because it was originally copied from the main server at time of making the standby. You will only need to change the pg_hba.conf file if you added more sub-nets to the main server.
- Do all the work necessary to get Theatre Manager clients to point to a new database server by doing one of:
- Use Theatre Manager to change the IP address of the database you log into -or-
- Change the IP address of the hot standby to be the same as the Master main server -or-
- Change the DNS to point to the new IP address, if that's what you use to connect to the server
- Log all clients, second generation and classic listeners into the new server IP address
- Log into the database using Theatre Manager.
- Quit and restart the Theatre Manager Server
- Quit and restart any web listeners
- Fix the reason that the main server died and plan to set up a new hot backup server
Primary Method to promoting the Backup Server to Main Server
If your recovery.conf file in the Postgres data directory was set up according to these instructions, it should have a trigger_file parameter and look like the except below.
|
# specify the name of a file whose presence should cause streaming replication to # end (i.e. failover). If you create this file, then Postgres will rename 'recovery.conf' # to 'recovery.done' and promote the hot standby to a primary server without a restart. trigger_file = '/tmp/pg_failover_trigger' |
| sudo touch /tmp/pg_failover_trigger |
- Notice the file
- Finish off the slave process and recover any log files transferred from the main server that still needs recovery
- Rename the 'recovery.conf' file to 'recovery.done'
- when that happens, it is now the primary server
Alternate Method using pg_ctl
use pg_ctl to promote the server
|
su - postgres enter the postgres password pg_ctl promote |
For more information refer to the postgres fail-over documentation