Product Development Process
Defect Tracking Process
Prior to working on an issue, developers should ensure that an issue has been logged in the defect tracking tool. If an issue is not logged, then the developer should escalate the issue to management to confirm priority.
FogBugz
The defect tracking tool used by Arts Management Systems development is FogBugz. While this document is not meant to be a complete guide to using this tool, there is a list of common tasks a developer should know how to do in the FogBugz Tutorial.
System administration for FogBugz is handled by the Arts Management IT and Product Development Department. FogBugz is accessed via the web and signing in at mail.artsman.com/fogbugz/
Issue Submission
Who Can Submit Issues
All Arts Management personnel with access to FogBugz can submit issues into the defect tracking database. Customers submitting support requests arrive in the same database. Arts Management staff can directly convert a support request to a development issue if it is determined to be a program issue. If you do not have access to FogBugz, contact the Development Team to be issued an ID and Password.
Product Design Team
Technical Support Teams
Feature and change requests will also be submitted to the Product Design Team.
Software Quality Assurance Team (SQA)
The issues reported from SQA will include refinements to existing issues, new issues caused by a break to existing code, and change requests.
User Acceptance Testing
Issues logged during user acceptance testing will have step-by-step instructions to recreate and sample data if necessary (see the section below entitled Secure Storage System).
Development Team
Target Release
Severity
Within a Target Release tasks should be accomplished based on severity. However, new features and change requests should be implemented prior to bug fixing.
Severity is assigned by the Development Manager
| 1 | Fix Immediately | Critical issue causes a system crash, data loss or corruption. The system becomes unstable or unusable. No workaround exists. Items of this nature should be fixed immediately in a patch release. |
| 2 | Fix next point release | Problem of a serious nature causes the software to operate in an unpredictable or detrimental manner with a serious adverse impact to the user. Major functionality is missing or broken. Workaround exists but is unacceptable. |
| 3 | Fix in point release if possible, incremental otherwise | A moderate problem causes system functionality to degrade with a moderate adverse impact to the user. Minor functionality is missing or broken. An acceptable workaround to the problem exists. |
| 4 | Fix next incremental release | The problem is not detrimental to the operation of the system. It is scheduled for correction in a future major release. |
| 5 | Fix if Time | The problem is not detrimental to the operation of the system and will be addressed for the proposed version if there is time. Can be deferred to any subsequent version |
| 6 | Undecided | Priority or severity has not been assigned yet |
| 7 | Rejected | Issue has been reported that has been determined as either not a bug, how the system operates, or has simply been rejected. |
Issue Resolution
Validating
Is this the expected behavior?
The first step a developer should go through when faced with a new issue is to validate the issue. Put simply, this is deciding, if given what the user is trying to accomplish, is the software behaving in the way expected. It is typically at this stage that the developer will also do an “its different therefore it’s wrong” check. Given the long adoption cycle for Point Of Sale software, there are issues that will occasionally slip past the Product Management review process in which a user is effectively reporting that because a goal is achieved in a different means from a previous version, it is a bug.
If this is the expected behavior then the issue should be rejected and marked “works as designed”.
At this point the developer may also encounter an issue which works as designed, but the “bug” suggested in the issue is in fact a good idea for a feature that has not been implemented. At this point the developer should contact product management about the possibility of creating a new feature or a Change Request that incorporates the functionality indicated - and then make an entry in FogBugz to begin the change tracking process.
Pre – Testing
If it appears the software is behaving erratically it is important to try and recreate the fault. If the problem cannot be recreated or cannot be supported with logs by the developer or the business partners onsite it is most likely not an issue with the software, but an issue with the state of the platform the software was running on.
If the issue cannot be recreated and there are no logs to support it, the issue should be rejected and marked “can not reproduce”. The customer should be advised to enable auditing and logging for a time to see if the problem persists, and if additional data can be captured.
Scoping
Addressing Security Concerns
As our software deals with sensitive data all changes to the software should always trigger discussion as to the impact of the change on the security of the applications and the data relating to PCI PA-DSS compliance and a worksheet completed if it is determined that the code change may affect sensitive information.
Return for more information
In the case where the developer needs more information to proceed, the issue can be returned to the submitter with a request for more information.
Sent for Design
When the solution for an issue will impact other parts of the application or the overall functionality of the application, the issue can be sent to the design group and marked “needs design”. The developer in most cases should include a summary of what the potential impact is going to be, to avoid having the designer try to replicate the work already done in investigation by the developer. Meetings and discussions with the designer may be needed to ensure clarity of what the issues are.
Technical Specification
When to do them?
A technical specification is required for all significant new development. Other issues should be accompanied by a technical specification if the changes the issue required were significant enough to merit a functional design. A technical specification can also be required for other reasons, and your supervisor will advise you if one is required for a given task. A good general guideline is to ask yourself “Is this complex enough that another developer would have difficulty following what is going to be done without a document?”
A technical specification is generally not required for bug fixes.
What goes into them?
There is no written in stone outline of what must go into a technical specification. There is a template for the specification located on the internal share point portal, but that is meant as a starting place. You should include enough detail in your technical specification so that if you were to no longer be available, another developer could successfully implement it.
Template
The template for the technical specification is located on the Artsman file server in the TM Development/TM Design Documents folder and is called AMS Design Template.doc. Documents are to be named ‘yymmdd
The template is meant to be an example or a guideline to the way a technical specification might appear. Sections may be deleted as needed or rearranged as necessary.
Once a technical specification is complete you must have a peer review before implementing the proposed changes. This peer review is not to judge the quality of the developers work, but the quality of the proposed solution as well as its compatibility with other areas of the system. A proposal that might be absolutely perfect for one area can completely destroy functionality in another if it is not compatible.
The peer review need not be in person. Copies of the technical specification can be emailed to participants with revision tracking turned on and then reviewed as they come back one at a time.
A good technical specification review will include other developers that can critique the methods and code that are going to be used. Design and SQA can benefit from the information as well, but are not a required part of the review process.
Sensitive areas of the application including, but not necessarily limited to, any protected classes should have limited peer review. This review should include the developer and one member of the Architecture team.Optional elements
Peer Review
Methods
Persons involved
Security Concerns
Developer Coding Cycle
Version Control
VCS 101
While this document does not cover the use of our version control software extensively, Omnis Studio VCS does have a list of common tasks a developer should know how to do.
Implementation
Platform
The development platform will be primarily Mac OSX using Omnis Studio and Python.
Compatibility testing for Windows will occur on the Mac under a Parallels Virtual Machine on Vista, Windows 7, Windows 8, Win 10, Win 2008 and Win 2012 server
IDE
Primary Development is done using:
- Omnis Studio (which controls, chroma-codes and interprets code as it is entered)
- Python using Pycharm (which chroma-codes and inspects code as it is entered for pep-8 compatibility)
- Some minimal ‘C’ code. In such case, Developers are free to use any editors as long as these do not introduce editor specific artifacts into the source code.
Tools
There are a number of other tools that are used by developers for specific tasks. If you have doubt about using a tool consult your supervisor or one of the architects. Most source text editing is done with BBedit (eg for web pages and plist files)
All code and key are stored in as VCS, specifically the Omnis Studio VCS or the Git Repository.
Code Writing
Best practices
There are documented coding guidelines that Arts Management Systems developers should follow.
Security Practices
Arts Management Systems developers are expected to stay current on issues and potential security vulnerabilities in the technology used in the Arts Management Systems product. Arts Management Systems architects will be responsible for monitoring these areas and escalating to management when an issue arises that needs to be addressed in a future product release.
In Code Documentation
In-code documentation is required for all new code as described in the coding practices.
Protected Classes
There are a few areas of the application that are critical for the stability of the product. As such they are the responsibility of the senior developers and architects to maintain. These are called protected classes and you need to contact the architect if you need to work with them and have a mandatory code review after you change them.
Defect tracking notes
As you work you should keep track of the units you change and what the overall changes to those units are. This can most easily be added to the check in notes in the VCS.Unit Testing
Inclusive Testing
Exclusive Testing
Step Through and Branch Testing
With step through testing, you can quickly throw a lot of small tests at a bit of code. An example might be converting a number to text. Adjusting the input parameters and stepping over code to see the results can quickly test many different parameters.
Security Testing
Credit Card & Security Testing
NB: Make sure any testing uses only test cards and never use real credit cards in a non-production environment.
When altering any code that deals with credit card information, it is important that key tests are performed to ensure the software remains in PCI compliance. All security patches and system and software changes need to be tested before being deployed, including but not limited to testing for the following.
| PA-DSS | Requirement | Testing Procedure | What we do in Theatre Manager |
| 5.1.1.1 | Validation of all input (to prevent cross-site scripting, injection flaws, malicious file execution, etc.) | Validation of all input (to prevent cross-site scripting, injection flaws, malicious file execution, etc.) | When using the Theatre Manager application, input validation for almost all fields is done through the specialzed protected class called oEditCheck which does specialized validation on inputs. Every text input field in the system will invoke a method from this class. Test your code in the 'evAfter' clauses to make sure that it does for all entry fields.
Since the Theatre Manager 'fat' client is a compliled application and not web based, much of this PCI requirement does not apply. The Theatre Manager commerce web server uses the same edit routines as the 'fat' client but has cleansing routines for parsing data prior to it hitting the edit routines. Refer to OWASP below. |
| 5.1.1.2 | Validation of proper error handling | Validation of proper error handling | particularly for credit card information, make sure that data is not diplayed back to an operator or customer that shows the entire PAN when errors occur. Refer to 5.1.1.5 for routines to display protected information appropriately. |
| 5.1.1.3 | Validation of secure cryptographic storage | Validation of secure cryptographic storage | all card information is updated in the database using a single protected classes called tfCreditCard.$reviseCreditCard. All access to cards is through that protected class and any use will ensure that cards are encrypted properly. However, after a test using credit cards, do an sql query on CD_CARD_NO to make sure nothing exists in clear text. |
| 5.1.1.4 | Validation of secure communications | Validation of secure communications | Card authorization occurs in via https and the merchant providerl. The protected classes oCCAuthorize handle all https communication and will not respond unless the merchant provider supports TLS 1.2 or later (high encryption) |
| 5.1.1.5 | Validation of proper role-based access control (RBAC) | Validation of proper role-based access control (RBAC) | Access to card information is managed in Theatre Manager through a protected class called oSecurity. All display of credit card information is done through another protected class called oEditCheck.$fetchCreditCard which converts all items for display using RBAC. |
OWASP testing
For web based components (i.e oWebComxxx), ensure that OWASP vulnerabilities are also tested and verified per PA-DSS standards 5.2.1-5.2.10. This section in the PA-DSS document repeats the current top 10 OWASP vulnerabilities (circa 2010) and are repeated below. Make sure to test those as well as review OWASP to keep this section of the test requirements evergreen.
Above all, read the OWASP top 10 when developing a Web API because they explain clearly what things mean and strategies how to avoid.
| PA-DSS | Requirement | Testing Procedure | What we do in Theatre Manager |
| 5.2.1 | Cross-site scripting (XSS). | Cross-site scripting (XSS) (Validate all parameters before inclusion.) | Look at any incoming parameters for javascript and other characters and simply removes them. We have determined that there is no valid need to have words like <script> in a enterable fields like name or address. Refer to rtWebSales.cleanUpParameters |
5.2.2 |
Injection flaws, particularly SQL injection. Also consider LDAP and Xpath injection flaws, as well as other injection flaws. | Injection flaws, particularly SQL injection (Validate input to verify user data cannot modify meaning of commands and queries.) | none of the API's in any oWebComXXX accept SQL for input. Make sure each parameter is checked for existance and validity using oWebComBase.$getWebParameters. |
| 5.2.3 | Malicious file execution | Malicious file execution (Validate input to verify application does not accept filenames or files from users.) | ensure that oWebComXXXX does not accept file names and does not read the file system. All input is sanitized and merged into variables of fixed length (the nature of Omnis Studio) so buffer overflows are not possible. |
| 5.2.4 | Insecure direct object references. | Insecure direct object references (Do not expose internal object references to users.) | OWASP recommends use of API's to address this issue. Build a new oWebComXXX for each web function. |
| 5.2.5 | Cross-site request forgery (CSRF). | Cross-site request forgery (CSRF) (Do not rely on authorization credentials and tokens automatically submitted by browsers.) | TM puts tokens in the cookie that are unique per session and per request. |
| 5.2.6 | Information leakage and improper error handling | Information leakage and improper error handling (Do not leak information via error messages or other means.) | ensure all messages are read from a table (tmError.txt) and only provide user direction, not system state. |
| 5.2.7 | Broken authentication and session management | Broken authentication and session management (Properly authenticate users and protect account credentials and session tokens.) | use the build in tCookie function to read and write cookies. Cookies are 3DES encrypted and contain time information to know if the patron is going back or forward. Requests that cannot be decrypted and have stale information are discared before they get to the oWebComXXX |
| 5.2.8 | Insecure cryptographic storage | Insecure cryptographic storage (Prevent cryptographic flaws). | make sure all internal keys and pw are never clear text in variables. Always store encrypted and use decryption to get the true value. |
| 5.2.9 | Insecure communications | Insecure communications (Properly encrypt all authenticated and sensitive communications.) | Implemented using TLS for the entire web site. Specific tokens like cookies and CC data are AES256 encrypted within the TLS layer. Always test for this. |
| 5.2.10 | Failure to restrict URL access. | Failure to restrict URL access (Consistently enforce access control in presentation layer and business logic for all URLs.) | All access to the web components are throught an API call. These are routed through a single apache module that adds some tokens of its own and redirects the URL to a specific machine, changes the IP and crosses a firewall from the DMZ using NAT. There is never direct access to any oWebComXXX |
Checking in changes
Periodic Build Testing
After you have checked in all your changes you should perform a clean build test. This is accomplished by renaming your local copy of the source, and getting the latest source from the branch you were working on. Then performing a build to ensure that the code still works.
Peer Review
Methods
The size and scope of the peer review process is dictated by the scope of code changes. Altering a line of code to fix an issue does not necessarily merit a code review. Introducing new functionality or altering the user experience of the product on the other hand should require a code review.
Persons involved
At a minimum your code needs to be reviewed by one of the senior developers. If your code changes impact more than a single area then an architect needs to review it. If your code impacts the database schema then an architect needs to review it. Any time there is a change to code that handles track data or credit card numbers; it needs to be reviewed by a senior developer.
Security and Protected Classes
Any time your code changes involve the use credit card data, encryption or decryption and/or any of the protected classes, these changes should be discussed with an architect before, and reviewed by an architect afterwards to ensure the highest level of adherence to coding best practices. The TM coding practices specifically addresses how sensitive data is to be dealt with in the Studio Code. OWASP practices specifically address tests for web objects.
Hand Inspection
A peer review can take many forms. For particularly important code, a 'hand inspection' of the code may be required. Normal code walkthroughs involve explaining the purpose of code segments and object classes. A hand inspection is when a second party actually steps through the new code to verify assumptions, parameters, values, comments and alter boundary conditions to simulate odd or unpredictable cases and attempt to identify unforseen defects.
Review Approval
The approval of a code review results in a the development build and forwarding to QA for testing. This also generates entries in the upcoming release notes which are build as each development release is built. An entry in the release notes constitutes approval of the development build.
Release to Software Quality Assurance
Documentation
As part of passing an issue to SQA for testing you should consider what you have done, and what impacts that will have on the environment and user interface of the application. As developers we often will do things like stopping and restarting a service, or registering a COM control, or installing 3rd party drivers, that the SQA testers will not just know to do. Document these steps that they will need to perform to ensure that development and testing cycles are not wasted. Make sure to attach the FogBugz case numbers for the issue being sent to SQA for testing.
Defect Tracking Cycle
In the defect tracking tool you can forward an issue and mark it ready to test. This will allow SQA to pick it up and begin testing.
In person follow up
While not a requirement it is recommended with any significant change that you follow up in person with the SQA testers that are testing your code. Answer any questions they have, address any concerns. We are all part of the same team and it is all of our jobs to release the best software we can.
Candidate Builds for QA/Production
The build for QA testing (i.e. any candidate for production release) will include building from the VCS. The option Build without Comments will be used to remove comments from any documentation in the applications.
Because of the way Omnis Studio is tokenized and structured and how the VCS operates, this will also have a supplementary effect of removing any commented test PAN’s and or other text based security information that may be present in the code.
Separation of Environments
The Studio VCS is used to help control and separate the Development, Test and Release functions.
- Developers test on their own machines, and at the end of the building and unit test processes, must place code into the VCS.
- The QA Test team builds candidate release from the VCS and uses their own test databases and test suites to prove the bug fixes or enhancements
- Code designated as a production release will go through the final build and testing process
Release Builds
 |
There are two ways to release Theatre Manager to customers.
|
The release process for Auto Deployment and Downloadable Installers is similar. There will always be:
- Beta build for internal testing
- Release Candidate for testing within the support team
- Targeted Releases for specific customers with specific problems
- General Release for releases that pass muster in the above three test levels
- Backout Release which is a re-deployment of the prior version, except with the version number rolled ahead of the abortive release.
When code has been designated for potential release:
- a final build of the code will take place using Build without Comments
- it will be placed onto the build directory and new installers built using the automated deployment scripting tool that is platform appropriate:
- Macintosh: we use packages to make a mac platform .pkg installer (see release notes)
- Windows: we currently use Installer Vise
- the installers will be tested on all platforms to ensure they run as expected
- the full installer will be placed on the production servers as 'Final Candidate'
- the Support team will download and perform complete installation and usage tests, prior to public availability and notification.
Beta Release
In many cases, one or two beta sites are selected for final testing prior to full notification of a new version - depending on the nature of the changes.
Selection is based on a number of factors such as desire/need for the specific change. Most often this will be one of what is termed a QA tested Development Release.
It could also be a new site where there is a Senior Arts Management representative onsite to watch for any anomalies that were not discovered in the comprehensive testing process. The key in this situation is approximately 8 days of comprehensive observation of the entire application by a knowledgeable person.
If there is a significant number of changes for a prospective public release that are of a nature that warrants a beta program with mulitple venues; a call will be made for willing beta participants who have test servers and can test. This occurs after QA testing have determined that the version is a candidate for public release.
Production Release
When an installer is deemed ready for public release, a number of steps need to occur:
- Release notes are to be created and published in the version release notes that contain:
- change notes compiled from aggregating and editing the developer checkin notes from the VCS and enhancing with information from FogBugz.
- a complete steps to upgrade all affected components
- an estimate of the time that a release will take
- any special notes or warnings as necessary
- The release will be placed into the 'PriorVersion' directory and given a codified name for Arts Management purposes
- A file on the server will have an entry placed into it that details the version number, release date and codified name. The purpose for this is so that a client can retrieve prior versions in the case a backout is required
- A brief 'marketing summary' of the release notes will be created and placed into the RSS feed on the main help page and published for public consumption
Auto Deployment Builds
Set Version in Theatre.lbr
in Startup_task method, set the following three items:
- Version Number according to the versioning terminology.
- Migration Step to be the minimum allowed TM server version that the client will work with
- Release Date to be the intended release date
Privatize/Lock the Library classes.
 Auto Deployment builds require the Theatre Manager library be built without comments and to be locked except
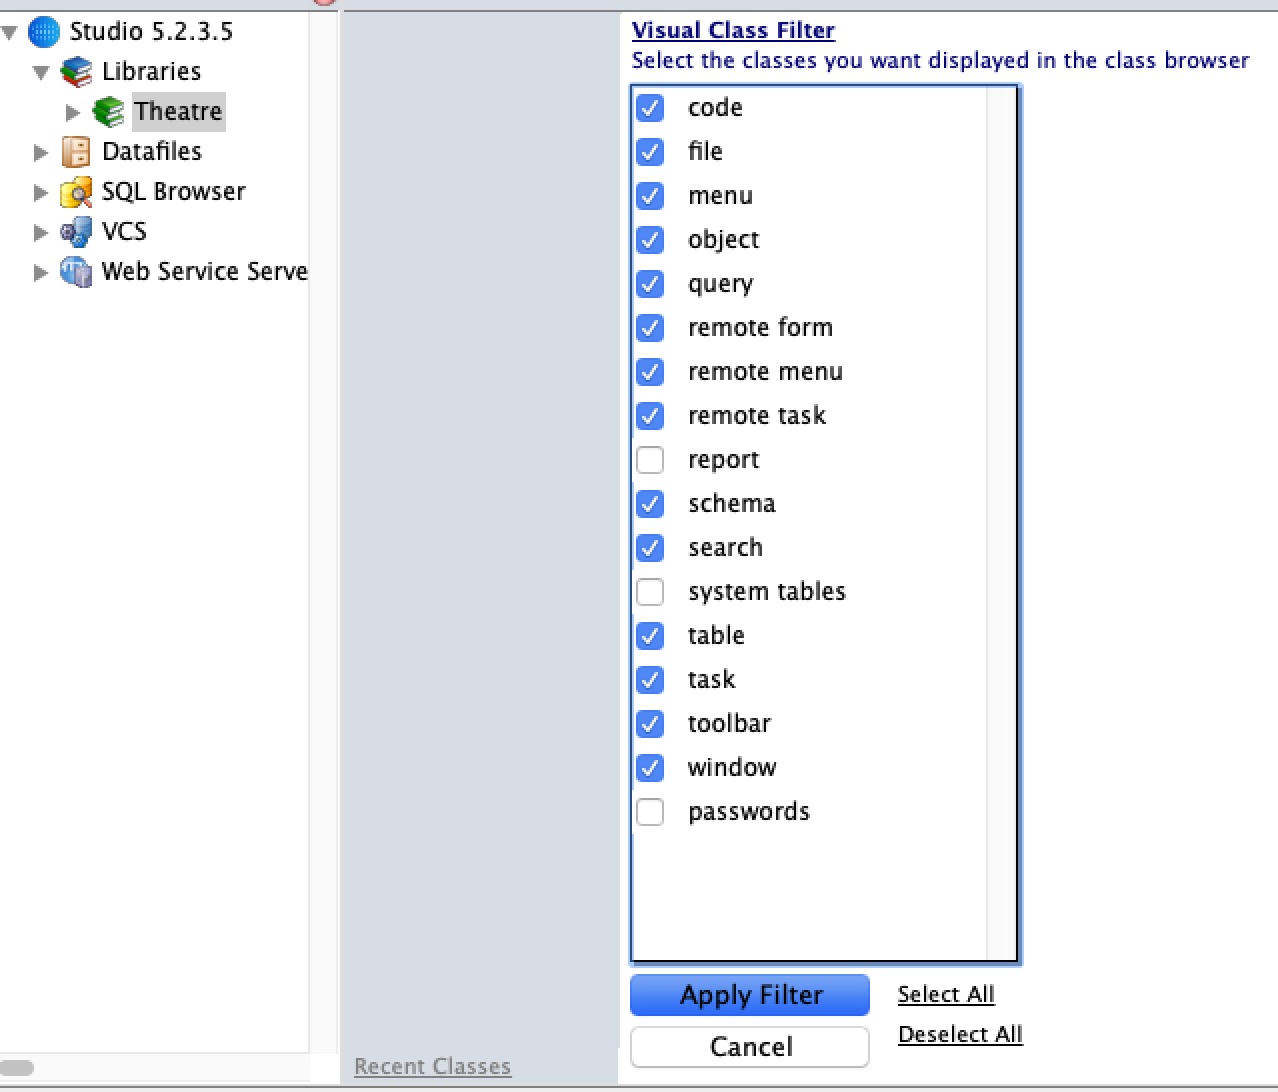
- All Report Classes - excluded using filters in the Studio development tool
- Password Classes - excluded using filters in the Studio development tool
- Systems Classes - excluded using filters in the Studio development tool
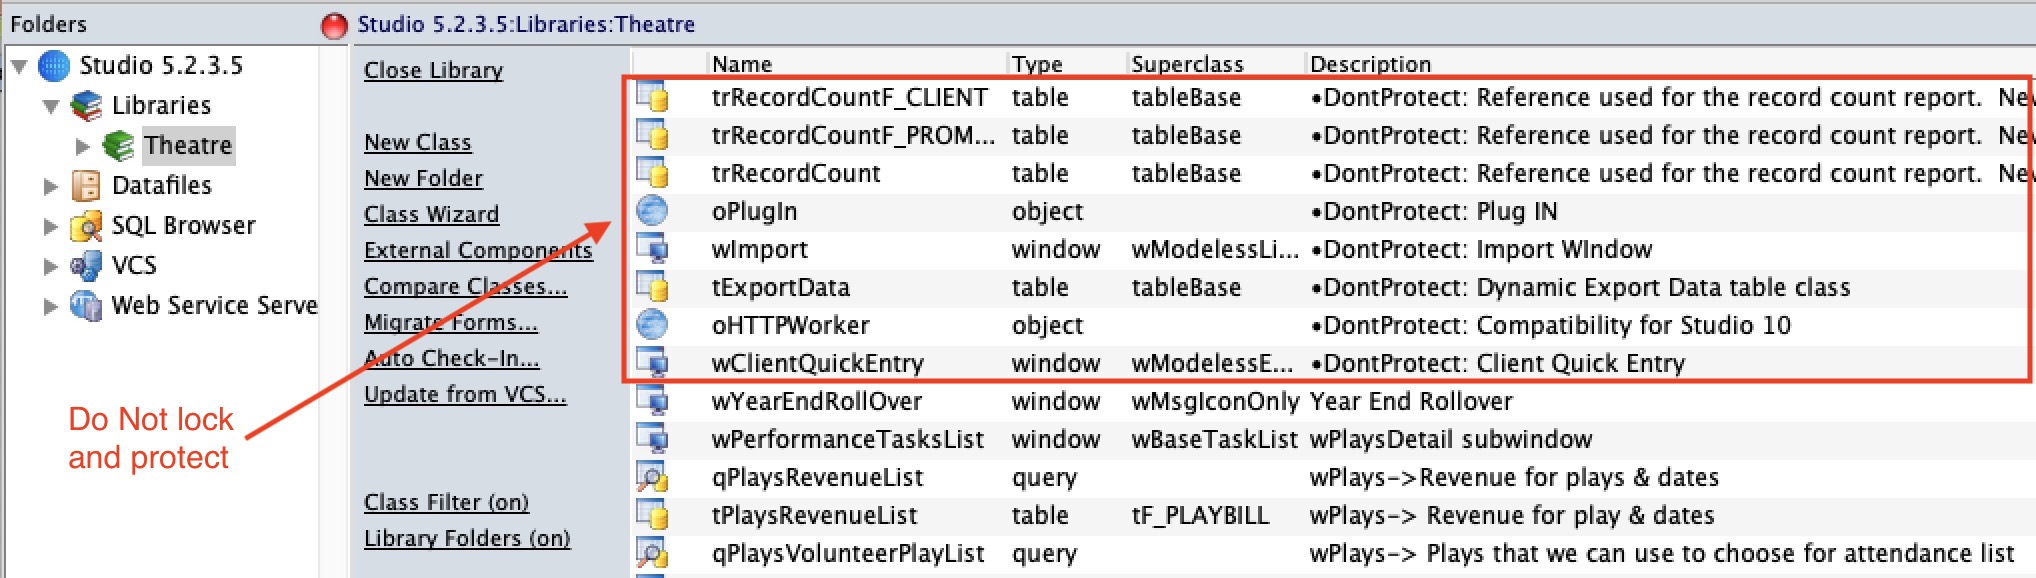
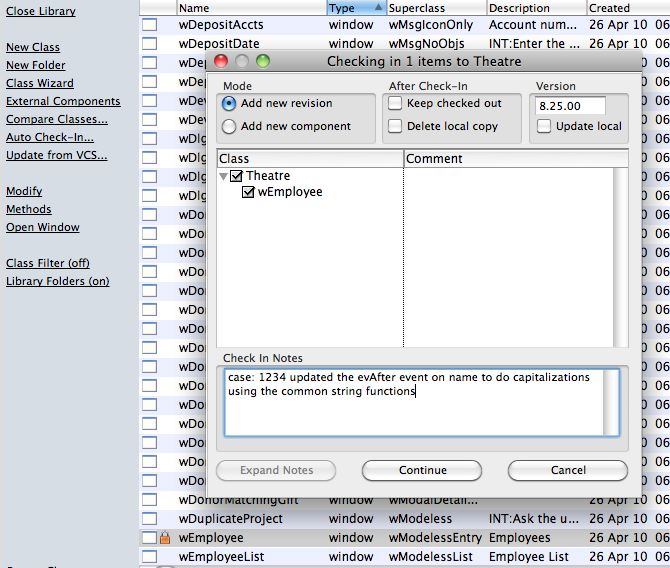
- the 10 or so specific classes that are marked with a bullet and are easily found by sorting the classes. An example is shown below
Testing With Runtime on Test Environment
For beta testing, test the library with the Theatre Manager runtime on your machine Once that is done, build a beta auto deployment package and release to developers.
Building Auto Deploy Package
- Rename the Theatre.lbs library to be TheatreXX.YY.ZZ.lbs where the XX.YY.ZZ matches the versioning terminology.
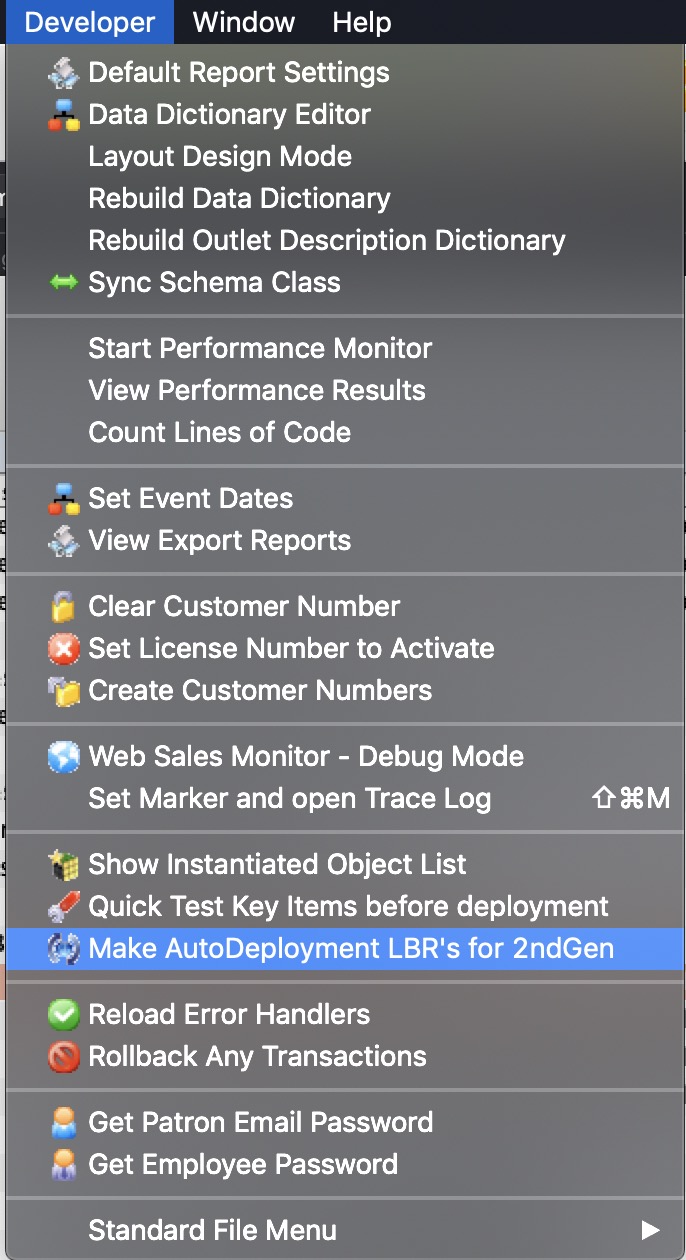
- Use the Studio development tool to make a specialized JSON payload, encode and zip it into a file.
The menu is Developer->Make AutoDeployment LBR's for 2ndGen
- This will:
- ask you for the location of the libraries and reject if not in the proper name
- encode, compress and zip the file for you into the desktop
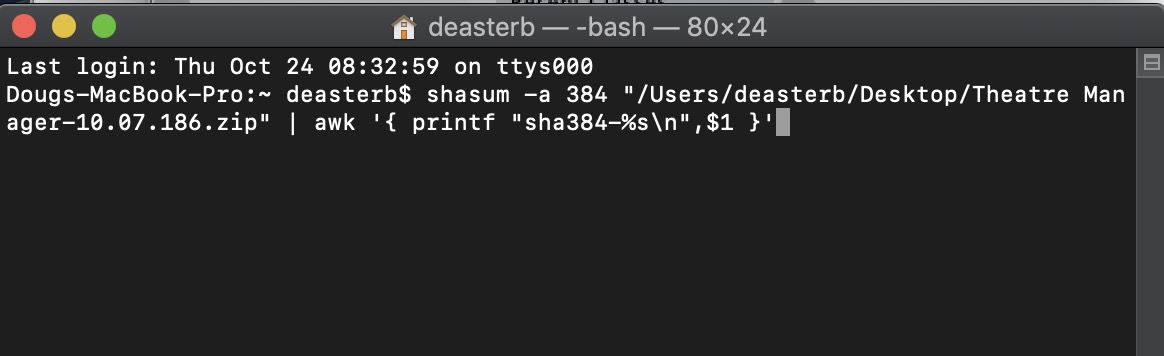
- Display a message telling you to open terminal and paste the clipboard into the command line to generate a SHA384 hash
- Open Terminal and paste from the clipbard. The command should look similar to below. When you hit return you will get the proper SHA-384 checksum for the zip file.
Staging deployment package to the CDN
- Login into Digital Ocean and go into the artsman-updates CDN folder. Drag the TheatreManager-XX.YY.ZZ.zip file created in the previous step to the Digital Ocean CDN and make sure to set the permission to public
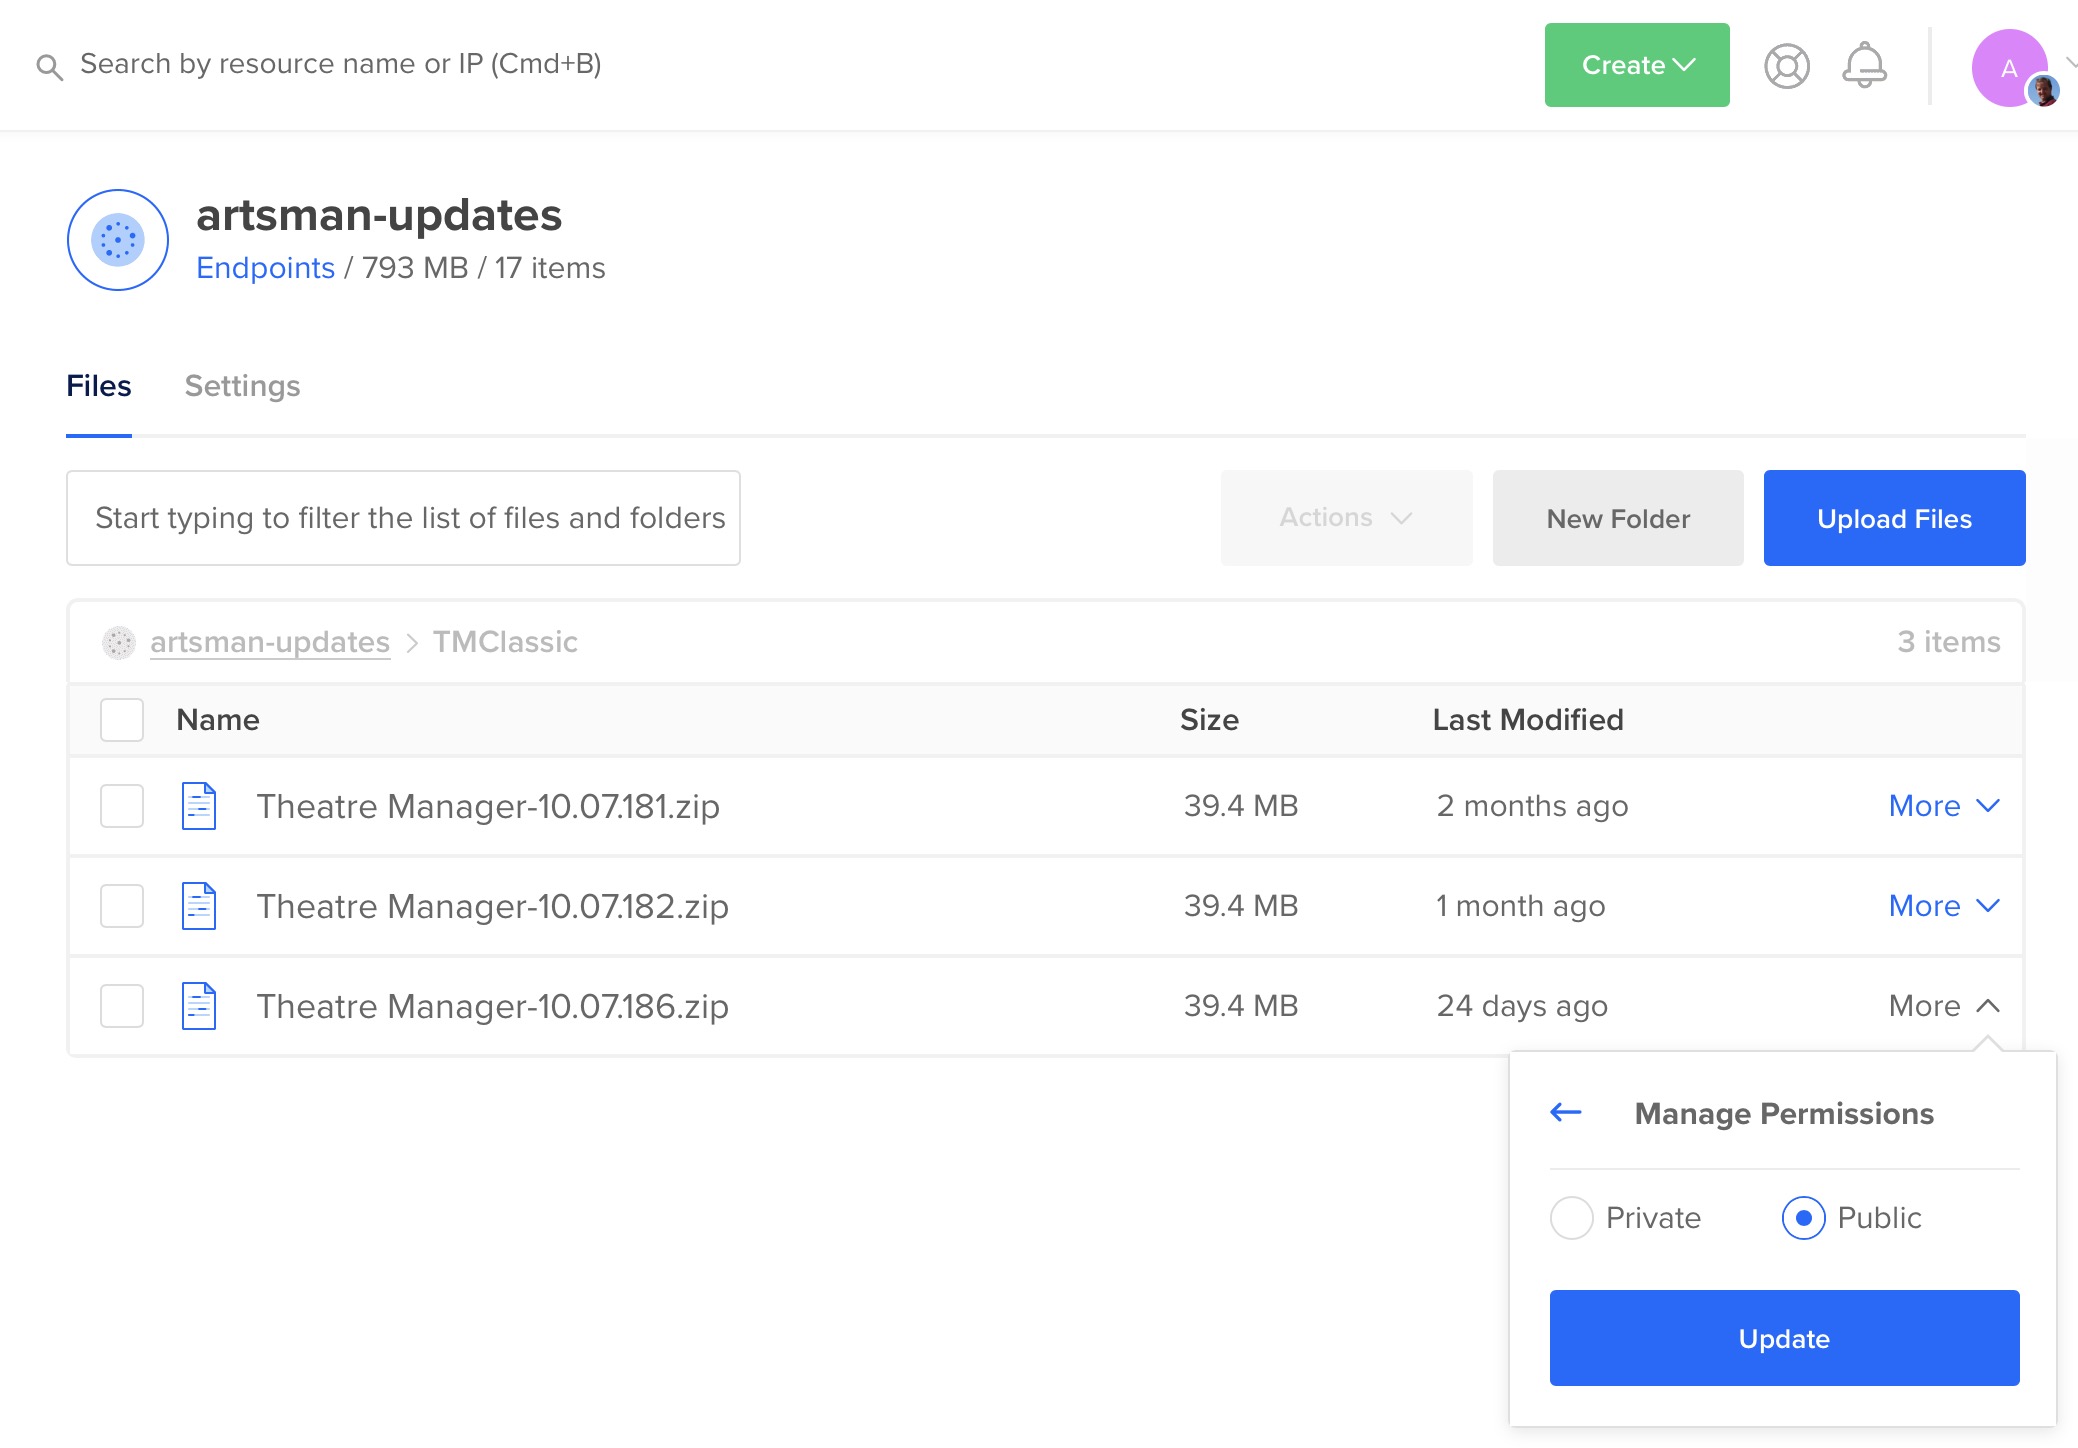
-
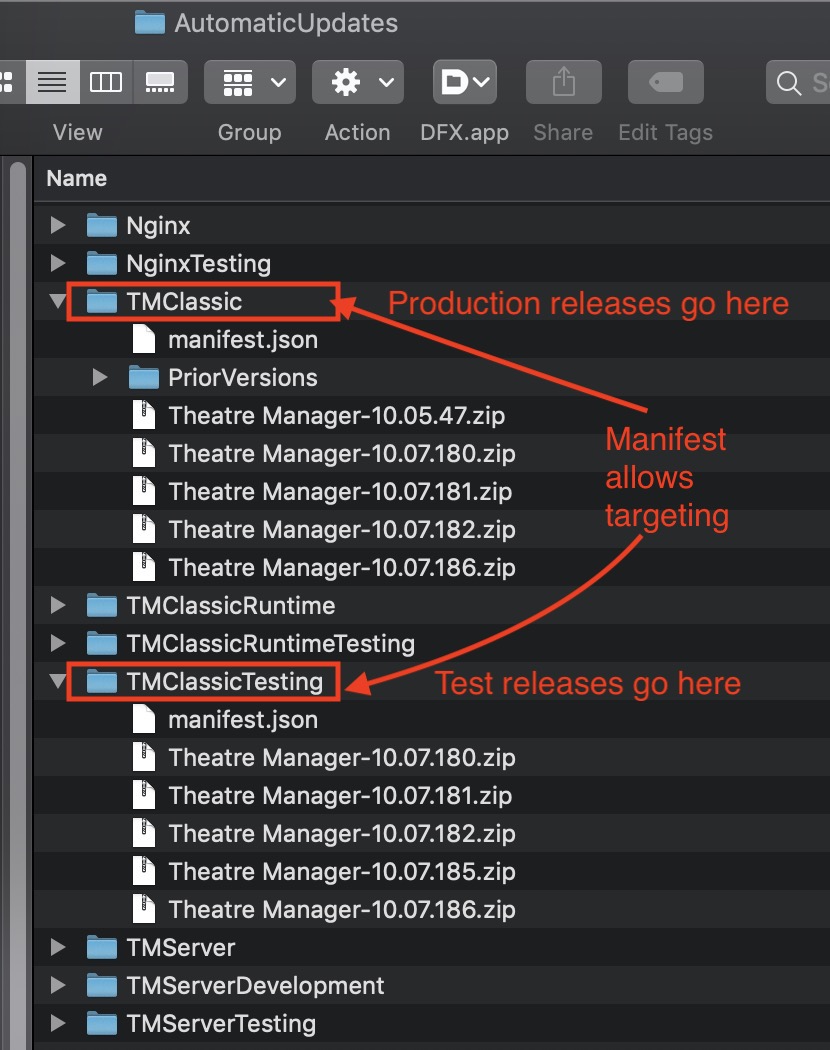 Also, log into the web server via seafile and push the release candidate into the folder as shown.
- You can place the file into both the production and test folders.
- A release will not proceed until the manifest.json file is edited.
The Manifest.json file
The following shows the constituent parts of the manifest file (json format) that needed to be edited for a release to. occur. If the manifest is not a completely valid JSON file, no release will occur.
A release should be done in four stages. It should be gradually released to:
- Via the Test release manifest and directories:
- all developers and verified for deliverability and changes.
- all support staff and verified in course of normal use.
- Via the Production release manifest and directories:
- the specific customer(s) that need the change immediately to correct their issue
- all customers subsequent to verification of each release stage
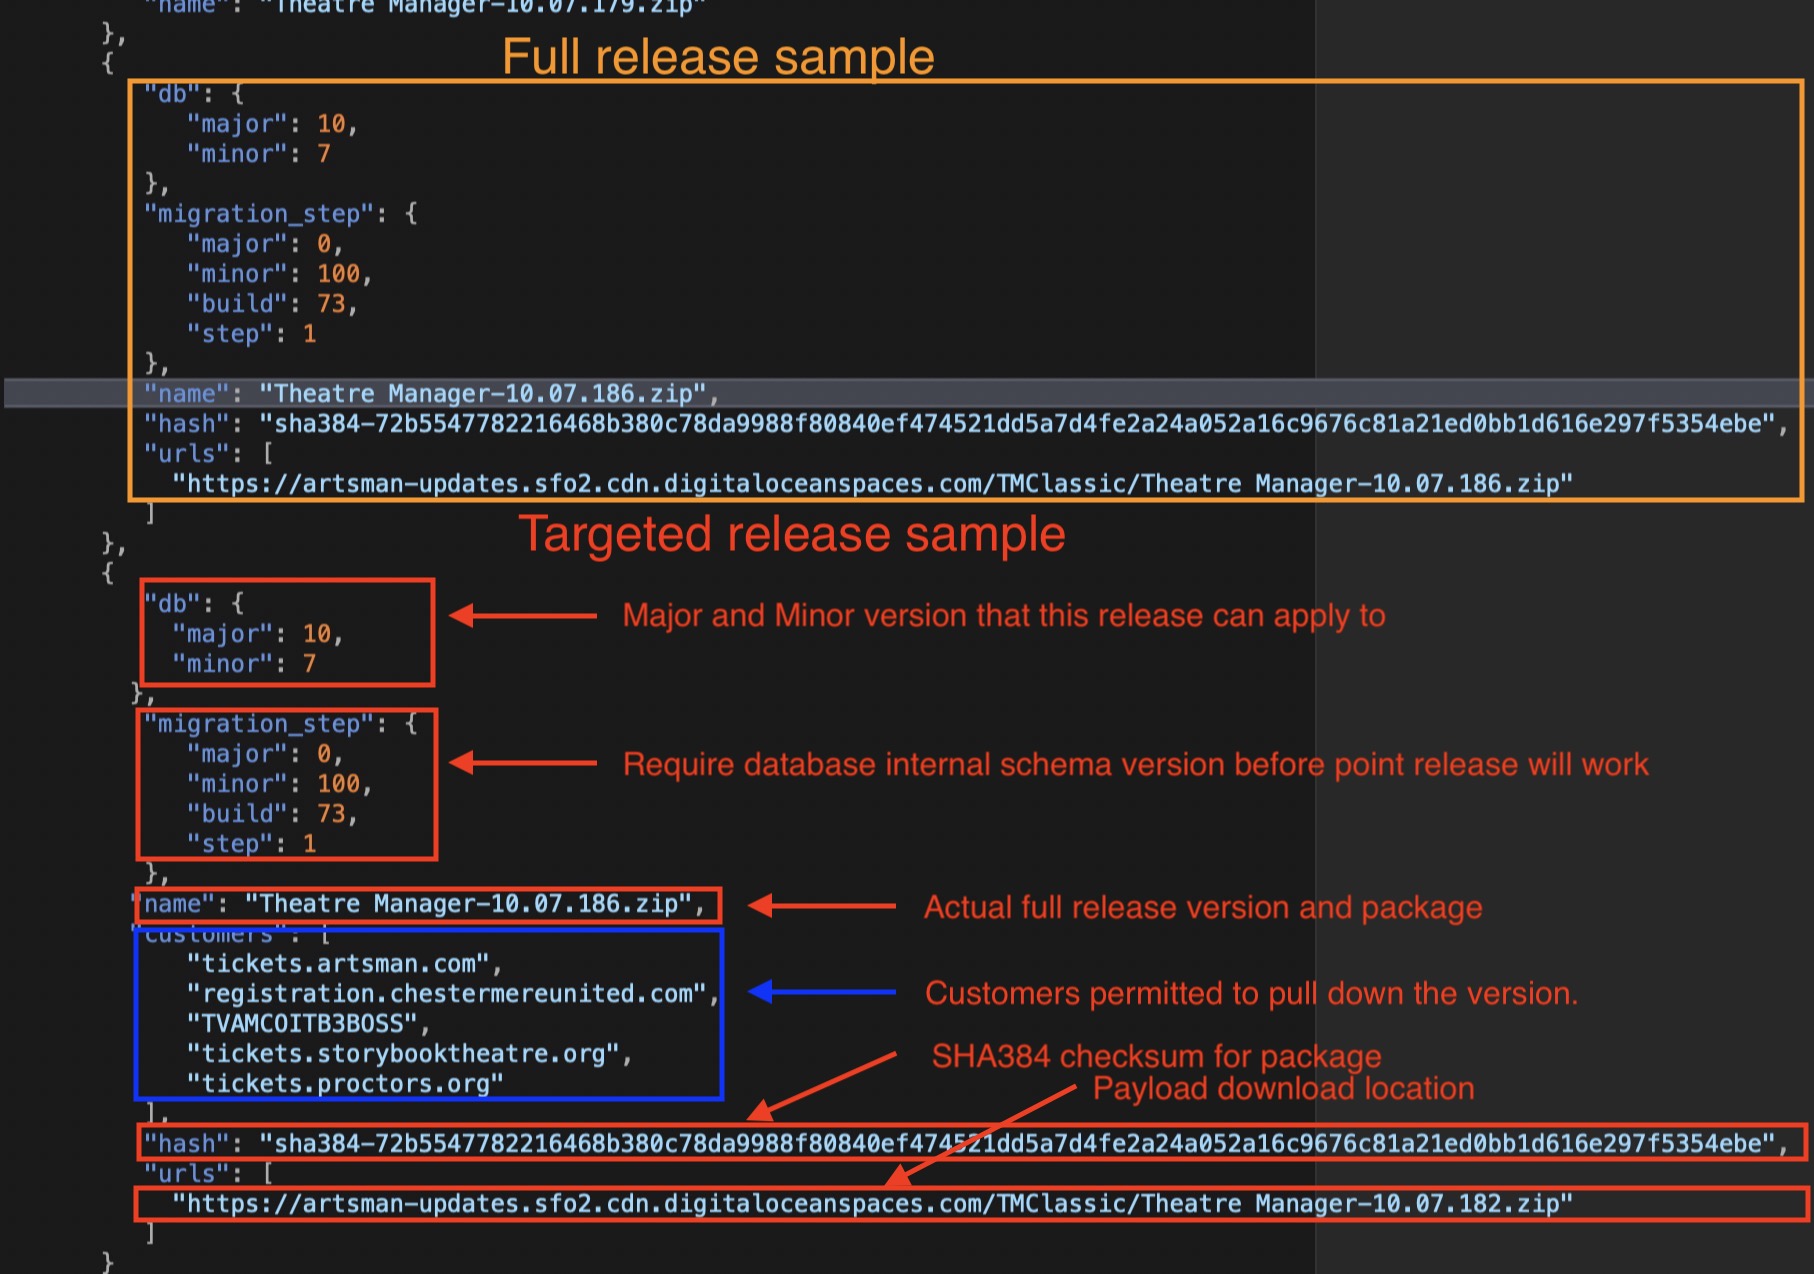
The components of the JSON file are:
- Major and Minor version numbers that this release is applicable for according to the versioning terminology.
- Minimum TM Server to co-ordinate that the release will not download unless the TM server is at that version
- Release Payload - the name of the release
- Permitted Customers - the licensee's that are able to download the version. If this is incorrect, nothing will download to the customer.
- SHA384 checksum - of the payload. if this is incorrect for the version, nothing will download
- CDN Location - the URL of the file to download. if this is missing or private in the CDN, nothing will download.
Backout Process
The backout steps are:
Remove current production installers
-
Remove the version and file number from the file containing the list of releases on the web site
- Mark the deployment package the Digital Ocean web site PRIVATE and change the manifest.json file so that deployment will not continue by putting a '-' in front of the venue URL's. Do not remove the venue URL's since the back-out will require knowing who could have downloaded the version. Rename the TMSetup.zip or TMSetup.exe installer file so that it can only be accessed if the file name is known. This is for internal purposes and restricted access.
- Edit the release notes on help.theatremanager.com for that version and mark as pending final testing
- For customers that are using that version:
- ascertain the impact of continuing to use the version by doing a mini SWAT analysis. (i.e. are they affected by the issue that was discovered, or don't they use that part of the application).
- If customers need rolled back, they will be instructed to put the older version in place
- the support team will roll back the database version so that they can use the older version.
- Assign first priority for development to make any corrections to the code that prompted the backout in the first place for the next developer release.
Create a New Installer
In the case of catastrophic condition, rebuild the previous version and release it as the 'next' point release. In effect, we make the prior release into the future release so that customers can upgrade and roll forward to the future release (which is really a prior release)
Version Control
- Omnis Studio VCS - which is provided by the vendor and used exclusively for the version control of any Omnis Studio Code
- GIT - which is used as a version control system for any other project, specifically python, web pages, and C code
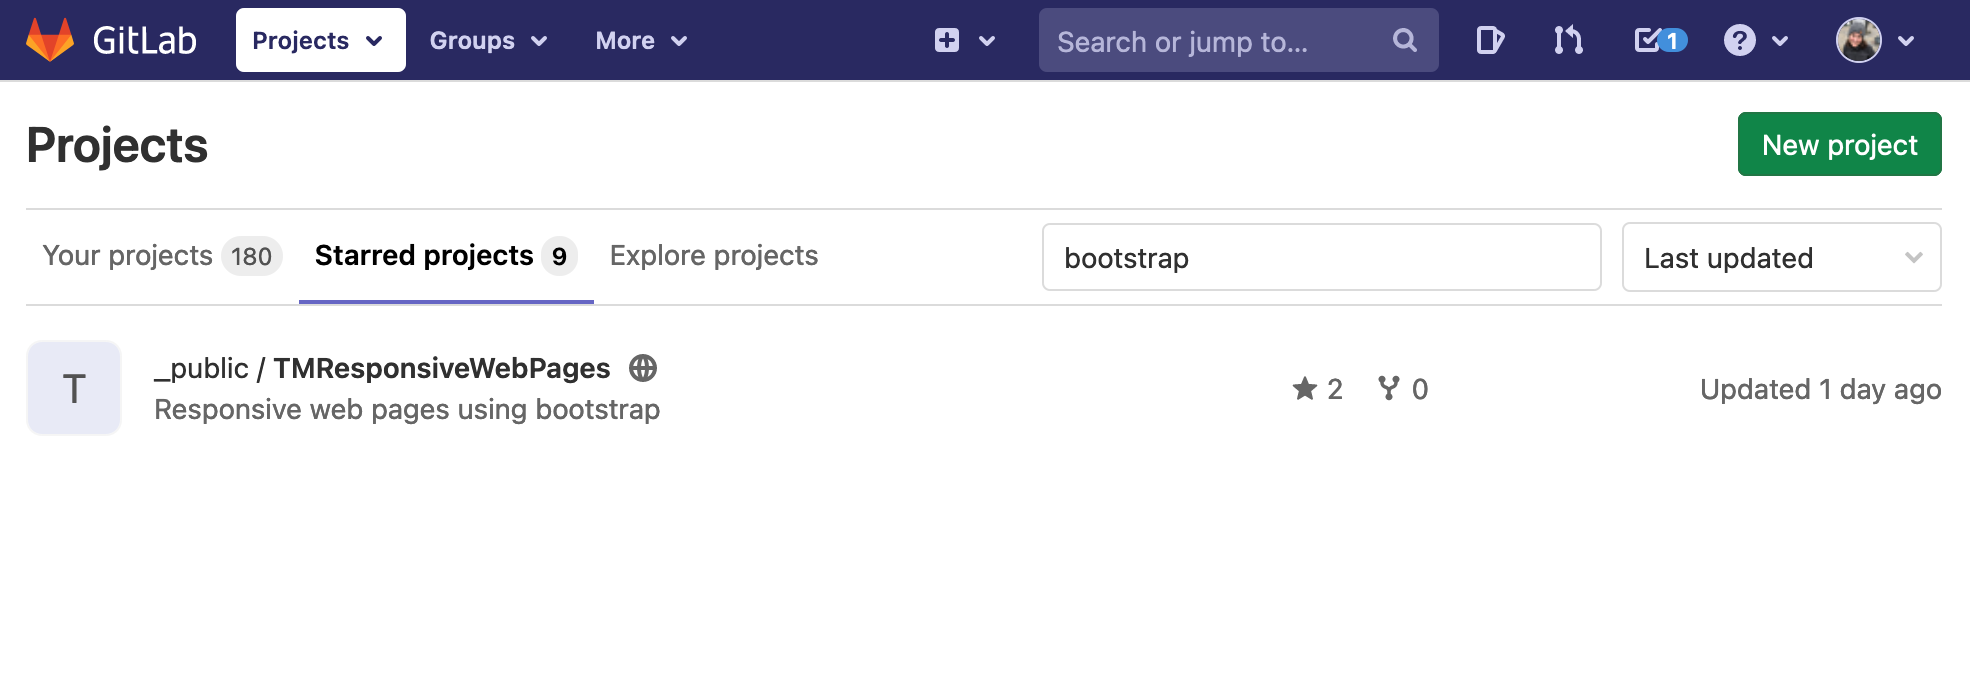
GIT Repository
There is ample documentation on
- git-lab on line
- and the general usage of git to make:
- repositories
- Pushing changes (similar to Check-in)
- Pulling revisions (get latest changes for a branch)
- Making branches (we always have master, current development branch and any a number of specific branches for features)
- Merging branches
Various Git tools provide ample ways of diff-ing changes in versions, seeing who made the change (blame) etc.
Omnis Studio VCS
Branches
The Main is the head branch. It is where all new development is done. It is also the first place you should fix when patching an issue.
HotFix branches are created at the time of release. The latest branch is forked and new development continues in latest while issues that are reported are fixed in HotFix.
Getting Source
Get Latest Revisions

Check the recursive checkbox, and when the Build tree check box appears check it as well. Click OK to begin the get process.
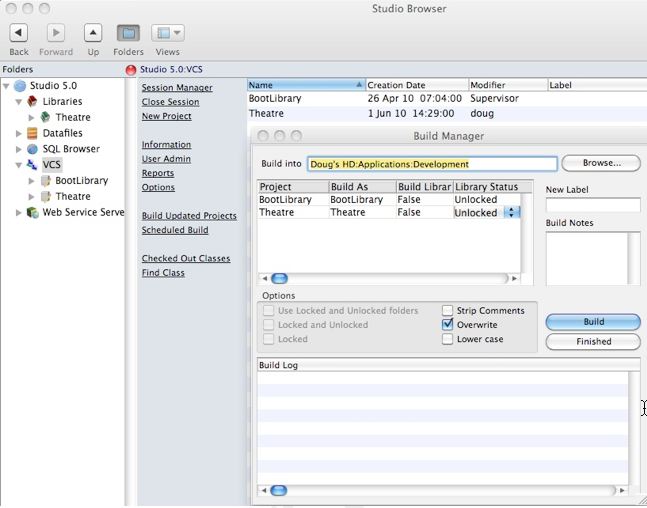
It is possible to build prior revisions of the code based on labels. Labels are applied to each major release and the Build Manager will perform that task when a release is done.
Classes can be deleted or marked deleted in the VCS when they are no longer required or referenced. For that reason, it is recommended on a periodic basis (eg when a major release is completed, or you have finished a project), to check in all code and then rebuild the library.
Comparing Revisions

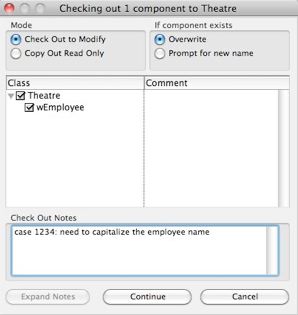
Checking Out
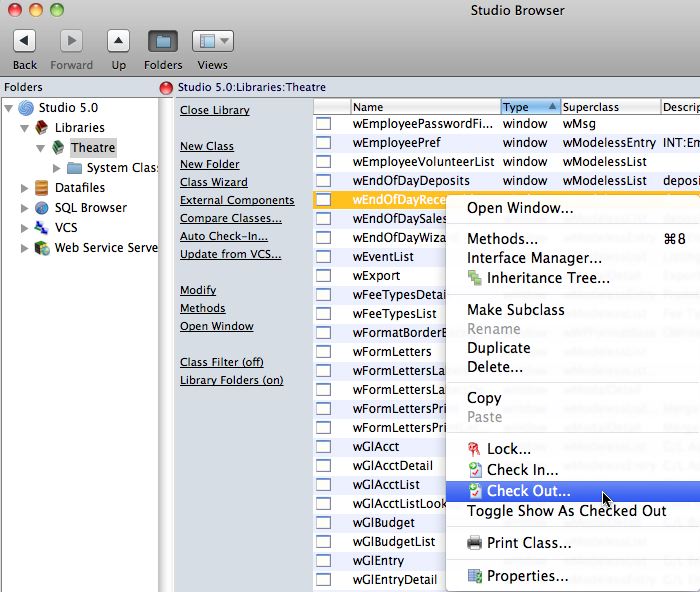
On the checkout window, indicate:
- the reason you are checking out the component. If there is an associated FogBugz case, enter that as in the checkout notes along with a brief synopsis of the activity intended to be worked on.
- If you are updating from the VCS or testing a component, indicate that you are copying out the components for testing.
Adding Classes
The name of the class is to be given a name according to the naming conventions in the coding practices.
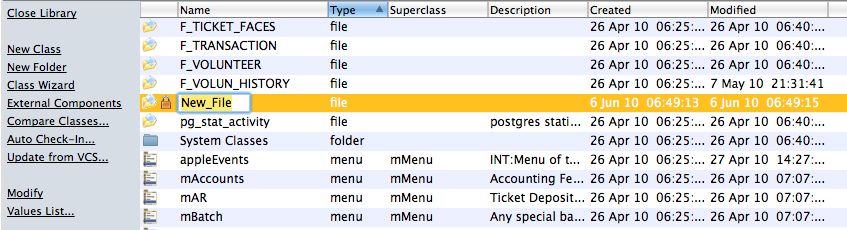
If you decide to discard the class before checking it in, simply delete it. If you check it in and discover that you no longer want it or need it, the it must also be deleted from the VCS.
Checking In Changes
When checking in, make sure that you:
- put the issue number from FogBugz in the check in notes (if available).
- add an explanatory comment with the case number
- indicate the severity of the issue and scope of the change
- update the version number to match the current release version to indicate when it was fixed.
- Complete the case number in FogBugz and to indicate its status, mark it complete, ready for testing and put in release notes into FogBugz as well. Ideally, the release notes and the check in notes should be the same.
Current Responsibility Matrix
| Area | Person |
| Architecture and product design | Dave McKeone |
| Ensuring changes meet PA-DSS and secure coding practices followed. | Doug Easterbrook |
| keeping up to date with changes in PA-DSS guidelines | Doug Easterbrook/Dave McKeone |
| Ensuring vendor personnel with PA-DSS responsibilities receive training | Doug Easterbrook/Dave McKeone |
| Following PCI guidelines for development processes | all developers |
| Following PCI installation guide and training customers in PCI requirements | Training and support staff. |