Increasing Windows Performance
Increasing Windows Performance
On Windows machines:
- Enable Windows Firewall to allow incoming on port 5432 for the database and turn off other non-essential ports. Alternatively, make sure that your IT personnel have opened the correct ports through the firewall between computers as per these firewall/router rules.
- Turn off auto-updates completely
- Windows Automatic Updates is now found in Services in Windows 10. -and-
- You may have to set the internet connection to metered as per this help page to really tell Microsoft that you don't wan updates, unless you want them.
These are something to be done manually and on a periodic scheduled basis. You do not want servers restarting in the middle of the night, nor do you want downloading to affect performance of your servers.
- Turn off:
- microsoft indexing for all directories and sub directories. by looking at the properties of the drive that database is running on
- And go to Services to find Windows Search and disable that.
- Disable any disk quota management on the disk drive
- turn off any virus scanning for ports and data directories used by postgres
NOTE: if using windows 10 pro, you need to permanently disable windows defender using one of the methods in the link. In win 10 Pro, use gpedit.msc to disable by group policy editor since windows 10 turns it back on later if you only temporarily disable it (Another stupid idea form Microsoft)
- Do not install active directory or join it to a domain. Only local access is required to this machine
- Turn off file sharing or any means that might allow a file to be added to the machine, other than via the postgres engine
- turn off any energy saving options
- do not use the machine for saving snapshots of files by turning off 'use shadow copies' on the appropriate drives. (This is set in the properties of the drive)
- set best performance options to maximize background performances.
Note: turn off any virus scanning against the database directory which is usually
C:\Program Files\PostgreSQL
or
D:\Program Files\PostgreSQL (if there are two drives)
Leaving any of those on will affect performance of the server for the database
Disable Defragmentation
Disable Defragmentation
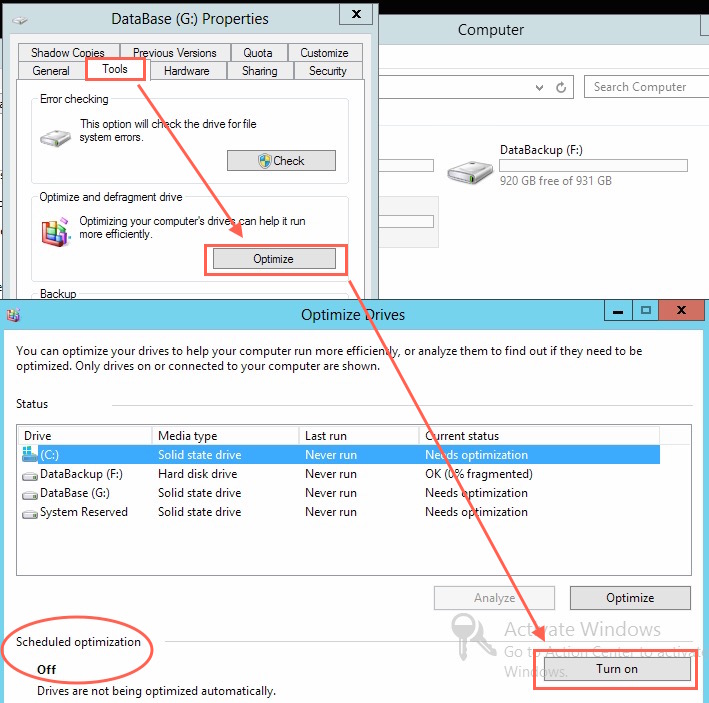
- Click on the drive containing the database server
- Right click to get properties
- Click on the Tools tab
- Click on the 'optimize' button
- Look at the bottom to see if optimization is on (or off)
- The button to turn it on and off is on the lower right
- The current state is on the lower left
Disable Download of Updates and Auto Updating
Disable Download of Updates and Auto Updating
Windows Automatic Updates is now found in Services in Windows 10.
How to locate:
- Open Control Panel and Administrative Tools
- Select Services
- In the Services window, scroll down to Windows Update and turn off the process.To turn it off, right-click on the process, click on Properties and select Disabled.
- Note: windows 10 sometimes listens to you, most times it does not, despite what you indicate in various settings and you may have to:
- prevent it from downloading updates
- which may involve doing some registry entries which could require you to gain control of some protected registry entries
- Windows 10 isn't pretty - you are better using 2012 R2 or some earlier version of windows like 8.1 if you must
Disable power saving on ethernet
Disable power saving on ethernet
- especially on workstations, and
- especially if you go take an extended coffee break or have a meeting.
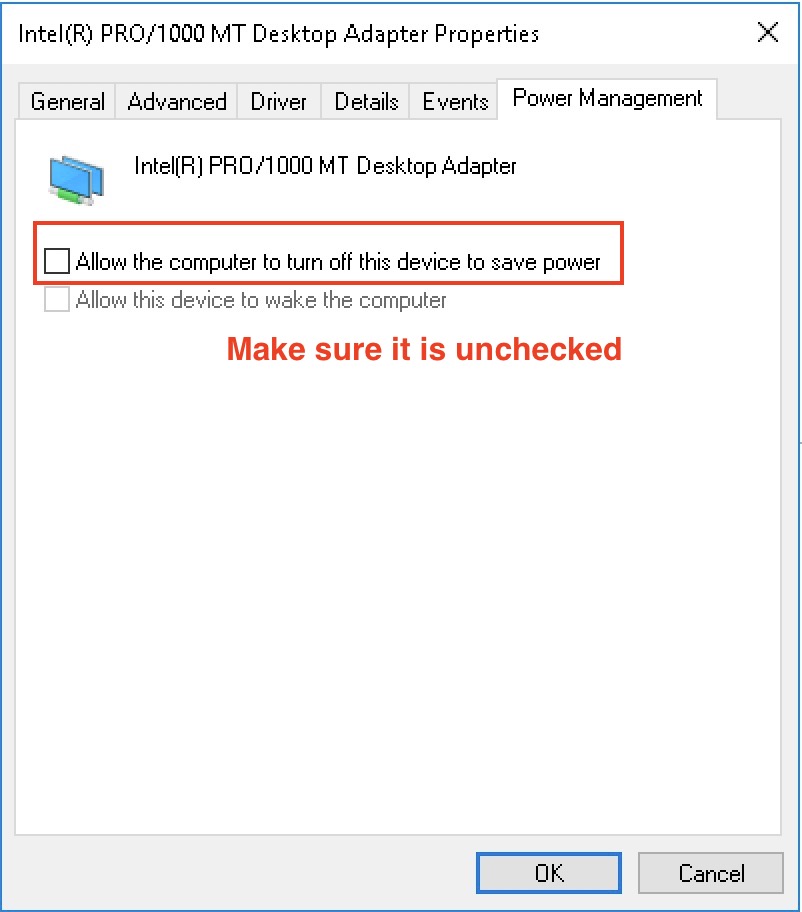
We suggest disabling power management on the ethernet card.
- use instructions like this for windows 7 and 8
- Use instructions below for Windows 10 (they are very similar to windows 7)
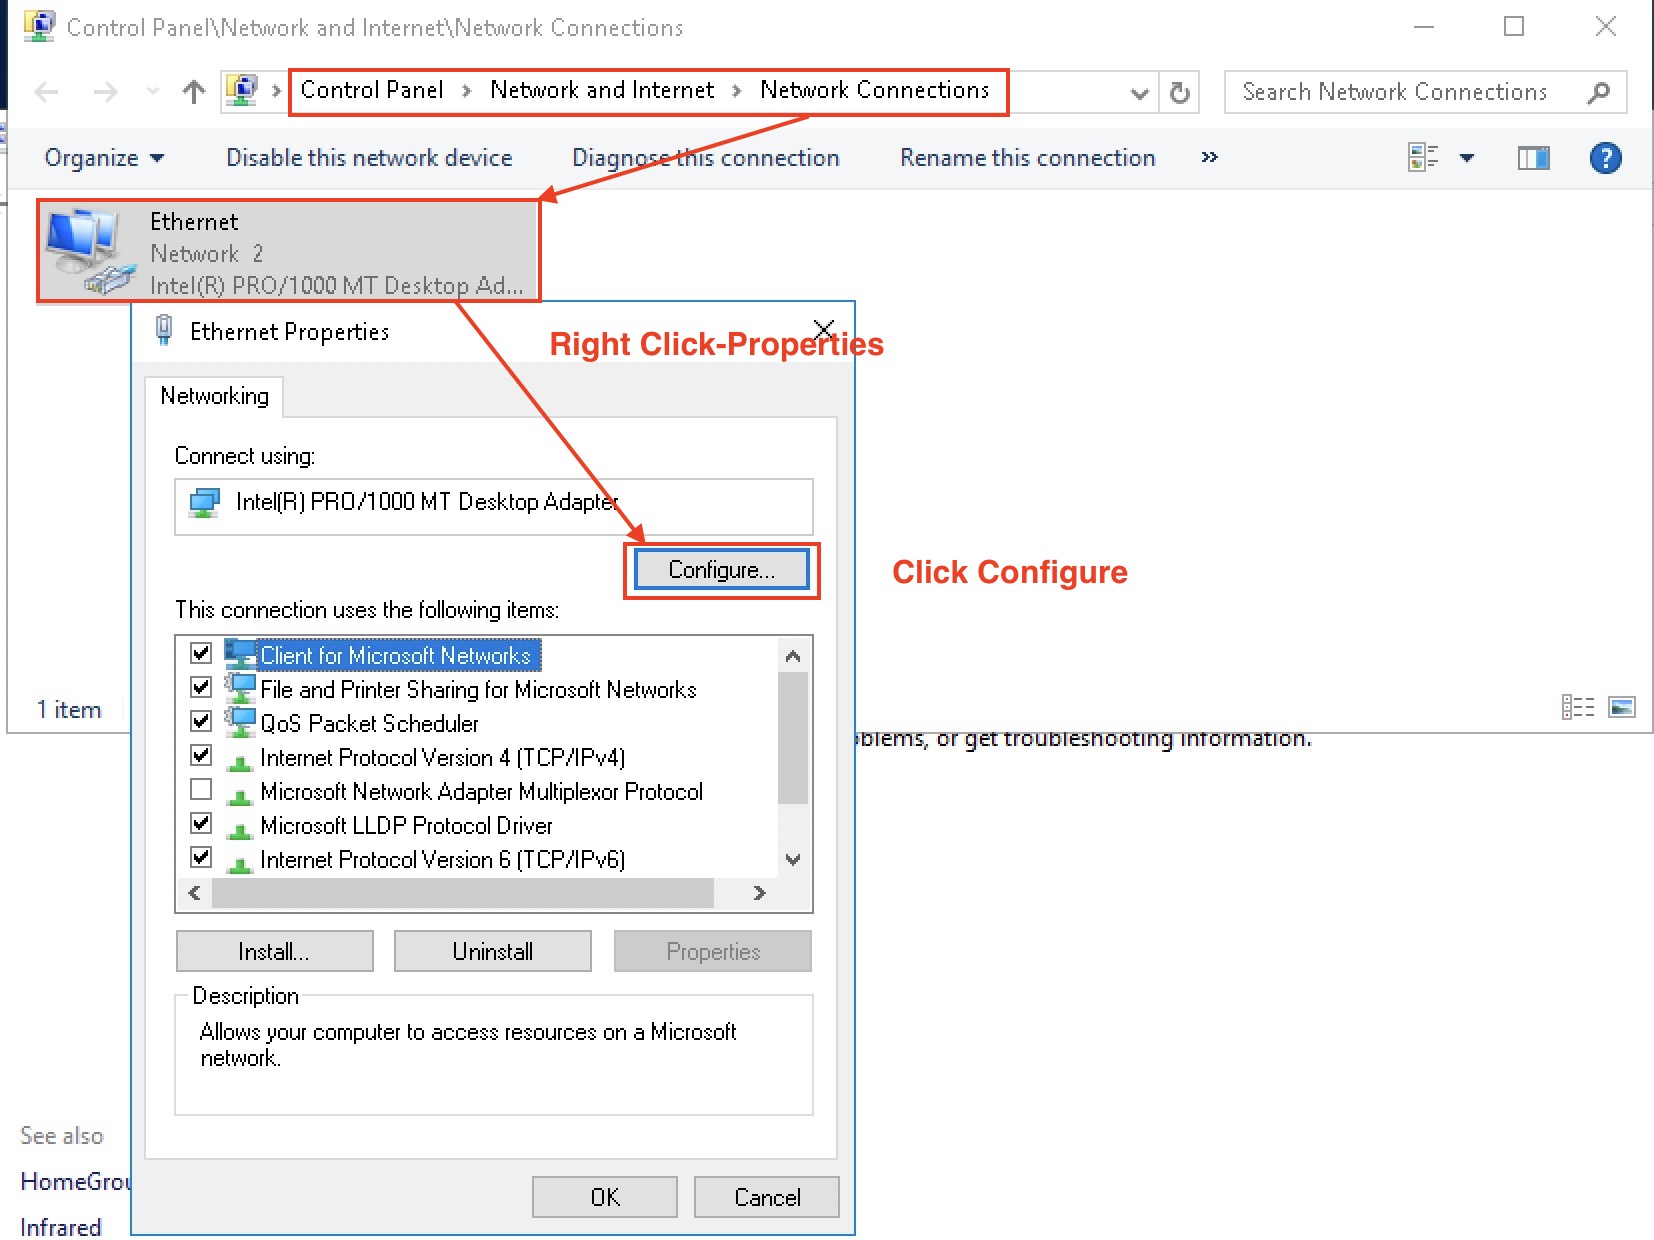
- Open Control Panel
- select network and Internet
- Pick Network Connections. the screen should look like below
- click the network card
- right click and show properties
- click configure
- click power management and uncheck the highlighted item per the image below
In addition, please make sure to disable power management except for monitors.
Making Windows Defender Manageable
Making Windows Defender Manageable
- Using 2012R2 or 2016 server for server processes instead of Windows 10. 2012R2 server does what you tell it with Defender, windows 10 does not - it automatically turns itself back on unless you
- Set windows defender exclusion to all theatre manager folders on that machine -and/or-
- Turning the Defender policy off -or-
- Installing some other AV software that disables Defender and takes over. (we dislike this option - other AV software is much much worse)
- Make sure to turn off DEP on windows 10 for all but essential programs - it might affect TM server from starting on startup
Setting a Custom Power Plan
Setting a Custom Power Plan
 |
Make sure to also turn off power saving on your ethernet card on all servers and workstations. |
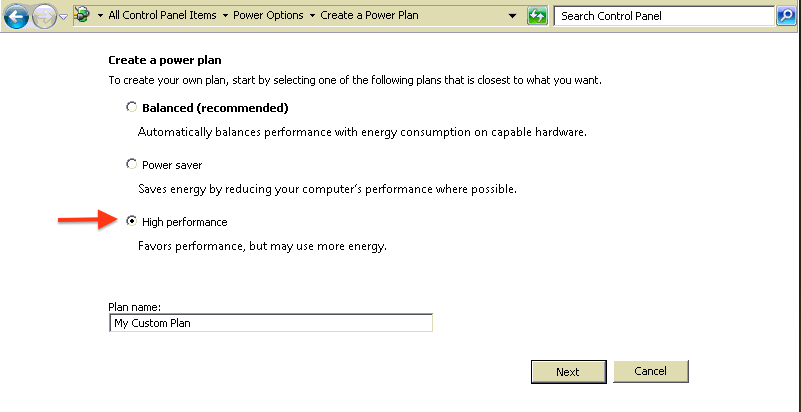
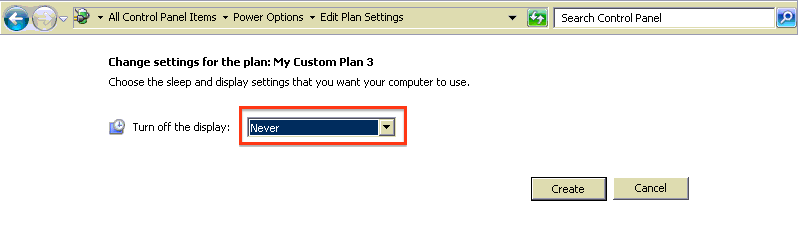
Create a custom Power Plan
- Open the control panel.
- Click Power Options.
- Click the Create a Power Plan option
- Select the bullet next to "High Performance"
- Click Next.
- Change the Display setting to "Never"
- Click Create.
Turning Off Indexing in Windows
Turning Off Indexing in Windows
Using Control Panel
You can usually turn of most indexing by clicking on the properties of the device. However, it seems windows 10 doesn't fully listen, so it may be best to approach this task via the control panel.
- Open Control Panels
- Look for where things are indexed
- Follow these instructions to disable indexing or something like the intent of the instructions.
Disabling indexing of disk from C drive properties
- Double-click on My Computer (or Computer).
- Right-click on C: drive (or the drive letter that Postgres is installed under).
- Select Properties from the popup context menu.
- Click the General tab.
- Remove the check in the "Allow files on this drive to have contents indexed in addition to file properties" box.
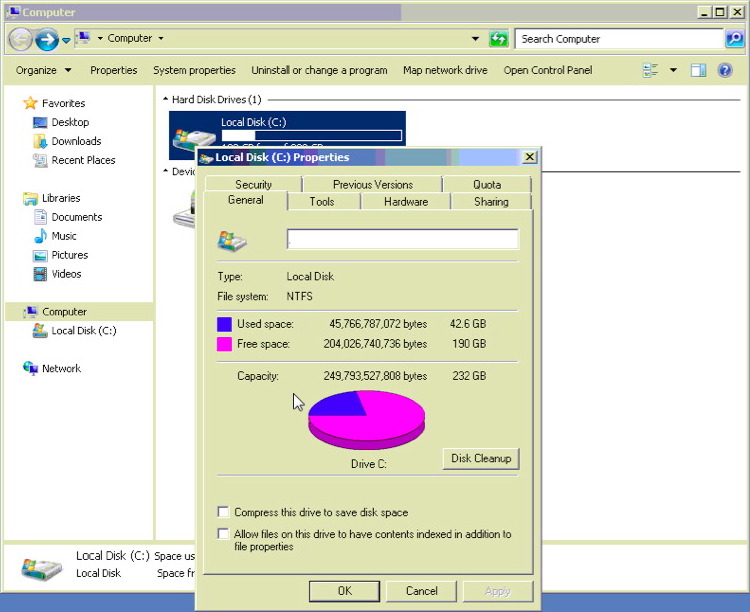
- Click Apply.
It may take several minutes for Indexing to complete. If a message pops up indicating Administrator permissions are required click Ok. If the current user is not the Administrator a prompt for the Administrator password will appear. Enter the password and continue. If a prompt appears indicating select folders cannot be altered it may be they are already open. Click Ignore All and let the process continue.
- Click OK.
- Reboot the computer.
Repeat this setting on the Web Listener computer, and the Apache server as well
Turning Off Disk Quota Management
Turning Off Disk Quota Management
- Double-click on My Computer (or Computer).
- Right-click on C: drive (or the drive letter that Postgres is installed under).
- Select Properties from the popup context menu.
- Click the Quota tab.
- Remove the check in the "Enable quota management" box.
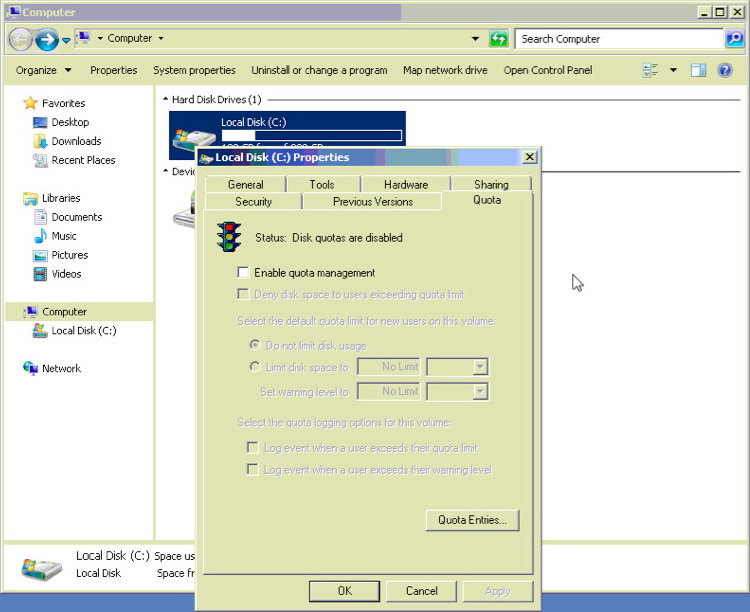
- Click Apply.
- Click OK.
- Reboot the computer.
Turning Off Windows Previous Versions
Turning Off Windows Previous Versions
To check if the setting is turned on:
- Double-click on My Computer (or Computer).
- Right-click on C: drive (or the drive letter that Postgres is installed under).
- Select Properties from the popup context menu.
- Click the Previous Versions tab.
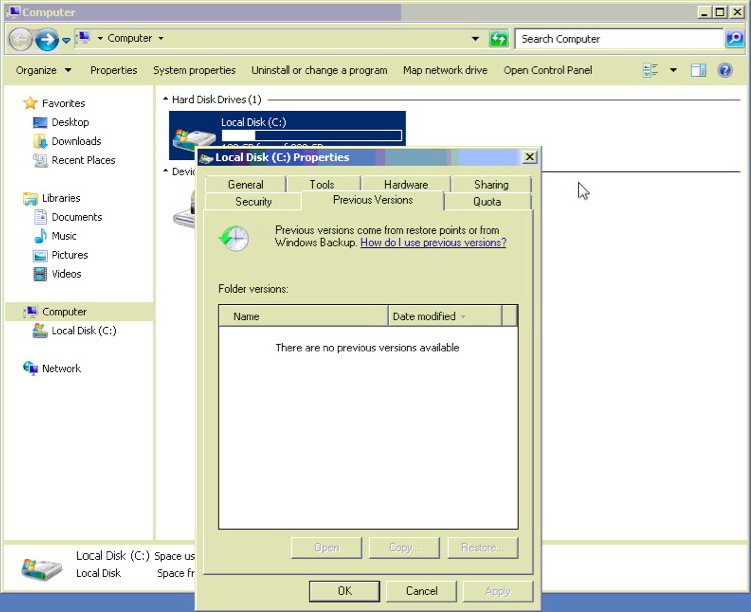
If Folder Versions reads "There are no previous versions available" this option is turned off. However, if backups are listed with date and time stamps, the feature is enabled and needs to be turned off.
- Click Start >> Control Panel.
- Click System in the Control Panel window.
- Click System Protection in the left column.
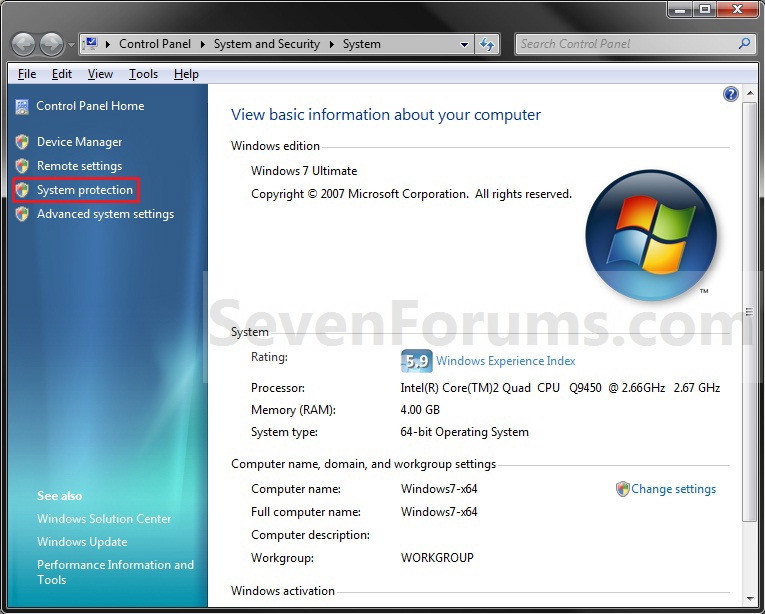
- Select the drive Postgres is installed on.
- Click the Configure button.
- Move the bullet to "Turn off system protection".
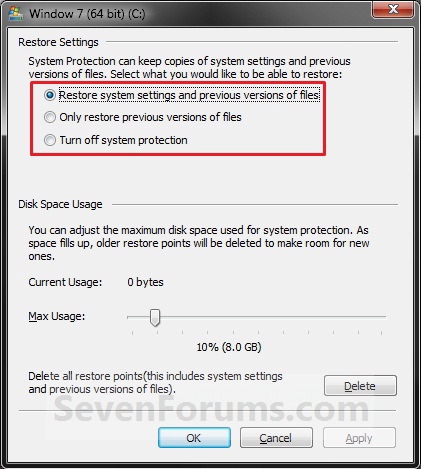
- Click Apply.
- Click OK.
- Reboot the computer.
Setting Best Performance Options
Setting Best Performance Options
- Right-click on My Computer (or Computer).
- Select Properties from the popup context menu.
- Double-click on System Properties in the left column.
- Select the Advanced tab.
- Move the bullet to "Adjust for best performance".
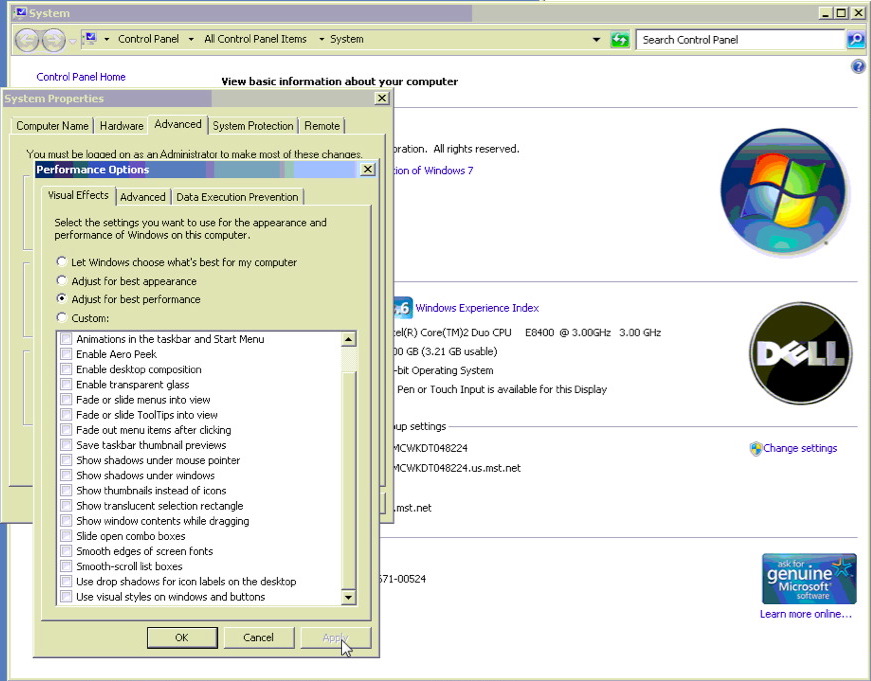
- Click Apply.
- Click OK.
- Reboot the computer.
Turning Off UAC for Windows
Turning Off UAC for Windows
- Open the control panel.
- Click User Accounts.
- Click the Change Users Account Control Settings link under Action Center
- Move the slider down to Never notify.
- Click Ok.