Linux PostgreSQL Server
As of July 1, 2018, the most recent version of Postgres is 10.4 (or later) - we recommend the latest production version be installed on new machines.
The server needs to be set up on one machine and the application can be set up on as many machines as you wish.
Follow these steps and you may want to bookmark this page in your browser in case you want to refer to these installation steps. If you are only installing a demo, refer to the last column for required steps.
| task | Description | Full Install | Demo |
| 1 | download the PostGres installer for Linux from Postgresql.org | yes | yes |
| 2 | the installation of the PostGres SQL server | yes | yes |
| 3 | installing the demo database and the main TheatreManager User | optional | yes |
| 4 | configuration of the server parameters for maximizing performance in a production database | yes | |
| 5 | creating a daily backup job in using cronnix to run the backup | yes |
Notes and Assumptions:
- This install process assumes you have NEVER installed PostGres or Theatre Manager on your computer before. If you have, you may need to refer to Updating Postgres Instructions
- You MUST turn all virus protection while running the installer (especially Norton if you are using it). Virus software always interferes with proper software installation.
- If this installer is being used to create a demo installation, then you only really need do steps 1, 2 and 3.
- This process assumes that you have never installed Theatre Manager or Postgres on your machine. If you have already installed Postgres:
- you will be asked if you want to un-install Postgres (you may want to do that and then try to re-install after)
- you may need to remove the 'postgres' user from your computer if one exists, unless you know the password for the use.
Step 1: Install PostgreSQL Database Server
Installing PostgreSQL on Linux
 |
Before starting the install, please check that the computer date and timezone settings are correct. Failure to do so may cause postgres to think it is in a different timezone. |
| 1. | Install the latest production version of PostgreSQL application using apt-get or yum as per the flavour of unix you are using. |
Step 2: Create user and import Database
Installing a demo database
The database server needs a specific user called TheatreManager with specific privileges that will be assigned as the owner of each database. We also want to import a demo database. This step assumes that you have installed things into the /Users/Shared directory. If you did not, then you will need to edit the script and do this step manually
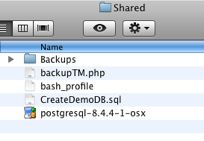
| 1. | Go to /Users/Shared directory. You should see some files and folders with names that look like below.
|
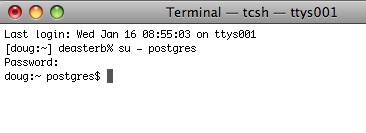
| 2. | Start terminal and change the user to 'postgres' by typing: su - postgres Press RETURN and then type the postgres user's password (password will not display anything)
|
| 3. | Drag the script '/Users/Shared/CreateDemoDB.sql onto the terminal window. This shortcut saves typing anything. Click into the terminal window and then press RETURN to start the command. If it does not run, then possible issues are:
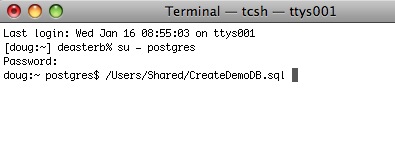
|
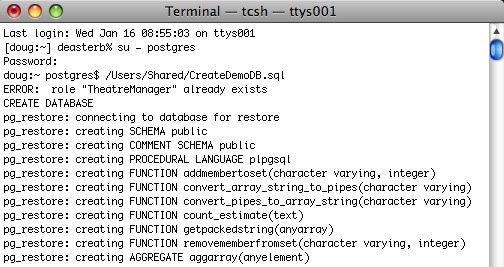
| 4. | The script will run and load up the TheatreManagerDemo database. You can modify this script to load up a customer database if necessary by editing it in BBedit or in textedit (make sure to save it as text if you use textedit - its preference, unfortunately, is to save as an rtf document). Note, any WARNING messages from the TheatreManagerDemo database creation can be ignored. These warnings are normal.
|