Adjusting Security Settings
 |
There are some settings in Theatre Manager that a venue must examine during installation and may need to be changed for PCI standard 8.5 compliance.
If you are upgrading from a demo version of TM, some of these settings were optional to facilitate the purposes of a demo and need implemented for a production system. |
Minimum Password Settings for All Users
- be required to enter a password to access Theatre Manager -and-
- have their own user id and password to track access within the database -and-
- ALSO have a unique logon to access the computer prior to accessing Theatre Manager that is PCI/DSS compliant.
Ensure that the minimum recommended settings are met and increase the security as you see fit. If the minimum recommended settings change, Theatre Manager will automatically update the current settings to any more current minimum during any upgrade.
The steps to increase security strength are:
- Log in as Master User (this System Administrator account is only person with access to System Preferences)
- go to 'Setup->System Preferences'
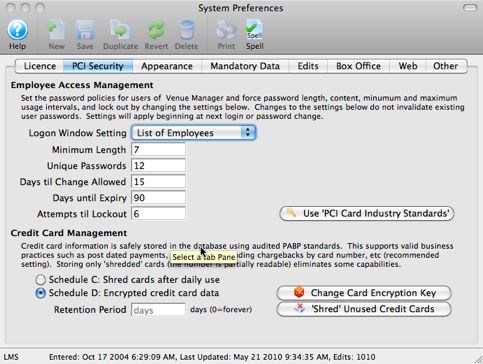
- click on the 'Security' Tab. The minimum recommended settings are below.
- Click on the 'Use PCI Card Industry Standards' to reset all password settings to the minimum acceptable standards.
- Make any adjustments you wish to the policies such as requiring longer passwords, or increasing the minimum number of unique passwords before a repeat password can be used.
- Close the window to save the changes.
Changing User ID's
If you wish to implement login by user id in addition to password, the change all the user id's in the system to a scheme that is suited to your network security needs. Since you will be logging in with a User Id and Password, it can be a good idea to make user names more difficult to determine.
To change user names and password settings, repeat the following steps for all users EXCEPT the Master User:
- go to Setup->Users & Access->Employee List
- Click the 'search' icon (the magnifying glass) or hit enter to see a list of users
- Double click on the name in the list to change
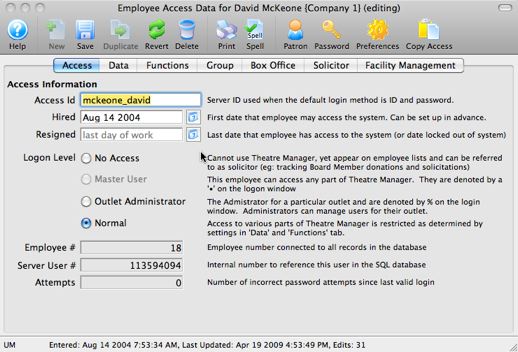
- Click on the 'Access' Tab
- Click on the 'Access Id' field and change that to something suitable for the employee
- Make sure the Logon Level selection is either 'No Access' if they are not allowed to use the system -or- 'Normal' if they are allowed to access the system.
- If the user can log in, click the 'Set Password' button and assign them an initial random password (or have the user type in their own). It is not necessary to know or record each users password - in fact we recommend that you do not write those down. If a user forgets their password, you can always re-assign a new one here.
- If user's access to parts of the system is similar to another users, you can use the 'Copy Access' button to make them like each other. You may wish to create a template for some of the important job functions that make copying easier.
Verify Credit Card Access
|
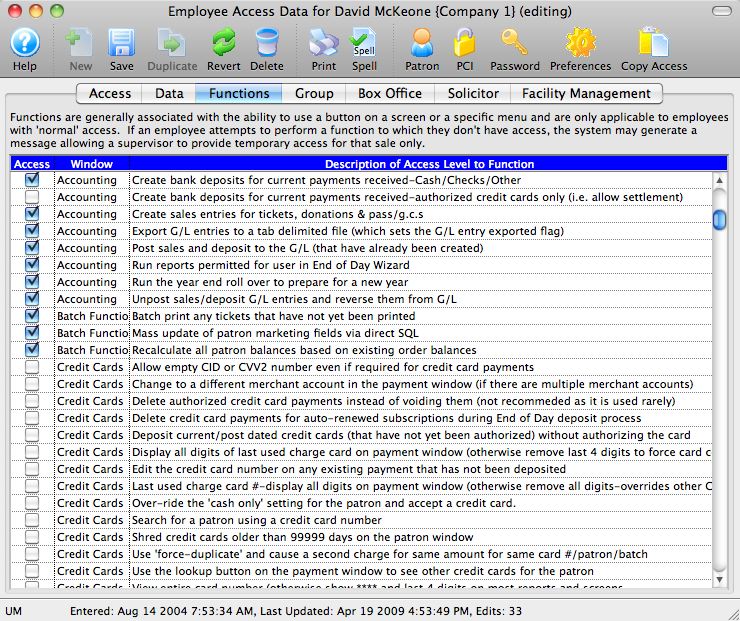
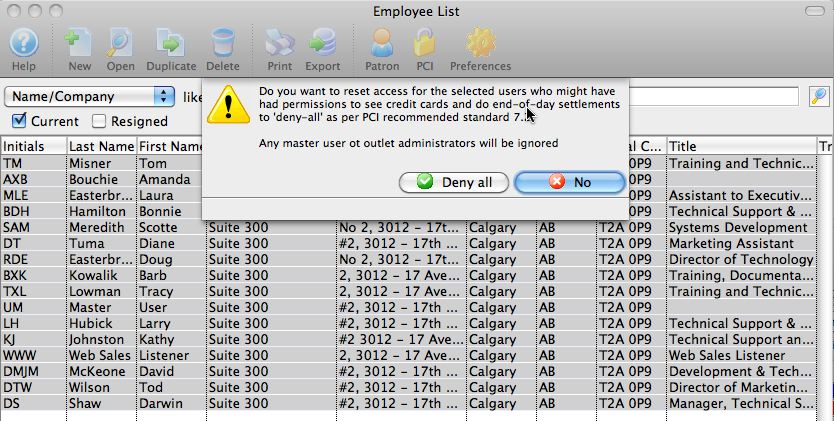
You must at least visit the 'Functions' tab and make sure that any of the privileges that say 'Credit Card' in the second column are all unchecked to start with. Then enable those that you wish the user to have. Creating any new normal user will default to a 'deny-all' setting per PCI DSS 7.2
All existing users can be easily reset to the 'deny-all' at one button click (see below) |
- 'Allow empty CID even if required for credit card payments'. If this is unchecked, the user must ask the customer for a CID/CVV2 number on the back of the credit card if it is required for the credit card type or by the processor. If your service provider does not accept or check CVV2 data, you may need to check this. You may also want to check this for at least one of the box office supervisory personnel who can then provide an operator over-ride to any other user if need be.
- 'Able to Search for Patron using a card number'. This should be checked for a finance position or a box office supervisor so that a patron can be found when all we are given is the credit card number - such as in the case of charge backs. When searching for a patron by credit card, only the first 4 and last 4 digits in the care are required for a search.
You can do reset all employees with non-administrative access at one time by selecting them all on the list of employees and clicking the 'PCI' button.
Change the Master User Password
Per PCI requirements, this password for this account must be changed at the initial installation of Theatre Manager by the venue so that it is something unique to the venue.
No user of Theatre Manager is required to have these privileges in order to use the system - except to create another user account. If any user is set as a Master User for the duration of the installation process, those privileges should be revoked per PCI compliance.
- Find any user with Master User access using Setup->Employees and Access->Employee List
- Click on the 'Access' tab
- Make sure that the 'Logon Level' is 'Master User' for only one administrative account. Change all others to normal users.
- Click 'Set Password' and give this special user a unique password. You will be asked to confirm the current password before you are allowed to change the password.
- You may want to log out of theatre manager and then log back in as the special 'Master User' account before continuing - just to make sure you have the user id and password set.
- This is one user id and password combination that you do wish to record on a paper and put in a sealed envelope in your safe with instructions to open under emergency only.