Duplicating a Project
Certain types of projects can have very similar pieces and may make good templates for other projects. For example, if you have shows that go up in your facility that have certain general steps, such as "Build Set", "Move In Set", "Hand Lights", "Rehearsals", etc., you can make a project that is a template that includes the groups and typical tasks associated with a project of this type. This can then be used as a template that is duplicated, along with all tasks and task participants.
You may also want to duplicate a projects like "2011 Auction", or "2010 Dinner Fundraiser".
When you duplicate a project, you use a wizard with a series of screens where you can make a variety of decisions to indicate how you want to make changes to the original project when creating the duplicate of the project.
Step 1 - Selecting Default Information
To duplicate an existing project, you perform the following steps:
- From the Project list window, highlight the project you want to duplicate and click the Duplicate
 button.
Click for information on opening the Project List window.
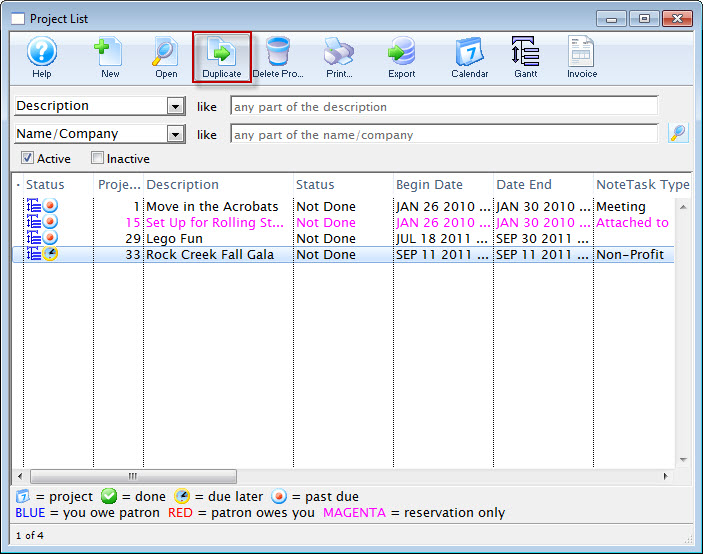
The Duplicate Project Step 1 window opens.
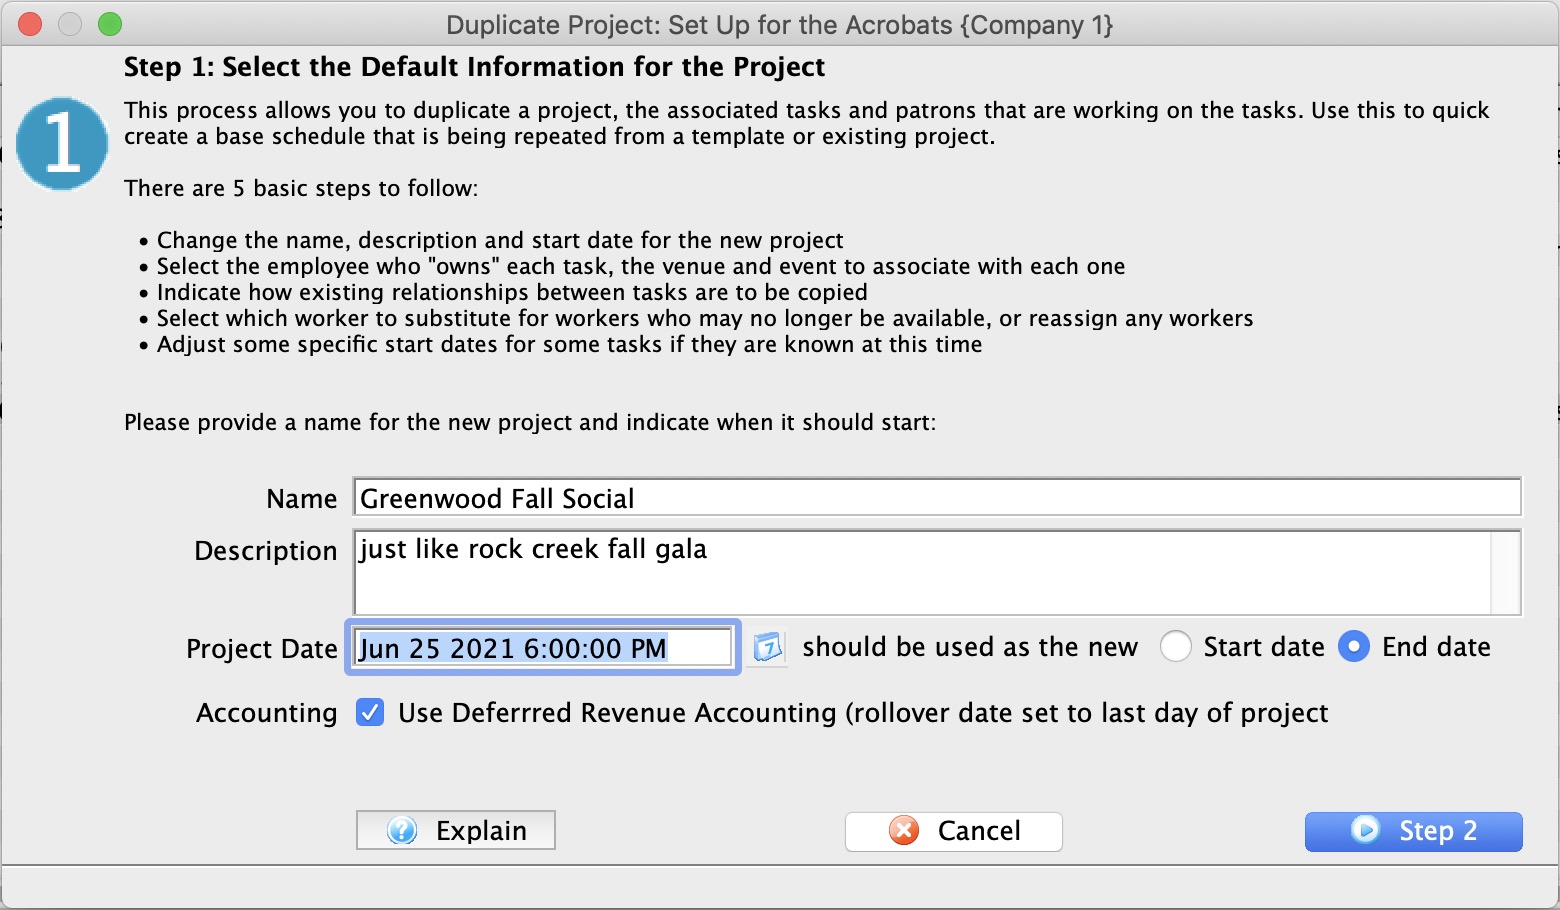
- Change the name of the Project.
For example: You have a recurring yearly auction.You could change "2010 Auction" to "2011 Auction" leaving all the auction project tasks available for the new auction.
- Add or change the description of the Project.
- Change the Date, click the Date
 button to enter a new starting or ending date and time for the project.

Click the 'start date' or 'end date' radio button to suit your purpose. If you click: - start date the project time for the first project is defaulted to 8:00am - all other tasks are forward adjusted from that time. This means you are planning the new project forward from the date specified - and it ends when it ends.
- end date the project time for the lat project is defaulted to 6:00pm - all prior tasks are backward adjusted from that date. This means you are planning the project backwards from the 'drop dead' date which is must be done by.
In a later step, you can decide if you want all tasks associated with the project to be offset from those in the original project by the same number of days the duplicate project's starting date if offset from the original starting date. - Indicate Use of Deferred Accounting
You can choose that the accounting goes into deferred accounts for resources and volunteer/staff activities.
The rollover date will automatically be set to the date of the last task in the new project. It can be changed later in Project Accounting Setup if need be.
- When you have updated the Name, Description and Date, click the Step 2
 button.
To cancel the Duplication, click the Cancel
 button.
Step 2 - Set Task Ownership, Venue and Play Settings
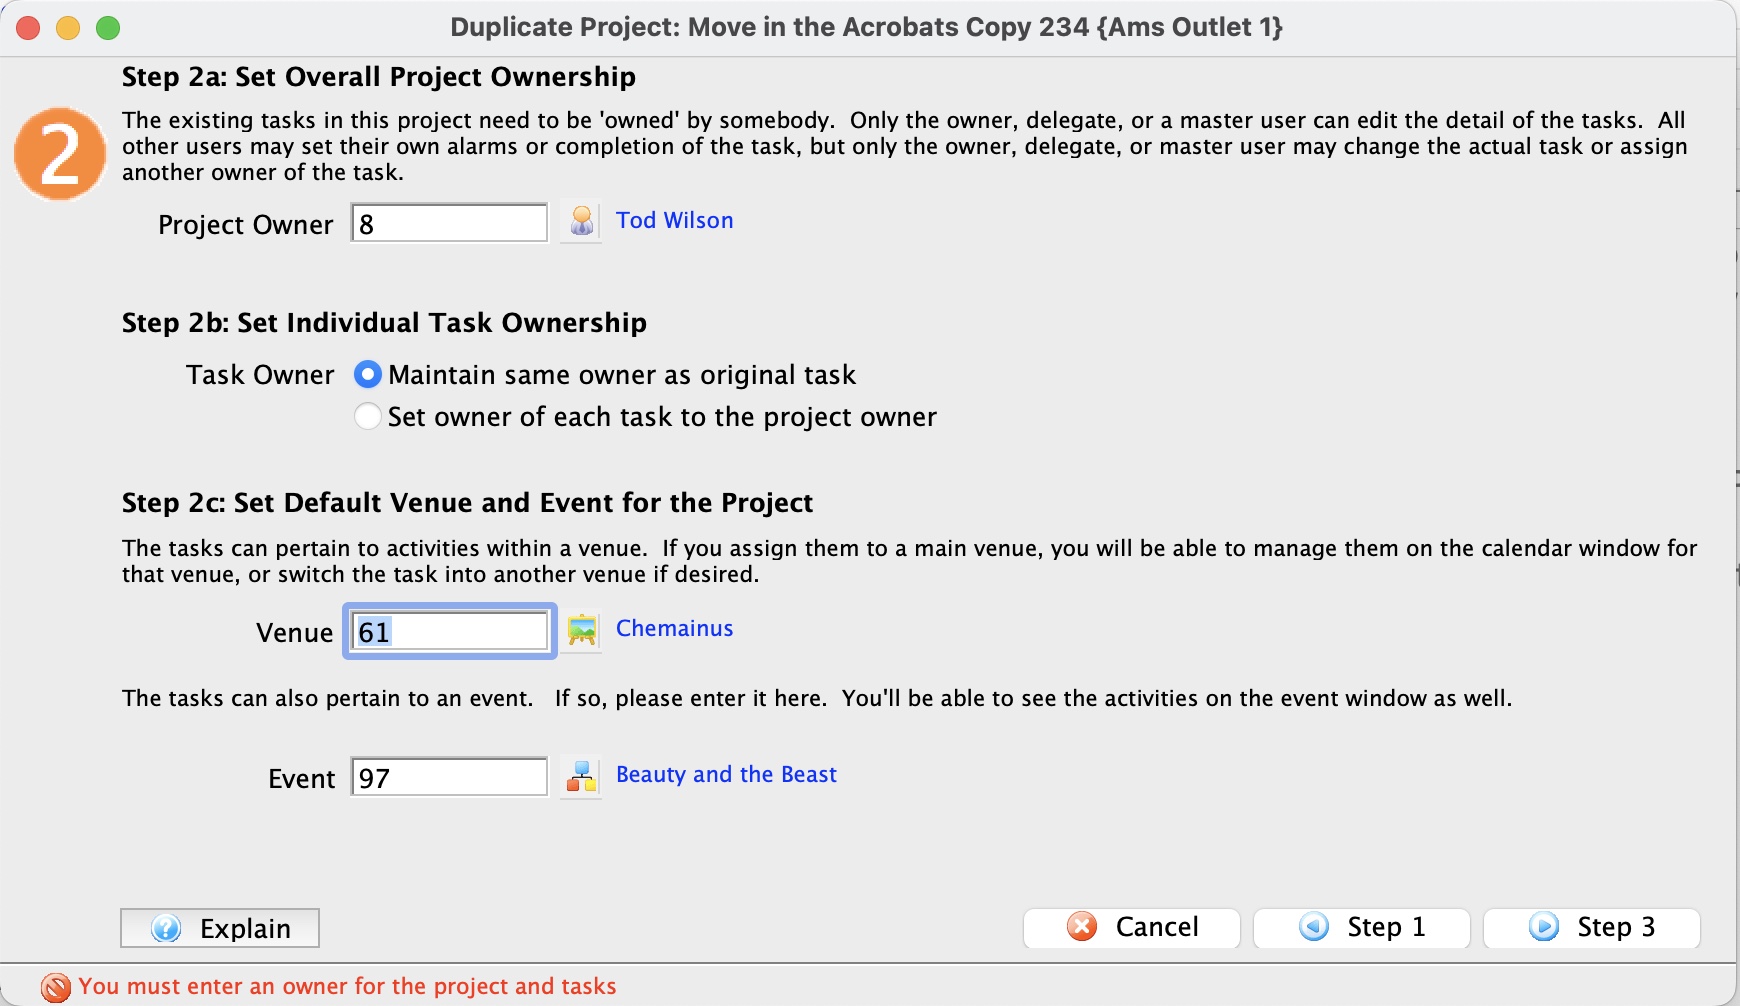
- In Step 2a, you can change the Project Owner clicking the
 button.
You also have the option of:
- Maintaining the same owner of each task. This is advantageous if you want a different employee to be able to edit their own tasks since the task owner and the project owner can edit a specific task.
- Setting the task owner to be same as the owner of the project. This means that only the project owner will be able to edit tasks in the new project.
The tasks can pertain to activities within a theatre/venue. If you assign them to a main theatre, you will be able to manage them on a calendar window for that theatre or switch the task into another theatre.
- In Step 2b, You can change the Theatre and Play settingings.
Click the
 button, to change the venue.
Click the
 button, to change the Play.
 - When you have updated Step 2, click the Step 3
 button.
To cancel the Duplication, click the Cancel
button.To return to Step 1, click the Step 1
 button.
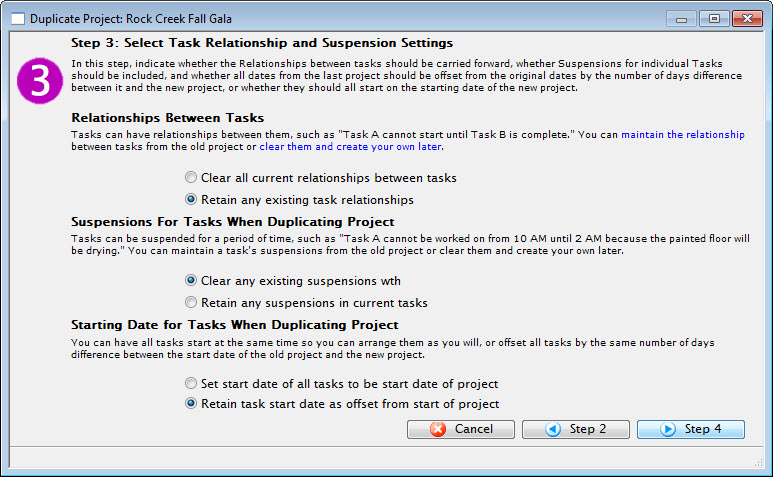
Step 3 - Set Task Relationships and Suspensions
In this step, you indicate whether the Relationships between the tasks should be carried forward, if the suspension of specific tasks should be included and if all the dates from the original project should be offset. That is changed to match the new project start date.
- Choose your relationship.

For Relationships, choose between Clear all current relationships between tasks (which will remove any "Start to Start", "Finish to Finish", or "Finish to Start" relationships between any tasks in the project) and Retain any existing task relationships (which will retain those relationships).
- Choose suspensions for tasks when duplicating a project.

For Suspensions, choose between Clear any existing suspensions (which will remove any periods of time during the tasks when there must be a suspension of work) and Retain any suspensions in current tasks (which will not remove those suspensions).
- Choose the starting date for tasks for the new project.
>
For Starting Date, choose between Set start date of all tasks to be start date of project (which will make all tasks align their start dates with the starting date of the project) and Retain task start date as offset from start of project (which adjusts the starting date of each task in the new project from the start date of the new project, to the same time/date offset as in the original project).
 >
> - When you have updated Step 4, click the Step 4
 button.
To cancel the Duplication, click the Cancel
button.To return to Step 2, click the Step 2
 button.
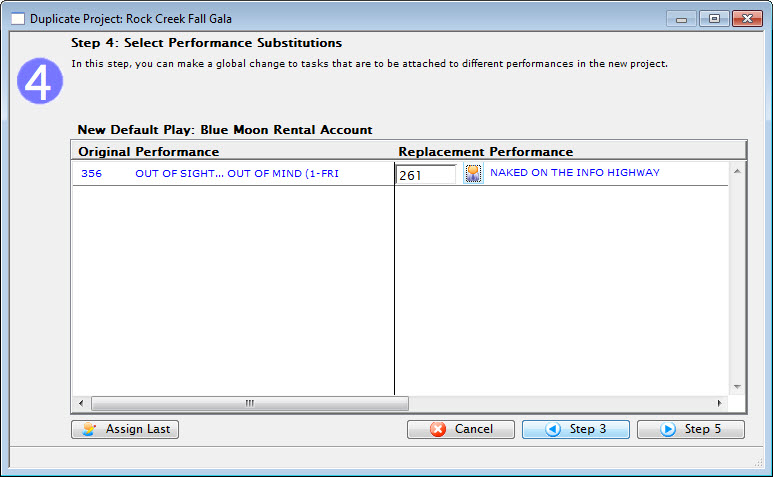
Step 4 - Performance Substitutions
In Step 4, you can make a global change to tasks that are attached to different performances in a new project. A list of performances associated with the Project are displayed.
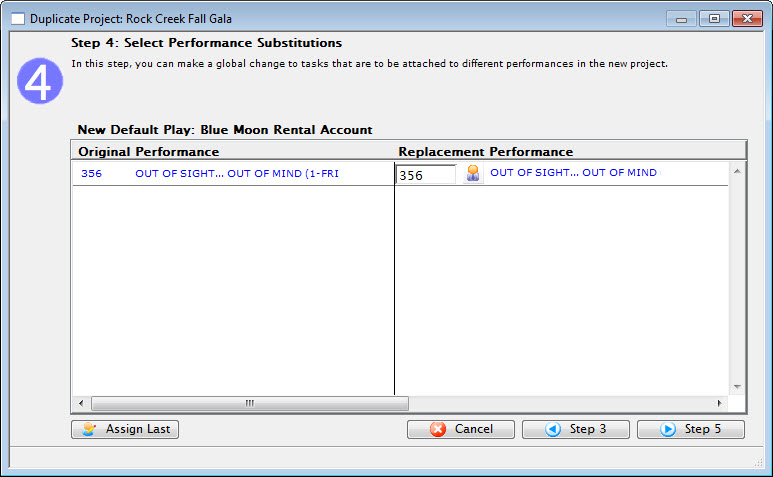
- To change the number of the new performance, enter the new number.

- To Search for a new performance for this task, click the button.
The Performance List Lookup window opens.
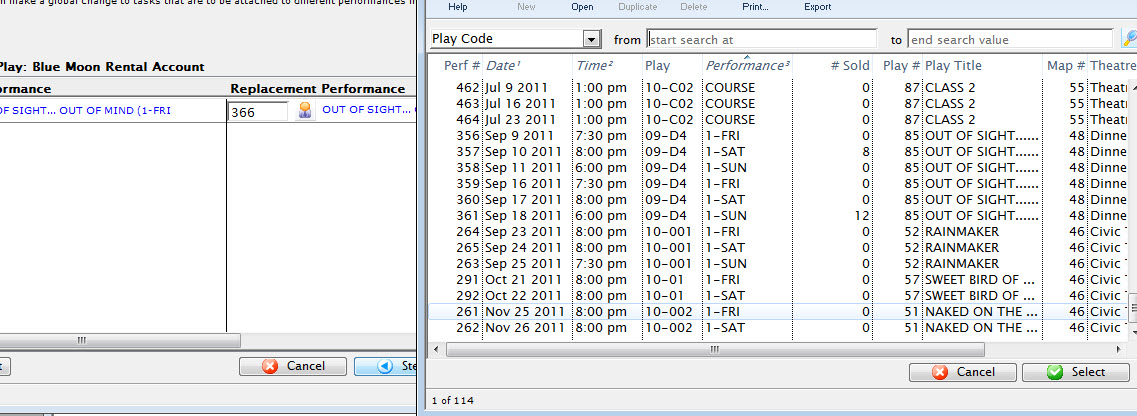
- Make your selection, by double clicking on it or by highlighting it and clicking the Select
 button.
You are returned to Duplicate Project Step 4 and your selection is in the Replacement Performance pane.
Click the Assign Last button to assign all replacement performances to the original performance. (This is the default.)
- When you have updated Step 4, click the Step 5
 button.
To cancel the Duplication, click the Cancel
button.To return to Step 3, click the Step 3
 button.
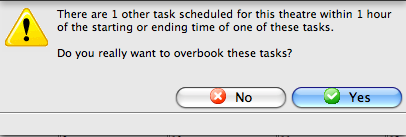
If there are any conflicts, such that you have tasks scheduled in the same venue within 1 hour of some previously assigned task, you will be asked to confirm if you want to overbook the tasks into this venue.
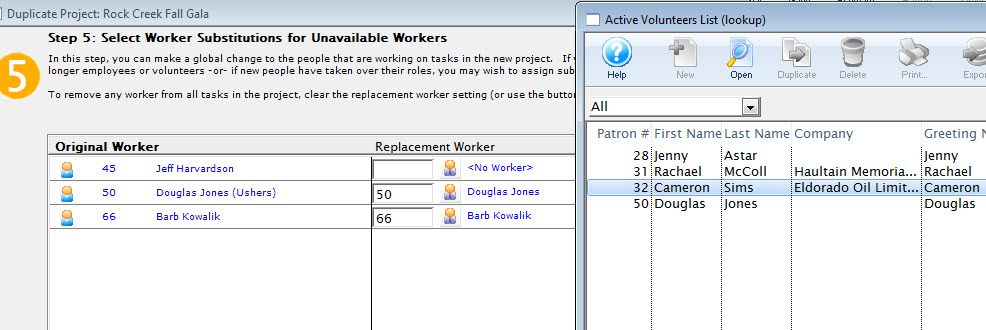
Step 5 - Select Worker Substitutions
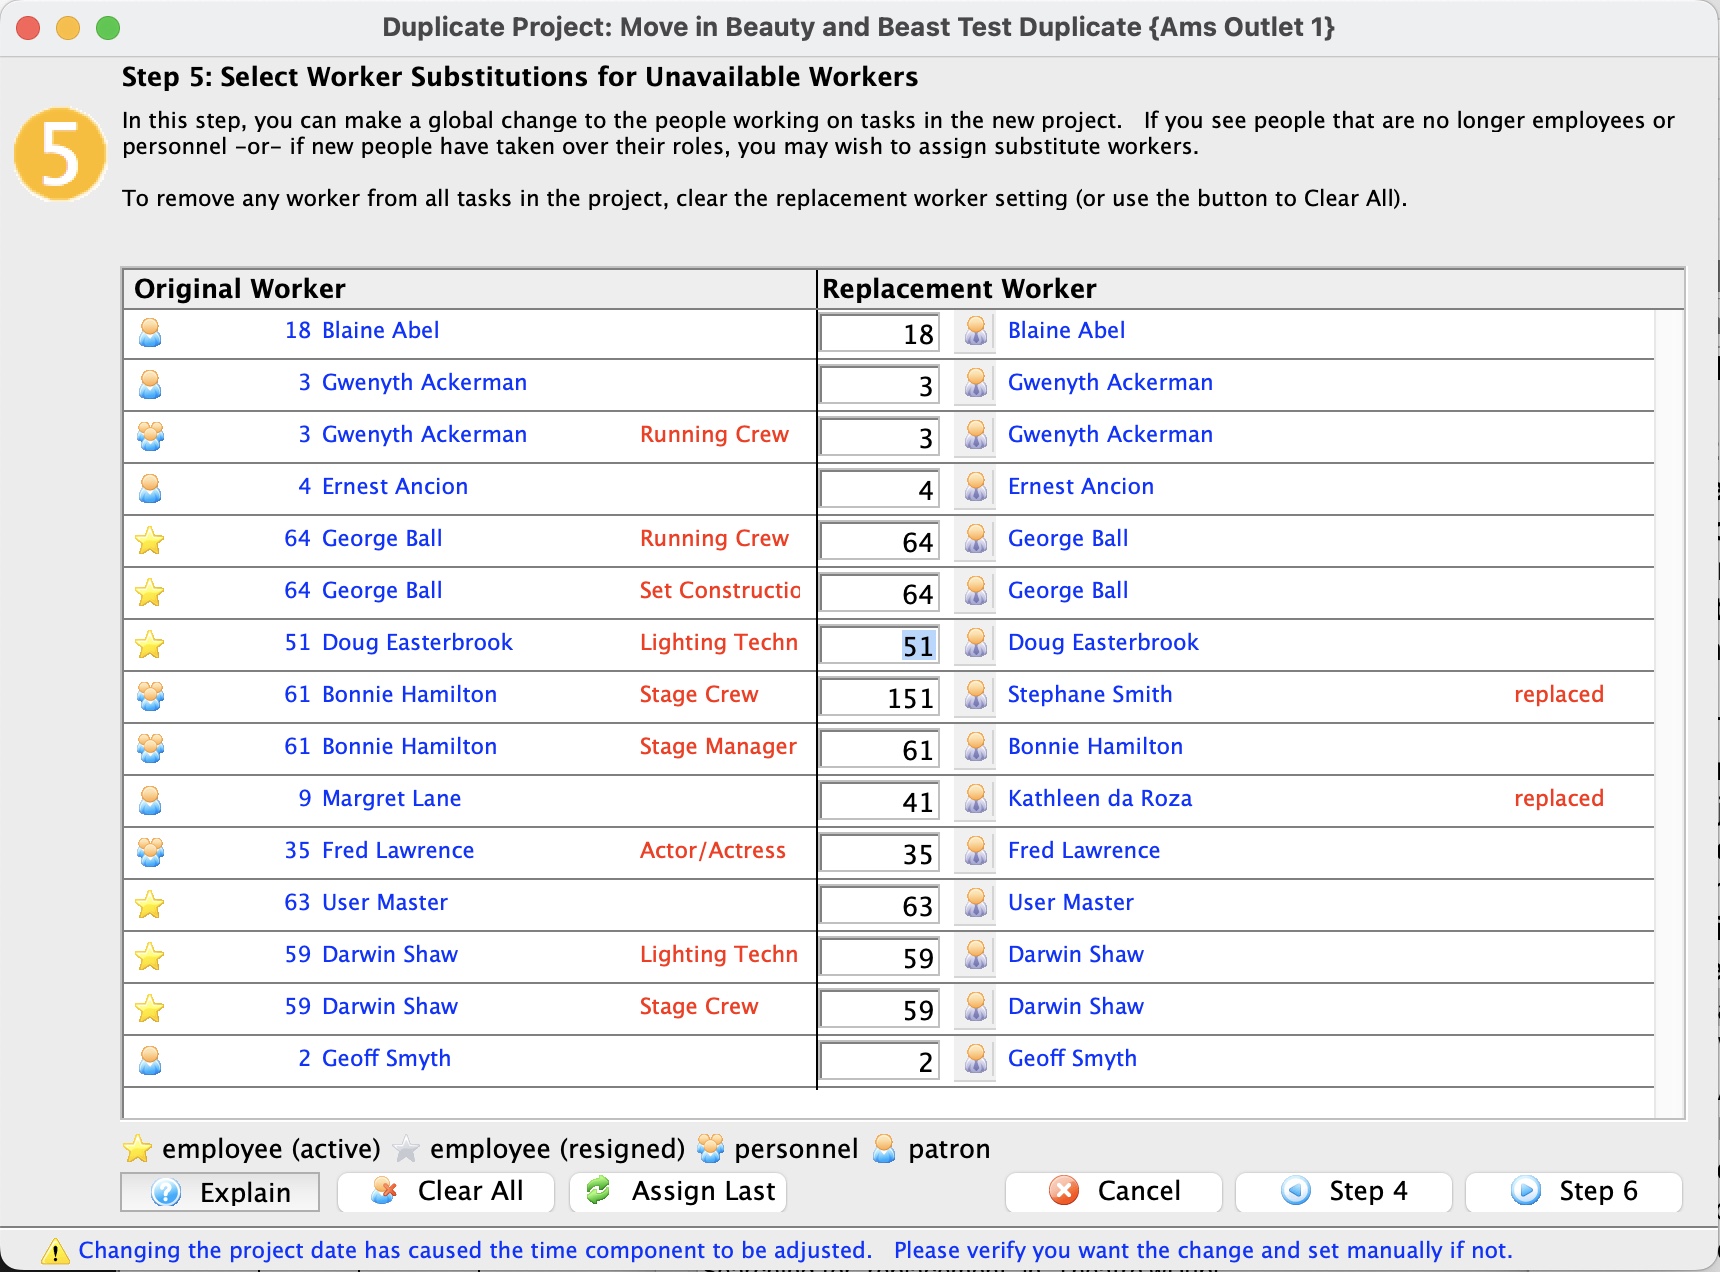
To Change the Workers:
- To remove a worker, change the assignments to employee #0.

This removes the person from the Task Participants.

- To change a worker, click the button.
If the individual is an employee or Patron, you have the option to select which list to choose them from Patron or Employee.

If the individual is a Volunteer, the Volunteer List opens for selection.
- To remove all of the Replacement Workers, click the Clear All
 button.

All of the Replacement workers are removed.

- Click the Assign Last
 button to assign all replacement workers to whom they were originally assigned to.

This is the default setting when the window opens.

- When you have updated Step 5, click the Step 6
 button.
To cancel the Duplication, click the Cancel
button.To return to Step 4, click the Step 4
 button.
Step 6 - Finalize dates
- You can drag tasks to a different day to move them prior to saving the duplicated project. Use the navigation buttons in the upper right to select a different month.
Possible conflicts in venue will be displayed as background tasks on the calendar.
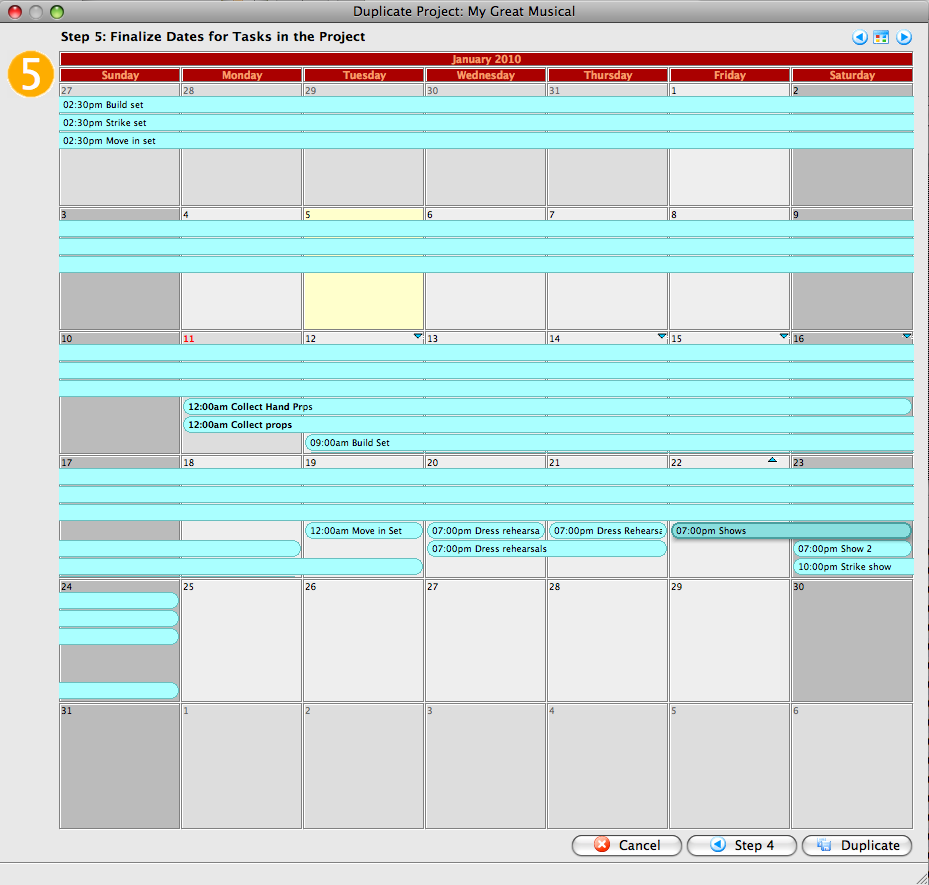
- When you have updated Step 6, click the Duplicate
 button to duplicate the projects and the associated tasks.
To cancel the Duplication, click the Cancel
button.To return to Step 5, click the Step 5
button.
In Step 6, you will see a calendar displaying the tasks associated with this project.