Login / Logoff
All transactions are linked to an Employee record. This means that for every sale, refund, exchange, form letter request... every process, Theatre Manager records the Employee initials for the Employee performing that task. If Employees 'share' an Employee record, then the audit trail of 'who did what' vanishes, and there will be no way to track which Employee performed a specific task. Sharing logins is not only poor business practice, but violates PCI Compliance.
There are a two options to set up log on to Theatre Manager, depending on the level of security you wish to invoke for the Employees. You can provide:
There are also special considerations for logging in using the Outlet Edition.
Login Options and Setup
In order to use Theatre Manager, each Employee must log in.
For PCI compliance, each employee must have their own individual Employee login and password. This means that no two users can 'share' a user account, such as 'Box Office Volunteer' or 'Marketing.' All transactions that take place within Theatre Manager are tagged to the Employee who processed the data. If generic employees are used, then tracking audit issues will be impossible.
There should be one (and only one) Master User in a database.
The Master User is not a specific person, but rather an 'Administrator' much like on Windows or Mac. This 'Administrator' does not do sales, run reports or mail lists or other daily operations. Instead, the Master User acts as a system technician who adjusts and edits how Theatre Manager operates. The Master User is a 'know all/see all' user, and therefore for PCI compliance, there is only ONE Master User. All other users are considered 'Normal Users' (some of whom have more privileges than others, but they all fall within the 'Normal' category).
The Master User password is generally known by only a few people within a venue.
These people will have their own login as employees, which is used for daily operation. The Master User is only used to make operational adjustments to the database such as adding new employees.
|
When providing Remote Assistance, AMS technicians will often require the Master User password as they will be making adjustments to the operation of Theatre Manager. |
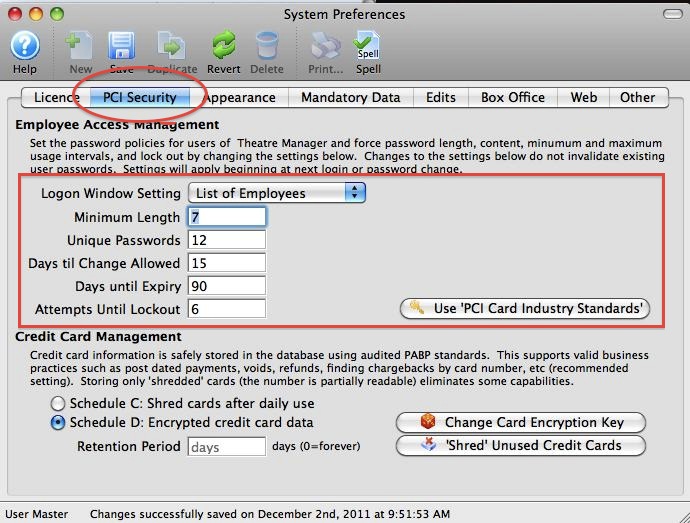
Login passwords should be set to expire every 90 days.
For PCI compliance, all passwords must be set to expire every 90 days, and will be required to be reset by the user. You will receive a warning several days in advance of your expiration date that your password will need to be changed. The expiration and other password parameters are controlled on the PCI Security tab of Setup >> System Preferences.
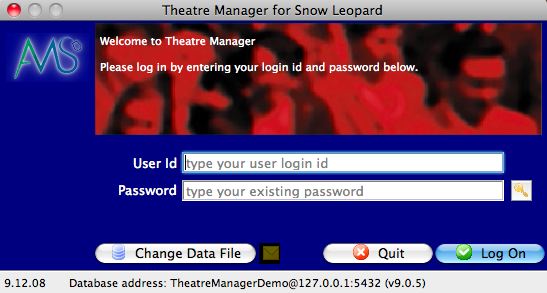
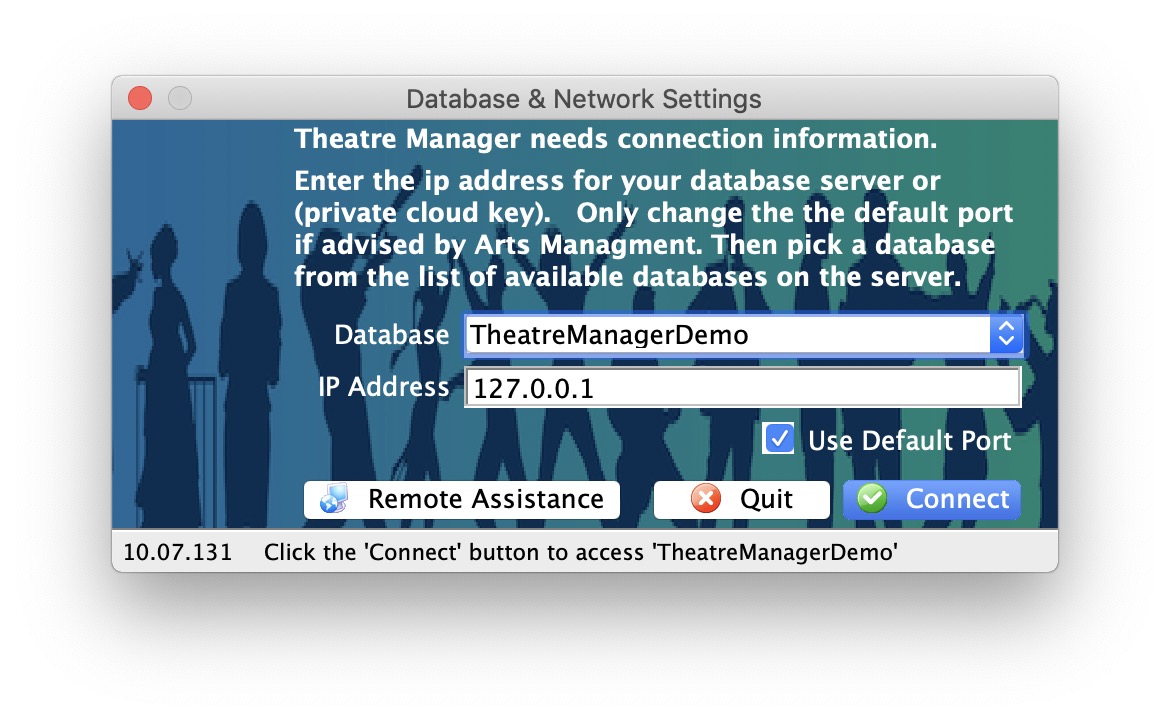
The Log In window provides valuable information about the database.
The log in window provides information such as:
- Database Version (shown here as 9.15.06)
- Database Name (shown here as 'TheatreManagerDemo')
- The IP address or DNS name of the database server (shown here as 127.0.0.1)
- The Port Theatre Manager is using to connect to the database (shown here as 5432)
- The version of Postgres being used (shown here as (v9.1.2)

Theatre Manager will always revert to the last used database.
If you utilize a 'Training' database, take extra care to note which database you will be logging into by checking the Database Name at the bottom of the log in window. If the Training database was accessed last on this machine, then Theatre Manager will attempt to log on to the Training database. If you intend to log into the live, 'Production' database, you will need to change databases first.
The Web Listener may be set to automatically log in.
If you utilize a dedicated Web Listener (Arts Management Systems recommends one for venues just starting with web sales, and a minimum of two dedicated web listeners for venues with a higher online sales rate) the dedicated machine may be set to automatically log in to web sales.
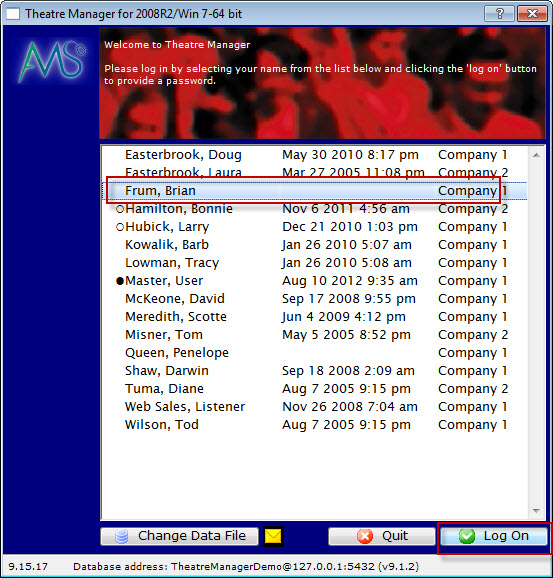
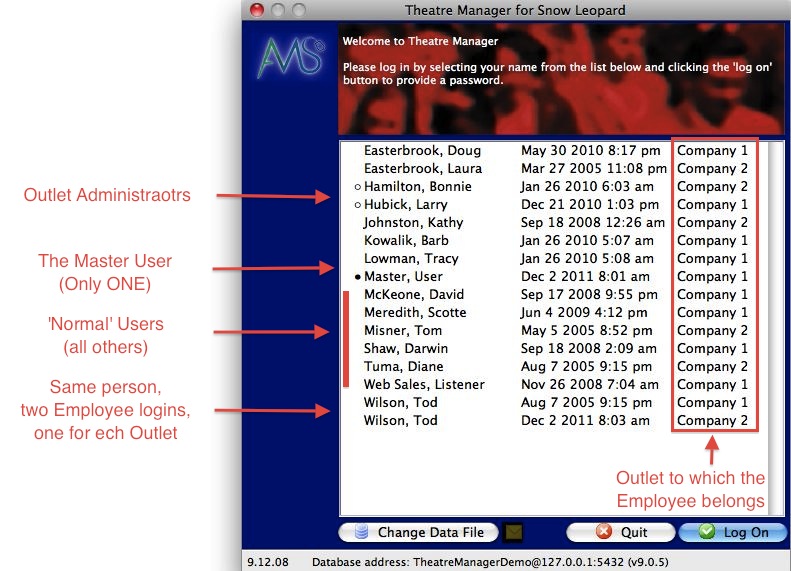
List of Employees
To login to Theatre Manager from the list of employees, you perform the following steps:
- Select your user name from the log in window.
There are some icons/colours that have meaning: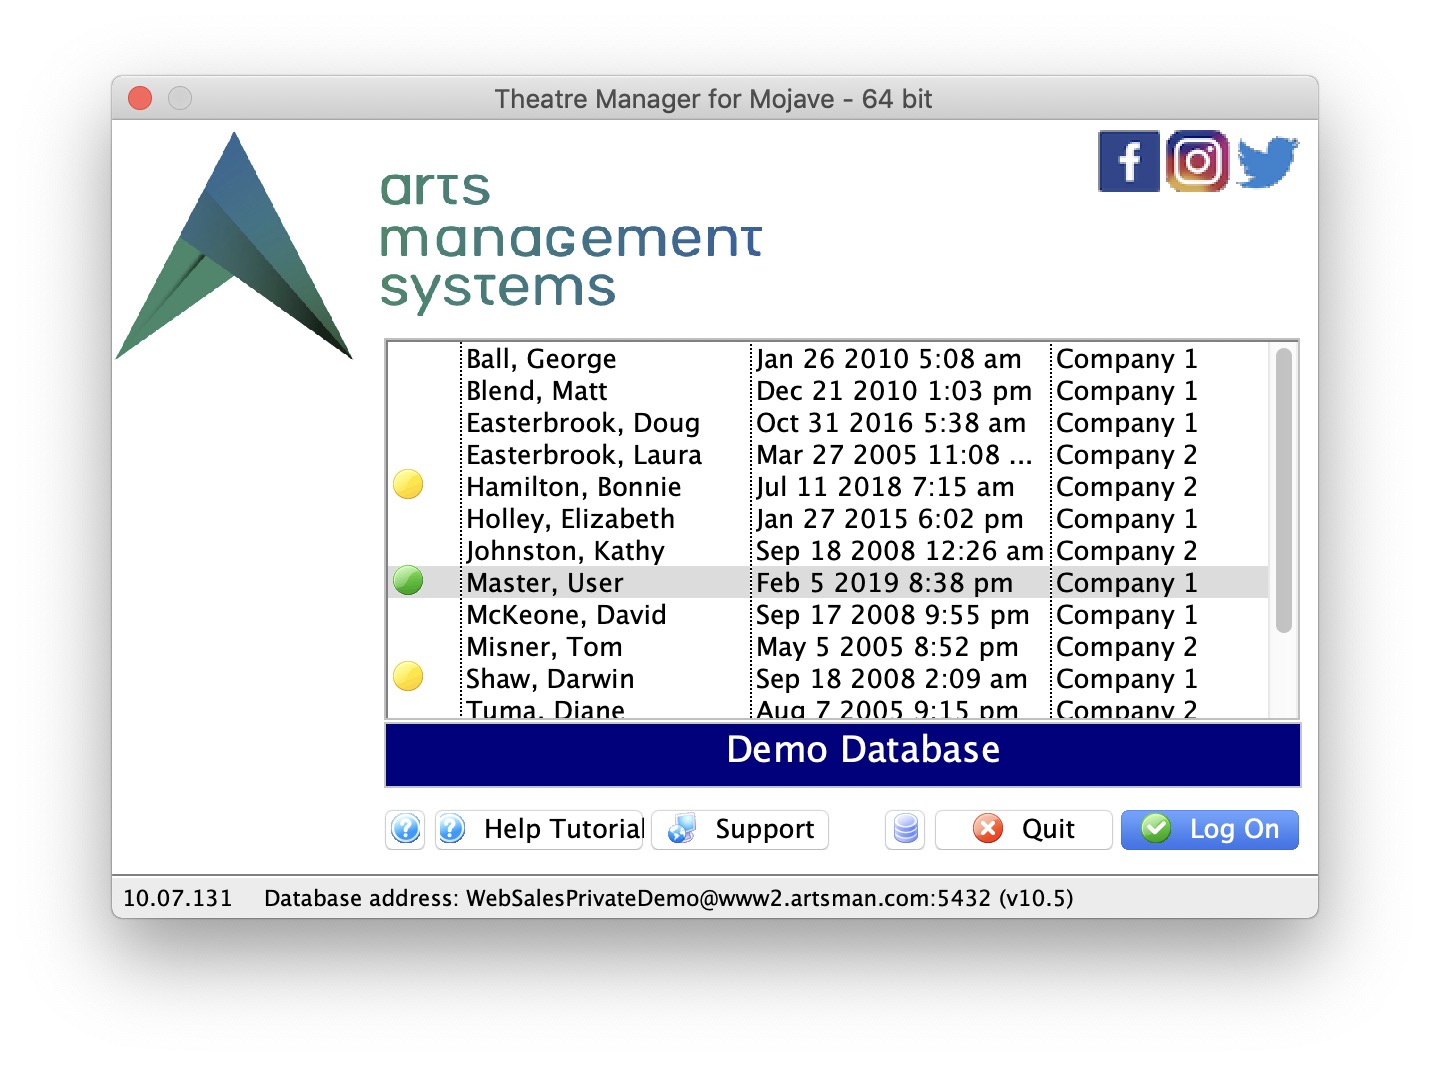
- a complete grey line means never logged in.
- a green dot means master user
- a yellow dot means the person is an outlet administrator
- checkmark means logged in once
- a number like 2, 3, 4, 5 indicates the number of time people are logged in
- a complete red line means logged in more than once and they will also have a number a head of their name
- Click the Logon
 button.
- Enter the password you created when your Employee record was set up.
If the employee is able to log into multiple outlets, the outlet list will appear above the password. The employee will need to select the outlet and provide the password for that outlet.
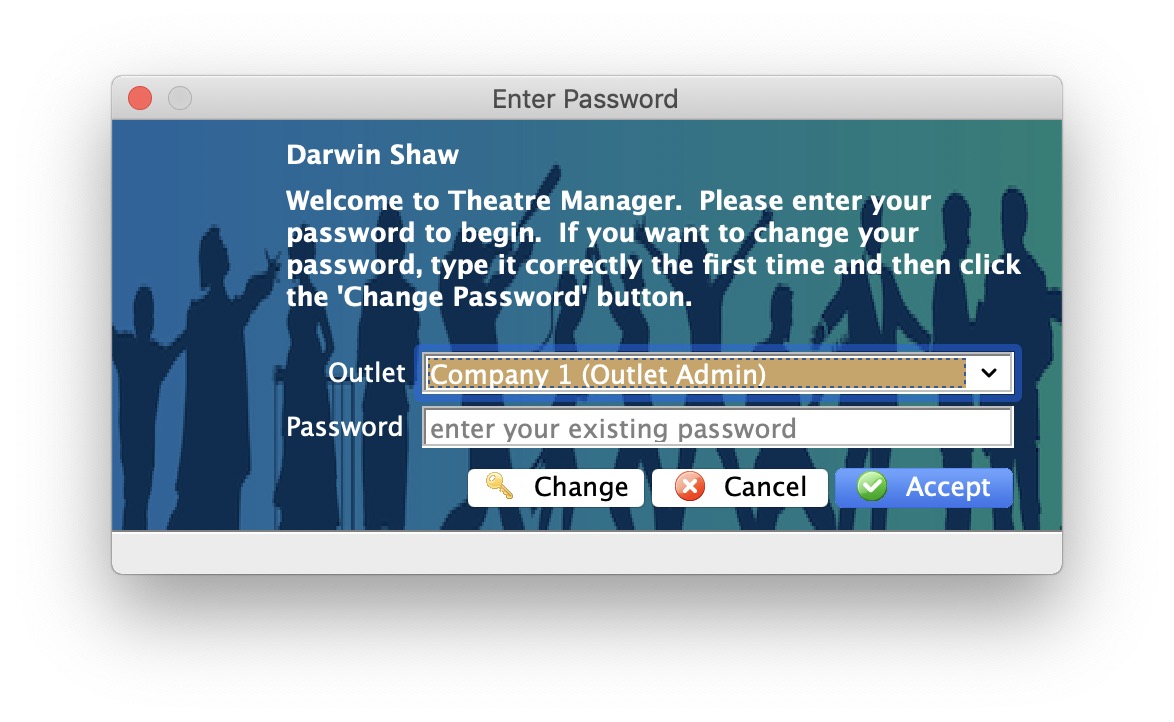
- Click the Accept
 button.
You are now logged into the last used Theatre Manager database.
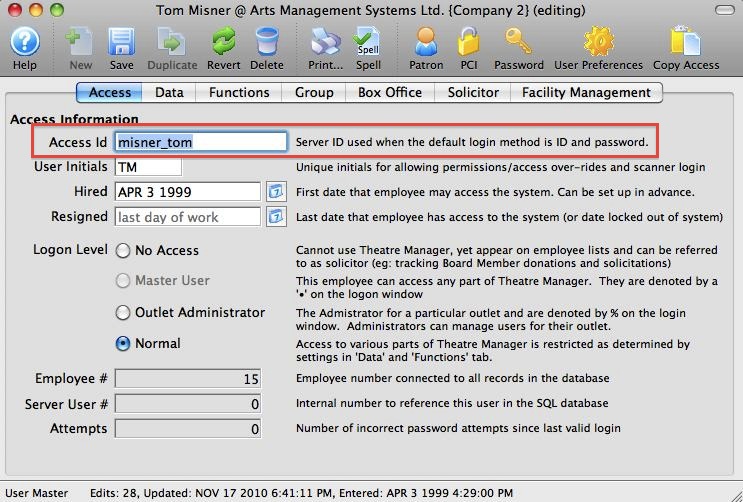
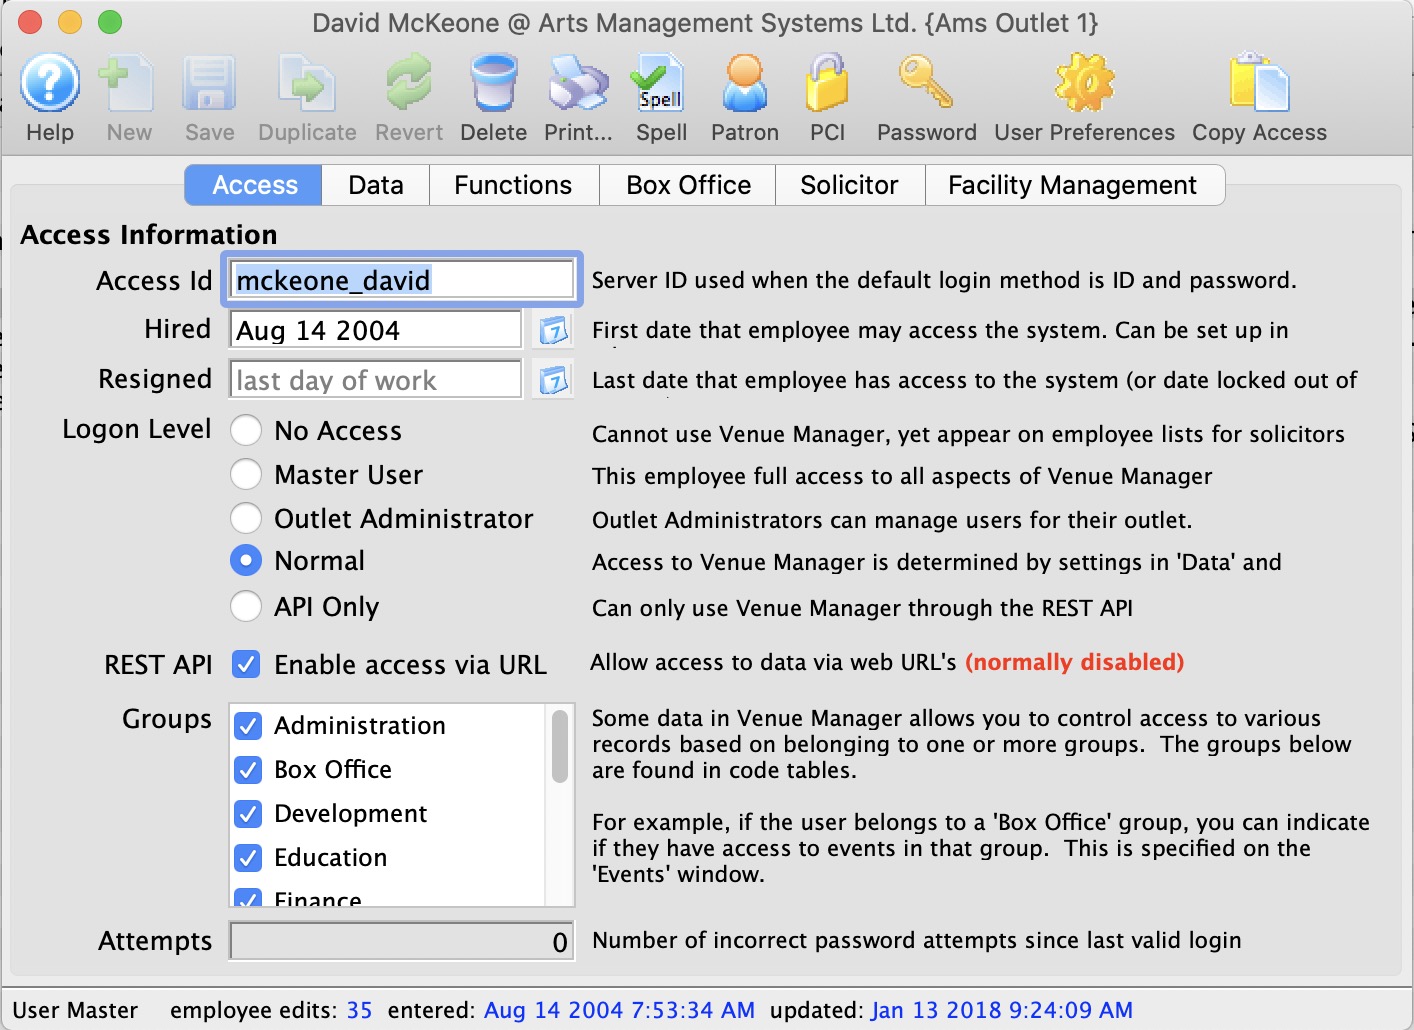
Access ID/Password
For enhanced security, Employees can be required to login using their own Access ID and password. The benefit is, to log in, the Employee must know BOTH their Access ID and their password, rather than a potential hacker choosing a name from a list and having to guess only one login access.
To enable this setting, change the Login Window Setting parameter in Setup>>System Preferences>>PCI Security tab.

The Access ID is found on the Access tab of the Employee record in Setup>>Users & Access>>Employee List.
|
The Access ID can be changed from the Theatre Manager default so that it is more easily remembered by the user. |
|
When providing Remote Assistance, AMS technicians will often require the Master User Access ID and password as they will be making adjustments to the operation of Theatre Manager. |

To Login to Theatre Manager using the Access ID and Password method, you perform the following steps:
- Start Theatre Manager by clicking on the desktop icon.
The Login window opens.
- Enter the Access ID and password you created when your Employee record was set up.
- Click the Logon
 button.
You will be logged into the last used database.
Windows NT Login ID
Employee Login
To login to the Theatre Manager system, you perform the following steps:
- Click/double-click the Theatre Manager icon
 on your desktop.
The Login window opens.
- Find your name in the list and select it.
- Click the Log On
 button.
- The Enter Password window opens.
- Enter your password.
- Click the Accept
 button.
The Theatre Manager application opens.
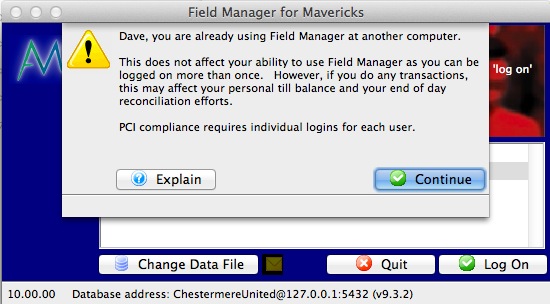
Logging in Twice
All it is doing is telling you that you may be logged in elsewhere for informational purposes.
- You may log in multiple times to the same database if you wish
- You should not share your user id with other users per PCI requirements for a unique login per person
- You can find out the IP address of the other workstations where you are logged in (if you think you are not logged in multiple times).
Click Continue to dismiss the message and continue logging in.
Password Help, Rules and Policies
 |
Theatre Manager implements fully PCI DSS compliant AES256 encrypted passwords per PCI DSS standard 8.5 and this feature cannot be changed or overridden.
This means all login passwords must be:
|
|
Changed all passwords from any vendor default password that might be used for installation per PCI DSS 2.1. For example, you must:
|
|
Never use the Master User account for daily operations. It should only be used when creating other accounts or for other very specialized needs as directed by Arts Management Systems. |
If your network has 'master' domain server (or open directory on OSX) available that could control password authentication for all machines, please ensure that the security policies on the domain/directory server is set to enforce PCI/DSS passwords and that all machines in the network log in using authentication from the server.
If a domain/open directory server is not available to enforce password settings, then each machine/user must use PCI/DSS compliant passwords.
|
If a user tries more than 6 times to gain access to the system, Theatre Manager automatically resigns the user - which means that they are locked out permanently until manually re-instated per PCI-DSS standard 8.5.13 and 8.5.14 |
Resetting an Employee Password
If an Employee forgets their password, or attempts to log in too many times and gets locked out of Theatre Manager, their password may need to be reset before they can log in again.
|
When an employee is locked out, Theatre Manager marks them as resigned. Any permissions that they used to have remain as they were. It is possible to reinstate the employee. This means that they will have same permissions from before they were locked out. |
- Log into Theatre Manager as a Master User or Outlet Administrator.
- Open the Employee List window.
Click here, for more information on the Employee List wondow.

- Search for the Employee to reset.
- Double click on the Employee record to open the Employee Data window.
Click here for more information on the Empolyee Data window.
- Click the Password
 button in the Employee Data window toolbar / ribbon bar.
The New Password window opens.
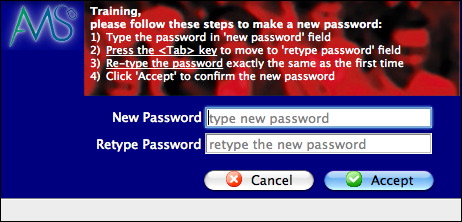
- Enter the password in the New Password field according to your password settings.
- Confirm the new password in the 'Retype Password' field.
- Click the Accept
 button.
The new password is set for the Employee.
Reinstating an Employee Locked Out of the Database
If an Employee returns to work for your organization, you can reinstate their Employee account.
You will also need to do this when an Employee enters an incorrect password too many times, as Theatre Manager will lock the Employee out of the program. This is designed to prevent people from accessing the database who should not have access.
Theatre Manager applies a resignation date to the Employee recor, which then removes them from the login window.
 |
This process is also used in cases when the Master User or Outlet User has been resigned/locked out. In this case, another Employee with Master User or Outlet User privileges can log in and complete the following process for the Master User account. We, also highly recommend setting a primary email for the Master User on its patron account so users can choose to have an email with the password sent to their email address in cases where the password is lost or forgotten. |
|
The password parameters are defined on the PCI Security tab in Setup>>System Preferences. |
- Login to Theatre Manager as a Master User or Outlet Administrator.
- Open the Employee List window.
Click here, for more information on the Employee List window.
- Check the Resigned box in the upper left of the window.
- Search for the Employee.
- Single click on the resigned Employee to select them.
- Click the Open
 button.
The Employee Access window for the selected employee opens.
- Clear the Resigned date field.
- Click the Password button in the Employee Access Data window toolbar / ribbon bar to set a one-time-use temporary password for the Employee.
NOTE: The employee will be forced to change their password from the one you enter above when they first log in.
- Close the Employee Access Data window.
The Employee is now listed in the login window andt hey will be able to access Theatre Manager using the password you entered above.
|
In some very rare cases, there will be no other Employees with Master User access to complete the above steps. In those instances, please enable Remote Assistance on the database server machine and contact support@artsman.com with the login id/pw combination so we can reinstate access. |
Change Your Password
To change your password to the Theatre Manager system, you perform the following steps:
- Click/double-click the Theatre Manager icon on your desktop.
The Login window opens.
- Find your name in the list and select it.
- Click the Log On button.
- The Enter Password window opens.
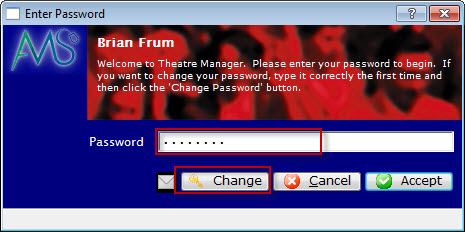
- Click the Change
 button.
- Enter your password.
- Click the Accept button.
The Change Password window opens.
- Enter your New Password.
- Enter the password again in the Retype Password field.
- Click the Accept button.
The Theatre Manager Application opens
If you change your mind, click the Cancel
 button. Theatre Manager will open.
Time on Computer Differs From Server
 You log into Theatre Manager and you get the following message:
Your computer date/time (MMDDYYYY 00:00:00) differs from the date on the database server (MMDDYYYY 00:00:00) by more than 30 seconds.
This error is one generated by Theatre Manager. Theatre Manager checks the time between the application and the Postgres Database Server as time is important in journalizing accounting.
|
If only one workstation is affected, it is ok to proceed with work but you should address the time discrepancy as soon as possible. Check the workstation clock If all workstations are getting the error, stop work, and resolve the issue as it may have a bigger impact on when transactions are posted. Check the time or timezone on the database server. |
Why does the time deviate?
It is a well established fact that computers don't keep time very well. They do a darn good job, but the time is generally based on the oscillation of crystals which are based on the frequency in the line voltage. If line voltage frequency varies from the normal +/- 60 cycles per second, it means clocks don't run true and they will never match the accuracy of an atomic clock.
Computer time can change on a particular machine for a number of reasons:
- sometimes it is the battery, or
- in older machines, it is not calculating the daylight savings time changes properly.
- Or your computer is in a different timezone than the database and needs an explicit offset
microsoft even states in this article that they expect the clock on the CPU to vary a minute a day up to an hour. yes, the article states that your computer clock may lose an hour a day.
Time differs by a few minutes
- Update the workstation clock and timezone to match the Server.
- In Theatre Manager you can check time zone setting in Setup >> Company Prefs >> Reports/Misc tab
- Set up time synchronization on your computer and server.
Time differs by an hourly increment.
- Verify that the server time and timezone is correct
- Verify that the timezone setting in the postgresql.conf file is correct.
- Verify that the workstation clock time and timezone match the Server. If they do not, you have two options:
- If the workstation should be in the same timezone, fix the timezone in the clock preferences
- If the office is in a different timezone than the server, you can set the workstation timezone in the Theatre Manager Preferences file for that workstation
- If it still persists, check that the postgresql.conf has the correct 'Log_timezone' setting and "timezone" setting for the local area and match the timezone on the server. There are instructions for editing on an OSX or Windows Server
- Typical values are:
- US/Eastern, US/Central, US/Mountain, US/Pacific, US/Alaska, US/Hawaii, US/Michigan, US/East-Indiana, US/Indiana-Starke
- Canada/Newfoundland, Canada/Atlantic, Canada/Eastern, Canada/Eastern, Canada/Saskatchewan, Canada/East-Saskatchewan, Canada/Central, Canada/Mountain, Canada/Yukon or Canada/Pacific
- The valid timezone list can be found in Setup >> Company Prefs >> Reports/Misc tab
Using Computer Time Synchronization
- On OSX, it is a matter of going to the system preferences and telling the Date&Time preference to 'Set Date and Time Automatically'
- On Windows:
- you can follow these instructions to set the time sync in control panels. But note, that windows does this sync once a week, so it is still possible for your clocks to drift during the week.
- If you want to actually force a time sync daily (or more often) you make a task that and follow the instructions in this help page
Changing the active Database
If you have multiple databases - such as a live, 'Production' database and a 'Training' database that is used for either training new employees in a benign environment or as a test bed for new ideas, concepts or features - you can switch between the databases on a 'per machine' basis. This means that while most of the office is using the 'Production' database, you can set a new employee at an out-of-the-way workstation where they can learn Theatre Manager without affecting the real data.
In general, Arts Management Systems will set up a Training database for you when we are visiting you onsite. If you require one at some other time, then simply contact Support at support@artsman.com, and we can arrange to remote in to your server and update your Training database for you. Note: In some cases, there may be a nominal charge for building a new Training database.
 |
A good time to rebuild your Training database is immediately after you have loaded all your events for the upcoming season. |
|
Click to see how to log into your database if it is hosted on the AMS Cloud |
To Change the Database:
- Double click on the icon on your desktop
- Either the List of Employees window or the Access ID window will appear.
- Click the
 button in the bottom left of the window.
The Database Connection window will appear.
button in the bottom left of the window.
The Database Connection window will appear.
- Use the drop down for DB Name to choose a different database.
- Click the
 button.
 - A Training database is clearly marked on the login window (where demo is shown below) and the title of every screen contains the word training
- A Demo database is marked as below.
|
You can also switch from a local database and log into the AMS Cloud Server and back, depending where your database is. |
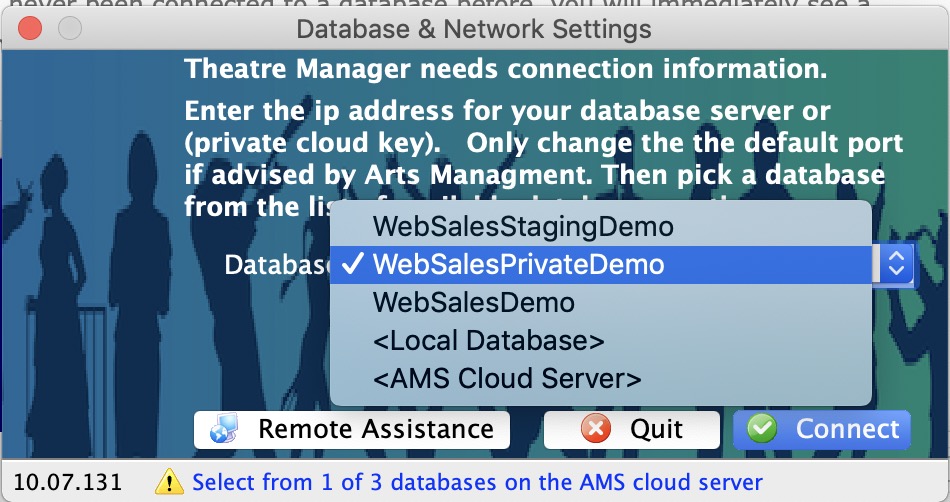
Either the List of Employees window or the Access ID window will reappear.
|
When switching databases, it is important to make note if the database is for Demo or Training use.
Often the Production and Training database are identical. However:  |
Login for Outlet Edition
The Login process for the Outlet Edition is the same as any other edition of Theatre Manager. Select your name from the list (or enter it directly), and enter your password to log in.
The Outlet Edition does have some extra considerations on the Login window. The Logon Level takes on new responsibilities based on your Cross Outlet Policies and Rules. For example:
- There should only be one Master User account. The Master User account is indicated by a solid bullet next to the Master User Employee Name.
- Each Outlet requires an Outlet Administrator account. The Outlet Administrator is indicated by an empty bullet on the Log in window.
- If an employee works for multiple Outlets, then that employee should have an employee record (still only one patron account) created for each Outlet. That employee will be required to log into the proper Outlet's employee record to have their activity and transactions recorded correctly.
RM Log In for Outlet Edition RM
Logoff
Logging off Theatre Manager is an important part of using the software. Since each client is provided with a specific number of licenses based on their contract with Arts Management Systems, you have only a limited number of licenses to go around your office. If you do not properly log off Theatre Manager, you may preclude someone else in your office from logging on.
|
Theatre Manager site licenses are 'concurrent' licenses - meaning, if your venue has ten user licenses, then ten workstations can be logged on at any one time. Theatre Manager can be installed on every workstation in your office, but only ten can log in at the same time. This emphasizes the need to have users log off when they are not using Theatre Manager. |
To Log Off of Theatre Manager, you perform the following steps:
There are two methods to log off of Theatre Manager.
- On the PC - From the Theatre Manager main menu, select File >> Quit.
- On the Mac - From the Theatre Manager main menu, select Quit Theatre Manager.
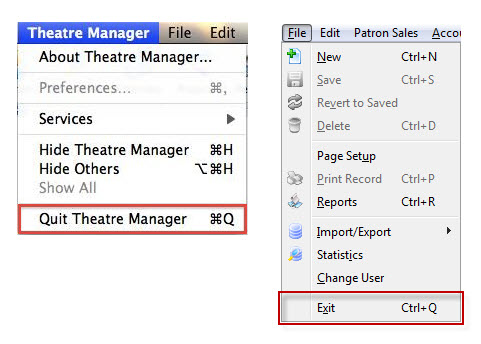
Alternatively, use the keyboard shortcut of:
- On the PC - Control+Q.
- On the Mac - Command+Q.
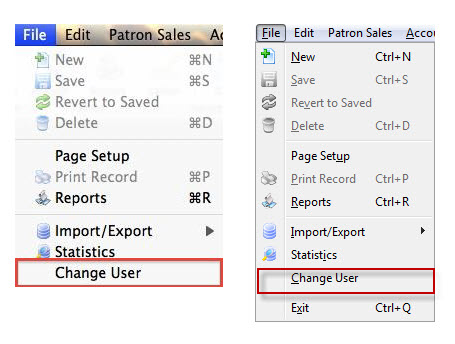
Change User
Occasionally, you may need to switch the Employee profile you are using in order to log on as a different Employee (for example the Master User). Rather than quitting Theatre Manager and logging back on, you can simply 'Change User.' This option will log off the current user, and return you to the login window.
- On both the PC and the Mac, choose File >> Change User