Form Letters and EBlasts
 A form letter is a standard letter sent regularly to patrons.
It is assumed that the general content of form letter will not change frequently - and yet you may want to customize some content each time it is sent to personalize it if desired. For example:
A form letter is a standard letter sent regularly to patrons.
It is assumed that the general content of form letter will not change frequently - and yet you may want to customize some content each time it is sent to personalize it if desired. For example:
- a user may automatically send a letter to patrons when they order tickets for the first time.
- The letter may include instructions on how to find the facility, information on upcoming events, and a thank you for purchasing tickets or for making donations.
- If you know the patron or they have unique circumstances, you can modify the version of the form letter for that patron only and save it.
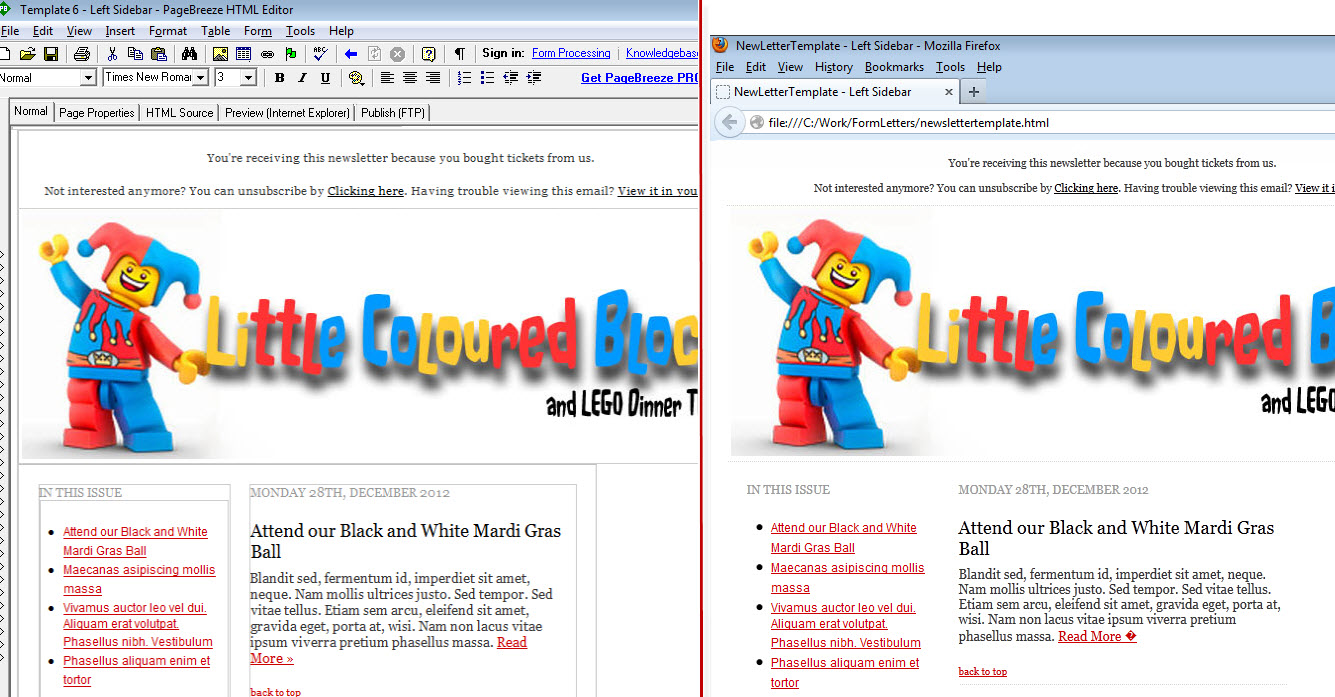
WYSIWIG Emails (or eblasts) in Theatre Manager work in the same way. An email is just a form letter that is sent as an email, rather than via the mail as per the example to the right.
After sending the email, you can track successful openings of the email and who has read it.
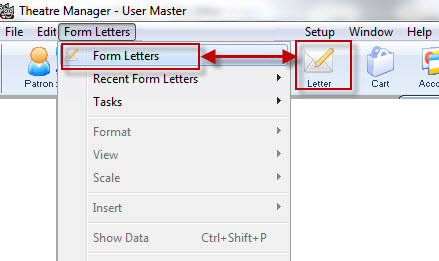
Access to the form letter functions is through the Form Letters Menu.

Click here for more information on the Form Letter Window.
| You can download the Cheatsheets (1-2 pages) and Screencasts (online video demonstrations of the functions with narration) by clicking on the icon. |
Cheatsheet (pdf) |
Flash Screencast |
MP4 Screencast |
| Create a Form Letter |
|
|
|
| Delete a Form Letter |
|
| |
| Export a Form Letter |
|
| |
| Import a Form Letter |
|
||
| Find an Existing Form Letter |
|
| |
| Duplicate a Form Letter |
|
| |
|
Merge a Form Letter and Delete a Batch |
|
|
|
|
Adding a Graphic to a Form Letter |
|


Windows and Features
This section describes the various windows and features of the Form Letter module. Please follow the links below for specific details on the word processor in Theatre Manager, the different areas of the Form Letters Menu and the Form Letter Window.
- Refer to instructions for how to create, edit and manage form letters.
- You can create a direct link to creating mail merges with your form letters .
- There are various Printing options.
- You can use this to create Address Labels.
Quick Reference information (Quick Reference Guides, Cheatsheets and Videos) are available for some Form letter functionality.
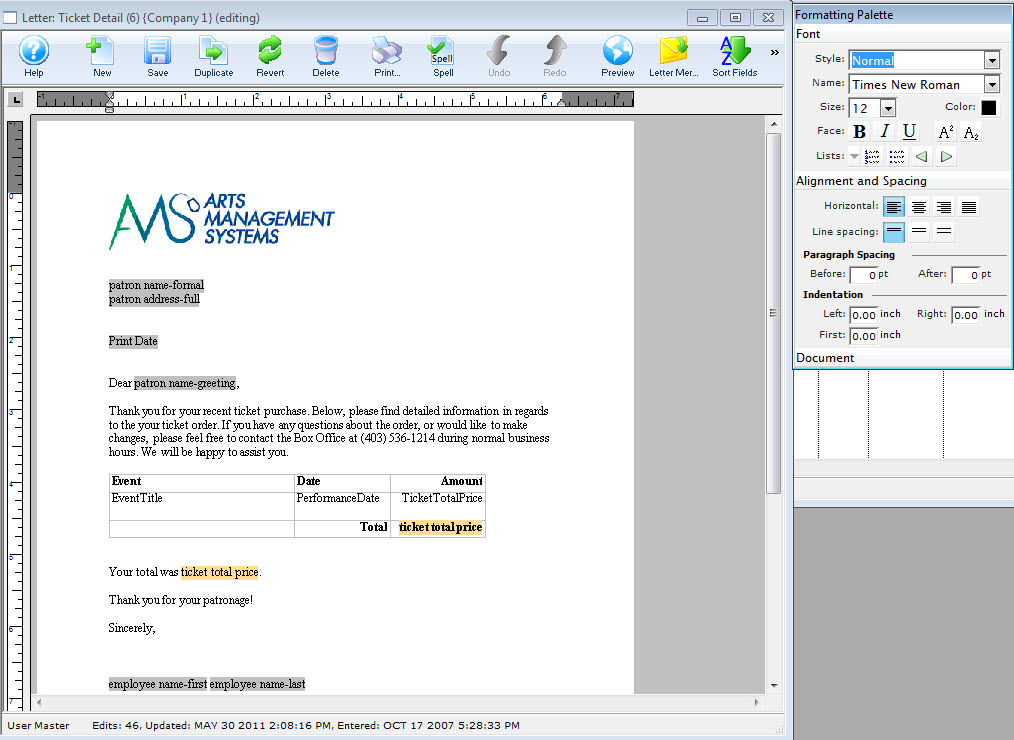
Features of the Word Processor
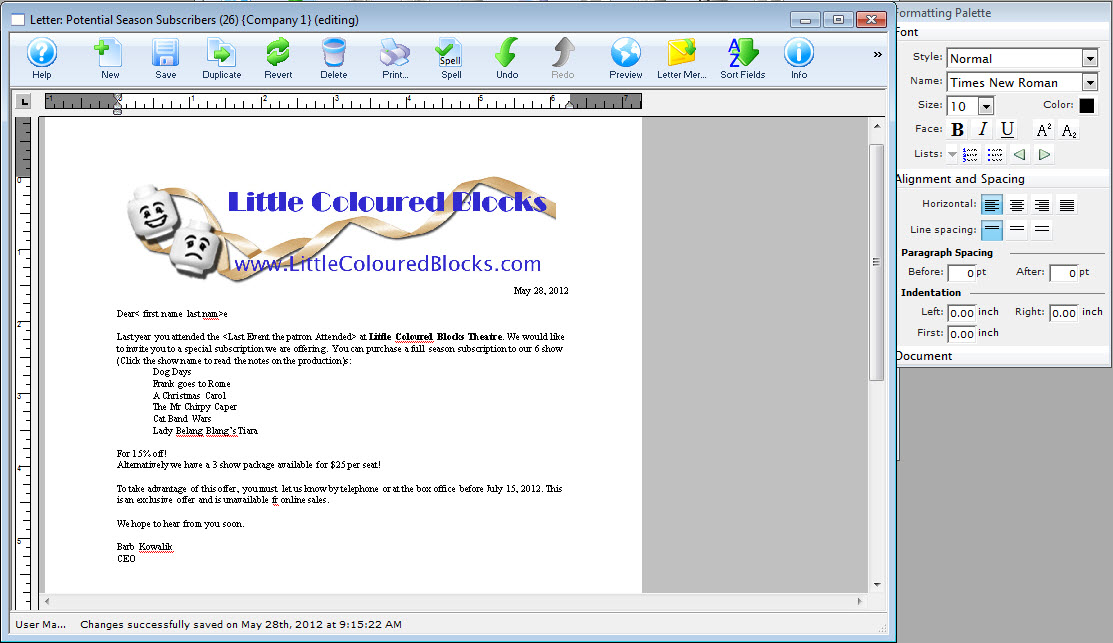
The word processing (form letter) module has a number of features common to most word processing software including a spell checker, merging of fields, tables, etc. It is also the foundation for creating what-you-see-is-what-you-get email blasts. You can see a sample on this page.
The Word Processor
- has a number similarities with common word processors.
- Documents can be viewed in Page Layout, Normal, and Field modes.
- The rulers allow the placing of tabs and setting of indents and paper margins.
- Text boxes, pictures and tables have numerous formatting options allowing the creation of more sophisticated documents.
- Theatre Manager data fields can be placed directly into the document, allowing you to personalize mailings and include patron-specific information in large mail merges.
- Document templates can be created for ease of use.
- The Find and Replace function is capable of searching and replacing based on text, styles, paragraphs, text formatting options, or any combination of this list.
- The spell checker is capable of checking as words are typed and will underline misspelled words in red. Simple context menus will show suggestions as to the appropriate spelling.
Other features include the Label Writer allowing address labels to be printed from database information, and a PDF Generator.
Quick Reference information (Quick Reference Guides, Cheatsheets and Videos) is available for some Form letter functionalty. Click here to access the Form Letter specific links.
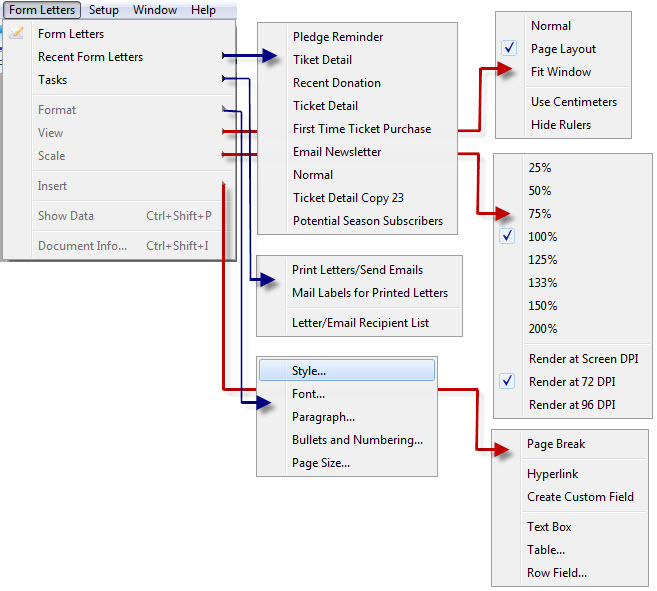
The Form Letters Menu
Alternatively, you can open Form Letters via the Letters  button on the main Theatre Manager toolbar / ribbon bar.
Quick Reference information (Quick Reference Guides, Cheatsheets and Videos) is available for some Form letter functionalty. Click here to access the Form Letter specific links.
Parts of the Form Letter Menu
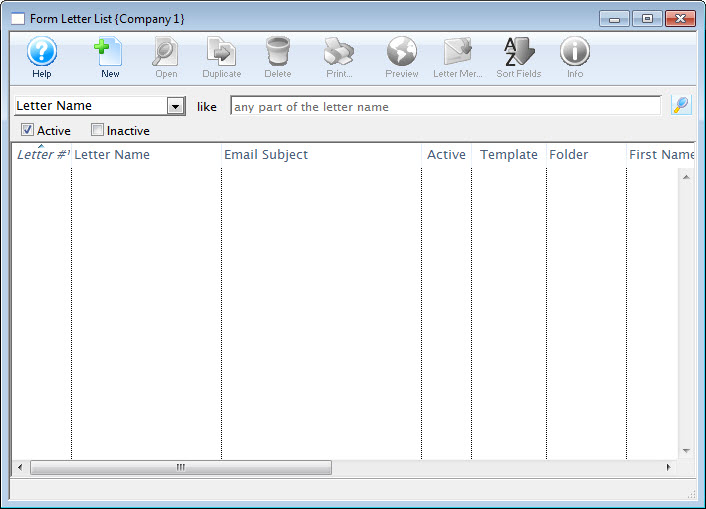
| Form Letters | This selection opens the Form Letter List window. Click here for more information on the Form Letter List window. |
| Recent Form Letters | This sub-menu lists recently accessed form letters for editing, and merging. For more information on the Recent Form Letters menu, click here. |
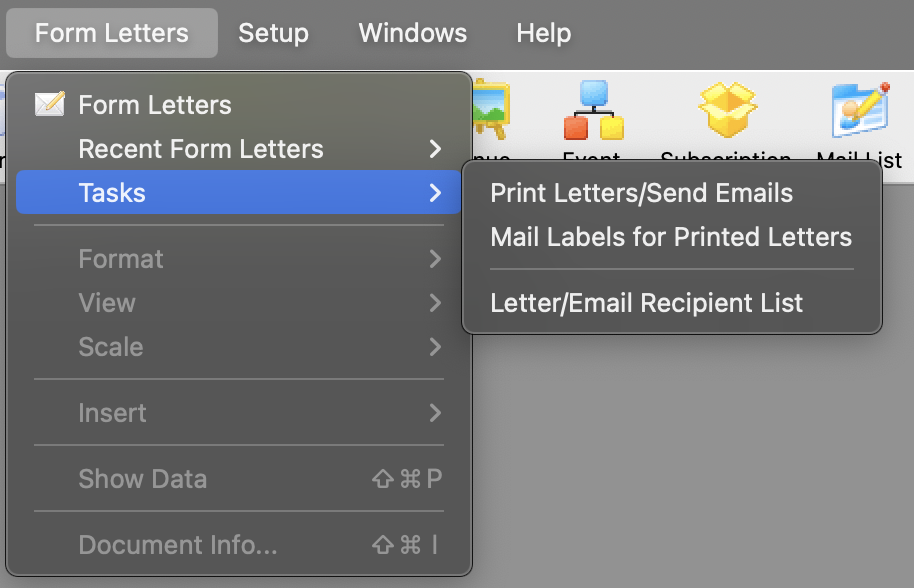
| Tasks | This sub-menu allows access to the printing features for letters and labels. For more information on the Tasks menu, click here. |
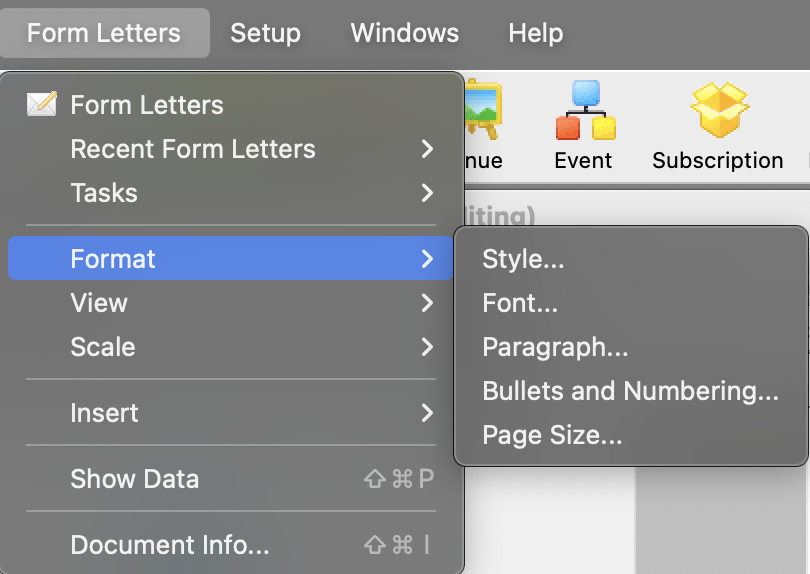
| Format | This sub-menu allows access to the different format features available when creating or editing a letter. For more information on the Format menu, click here. |
| View | This sub-menu allows changing the view options for the current document. For more information on the View menu, click here. |
| Scale | This sub-menu allows changing the zoom options for the current document. For more information on the Scale menu, click here. |
| Insert | This sub-menu allows the insertion of objects into the current document. For more information on the Insert menu, click here. |
| Show Data | Clicking on this menu option will convert all merge fields to date taken from the database. This is for viewing how the letter will look when merged. |
| Document Info | This will open the Form Letter Info Window for the current document. For more information on the Document Info window, click here. |
Search Function
You may search for donation receipts using a variety of fields. The search fields can be selected from the drop down list located in the upper left portion of the window.
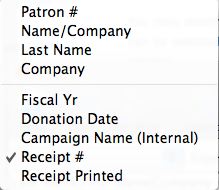
| Patron # | Use this search field to locate donation receipts for a range of, or a specific patron number. |
| Name/Company | Use this search field to locate donation receipts for a particular patron, or a range of patrons based on letters in their last name or company name. |
| Last Name | Use this search field to locate donation receipts for a particular patron, patrons with the same last name, or a range of patrons based on letters in their last name. |
| Company | Use this search field to locate donation receipts based on the company a patron works for. |
| Fiscal Year | Use this search field to locate donation receipts based on the fiscal year that the donation was received. |
| Donation Date | Use this search field to locate donation receipts based on the actual date that the donation was received. |
| Campaign Name (Internal) | Use this search field to locate donation receipts based on the internal name of the campaign type assigned to them. |
| Receipt # | Use this search field to locate donation receipts based on the receipt numbers that were assigned to them. |
| Receipt Printed | Use this search field to locate donation receipts based on the actual date that the donation receipts were printed. |
| From and To | Use these fields to enter in search parameters based upon the field you are using to search. |
 |
This button will begin a search for donation receipts that match the specific search criteria set in the from and to fields. |
 |
Opens the selected Donations Detail window. |
 |
Unprints the receipt for the selected Donation. |
 |
Exports the data from the Donation Receipt List out of Theatre Manager as a tab-delimited file to be used in other programs. |
 |
Generates the Donation Receipts List as a report with the results of the searched for patrons found in the displayed list. |
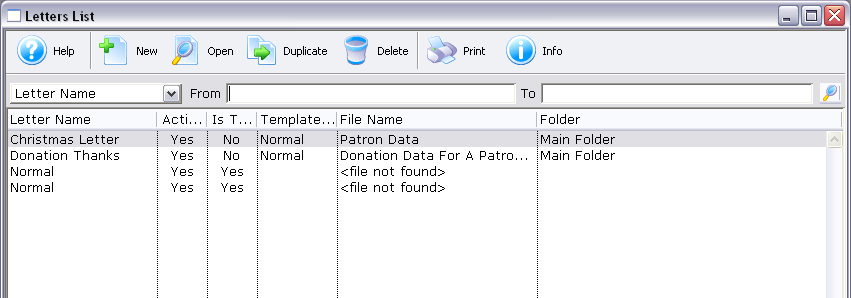
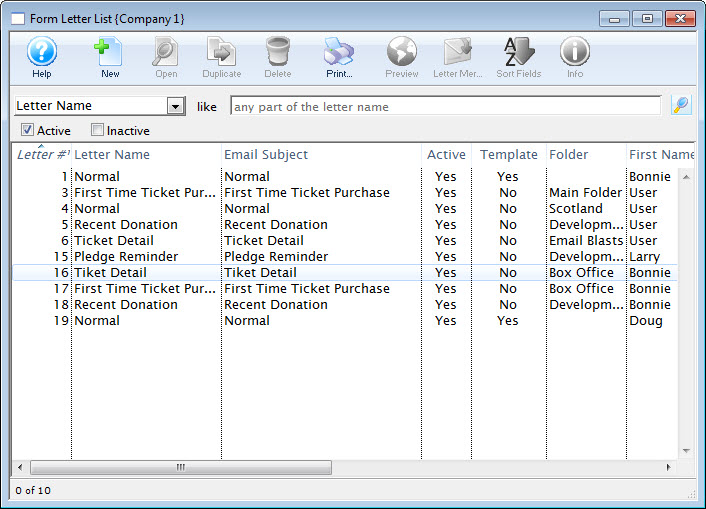
Form Letter List Window
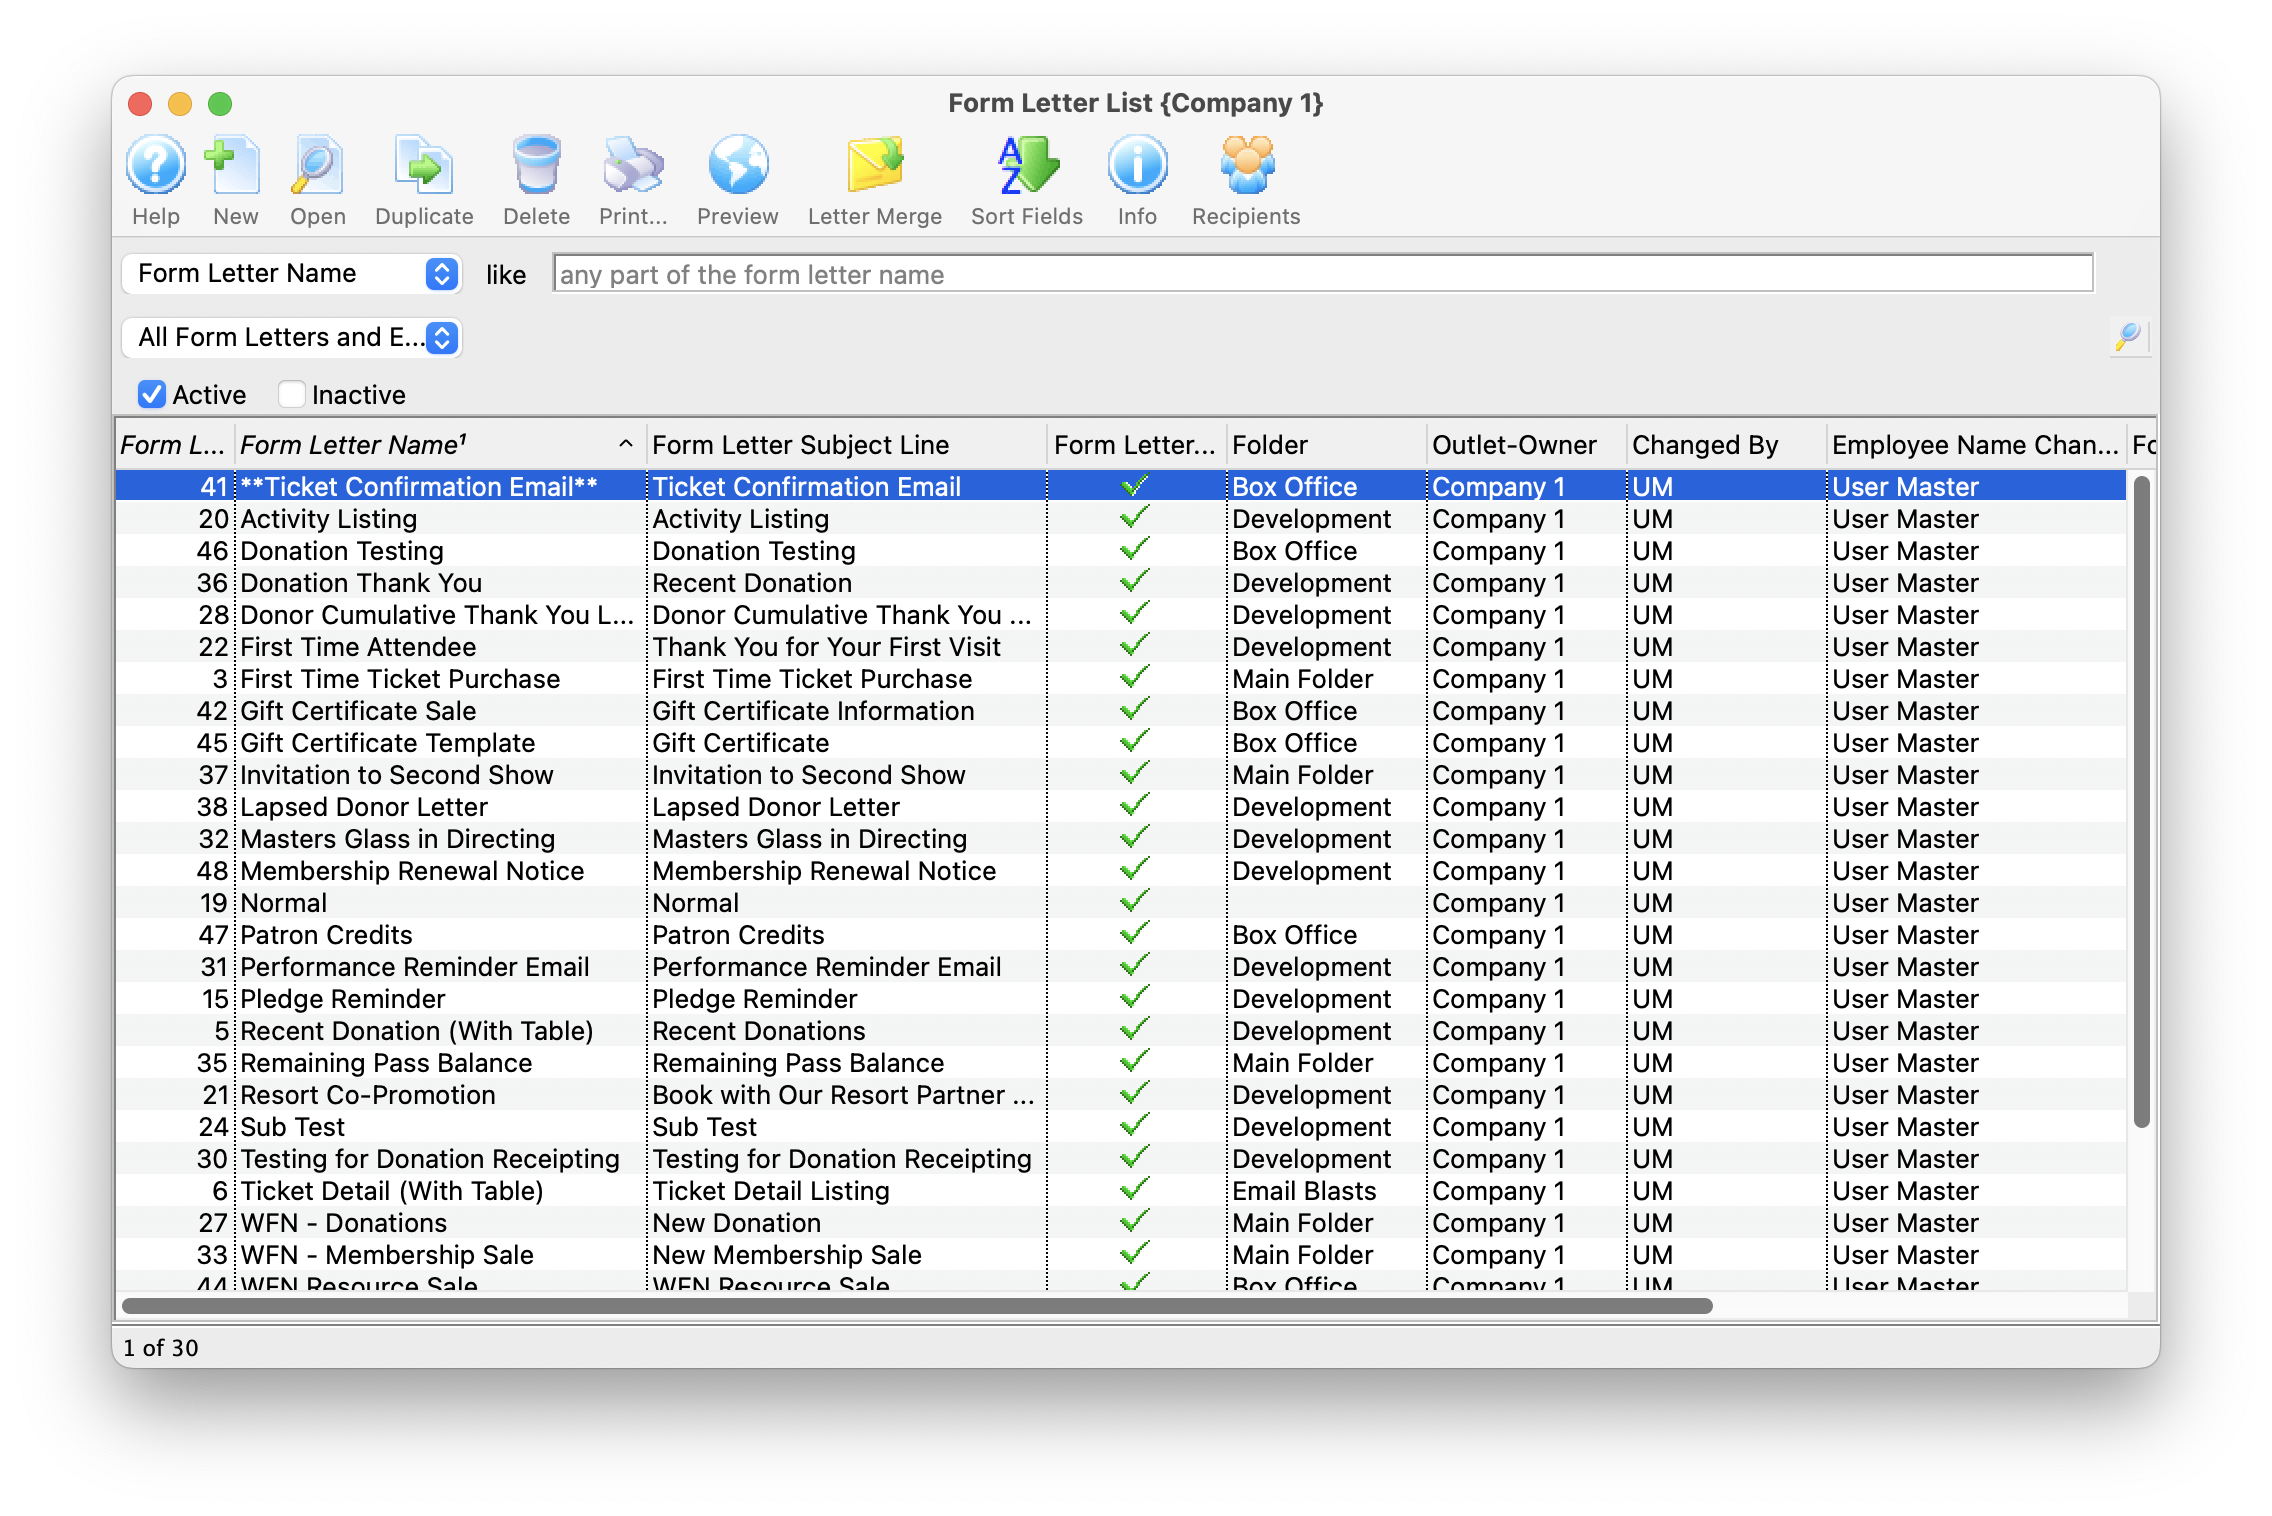
The Form Letter List Window is opened by accessing the Form Letters Menu >>
Letters >> Open or Rename Form Letters or by clicking on the Letters button on the main toolbar.
Quick Reference information (Quick Reference Guides, Cheatsheets and Videos) is available for some Form letter functionalty. Click here to access the Form Letter specific links.
Parts of the Form Letter List Window
 |
Opens the Form Letter Window and created a new Form Letter. Click here for more information on creating a Form Letter. |
|
Opens the currently selected Form Letter. Click here for more information on finding a Form Letter. |
 |
Duplicates the currently selected Form Letter. Click here for more information on duplicating a Form Letter. |
 |
Deletes the currently selected Form Letter. Click here for more information on deleting a Form Letter. |
|
Prints the currently selected Form Letter. Click here for more information on printing a Form Letter. |
 |
Displays the Form Letter Info Window for the currently selected Form Letter. Click here for more information on this window. |  |
Opens a list of patrons who have been sent correspondence from a selected Form Letter |
 |
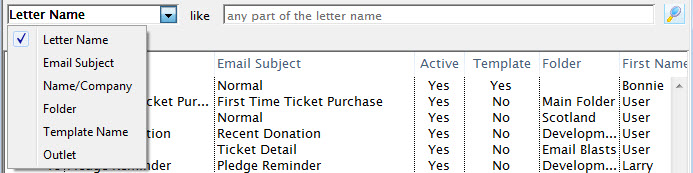
Drop down menu allowing for different ways to search for a Form Letter. |
|
Allows for searching for a Form Letter via text matching the selected field in the Drop Down List. Pressing the search button with noting entered, displays the full listing of letters. |
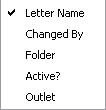
| Letter Name | The file name of the letter currently displayed. |
| Active? | Shows whether the letter is currently active for use. |
| Is Template | Shows whether the letter is a template to be used for the creation of other letters. |
| Template Name | Shows the name of the template used in the creation of the letter. |
| File Name | The data set being used for the merge fields of the letter. |
| Folder | The folder that the letter is currently saved under. |
Recent Form Letters Menu
This menu shows a list of recently used form letters to more quickly access the most recent letters.

Form Letter Tasks Menu
 This menu is used for creating new form letters, editing existing form letters, and merging form letters with data.
Parts of the Tasks Menu
| Print Letters / Send Emails | Begins the batch print process for letters and/or the batch process for sending e-mails. For more information on printing letters and sending emails click here. |
| Mail Labels for Printed Letters | Allows you to print labels. Click here for more information on printing labels. |
| Letter / Email Recipient List | Allows you to find out who received a letter or eblast and/or look at the current status of a series of letters. click here for more information on the email / recipient listing. |
Formatting
Format Menu Items
 The Format menu is used for adjusting the format of the text and paragraphs of the letter. Some of these options are also available in:
- The context menu for the word processor window
- Some keyboard shortcuts
Parts of the Format Menu
| Style | This opens up the Format Style window for changing the style of the text based on an existing style (or to make a new style. |
| Font | This opens the Format Font Format Font window for changing the font of the text. |
| Paragraph | This opens the Paragraph Properties window for changing the format of paragraphs in the letter. |
| Bullets and Numbering | This opens the Bullets and Numbering window for formatting text with bullets or numbering. |
| Page Size | This opens the Format Page Size window for the adjusting the properties of the document. |
Format Style
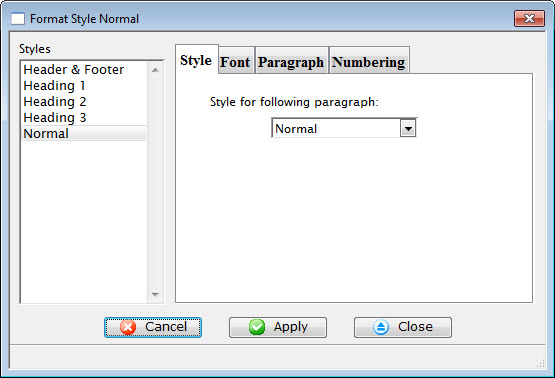 The Style Menu is a sub level of the Format Menu under Form Letters. The Style
Menu lists templates of the most used font styles and sizes. It allows setting
the style and size in which the text will be displayed, or to change the
style and/or size of the currently selected text.
The Style Menu is a sub level of the Format Menu under Form Letters. The Style
Menu lists templates of the most used font styles and sizes. It allows setting
the style and size in which the text will be displayed, or to change the
style and/or size of the currently selected text.
Some of these options are also available in:
- The context menu for the word processor window
- Some keyboard shortcuts
Parts of the Format Style Converter
 |
Adjusts the style of the selected template. For more information on the style tab click here. |
 |
Sets the font for the selected template. For more information on the font tab click here. |
 |
Defines the paragraph dimensions for the selected template. For more information on the paragraph tab click here. |
 |
Determines the bullet and numbering format for the selected template. For more information on the numbering tab click here. |
Style Sheet Tab
Displays the styles available in the document and allows you to both alter the style sheet and choose the style for the following paragraph.
Parts of the Style Tab
| Converter | This style is a 12 point Geneva font. |
| Heading 1 | This style is typically used for the first heading of a section. It is a 16 point Helvetica font. |
| Heading 2 | This style is typically used for a second-level heading in a section. It is a 14 point Helvetica font. |
| Heading 3 | This style is typically used for a third-level heading in a section. It is a 13 point Helvetica font. |
| Normal | This style is typically used for the body of a paragraph. It is a 12 point Times New Roman font. |
Font Tab
Font Tab |
|
| Font | A drop-down menu listing all available fonts that can be used in the letter. |
| Font Size | A drop-down menu listing standard point sizes for the font selected. Sizes may also be entered in the field manually. |
| Style | This style section refers to the style of the font. The available options are Bold, Italics, and Underlined. |
| Text Color | The color of the text may be changed either by:
|
| Script | The script section allows for the text to be formatted as either Superscript or Subscript. |
Format URL for Link
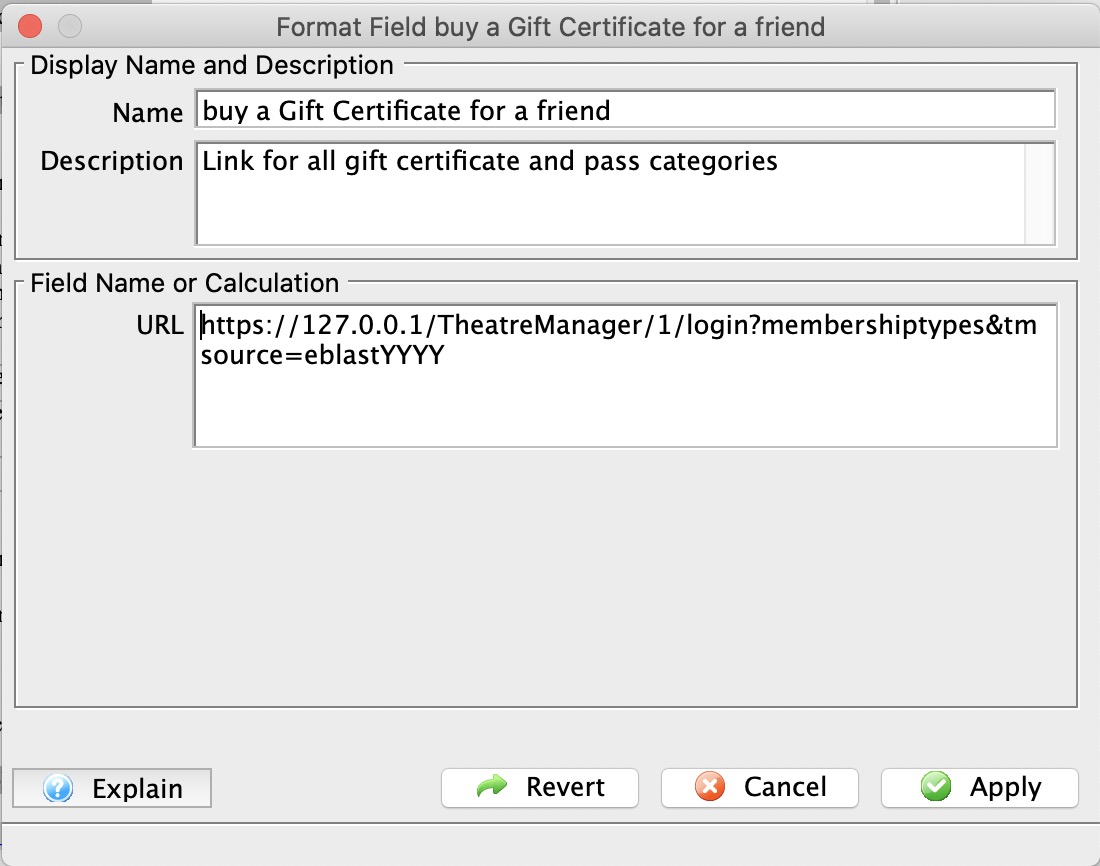 Links are useful in eblasts to help you direct the patron to a specific area in the web site to begin the buying process and track the reason people came to the web site using the tmsource feature of a link
You can right-click on text to format it a Link or to edit the URL for an existing link.
You can alter the:
- Name of the link which is displayed on the letter for the patron to click on
- Description of the field which is the tooltip displayed when you run your mouse over the field. It will default to explain what link you have chosen
- URL that clicking on the link will display in your browser.
Selecting a link
You can type in any link you want such as your marketing web site URL or the ticketing web site.
The context menu has a helper to help you quickly insert a URL for various parts of your ticketing web site.
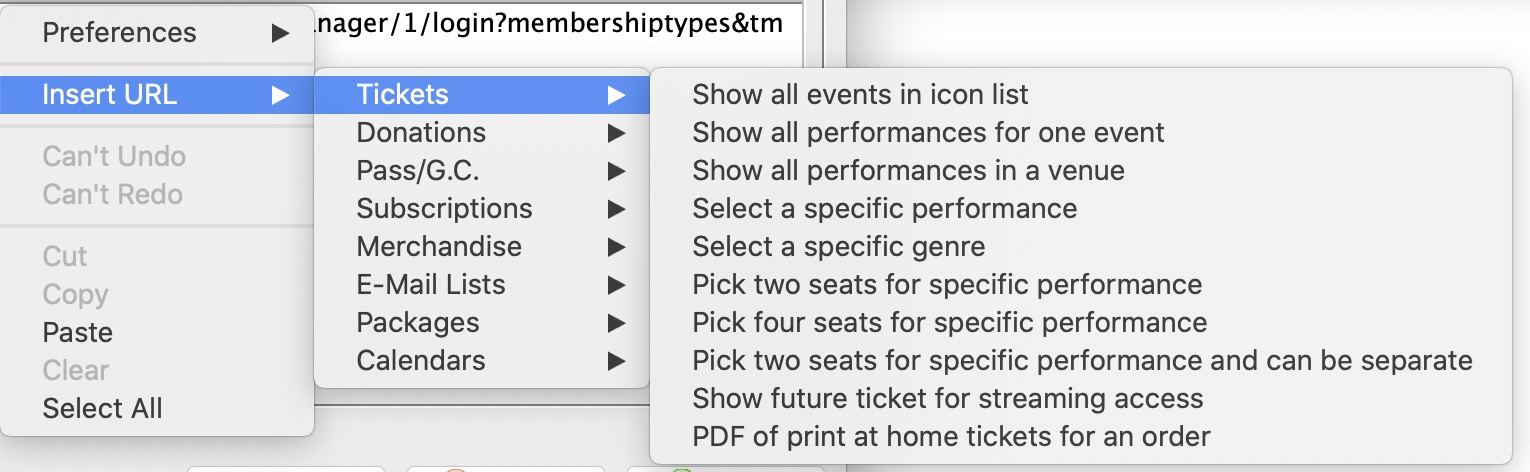 For example, if you want to place a link to show all events:
- Right click on the URL field
- Select Insert URL
- Select Tickets category of URL's
- Select Show All Events in Icon List
- The Description will change to describe what the link does as a helpful tip to you
- The URL will be changed to the link that will accomplish that task
- Some links will have XXX or QQQ in them. It the link is for a donation campaign, the XXX need to be changed to one of your donation campaigns.
 |
For more information about a URL that is inserted, please refer to redirecting links |
|
The parameter tmSource is automatically appended to the end of all links with an example value. Please change it to make sure you do eblast referral tracking. |
Formatting Fields and Calculations or a Form Letter
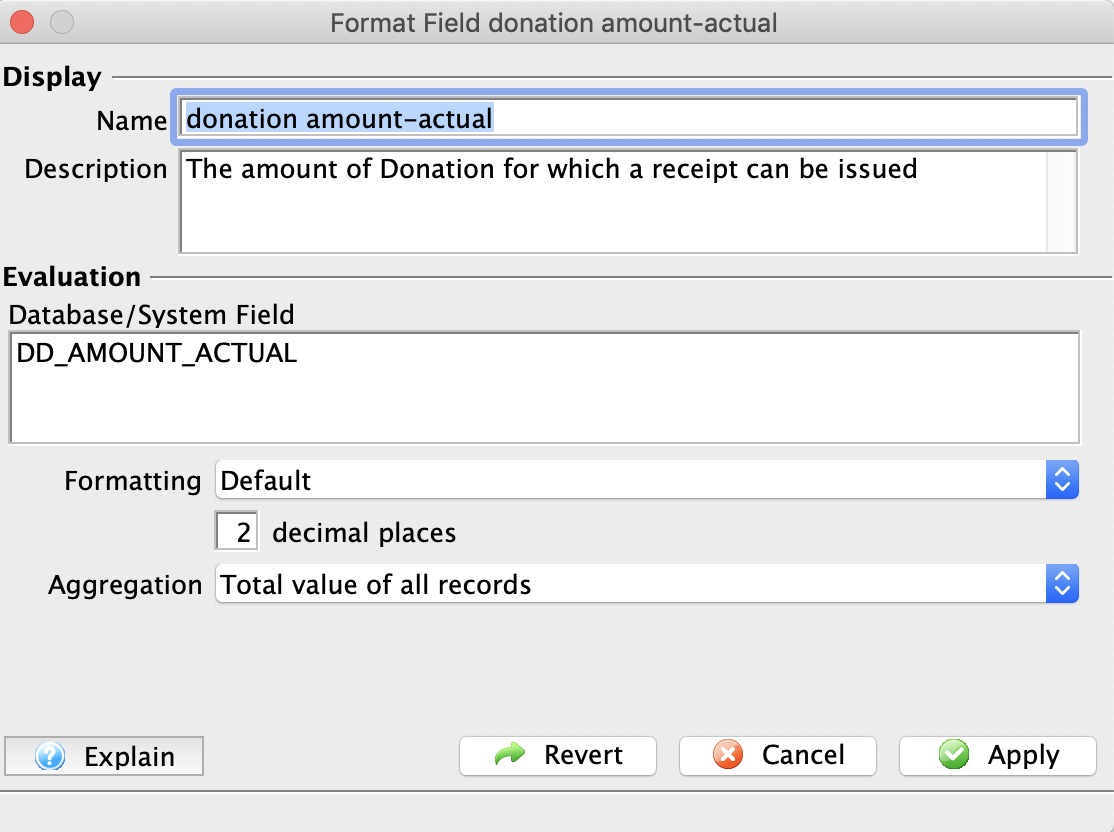 You can double click on fields to alter some formatting of the field and some other options. You can alter the:
- Name of the field which is displayed on the letter, if you prefer something different than the standard.
- Description of the field which is the tooltip displayed when you run your mouse over the field.
- Calculation that the field will display. This is normally only a single database field selected from the context menu as per the example to the right.
- Formatting of the field (numeric, date, text, currency, etc) by using the popup.
- Number of decimals if it is a numeric field
- Aggregation of the field if it is of a type that can be aggregated.
- Typically this lets you display maximum, minimum, total or average value of all the records that might appear on a consolidated letter
- It is only effective on a document designed to display multiple records in a table
- Note: If a field has aggregation set on it, it appears yellow in the document
Adding a calculation containing one or more fields
The one time you may wish to change all the options available for a field is when you want to have a calculation occur between multiple fields. The example below shows calculating the net deductible donation amount based on the difference between the actual donation amount and the benefit. In this case, the sample shows the calculation changed and all other items in the screen changed to reflect it on the document.
An obvious question is how to get the names of the fields for a calculation. You can use a simple trick:
- Insert each the fields onto the form letter that you might want to put in the calculation
- Double click on those fields
- Write down the name of the field from the 'evaluation' field
- Close the window
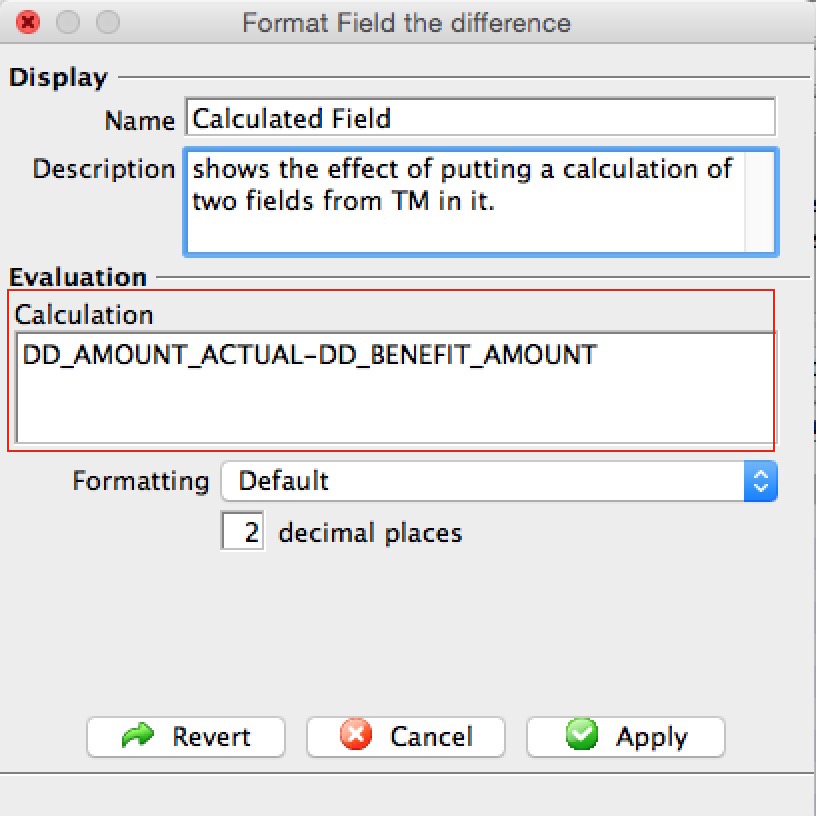 Insert one of the fields a second time (or copy/paste it). This is what we will use as the calculated field.
- Change the Database/System Field area to contain a calculation based on multiple variables. In this example, the field
DD_AMOUNT_ACTUAL was changed to be the calculation
DD_AMOUNT_ACTUAL-DD_BENEFIT_AMOUNT
- hit the tab key and the Database/System Field will change to Calculation if it contains valid fields to let you know that Theatre Manager recognizes the calculation
- You may wish to change the name and description to indicate what you've done - and the next person to edit the letter will know from the name of the calculation what it means.
- Change the Database/System Field area to contain a calculation based on multiple variables. In this example, the field
- Print some samples of the letters - reviewing the date on the letter to see if it is right
- Then remove any fields from the letter that you don't really want the patron to see, but you added to the letter to get the field names
Once you've created a calculation, you should also be able to use it to create a custom field and do conditional printing.
Paragraph Tab
Paragraph Tab |
|
| First Line Indent | Sets the indent of the first line of each paragraph. |
| Left Indent | Sets a left indent to all lines of a paragraph. |
| Right Indent | Sets a right indent to all lines of a paragraph. |
| Alignment | A drop-down menu allowing for the adjustment of the alignment of the paragraph. The available options are Left, Center, Right, and Justified. |
| Line Spacing | A drop-down menu to set the spacing between lines in a paragraph. The available options are Single, 1.5, and Double. |
| Spacing Before | Sets the spacing before each paragraph. |
| Spacing After | Sets the spacing after each paragraph. |
| Tabs | Sets any tab stops that should be on the page. L=Left, C=Centre, R=Right, D=Decimal followed by a number where the tab stop occurs.
For example: a tab stop o L2.50 would a Left Tab at 2.5". Tabs can be set usin the toolbar as well. |
Numbering Tab
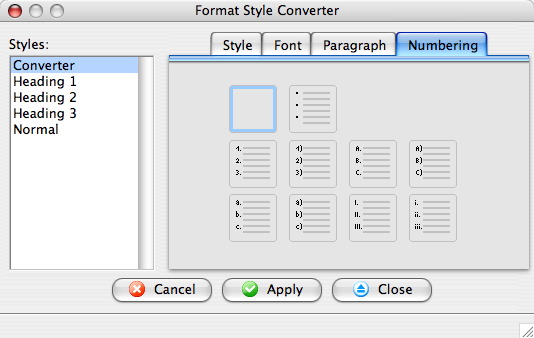
Parts of the Bullets and Numbering Window |
|
 |
Text is not in list format or removes list format from selected text. |
 |
Converts the text to a list with bullets. |
 |
Converts the text to a list with numbers and a period separator. |
 |
Converts the text to a list with numbers and a parentheses separator. |
 |
Converts the text to a list with upper case letters and a period separator. |
 |
Converts the text to a list with upper case letters and a parentheses separator. |
 |
Converts the text to a list with lower case letters and a period separator. |
 |
Converts the text to a list with lower case letters and a parentheses separator. |
 |
Converts the text to a list with roman numerals and a period separator. |
 |
Converts the text to a list with roman numerals and a parentheses separator. |
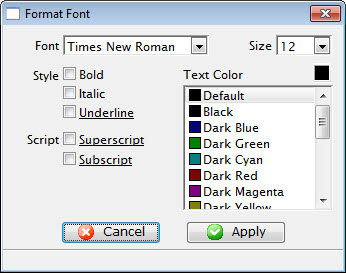
Format Font Window
 The Font Menu is a sublevel of the Format Menu under Form Letters. The Font
Menu allows the changing of the font and size of the text for input, or
to change text that is currently selected.
The Font Menu is a sublevel of the Format Menu under Form Letters. The Font
Menu allows the changing of the font and size of the text for input, or
to change text that is currently selected.
Some of these options are also available in:
- The context menu for the word processor window
- Some keyboard shortcuts
Parts of the Format Font Window
| Font | A drop-down menu listing all available fonts that can be used in the letter. |
| Font Size | A drop-down menu listing standard point sizes for the font selected. Sizes may also be entered in the field manually. |
| Style | This style section refers to the style of the font. The available options are Bold, Italics, and Underlined. |
| Text Color | The color of the text may be changed either by using the color picker button on the right hand side, or the list of default colors below. |
| Script | The script section allows for the text to be formatted as either Superscript or Subscript. |
 |
Closes the Format Font window without applying any changes. |
 |
Applies the changes to the text and closes the Format Font window. |
Paragraph Properties
 The Paragraph Menu is a sublevel of the Format Menu under Form Letters. The
Paragraph Menu allows the adjustment of the paragraphs in the letter.
The Paragraph Menu is a sublevel of the Format Menu under Form Letters. The
Paragraph Menu allows the adjustment of the paragraphs in the letter.
Some of these options are also available in:
- The context menu for the word processor window
- Some keyboard shortcuts
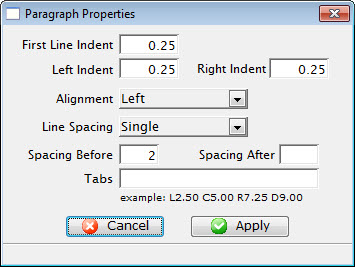
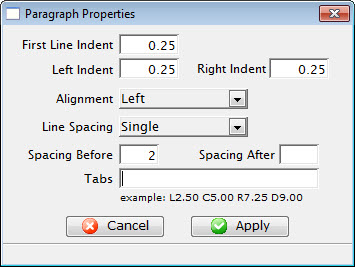
Parts of the Paragraph Properties Tab
| First Line Indent | Sets the indent of the first line of each paragraph. |
| Left Indent | Sets a left indent to all lines of a paragraph. |
| Right Indent | Sets a right indent to all lines of a paragraph. |
| Alignment | A drop-down menu allowing for the adjustment of the alignment of the paragraph. The available options are Left, Center, Right, and Justified. |
| Line Spacing | A drop-down menu to set the spacing between lines in a paragraph. The available options are Single, 1.5, and Double. |
| Spacing Before | Sets the spacing before each paragraph. |
| Spacing After | Sets the spacing after each paragraph. |
| Tabs | Sets any tab stops that should be on the page. An example of a tab stop would be L2.50 which places a Left Tab at 2.5". |
|
Closes the Format Font window without applying any changes. |
|
Applies the changes to the text and closes the Format Font window. |
Format Page Size Window
 The Page Size Menu is a sublevel of the Format Menu under Form Letters. The
Page Size Menu allows the adjustment of the size and orientation of the letter..
The Page Size Menu is a sublevel of the Format Menu under Form Letters. The
Page Size Menu allows the adjustment of the size and orientation of the letter..
Some of these options are also available in:
- The context menu for the word processor window
- Some keyboard shortcuts
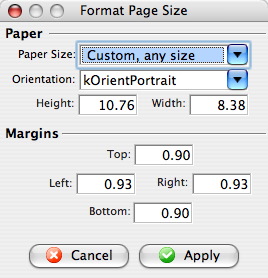
Parts of the Format Page Size Window
Paper |
|
| Paper Size | The drop-down menu displays a list of standard paper sizes. The user may also enter custom sizes below or select the custom format from the list. |
| Orientation | The drop-down menu allows a change between orientating the paper in Portrait or Landscape. |
| Height | Displays the height of the paper when a size is selected above or allows the user to enter a custom height. |
| Width | Displays the width of the paper when a size is selected above or allows the user to enter a custom width. |
Margins |
|
| Top | Sets the size of the top margin in inches. |
| Left | Sets the size of the left margin in inches. |
| Right | Sets the size of the right margin in inches. |
| Bottom | Sets the size of the bottom margin in inches. |
|
Closes the Format Font window without applying any changes. |
|
Applies the changes to the text and closes the Format Font window. |
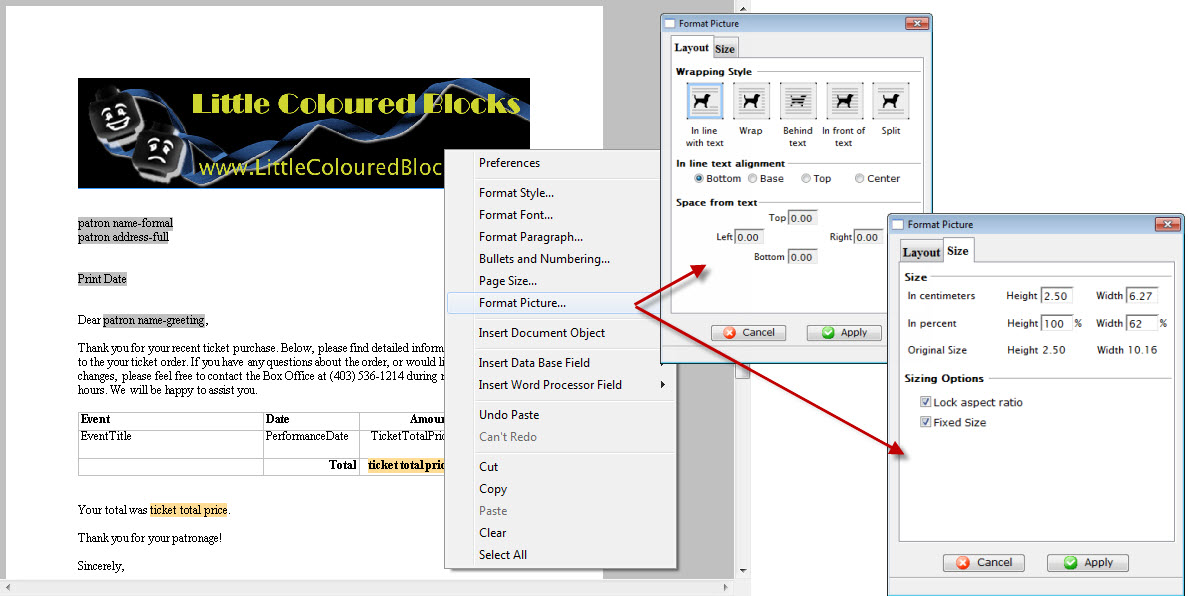
Format Picture or Image
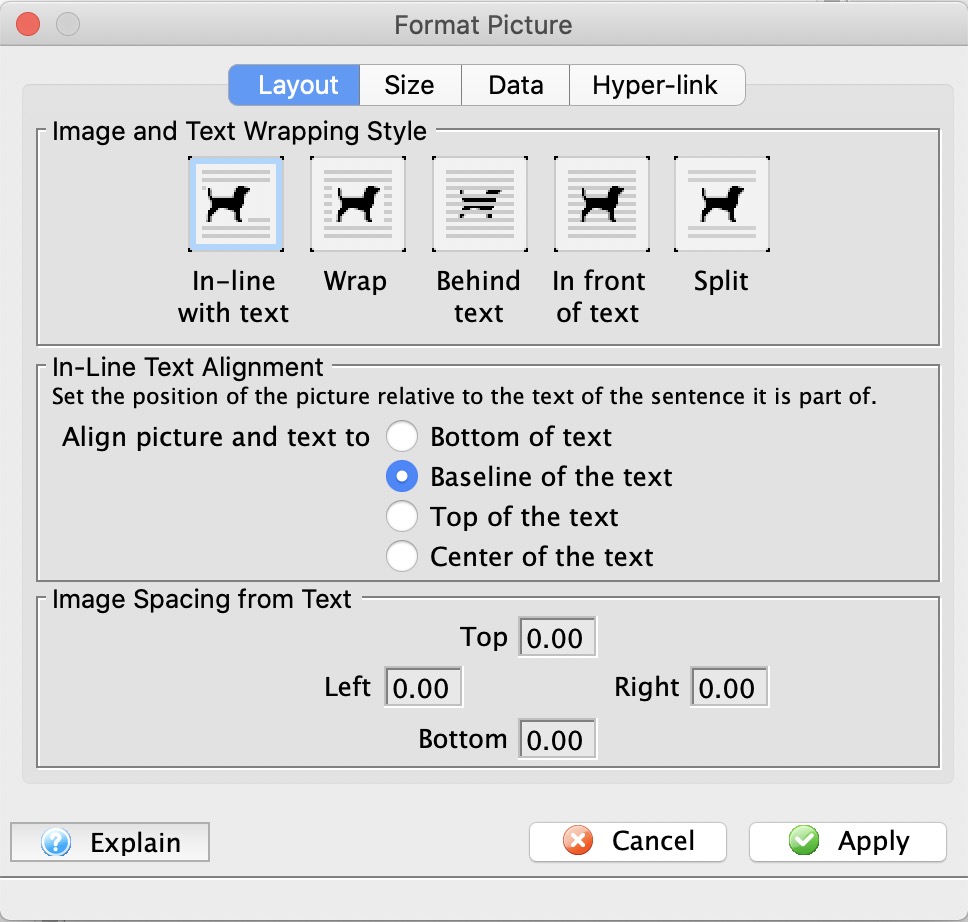 This allows you to format many aspects of a picture such as:
- How text wraps around the image
- How the text aligns to the top or bottom of text
- The amount of spacing from the image and the rest of the text in all directions
- Alter the size of the picture for display purposes
- Keep the aspect ratio
- Give the image a name and description for documentation purposes
- A URL to open when the image is clicked
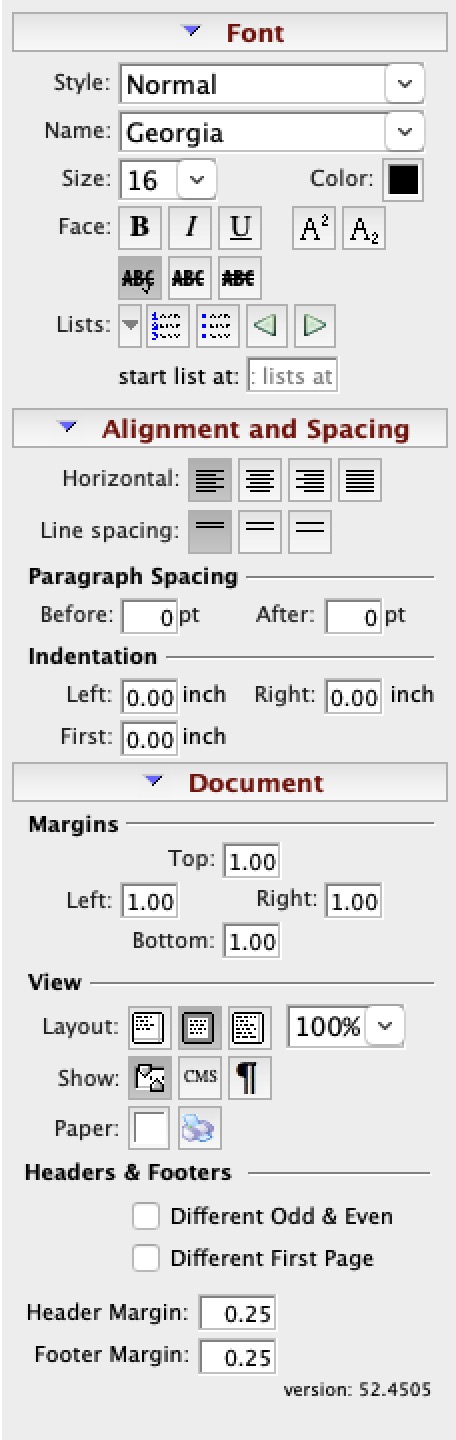
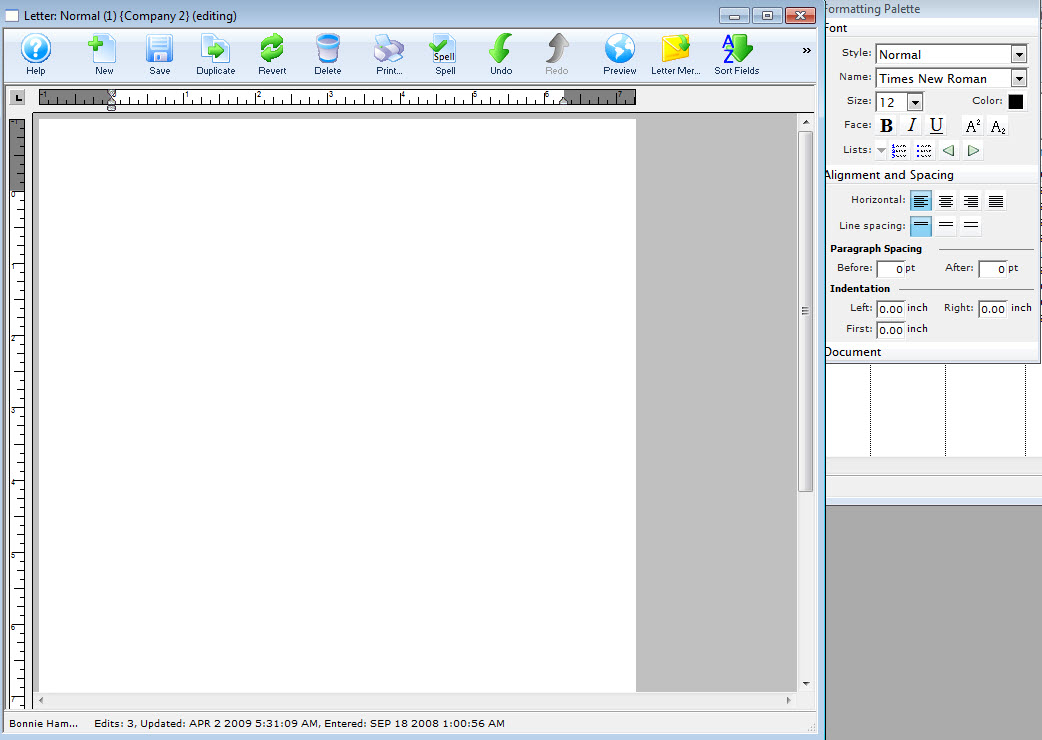
The Formatting Palette
- The context menu for the word processor window
- The Form Letter menus on the main Theatre Manager menu bar
- Some keyboard shortcuts
Parts of the Formatting Pallette
Font |
 |
|
| Style | Templates for font styles. A style may be applied to text to change its formatting. Drop down the menu to change the style. | |
| Name | Name of the current font. Drop down the menu to change the font. | |
| Size | Size of the current font. Drop down the menu to change the size. | |
| Color | Color of the font. Drop down the menu to view the color picker. | |
| Face | Affects the special format of the text. This allows for Bold, Italic, Underlined, Superscript and Subscript text. | |
| Lists | Inserts a list into the current text. The list can be in numbered or bulletted format. The list can also be indented or outdented. | |
Alignment and Spacing |
||
| Horizontal | Changes the horizontal alignment of the text to either Left, Center, Right or Justified. | |
| Line Spacing | Changes the spacing between lines to 1 line, 1.5 lines or 2 lines. | |
Paragraph Spacing |
||
| Before | Changes the spacing between a new paragraph and the preceding paragraph. | |
| After | Changes the spacing after a paragraph and before the following paragraph. | |
Indentation |
||
| Left | Changes the indenation of text on the left side. | |
| Right | Changes the indentation of text on the right side. | |
| First | Changes the indentation for the first line of a paragraph. | |
Document |
||
Margins |
||
| Top | Changes the size of the Top margin of the document. | |
| Left | Changes the size of the Left margin of the document. | |
| Right | Changes the size of the Right margin of the document. | |
| Bottom | Changes the size of the Bottom margin of the document. | |
View |
||
| Layout | Changes the Layout View of the document between:
|
|
| 100% | You can set the zoom in/out of the document view. | |
| Show | The first button will turn on the rulers and the second button will change the rulers from inches to centimetres.
Also on the View Menu |
|
| Show Paragraph | the show paragraph icon will show the hidden text markers like tabs, paragraph markers and other invisible non-breaking spacing characters | |
| Paper Colour | Drop down menu allows for changing the color of the paper via a color picker. | |
| Paper Size |
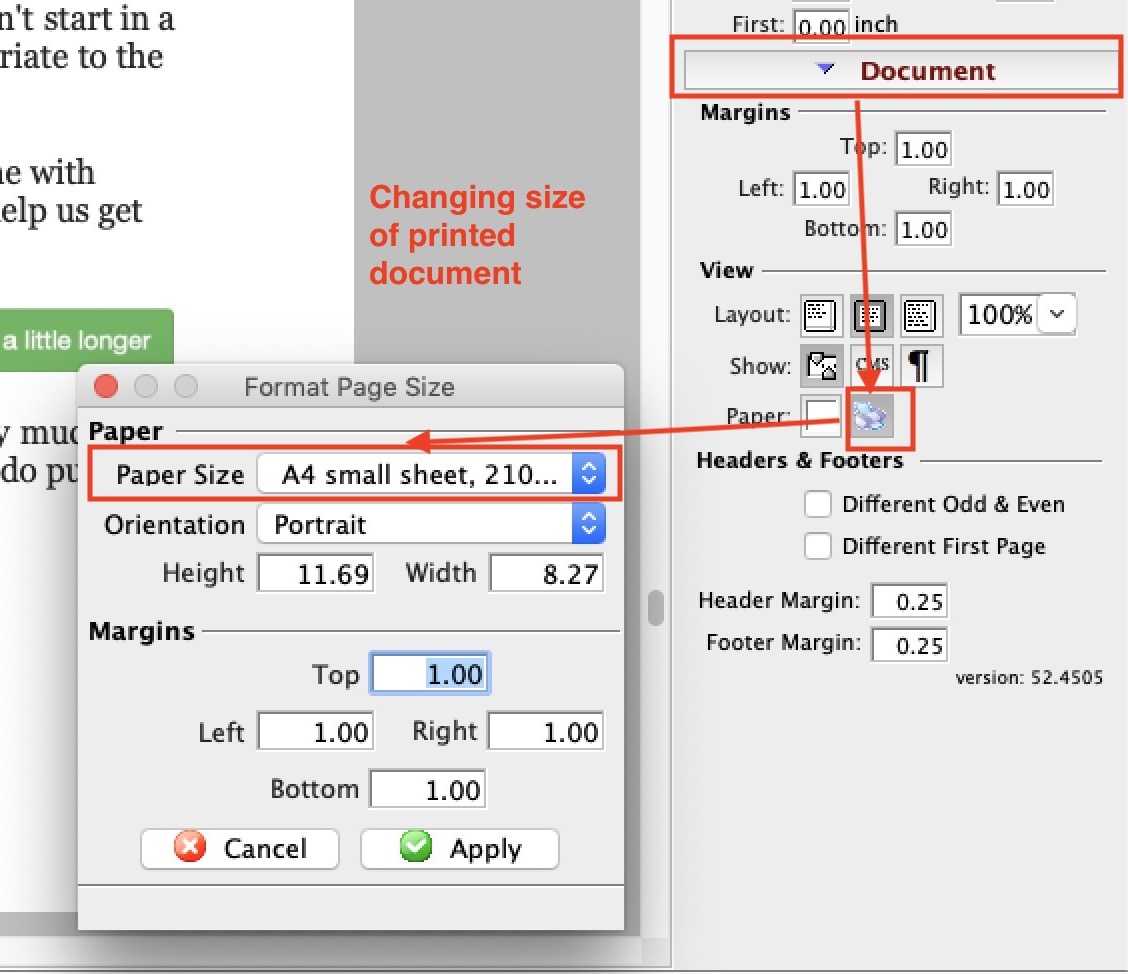 Opens a window that lets you set some page size characteristics based on common paper sizes, or ones that you might want to customize.
This also available on the context menu and the Format Menu |
|
Headers & Footers |
||
| Different | Check for different Odd and Eve and/or Different first page headers and footers | |
| Margins | Define the margins for the headers and footers | |
View Menu
The View menu is used for adjusting the view of the letter in the Form Letter Window.
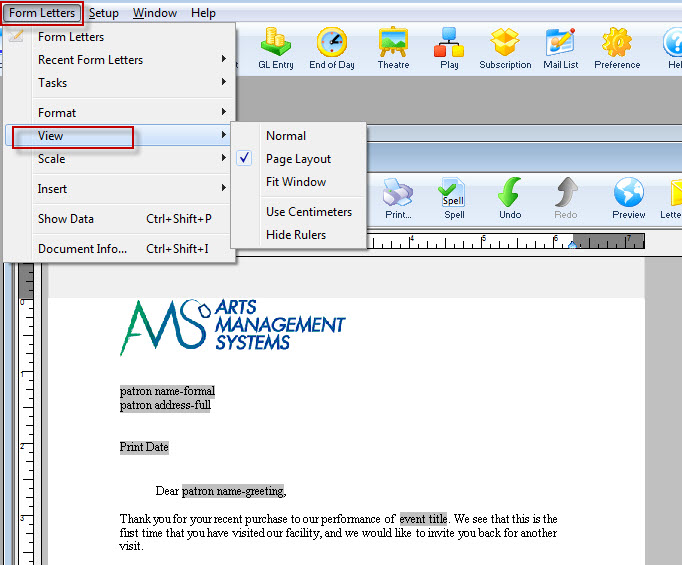
Parts of the View Menu
| Normal | The Normal command displays normal view (active when checked), to display page breaks as horizontal lines, and to not display headers and footers. |
| Page Layout | The Page command displays page layout view (active when checked), to display a document as it will print. The page outline, text, margins, headers, footers and objects display in their actual size and position. |
| Fit Window | This sets the Form Letter window to Fit Window view. This view sets the zoom size of the letter to fit the size of the window. |
| Use Centimeters | This converts the ruler from inches to centimeters. If it says "use centimeters" then inches are currently in use. |
| Hide Rulers | This turns on or off the rulers in the Form Letter window. If it says "hide rulers" then rulers are currently visible. |
Scale Menu
The Scale menu is used for adjusting the zoom of the letter in the Form Letter Window.
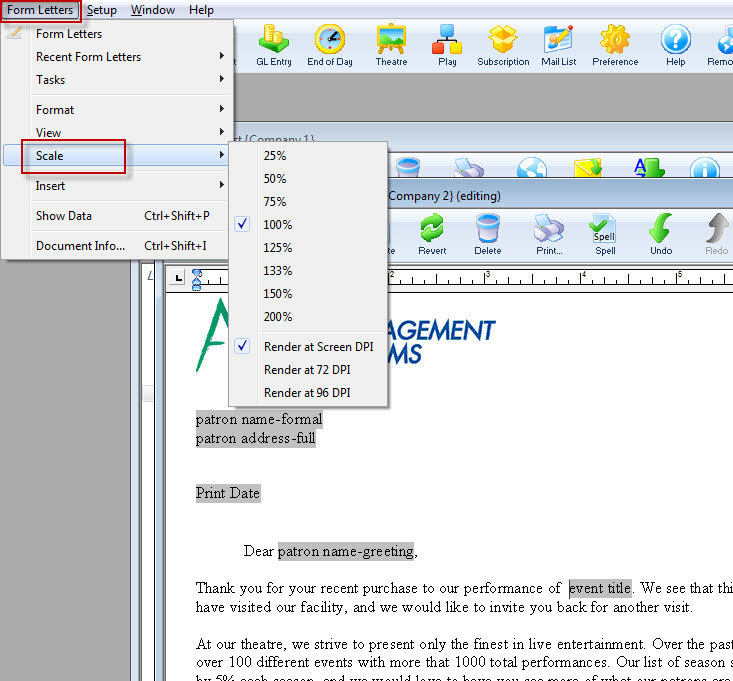
Parts of the Scale Menu
| 25% | Sets the view of the letter at 25% zoom. |
| 50% | Sets the view of the letter at 50% zoom. |
| 75% | Sets the view of the letter at 75% zoom. |
| 100% | Sets the view of the letter at 100% zoom. |
| 125% | Sets the view of the letter at 125% zoom. |
| 133% | Sets the view of the letter at 133% zoom. |
| 150% | Sets the view of the letter at 150% zoom. |
| 200% | Sets the view of the letter at 200% zoom. |
| Render at Screen DPI | Renders the letter and images at the DPI of the screen. |
| Render at 72 DPI | Renders the letter and images at 72 DPI. |
| Render at 96 DPI | Renders the letter and images at 96 DPI. |
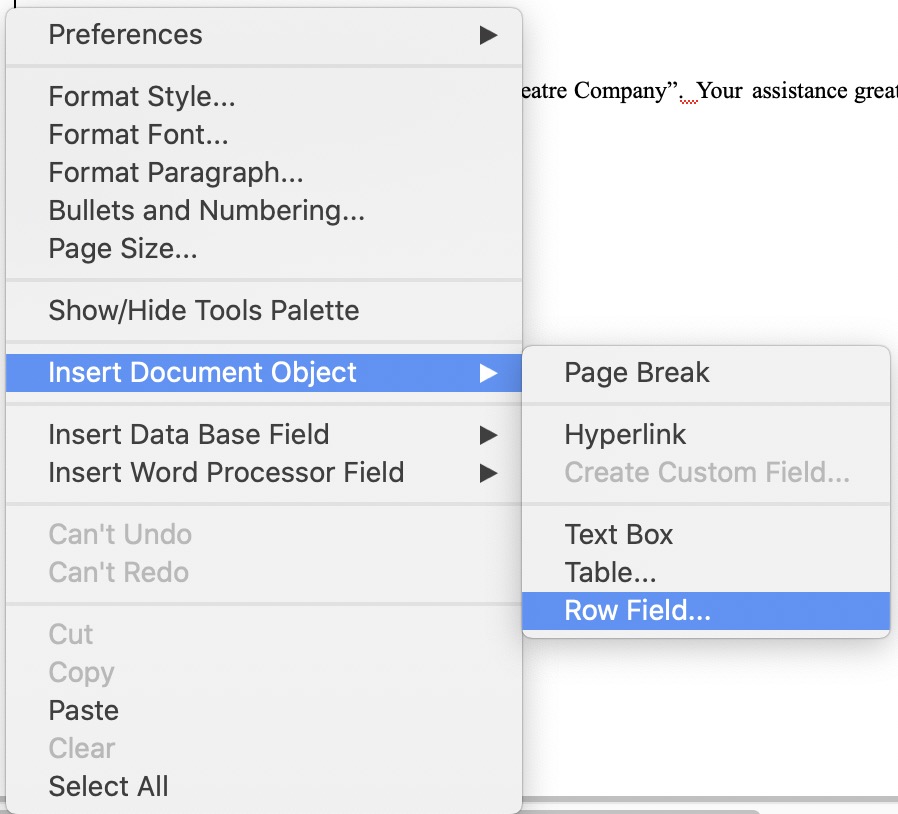
Insert Menu
The Insert menu is used for inserting special objects into the letter. An example of these objects would be hyperlinks or tables.
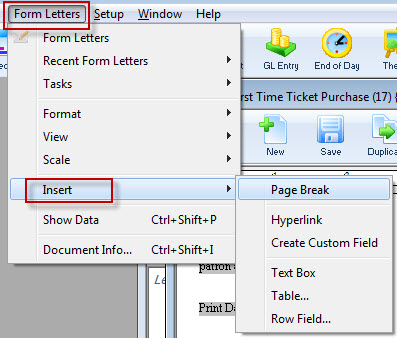
| Page Break |  |
Inserts a page break into the letter. A page break will force any text following the page break to start on a new page. |
| Hyperlink |  |
Inserts a hyperlink into the letter. A hyperlink is typically used to create a clickable link to a web URL. |
| Create Custom Field |  |
Inserts a custom field into the letter. These are specialty fields that are not found within the standard Theatre Manager merge fields. For more information on inserting custom fields click here. |
| Text Box |  |
Inserts a Text Box into the letter. The text box is typically used to create a section of text that is movable in the letter. |
| Table |  |
Opens the Insert Table window. Tables are used to format text into rows and columns. For more information on inserting tables click here. |
| Row Field |  |
Opens the Insert Row Fields window. Row Fields are used to insert data in table format into the letter. This would typically be used to display a list of tickets or donations. For more information on inserting row fields click here. |
Insert Custom Field Window
|
Custom fields are different than calculated fields in a document. A custom field is used for conditional documents and paragraphs. In some cases, they can be built from any text, fields or calculated fields. |
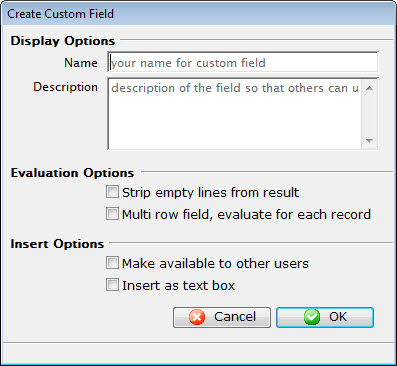
Parts of the Insert Custom Field
Display Options |
|
| Name | Enter a name for the custom field. |
| Description | Enter a description of what the custom field does. |
Evaluation Options |
|
| Strip empty lines from result | When checked, Theatre Manger will remove any empty lines from the data returned. |
| Multi row field, evaluate for each record | When checked, Theatre Manager will remove any empty lines from the data returned, and check on a line by line basis. |
Insert Options |
|
| Make available to other users | Makes the custom field available to other users. |
| Insert as text box | Inserts the custom field as a text box. |
 |
Cancels the current operation. Closes the window and performs no action. |
 |
Performs the current operation. This will add or alter the custom field that has been created. |
Insert Table Window
The Table menu is used for inserting a table into the letter. Tables allow text to be formatted into rows and columns in order to create a better presentation.
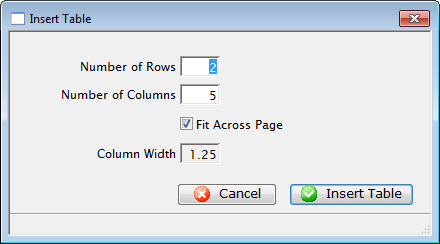
Parts of the Insert Table Window
| Number of Rows | The number of rows to create the table with. |
| Number of Columns | The number of columns to create the table with. |
| Fit Across Page | When checked, Theatre Manager automatically determines the column width in order to fit the table to the full width of the letter. |
| Column Width | The width of the columns to be set when the table is created. |
|
Cancels the current operation. Closes the window and performs no action. |
 |
Performs the current operation. This will add the table to the letter. |
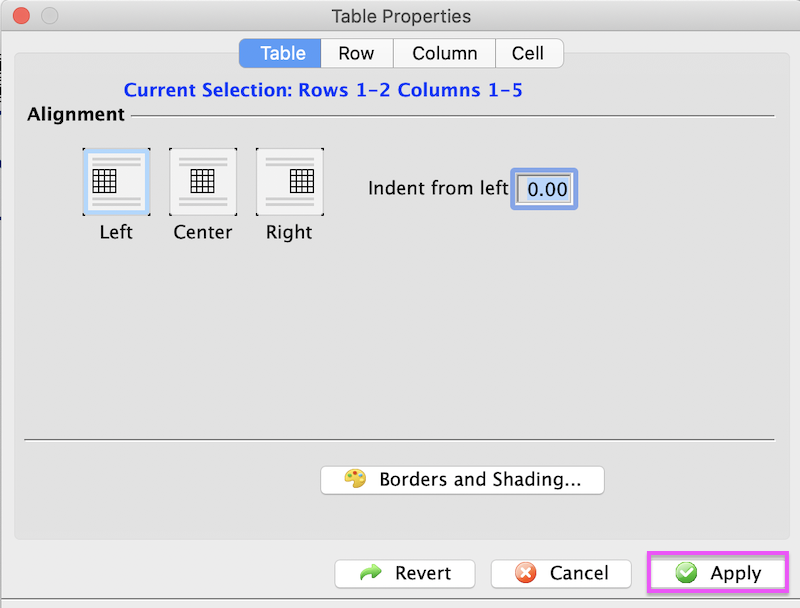
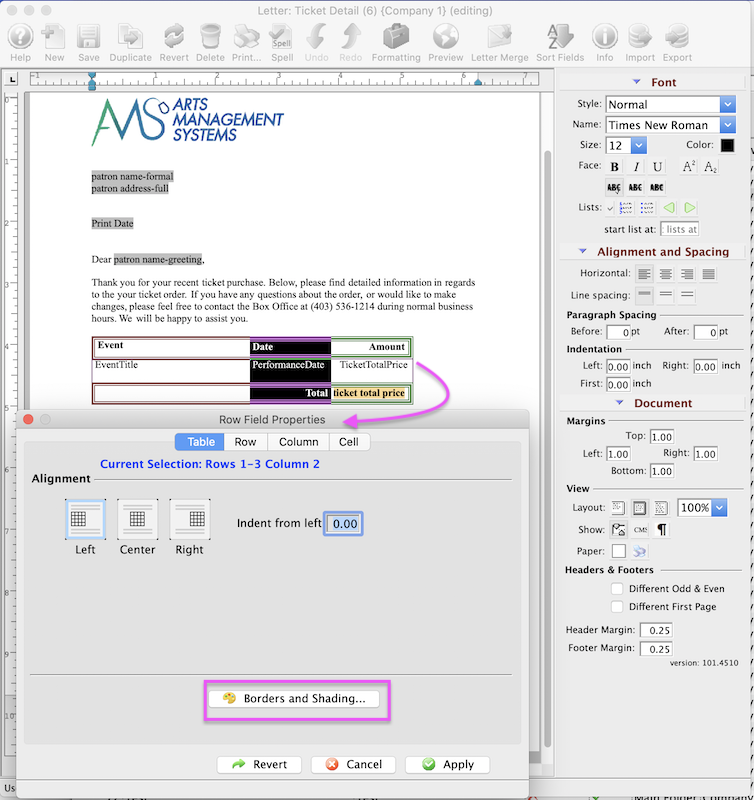
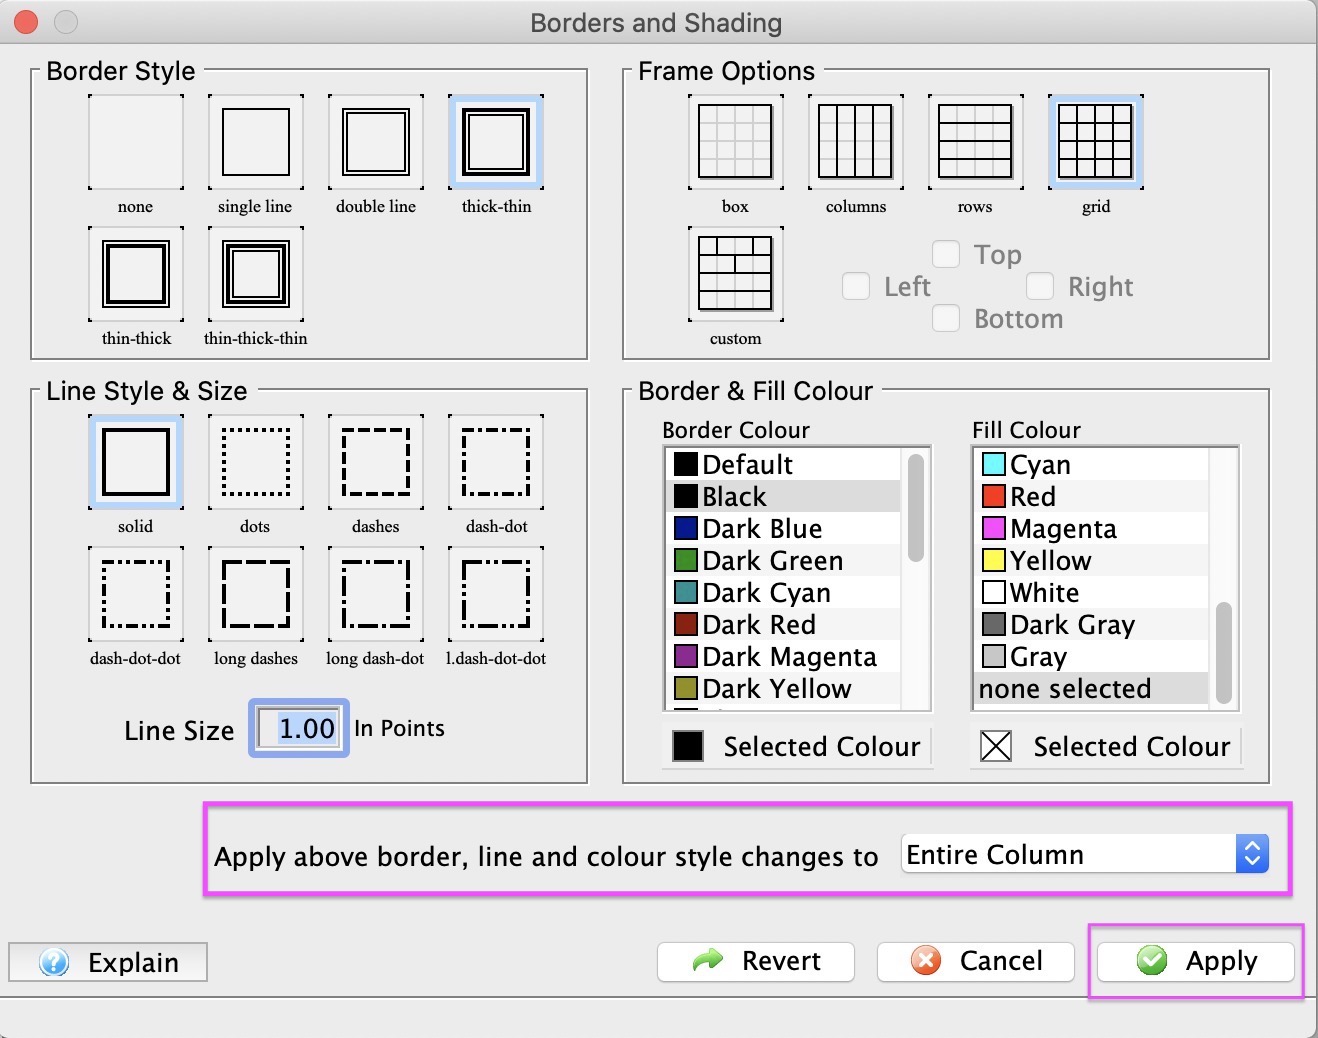
Table Borders and Shading
Formatting table Borders and Shading options are accessible after a table or row field table is inserted into a Form Letter. Borders and Shading is part of the table properties.
- Accessing Borders and Shading options right-click anywhere on the inserted table, select Table, Borders and Shading.
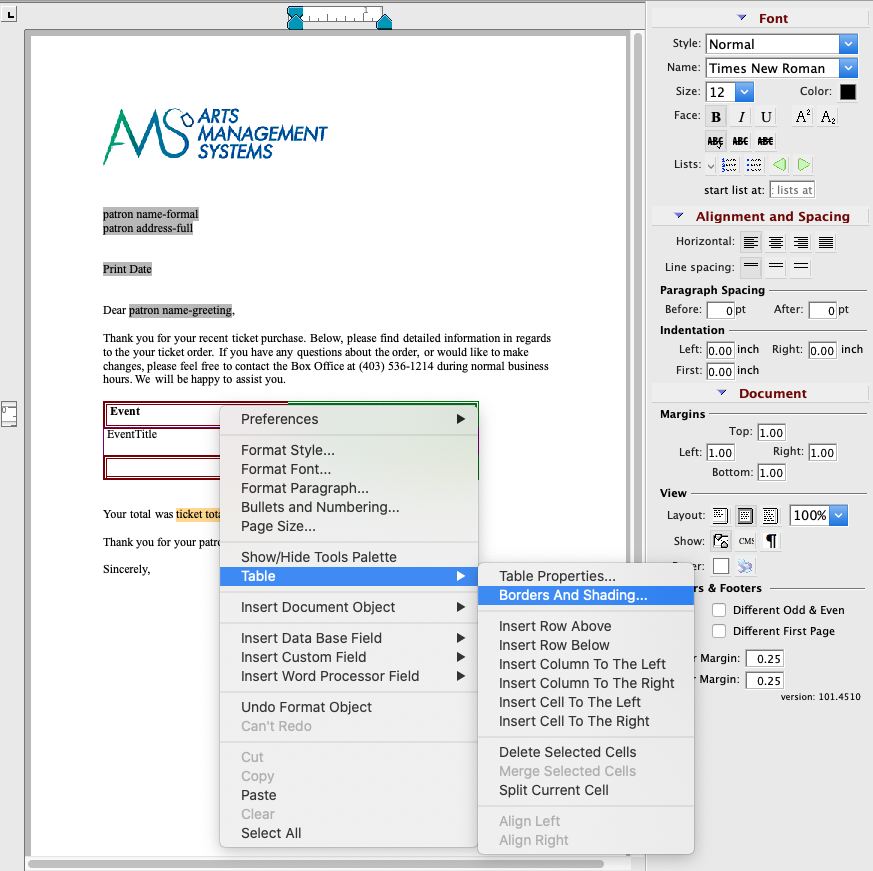
- Set Borders and Shading attributes there are 5 attribute options for Borders and Shading:
- Border Style
- Frame Options
- Line Style, Colors
- Line Size
-
Apply edits by selecting an option from the dropdown menu where changes are to be applied to the table, then click the Apply button.
- To complete the update and apply changes to Table. Closing the Borders and Shading window will set the Applied Changes. From the Table Property Window, click Apply button from the Table Property window.
Insert Row Field Window
 The Row Field menu item is used for inserting a table with data fields into the letter. This table consists of columns of data fields to present a list of information. This is typically used in form letters to list things like the examples below:
- tickets that have been purchased for an order, subscription or what have you.
- donations that have been made for a year, a specific campaign, or part of an ongoing-never ending donation
- volunteer of staff activity assignments for an upcoming period of time
- a notice of gift certificates that are still active, available and assigned to a patron so that they can redeem them
- or anything else where you want a list of some data on the form letter.
Row fields can have:
- Multiple columns of data from related records in the database
- Column headers
- Detail rows containing the data for each column
- Subtotals, averages, max and minimum on rows that are numeric
- Separate subtotals, averages, etc outside the row field
Sample of Row Field In a Form Letter
Sample of empty Row Field
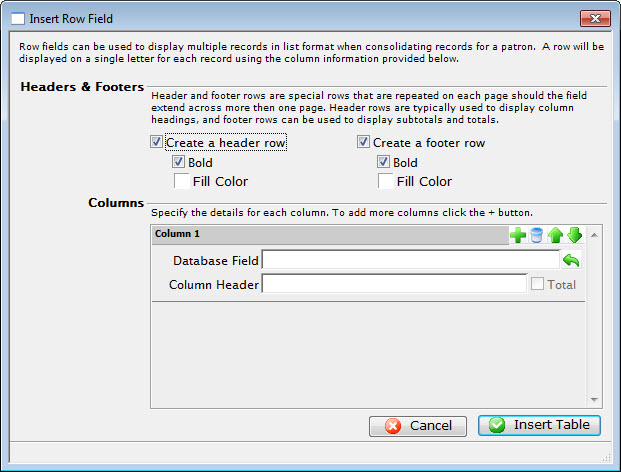
Parts of the Insert Row Field Window
Headers & Footers |
|
| Create a header row | Creates a header row for the table listing the fields that are used. |
| Bold | Sets the header row in bold typeface. |
| Fill Color | Allows changing the color of the header row background. |
| Create a footer row | Creates a footer row for the table. The footer row typically contains sub-totals of the information in the table. |
| Bold | Sets the footer row in a bold typeface. |
| Fill Color | Allows changing the color of the footer row background. |
Columns |
|
 |
Adds another row field to the table. |
 |
Deletes the row field from the table. |
 |
Moves the placement of the row field up. This will place the column farther left in the table. |
 |
Moves the placement of the row field down. This will place the column farther right in the table. |
| Database Field | The database field to be used as a column header. |
 |
Displays a drop-down menu to allow the lookup of database fields. |
| Column Header | Allows a description to be entered as the column header rather than using the database field. |
| Total | When checked, the total will be displayed for this field instead. |
|
Cancels the current operation. Closes the window and performs no action. |
|
Performs the current operation. This will add the table to the letter. |
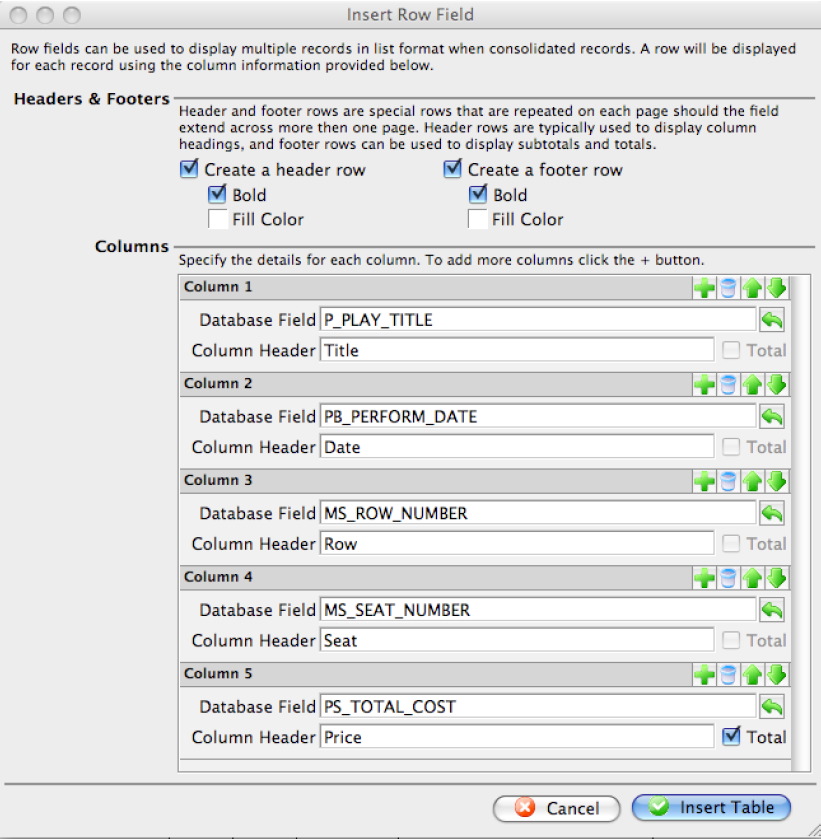
Sample of row field for some ticket data
The example below shows a row field containing some ticket data. Refer to creating a ticket example for more information.
Form Letter Window
- Form Letter Menus that are activated when a letter is open.
- Word Processor Features
- Tool Palette at the right of the word processor window
- Keyboard formatting shortcuts

Quick Reference information (Quick Reference Guides, Cheatsheets and Videos) is available for some Form letter functionalty. Click here to access the Form Letter specific links.
Parts of the Form Letter Window
|
Creates a new form letter. Click here for more information on creating a new Form Letter. |
 |
Saves the current Form Letter. |
|
Duplicates the current Form Letter. Click here for more information on duplicating Form Letters. |
 |
Reverts to the last saved version of the letter. |
|
Deletes the current Form Letter. Click here for more information on deleting a Form Letter. |
|
Prints the current Form Letter. Click here for more information on printing Form Letters. |
 |
Checks the spelling of the current letter. |
 |
Undoes the last action taken on the current letter. This does not revert to the last save. |
 |
Redoes the last action that was undone. This is good for correcting an action that was accidentally undone. |
 |
Imports an RTF document to be used as a letter. Click here for more information on importing a Form Letter. |
|
Exports the letter as an RTF document to be opened in another application. Click here for more information on exporting a Form Letter. |
 |
Opens the Form Letter Info Window. Click here for more information on the window. |  |
Opens a list of patrons who have been sent this specific letter. |
| Formatting Pallette | The fomatting pallette allows easy access to many common word processing functions. For more information on this feature, click here. |
| Context Menu | The Context Menu, also known as the right-click menu allows for adding new fields and making other adjustments to the letter. For more information about using this menu, click here. |
| Headers and Footers | Headers and Footers can be used for contracts and page numbering. For more information about using the header and footer, click here. |
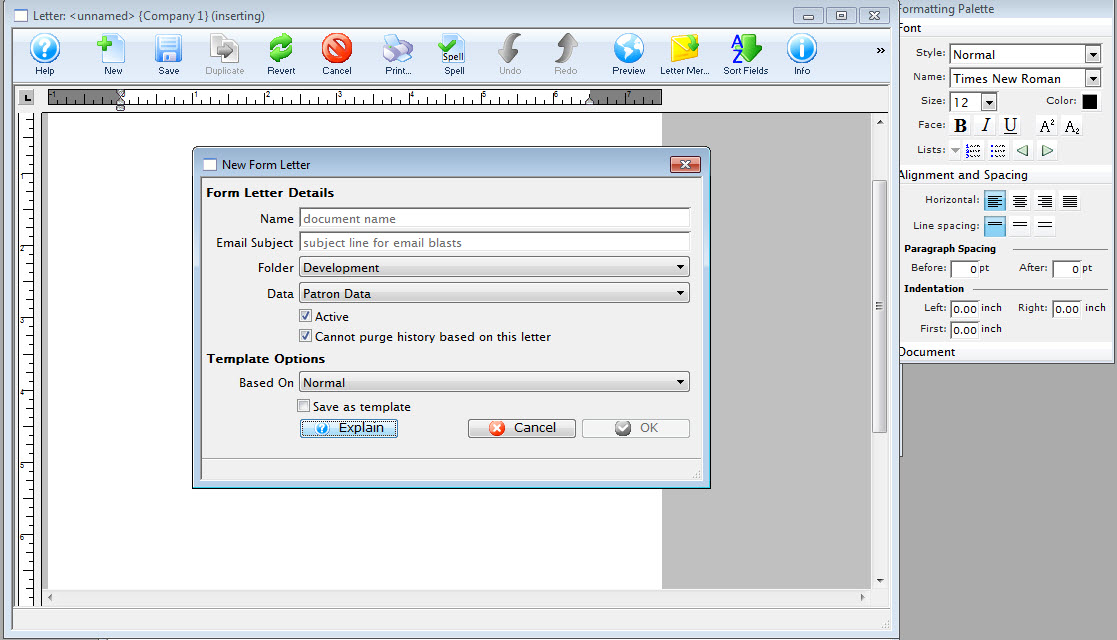
New Form Letter Window

Parts of the Form Letter Info Window
Form Letter Details |
|
| Name | File name of the Form Letter |
| Email Subject | The email subject heading if the form letter is designed to be emailed to patrons |
| Folder | The Form Letter Folder where the letter will be saved |
| Data |
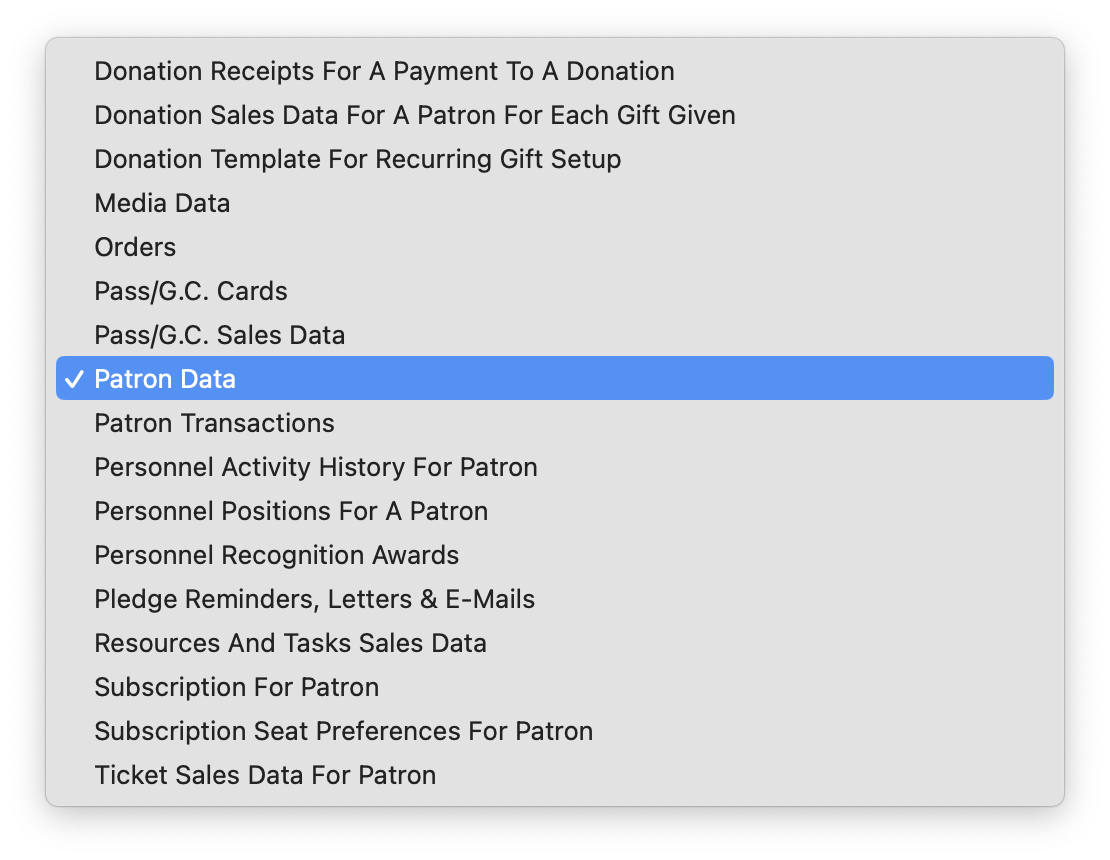 The type of data that can be contained within the letter. Refer to file selection for mail lists for additional assistance as the merge fields on a letter follow the same principles as the search criteria on mail lists or reports.
 |
| Unsubscribe List |
If an email is to be sent out with an unsubscribe capability on it, you need to specify a mail list to track the unsubscribes. This allows you to pick a default for each mail list. you can use the same one for many letters if you want one common list for unsubscribe tracking.
If none is specified as a default, you can always specify one on the merge window |
Form Letter Options |
|
| Base Template | A template form letter containing some base content or formatting that will be automatically included in creating this letter. An example of a template might be a letterhead. The default 'Normal' template usually has nothing other than an empty page. |
| Access Groups | You can specify who has access to this letter using the access groups feature |
| Active | Indicates if the displayed Letter is active or not |
| Cover Letter on Invoice Emails or emailing tickets | When checked:
|
| Retain all history for letter | Cannot automatically remove any form letters from a patron's letter tab during any purge process set up in system preferences |
Template Options |
|
| Make this document a template | The current letter will be saved as a template to be used for future letters |
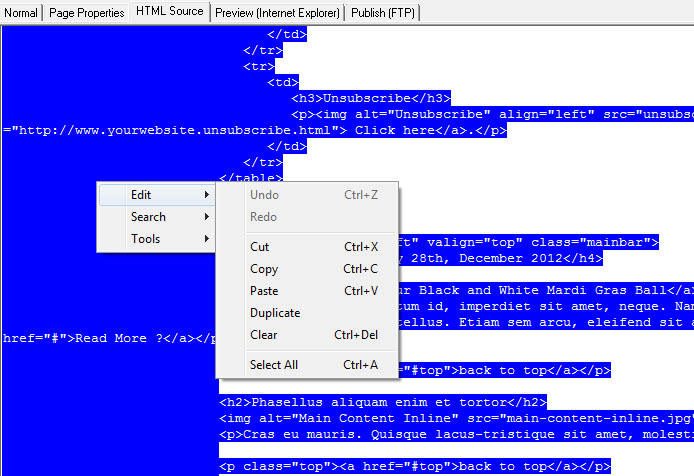
Context Menu
- This menu is useful for quickly doing operations.
- This is also where the option to add database merge fields is located.
|
Some of the text formatting features are also available on the tools palette |
Parts of the Context Menu Window
| Preferences | Opens the Preferences Flyout menu. You can:
|
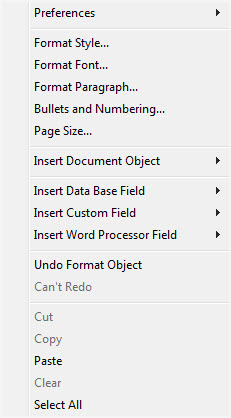 |
| Format Style | This will open the Format Style window. For more information on formatting styles click here. | |
| Format Font | This will open the Format Font window. For more information on formatting fonts click here. | |
| Format Paragraph | This will open the Paragraph Properties window. For more information on formatting paragraphs click here. | |
| Bullets and Numbering | This will open the Bullets and Numbering window. For more information on bullets and numbering click here. | |
| Page Size | This will open the Page Size window. For more information on page size click here. | |
| Insert Document Object | This will display the sub-menu for inserting a document object. For more information on inserting objects click here. | |
| Insert Database Field | This will display the sub-menu for inserting a database field in the letter. For more information on inserting database fields click here. | |
| Insert Word Processor Field | This will display the sub-menu for inserting a word processor field into the letter. The word processor fields are default fields that are commonly used when creating a document. Some examples are time and date formats. When using a field, the field will automatically update each time the document is opened or printed. | |
| Undo | This will undo the last action taken. If there is no action to be undone, then it will say "Can't Undo." | |
| Redo | This will redo the last action that was undone. If there is no action to redo, then it will say "Can't Redo." | |
| Cut | This will cut the selected text or objects to the clipboard. | |
| Copy | This will copy the selected text or objects to the clipboard. | |
| Paste | This will paste any text or objects from the clipboard into the letter. | |
| Clear | This will clear the selected text or objects. | |
| Select All | This will select all text and objects in the document. |
 .
. Headers and Footers
A header or footer is text or graphics that is usually printed at the top or bottom of every page in a document. A header is printed in the top margin; a footer is printed in the bottom margin.
Headers and footers can be as simple as the document title and a page number, but you can create headers and footers that contain graphics, multiple paragraphs, and fields. You can specify a different header or footer for odd and even pages or use a different header or footer for the first page of a section or document.
.
You can insert the following into Headers and Footers:
- Text
- Graphics - pasted only and one text line high
- Database Field - Using the right-click context menu
- Custom Field - Using the right-click context menu
- Word Processor Field - Using the right-click context menu
Headers and footers can also have formatting applied to them.
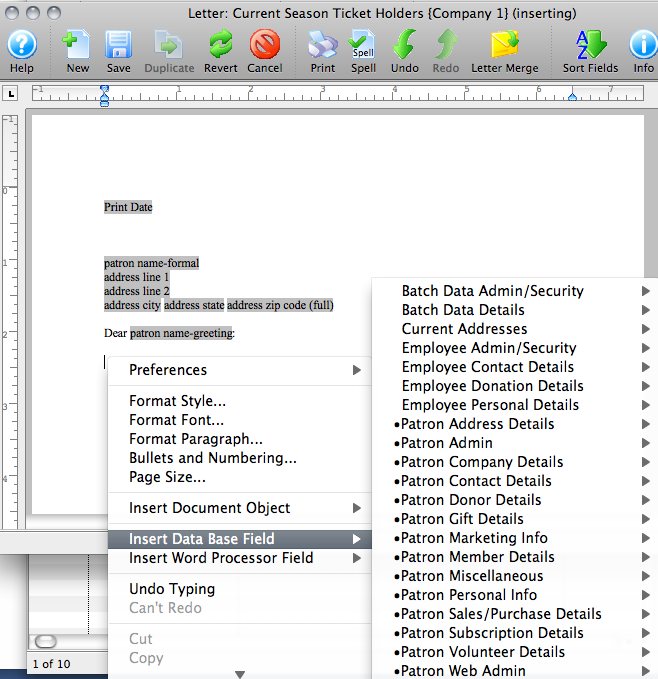
Adding a Merge Field
|
These steps indicate how to add an individual field. Afterwards, you can make calculated fields with a few additional steps. |
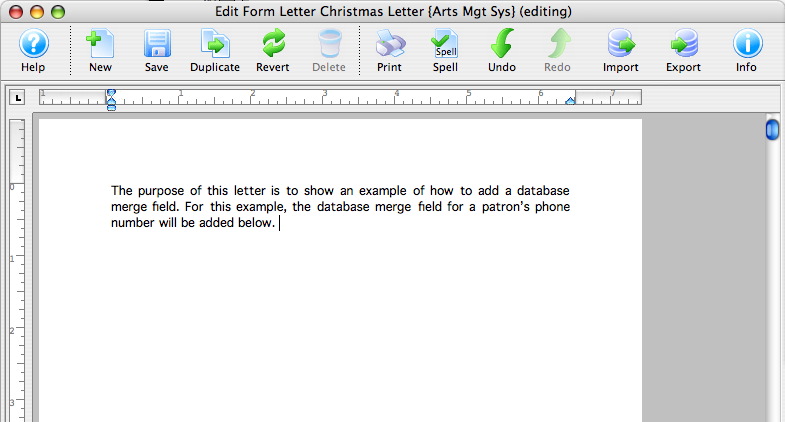
When creating a Form Letter, the purpose is typically to pull data from Theatre Manager automatically so that letters or e-mails can be sent to patrons. To do this, database fields are placed in a generic Form Letter.
- In the Form Letter window, place the cursor in the position that the database field is to be located.
- Right-click to open the Context menu and go to the Insert Data Base Field option.
A list of database categories will appear. For more information about the Context menu click here.

- Select the category that the database field resides under.
A sub-menu will open showing all of the database fields that reside in the category.
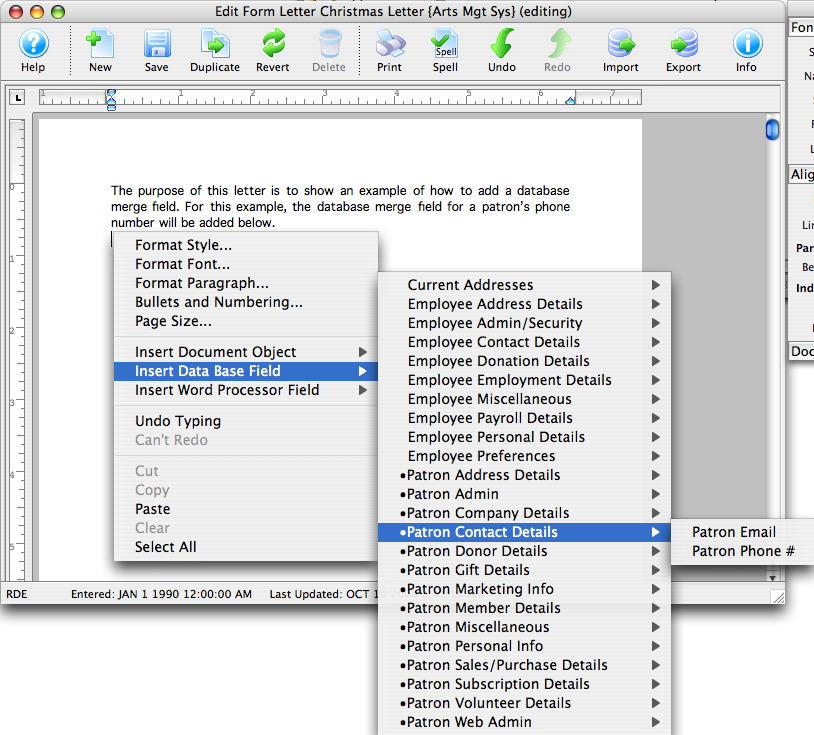
- Click on the field to be used in the letter.
The field will now appear in the letter.
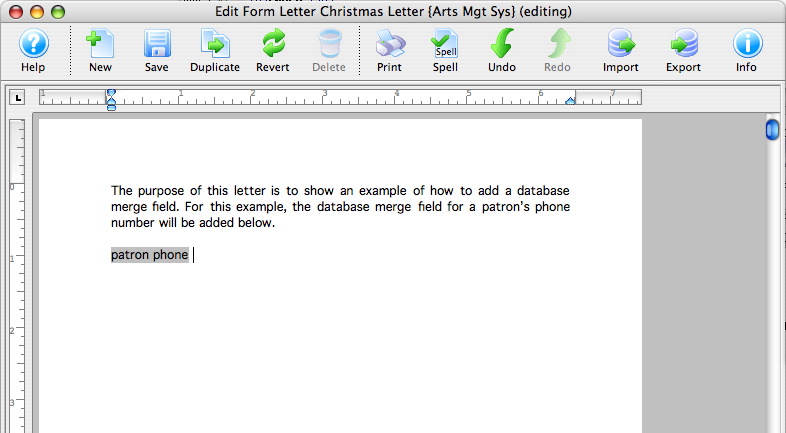
- Repeat these steps for all merge fields that need to be entered.
If a wrong field is selected, simply click on the merge field in the letter and press the DELETE key on the keyboard.
Formatting a Merge Field
Most options may be self explanatory as they format the field by date, currency, etc.
The Consolidate option has an important meaning depending on the option picked when actually merging letters.
If the data field is in a row field table, each record will appear individually. If the field is OUTSIDE the row field, then the use of Consolidate has the following effect:
- No Consolidating: The FIRST record found in the sort order appears in the non-table fields area. This can be used to advantage such as to show the 'last' event purchased along with tickets --or-- the most recent amount given along with the total given.
- Consolidating: anything you are totalling, averaging or using minimum or maximum causes the field to appear 'orange'. It will be consolidated according to the total, average, maximum or minimum.

Form Letter keyboard short cuts
There are other methods of formatting your document:
- The Form Letter Menu and SubMenus
- The Form Letter Tools Palette
- Use the context menu to alter the selected object (text, image, table) by right clicking it.
| Form Letter Action | OSX Shortcut Keys | Windows Shortcut Keys | Tools Palette |
| Bolds or unbolds the selected text | Command & B | Ctrl & B |
|
| Italicizes or removes italicization from the selected text | Command & I | Ctrl & I | |
| Underlines or removes underlining from the selected text | Command & U | Ctrl & U | |
| Makes the selected text smaller by increments | Command & [ | Ctrl & [ | |
| Makes the selected text larger by increments | Command & ] | Ctrl & ] | |
| Makes the selected text smaller by one point size | Command & Shift & { | Ctrl & Shift & { | |
| Makes the selected text larger by one point size | Command & Shift & } | Ctrl & Shift & } | |
| Hide or show non printable characters | Command & Shift & 8 | Ctrl & Shift & 8 | |
| Selects all text | Command & A | Ctrl & A | |
| Undo the latest change. You can undo multiple times to back out a number of changes | Command & Z | Ctrl & Z | |
| Redo the latest change. You can redo multiple times to roll forward a number of changes | Command & Y | Ctrl & Y | |
| Cut the selected items | Command & X | Ctrl & X | |
| Copy the selected items | Command & C | Ctrl & C | |
| Zooms out on the document (you see more of the document in the same viewing area and everything is smaller) | Command & - | Ctrl & - | |
| Zooms in on the document (you see less of the document in the same viewing area and everything is magnified) | Command & = | Ctrl & = | |
| Paragraph alignment - left justify | Command & Shift & L | Ctrl & Shift & L | |
| Paragraph alignment - right justify | Command & Shift & R | Ctrl & Shift & R | |
| Paragraph alignment - center justify | Command & Shift & C | Ctrl & Shift & C | |
| Paragraph alignment - fully justify | Command & Shift & J | Ctrl & Shift & J | |
| Paragraph spacing - single line | Command & 1 | Ctrl & 1 | |
| Paragraph spacing - double line | Command & 2 | Ctrl & 2 | |
| Paragraph spacing - 1.5 lines | Command & 5 | Ctrl & 5 | |
| Paragraph increase left indentation | Command & M | Ctrl & M | |
| Paragraph decease left indentation | Command & Shift & M | Ctrl & Shift & M | |
| Paragraph increase first line indentation. The first line is indented more within the paragraph. | Command & T | Ctrl & T | |
| Paragraph decrease first line indentation. This can make paragraph out-dents | Command & Shift & T | Ctrl & Shift & T | |
| Previous character | left-arrow | left-arrow | |
| Next character | right-arrow | right-arrow | |
| Previous word | Option & left-arrow | Ctrl & left-arrow | |
| Next word | Option & right-arrow | Ctrl & right-arrow | |
| Previous paragraph | Option & up-arrow | Ctrl & up-arrow | |
| Next paragraph | Option & down-arrow | Ctrl & down-arrow | |
| Beginning of line | Command & left-arrow | Home | |
| End of line | Command & right-arrow | End | |
| Beginning of document | Home | Ctrl & Home | |
| End of document | End | Ctrl & End | |
| Scroll left | Command & Option & left-arrow | Ctrl & Option and left-arrow | |
| Scroll right | Command & Option & right-arrow | Ctrl & Option and right-arrow | |
| Scroll up | Command & Option & up-arrow | Ctrl & Option and up-arrow | |
| Scroll down | Command & Option & down-arrow | Ctrl & Option and down-arrow | |
| Scroll page up | Page Up | Page Up | |
| Scroll page down | Page Down | Page Down |
Sort Window
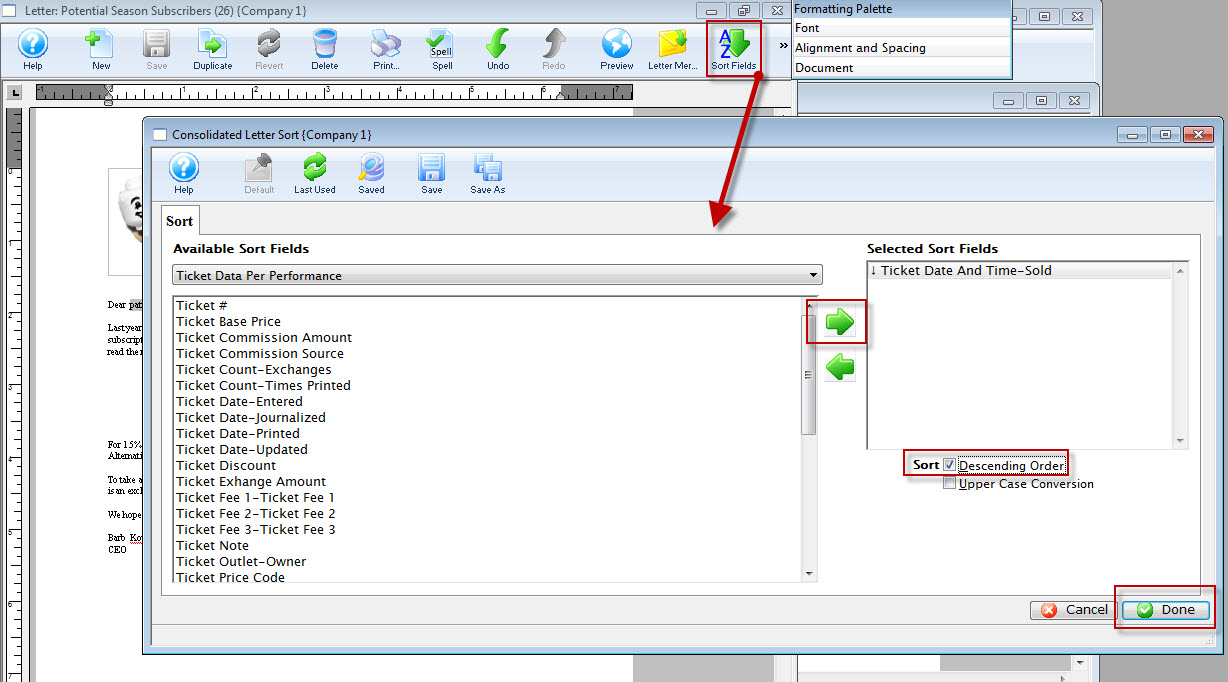
When printing multiple records into a table on a document, it may be helpful to specify the sort order of the data so that it appears in the order you want. You can specify up to 9 sort fields.
For example, you may want to display:
- the oldest to newest donation within a campaign
- all the tickets for a performance date together
- volunteer activities for a patron in the order that you want them to come to the venue
If you do not sort the data in a table, it will appear in a random order.- which may be ok.
|
Form letters that are templates cannot have sort fields - since they are only templates. |
|
The current sort order of a letter is displayed on the form letter merge window for your convenience. |
Parts of the Sort Tab
 |
If available, uses the default search criteria for this report. |
 |
If this Letter has previously been merged, this button adds the previous criteria. |
 |
Opens a list of saved criteria for this report. |
|
Saves the current criteria to be used later. |
 |
Saves the current criteria to be used later and opens a dialog to name this criteria. |
| Available Sort Fields | A list of fields available to sort your Row Field elements by, if a row field is used on the form letter. |
 |
Adds the currently selected field to the sort field list on the Right. |
 |
Removes the currently selected field from the sort field list. |
| Selected Sort Fields | The fields currently used for sorting the data within a Row Field. There is a limit of nine sort fields to sort the list by. |
| Sort In Descending Order | When checked, the currently selected sort field will sort in descending order. |
| Upper Case Conversion | When checked, the currently selected sort field will be converted to upper case letters. |
 |
Cancels that adding of criteria and returns the user to the Merge window. |
 |
Completes the addition of criteria and the sorting of data, and begins to generate the merge. |
Form Letter Instructions
This page contains links to information relating to the composition, editing, and removal of form letters.
Quick Reference information (Quick Reference Guides, Cheatsheets and Videos) is available for some Form letter functionalty. Click here to access the Form Letter specific links.
Creating a New Form Letter
Form letters can be created for many different purposes. They can be used to send information to patrons, donors, volunteers, employees, and members of the media. A new form letter can be created from the Form Letter List Window.
- From the Form Letter List window, click the New button.
The New Form Letter window and the Word Processor with a new blank page open.
Click here for more information on the Form Letter List window.
Click here for more information on the Version 8 Word Processor.
- Enter the Form Letter Name and the Subject line for email blasts and chose a folder to store the letter.
- Choose the merge data for this letter.
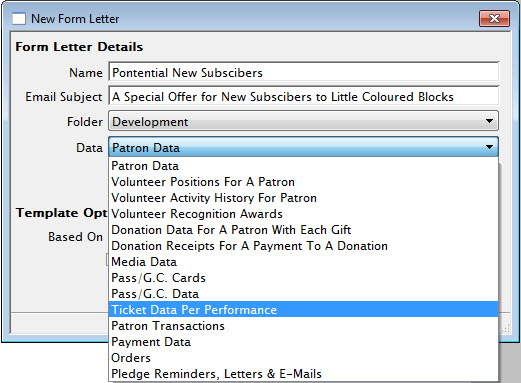
Patron data is a parent for most other files. If other merge criteria is selected the patron record details will also be available as criteria. Due to the relationship of data within Theatre Manager some items can not be merged together.
Click here for more information on the Form Letter Window.
- Select the Template for use in this letter. The Normal Template is the default template.
- Click the Ok button.
- Click the Save button.
You have now saved the base parameters for the new letter.
- Enter the text for the base letter.
- Using the right-click context menu, add merge fields to the Form Letter.
To enter a merge field, right-click (or control-click on a Mac) in the area of your document you'd like the field to appear, then simply find and select the field you'd like to use in the context menu (fields with patron data and details are in Data Base Fields). Click here for more information on adding merge fields to the letter.
- Click the Save button to finalize the Form Letter.
Click here to learn how to do a mail merge with the Form Letter.
| You can download quick reference information on Creating Form Letters by clicking on the icon. |
Cheatsheet |
Flash |
Mp4 |
Editing an Existing Form Letter
When editing the form letter, you are editing the same form letter that is used by all employees. This is not a unique copy of the form letter for just a single patron. Any changes made and saved will effect all associations with the letter. If you wish to make changes to the letter to suit your requirements first duplicate the letter then make the modifications. Click here for more information on duplicating a Form Letter.
- Search for the Form Letter to edit.
Click here to learn how to find existing Form Letters.
- Click on the Form Letter to edit.
- Click the Open button.
The Form Letter Window will open and load the form letter. Click here for more information on this window.
- Make any necessary changes.
- Click Save
button.
Importing a Letter
Letters can be imported from another application to use in Theatre Manager. However, the document must be in RTF, HTML, TXT, or TMD format. The TMD format is a Theatre Manager format that allows for the importing of letters created in Theatre Manager.
- From the Form Letter List window, click the New button.
Click here for more information on the Form Letter List window.
The Word Processor opens to a new blank page.
- Enter the Form Letter details.
Click here for more information on the Form Letter Info Window. Click here for more information on the Form Letter Window.
Enter a name of the letter, then select a folder to save the letter. Choose the merge data for this letter. Patron data is a parent for most other files. If other merge criteria is selected the patron record details will also be available as criteria. Due to the relationship of data within Theatre Manager some items can not be merged together.
Select the Template for use in this letter. The Normal Template is the default template.
- Click the Ok button.
- Click the Save button.
- Click the Import button.
The Open File dialog for your operating system appears.
- Locate and select the file (letter) you want to import.
The file format type may need to be changed--to locate the appropiate file--depending on your operating system.
- Press the Open button.
The file will imported into Theatre Manager as text.
- Using the right-click context menu, add merge fields to the Form Letter.
Click here for more information on adding merge fields to the Form Letter.
- Click the Save button to finalize the Form Letter.
| To review Quick Reference information on Importing a Form Letter, click the following: |
Screencast |
Exporting a Form Letter to Another Application
A Form Letter can be exported to be used in another application. This can be used to edit the letter in another application and then import it back in to Theatre Manager. Letters can be exported as an RTF, HTML, or TXT document.
|
All merge fields will be lost when exporting a letter in these formats. To retain all merge field properties, use the Theatre Manager file format TMD. |
- Search for the Form Letter to export.
- Click on the Form Letter to export.
- Click the Open button.
The Form Letter Window will open and load the form letter. Click here for more information on this window.
- Click on the Export button.
- Select the file format for the letter to be exported as.
The Save As dialog for the user's operating system opens.
- Select the location to save the exported leter and click the save button.
The document is placed in the selected directory in the selected format.
Click here to learn how to find existing Form Letters.
|
Flash |
MP4 |
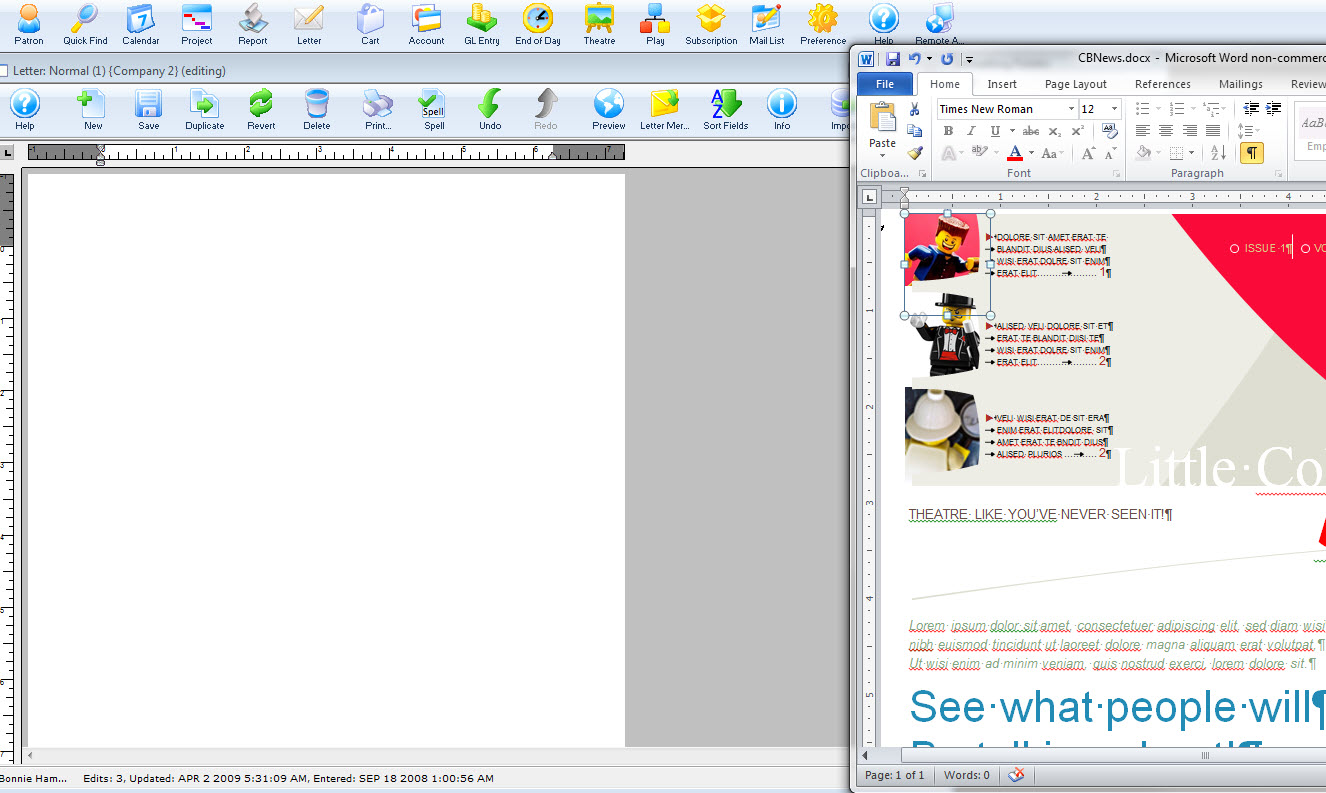
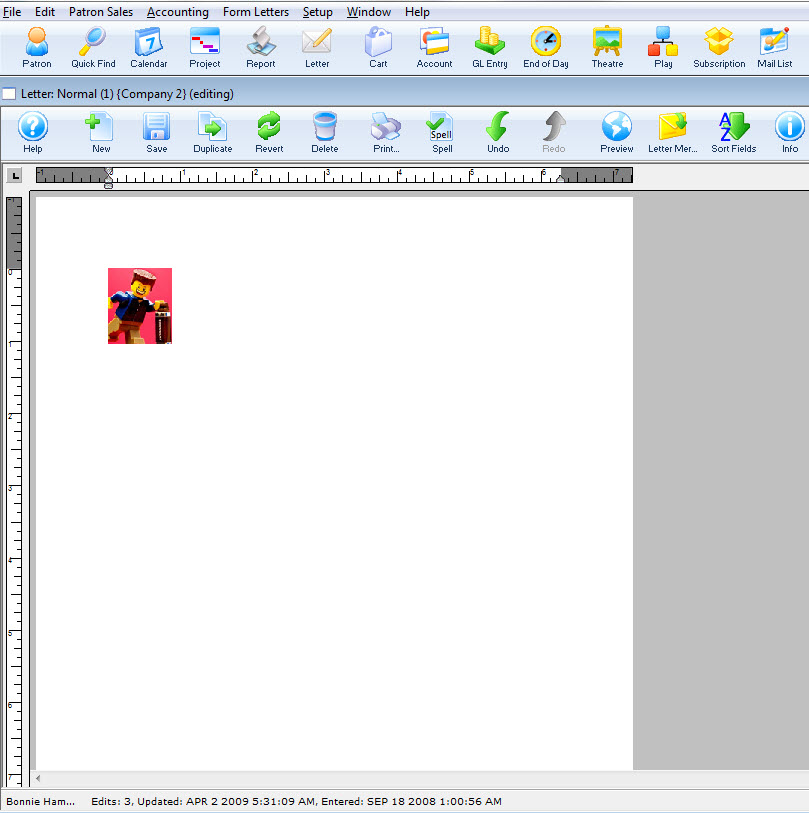
Adding a Graphic to a Form Letter
Unlike plain text, adding graphics and color to your form letters, newsletters and email adds impact to your content. In the form letter functions of Theatre Manager, you can easily add graphics. These can range from your logo to photographs to clipart.
There are 3 different methods to add graphics to a form letter:
- Drag and Drop the image into a form letter.
- The menu option Edit >> Paste From File.
- Copy and Paste.
| You can download the Cheatsheet (1-2 pages) of adding a Graphic to a Form Letter. |
|
Add URL to a Graphic
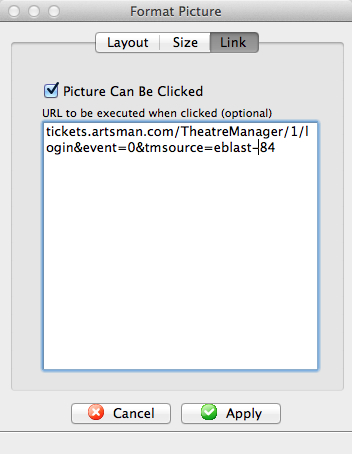
There are two selections to make.
| Item | Values |
| Picture can be clicked | If this is enabled (clicked), then when the picture is placed in an email, the user will be able to click on it and activate the URL. If this is disabled, entering the URL will have no effect |
| URL |
The URL is the link that you want execute if the user clicks on the picture. You can enter email addresses, actual URL's to any web site, or feeds.
The link should contain an accepted web prefix like https://, mailto:, or tel: (being explicit is better). If the link does not have a prefix, the patrons email client may try to interpret what it should be based on content. This can be a link to your ticketing web site, in which case we recommend the use the tmsource= parameter to know which eblast resulted in a sale. Examples of URL's are:
|
Copy Paste
Copy and Paste is a phrase that implies copying material from one page to another. Material may include text, an entire page, symbols, characters, photographs, files or folders. This can be accomplished by using the left and right buttons of your mouse or by using your mouse and the keyboard of your computer.
- Open the letter you want to add the graphic to.
Click here for more information on opening an existing form letter.
The selected letter opens.
- Open the document you want to copy the graphic from.
Mouse Method
- Highlight by holding down the left button of your mouse and dragging across the material you wish to copy.
Release your hold from the left button of the mouse.
- Right click the highlighted material. The right click commands menu opens.
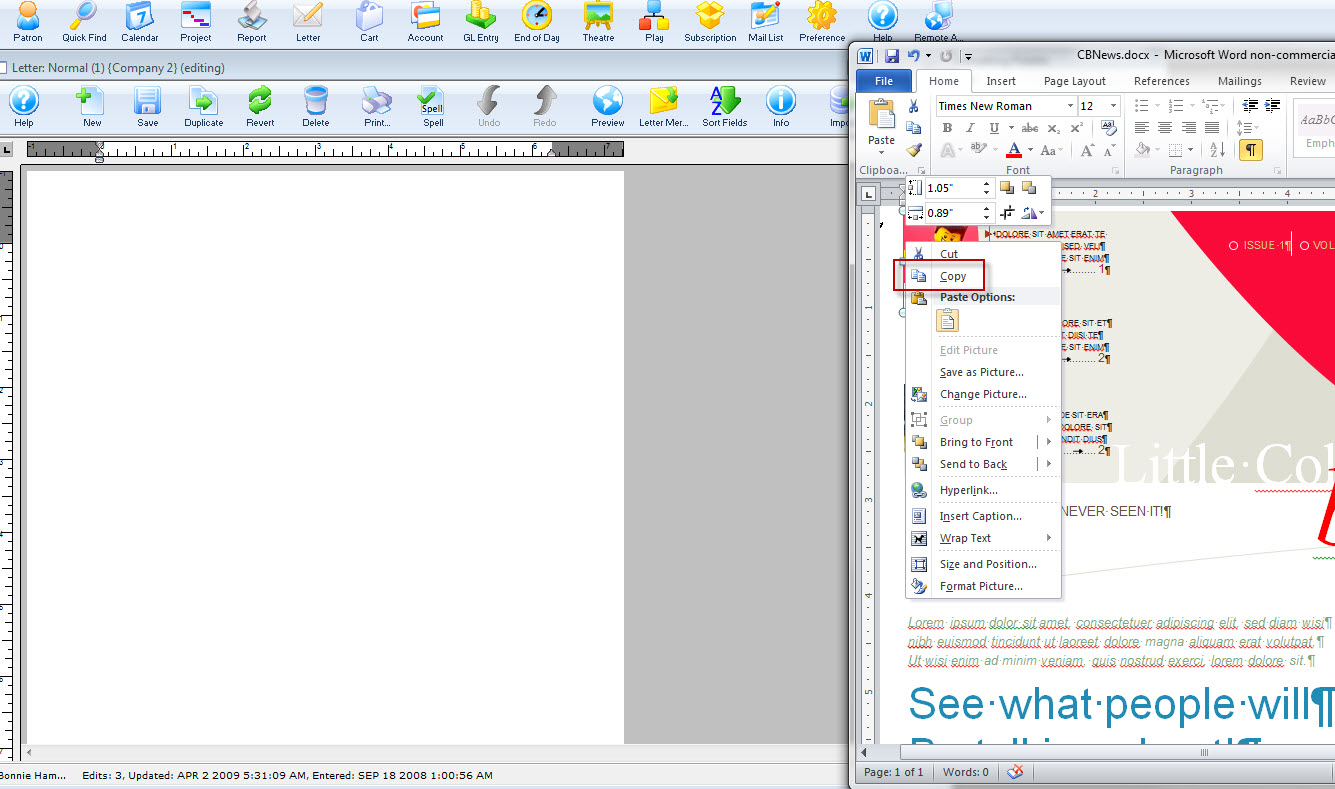
- Left click on Copy, to copy the highlighted material.
Proceed to your new page where you would like to place the copy.
- Place the cursor and right click over the area that needs the copied material. The right click menu opens.
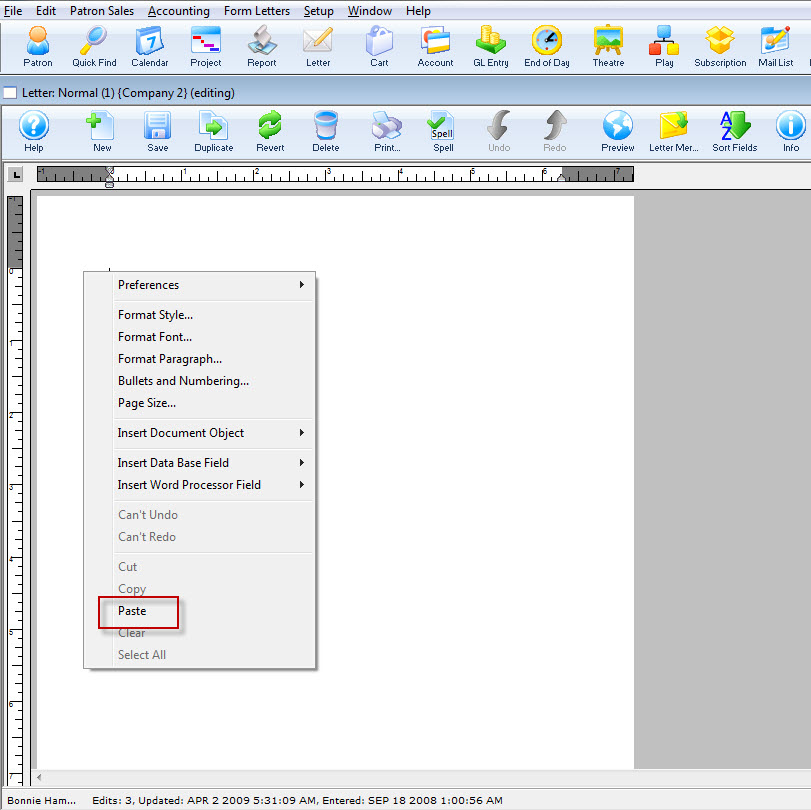
- Left click on Paste. The copied material is placed at the new location.
Mouse and Keyboard Method
- Highlight by holding down the left button of your mouse and dragging across the material you wish to copy and release the mouse button.
- Hold down the Ctrl key on your keyboard, while pressing the C key at the same time, to copy the highlighted material.
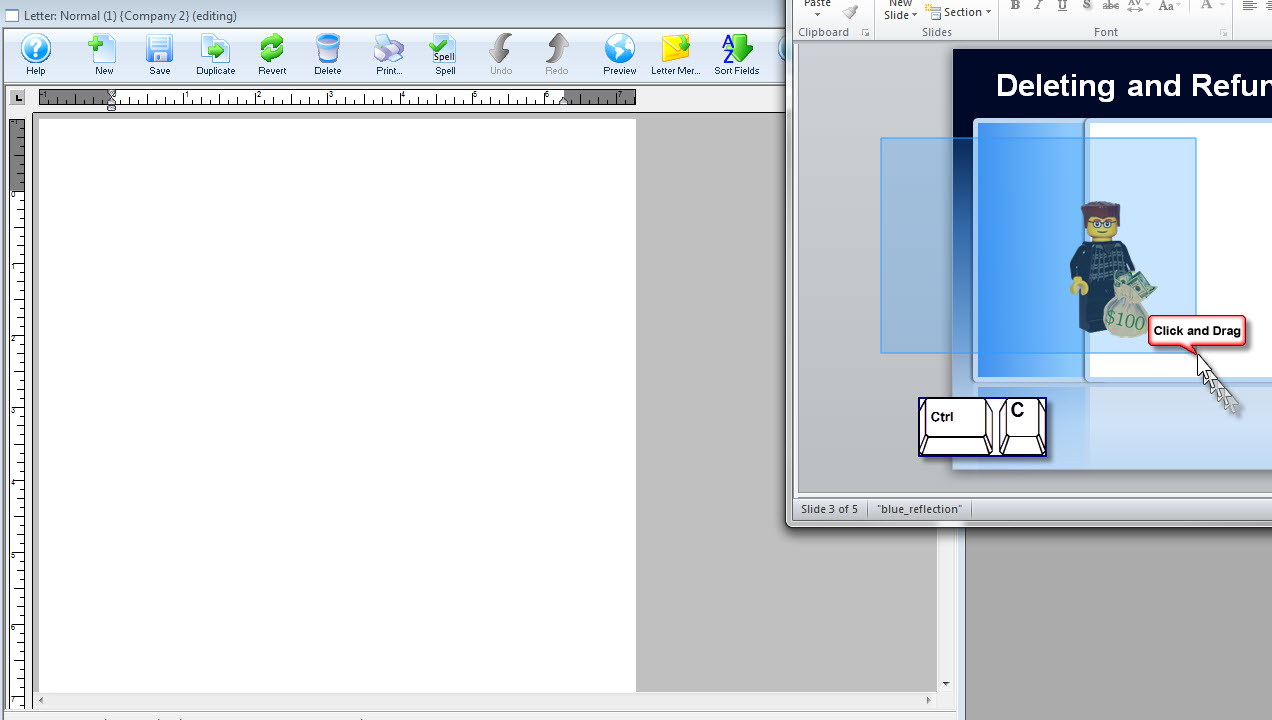
Proceed to your new page where you would like to place the copy.
- Put the cursor where you would like the copied material and hold down the Ctrl key on your keyboard, while pressing the V key at the same time.
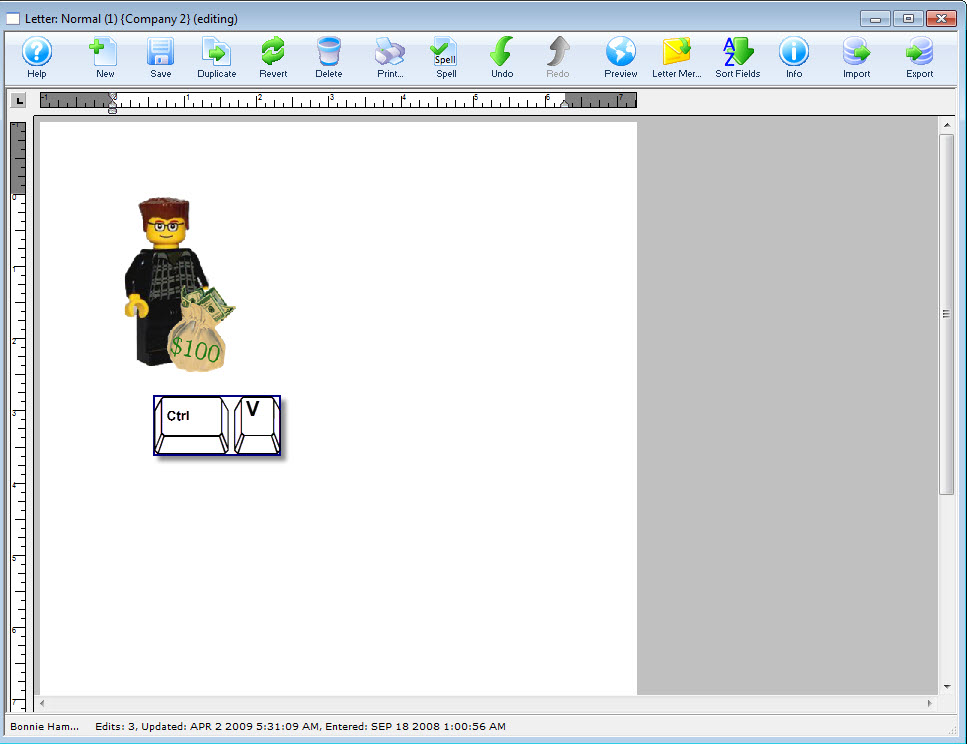
Your picture is now pasted in the document.
Drag and Drop to add a Graphic
To Drag and Drop a graphic into your form letter, you perform the following steps:
- Open the letter you want to add the graphic to.
Click here for more information on opening an existing form letter.
The selected letter opens.
- Highlight the existing Graphic, if there is no graphic, place your cursor at the beginning of the line for your insertion point and now drag and drop the graphic into place.
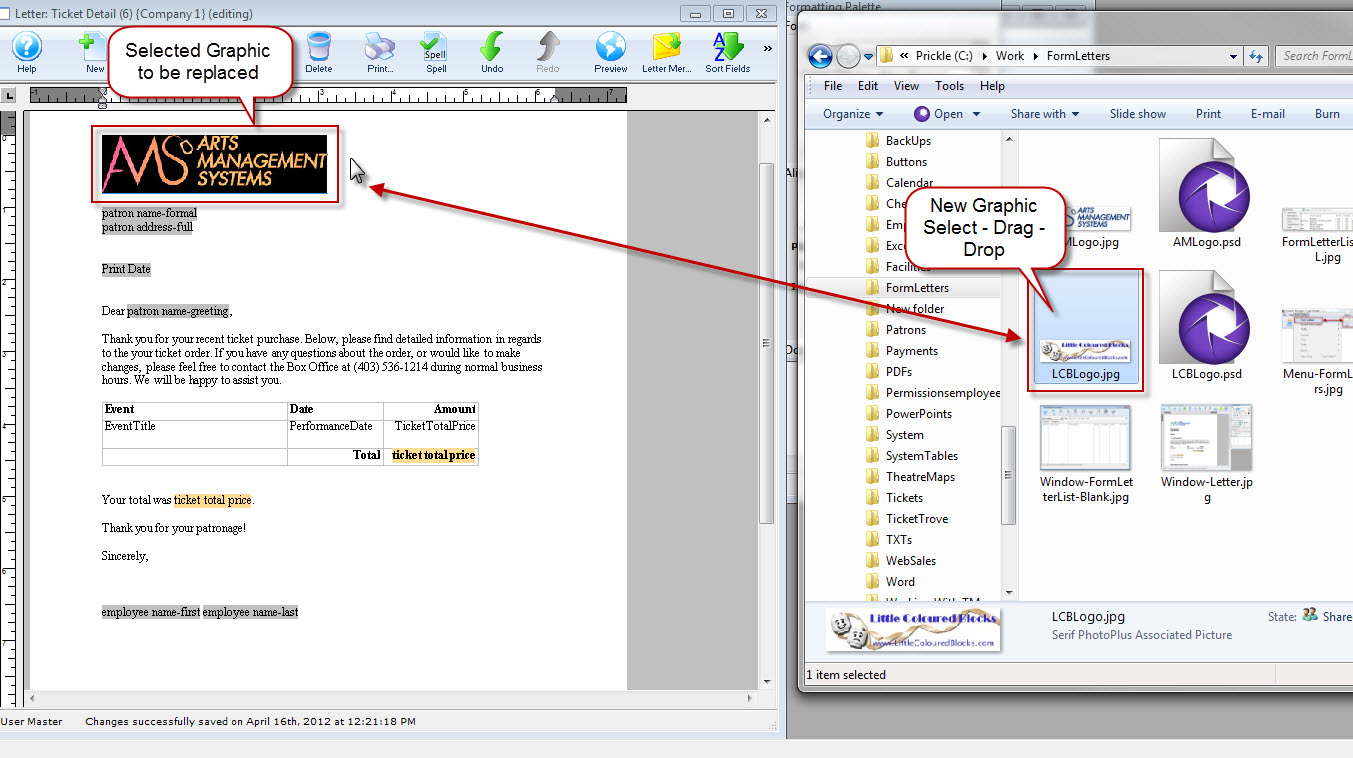
A confirmation dialog opens.
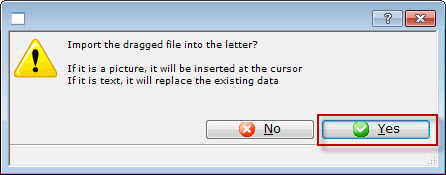
- Click the Yes
 button.
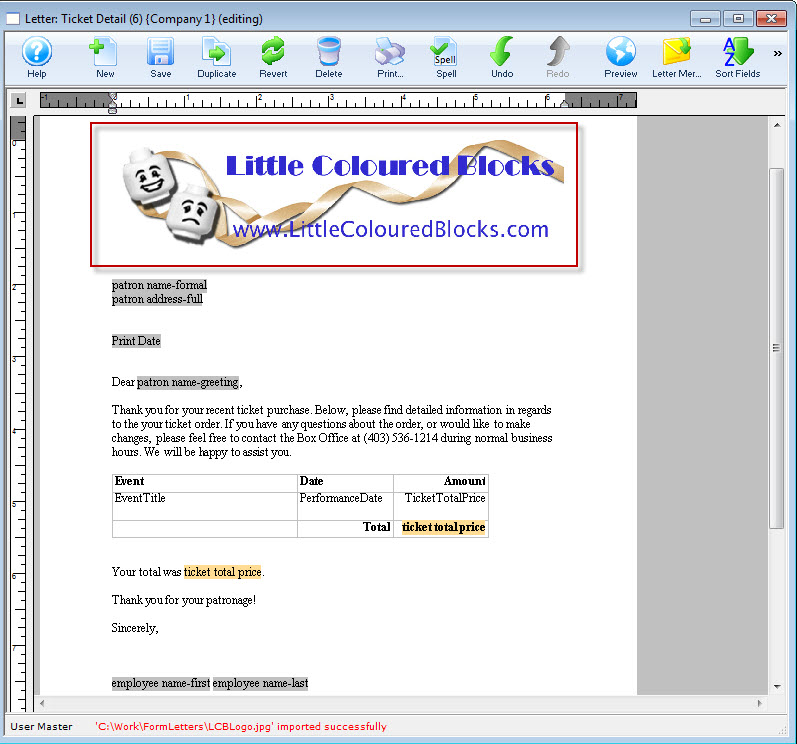
Your graphic has been added to the form letter using drag and drop.
To change the graphic size or location, use the right - click menu.
Float Image with Text wrapped
 If an image is added to a form letter, the default positioning is that the image is inline with the text. That means that as you add more text before the image, the image will float down the page because of the expanded text.
When creating a newsletter or eblast, it can be advantageous to fix the position of the image on the page and allow the text to wrap around it. To do this:
- Drag the image onto the form letter approximately where it should be placed
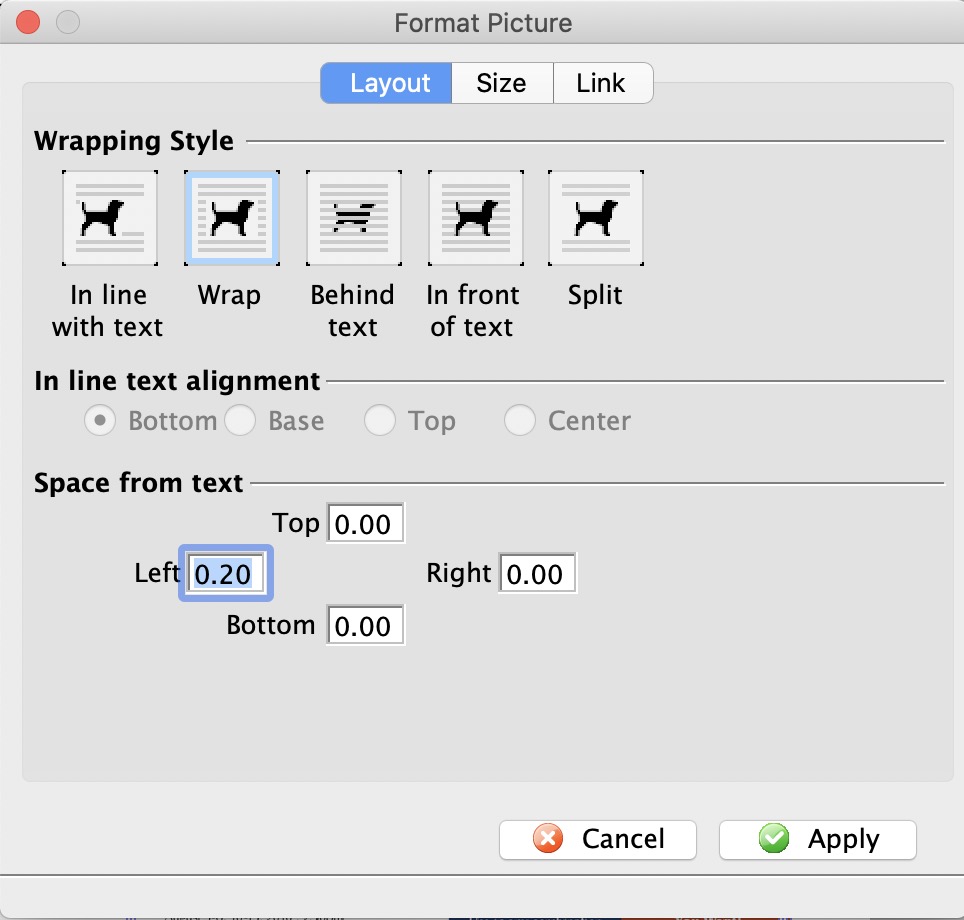
- Double click on the image. The formatting window, similar to the image on the right, will appear.
- Change the formatting to be Wrap
- (optionally) set the space from text:
- This is the white space that the form letter will leave around the image
- You can set values for one or more of the left, right, top or bottom of the image
- In the example, white space will be created only at Left border of the image for 0.2
- Close the Format Picture window. The text is now wrapped around the image
- Click on the image and drag it to the desired location in the document and the text will format automatically.
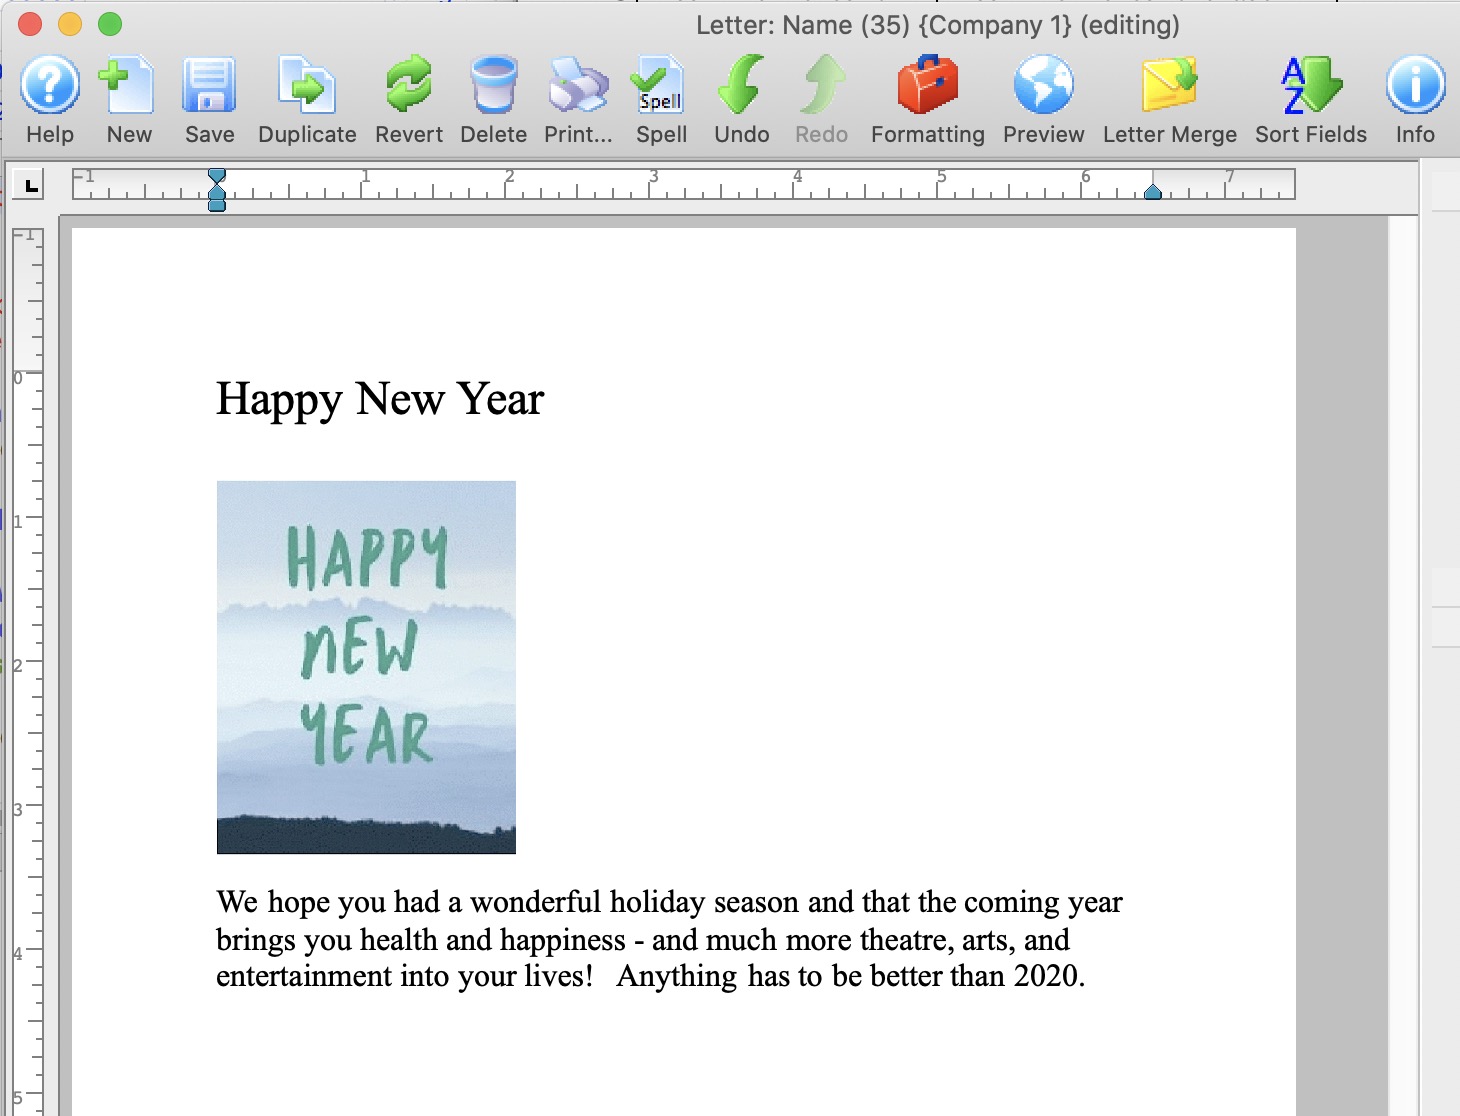
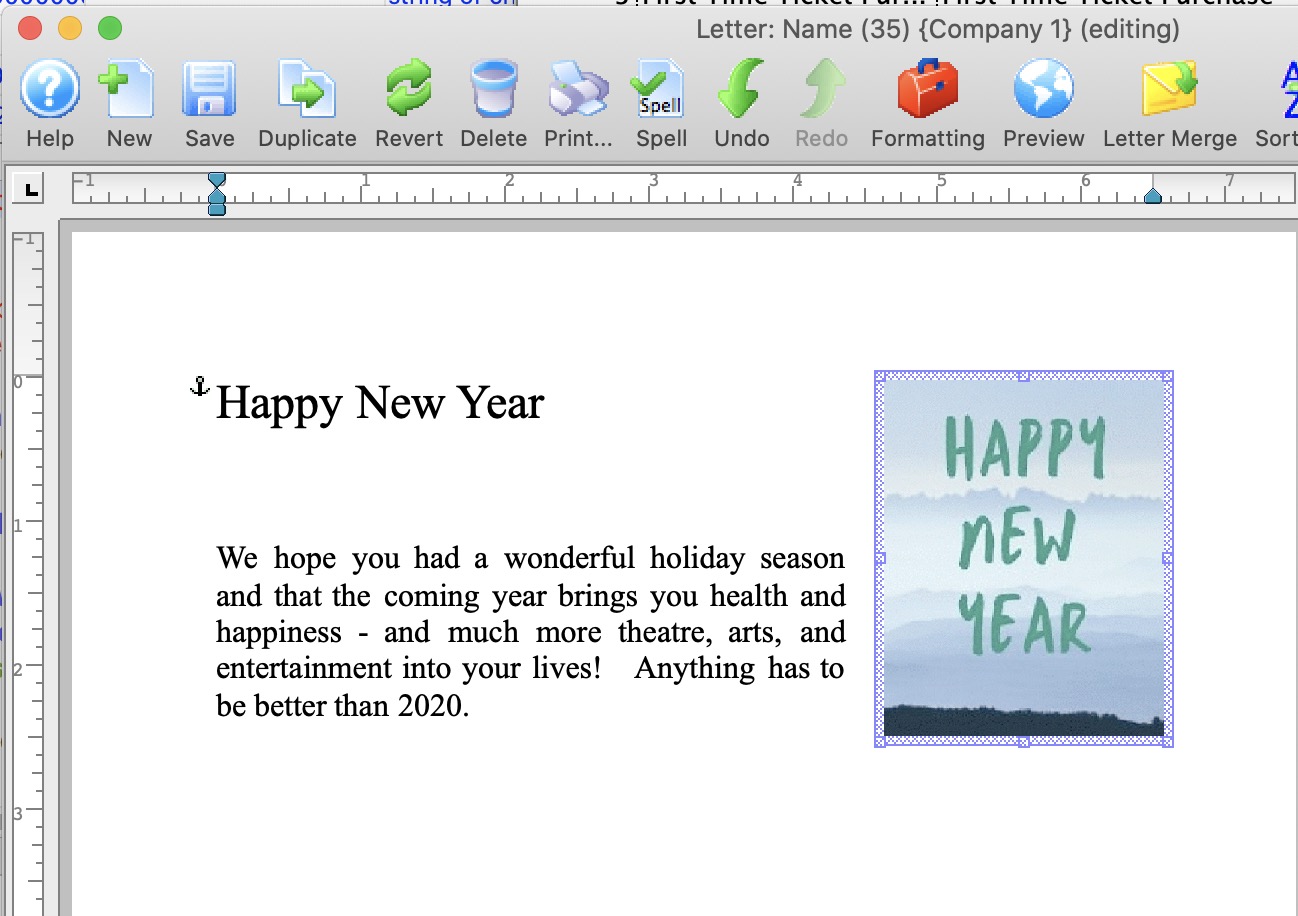
An Example is shown below:
The example shows placement of one image on a form letter. This can be repeat this as many times as needed in order to move images around on the page when creating a letter or email.
- The image for happy New Year is dragged onto the document and landed between text
- By double clicking on the image the parameters for wrapping and space around the image can be set
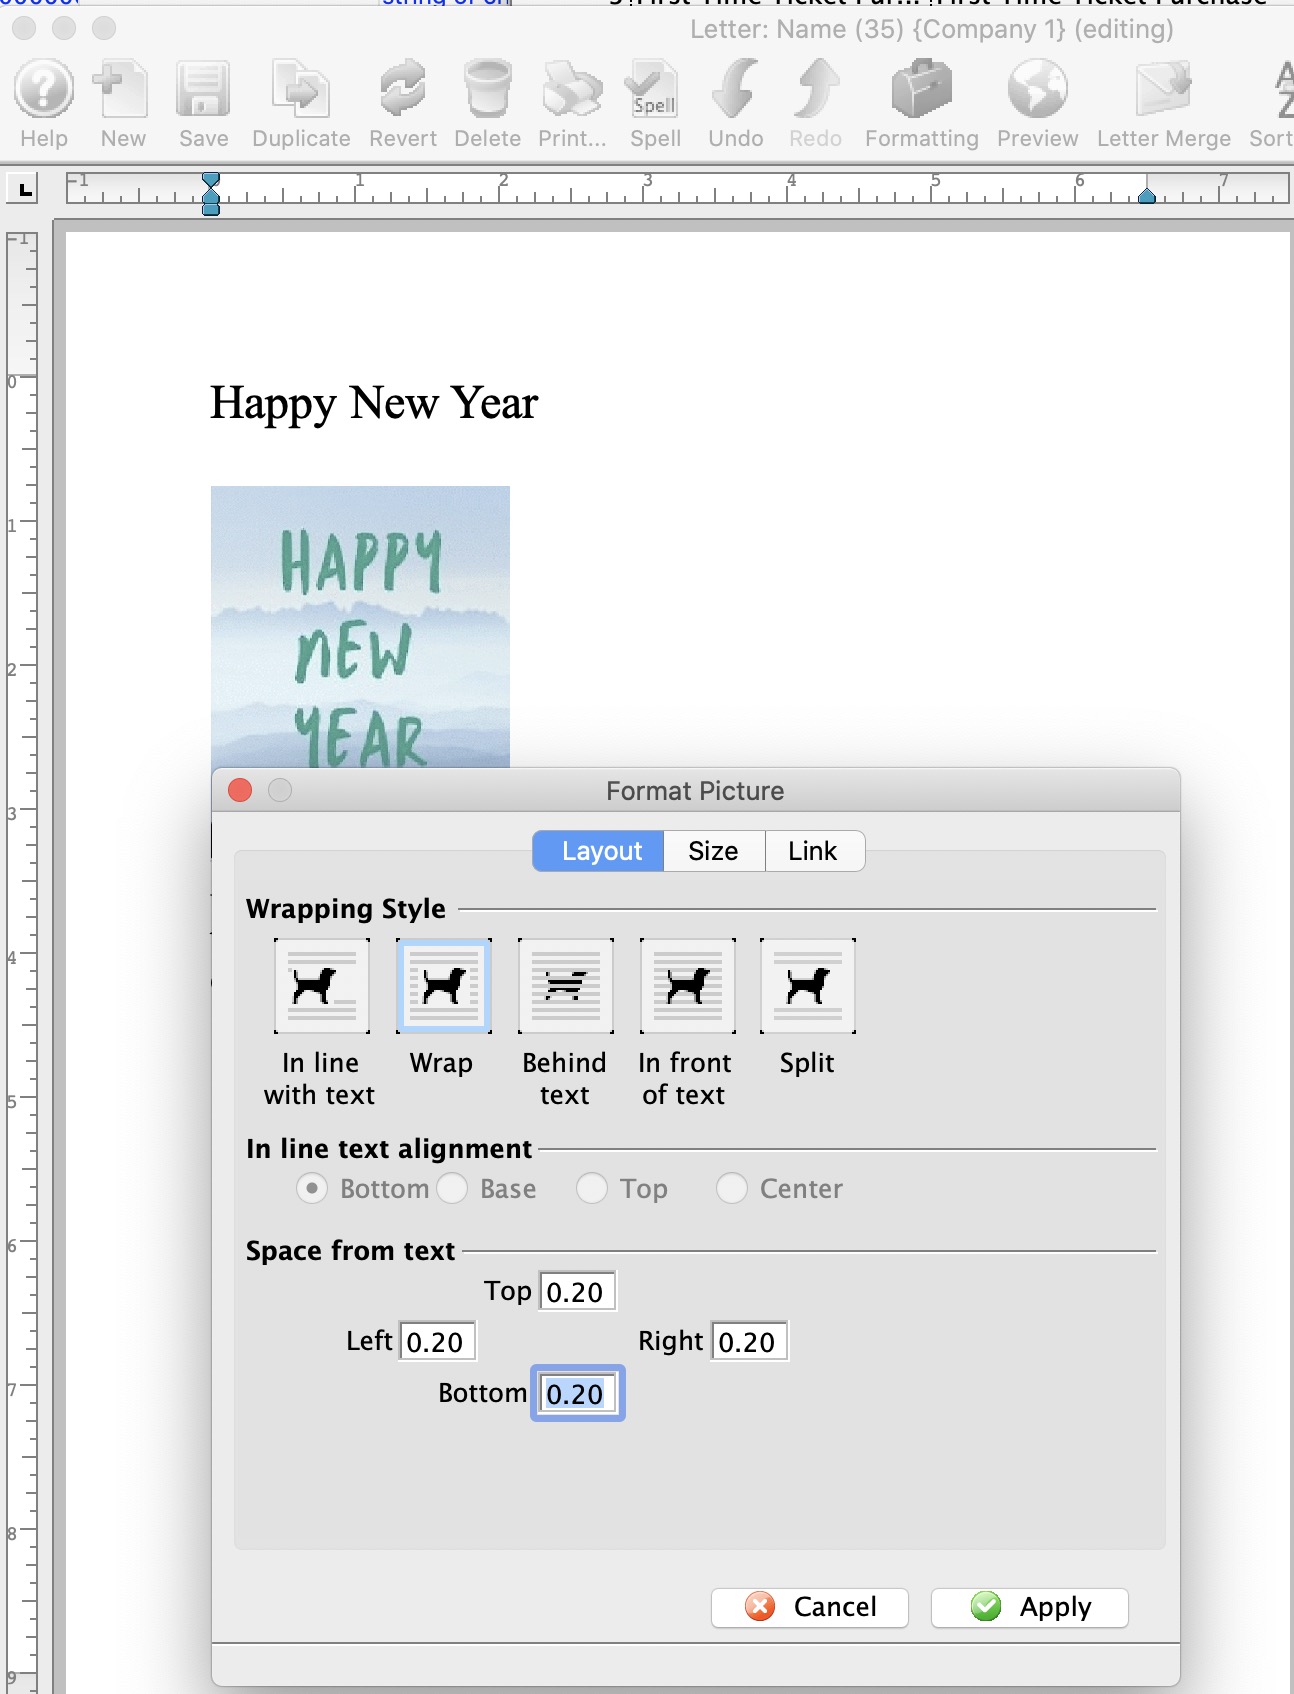
- Click on the image and drag it to the desired location in the document. In this case, the image is dragged to the right and the text formates nicely around it.
Paste From File
To add a graphic to a Form Letter by using paste from file, you perform the following steps:
- Open the letter you want to add the graphic to.
Click here for more information on opening an existing form letter.
The selected letter opens.
- With your cursor, locate the beginning of the linewhere you would like the graphic to appear.
- Chose the Main Menu item Edit >> Paste from File.
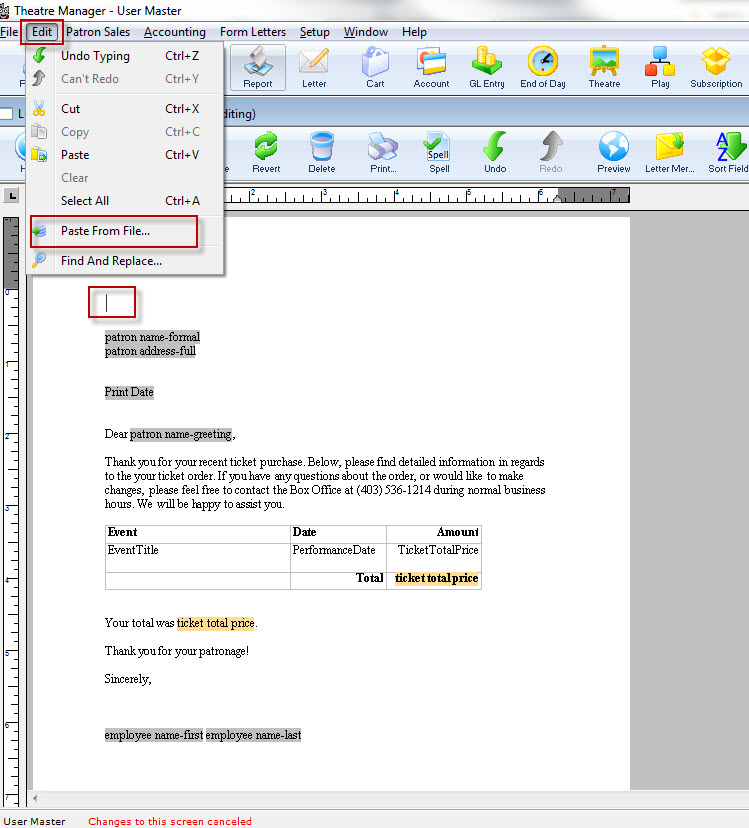
The file dialog for your operating system opens.
- Find the graphic file you want to insert into your form letter. You may have to use the drop down selection to choose the appropriate file type.
- Click the Open
 button.
The graphic is pasted into the Form Letter.
Create an HTML eblast
Unlike a plain text email, an HTML email incorporates fonts, color and graphical content. Individuals often choose to use such emails for marketing and email newsletters (popularly called "ezines"). Sending emails of this sort to multiple recipients is traditionally referred to as an eblast (email blast). Incorporating HTML eblasts into your online marketing technique might increase your site's visitor count and be a successful method for promotion.
Creating an html email is as simple as importing the html code into the form letter.
You can create your html email in a text editor or HTML editor. To do this, you perform the following steps:
- Open a new text document or HTML editor and create an HTML email.
Use basic HTML code, such as "<B>" for bold text and "<I>" for italicized text. If you are incorporating graphical content, upload them to your marketing web site rather than attaching them to the document.
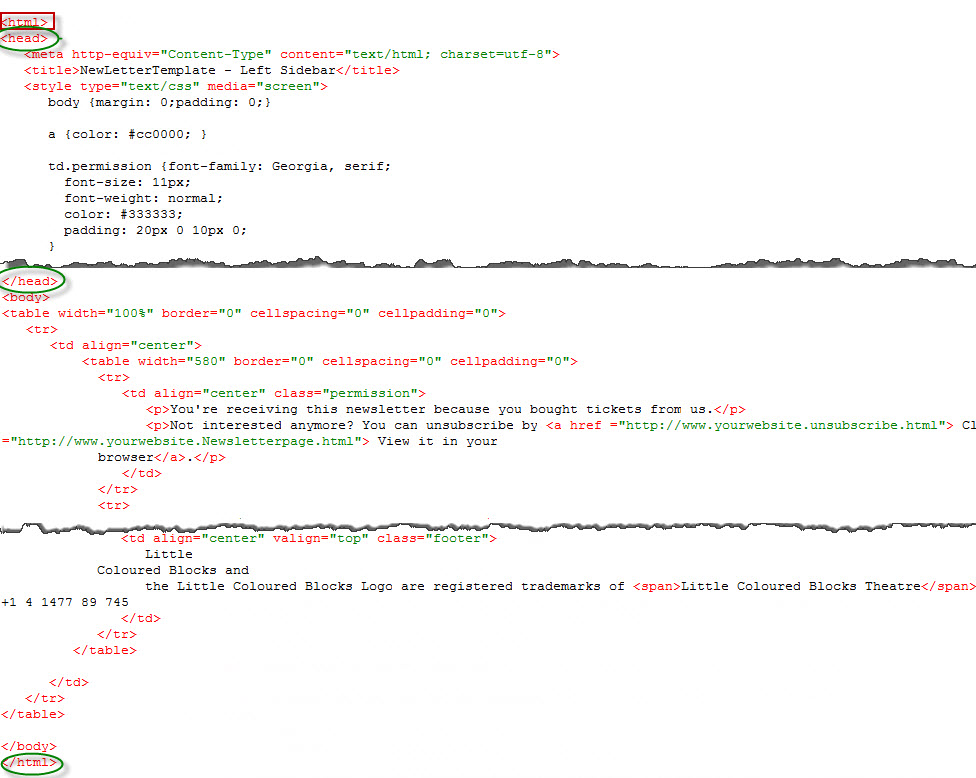
Ensure you have the HEAD tags open and closed and HTML at the beginning and the end of the document.
- If you are using a WYSIWYG (what you see is what you get) HTML editor, review your final email. Otherwise, open the filename.html in a web browser.
- Select and copy the HTML email draft letter.
- In the open form letter, paste the copied HTML.
- Click the Save button.
The form letter/eblast now contains the html code.
You can now add any Database or Custom fields.
Deleting an Existing Form Letter
A Form Letter can be deleted when it is has not been linked to any patron files. To make a letter is no longer available for use that has been linked to patron files, make it inactive.
- Search for the Form Letter to delete.
Click here to learn how to find existing Form Letters.
- Click on the Form Letter to delete.
- Click the Delete button.
The letter can also be opened and deleted from the Form Letter Window.
| You can download quick reference information on Deleting a Form Letter by clicking on the icon. |
Flash |
MP4 |
Duplicating an Existing Form Letter
To modify a Form Letter without affecting all users, create a duplicate of the letter.
- Search for the Form Letter to duplicate.
Click here to learn how to find existing Form Letters.
- Click on the Form Letter to duplicate.
- Click the Duplicate
 button.
A copy of the letter will be placed in the same folder and will appear in the list window. The letter can also be opened and duplicated from the Form Letter Window.
| You can download quick reference information on Duplicating a Form Letter by clicking on the icon. |
Flash |
Finding an Existing Form Letter
- Select the main menu Form Letters >> Form letters or click the form letter icon on the Theatre Manager Toolbar / Ribbon Bar.
The Form Letter List window opens.
Click here for more information about this window.
- Select your criteria from the Drop Down List Menu and enter criteria for a specific search, or click the Search
 button to find all letters.
The letters are displayed in the window.
| To view the screencast on Finding a Form Letter, click the following: |
Flash |
MP4 |
Deleting a Letter from a Patron Record
After adding a letter to a Patron record, it may become necessary to delete the letter.
- Open the Patron's record from the Patron List window.
Click here for more information on this process.
- Click on the Letters
 Tab at the bottom of the Patron window.
- Click on the letter to be deleted.
- Click the Delete
 button.
A warning message will appear.
- Click the Delete
 button.
The letter will now be removed from the patron's record.
Merging Letters/Emails
In Theatre Manager there are multiple ways to merge a Form Letter to a Patron. This can be done as a single process or as a batch process. Below are the ways to merge a letter.
Merging a Letter or Email to a single Patron
A letter can be merged from:
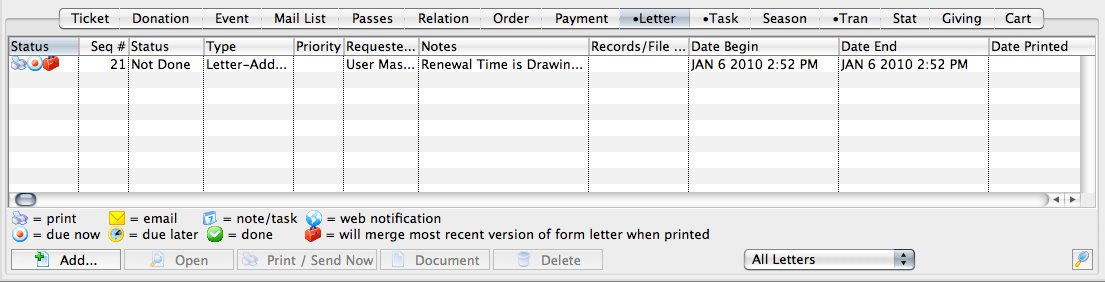
- the Letter Tab of the Patron window. Click here for more information.
- the Membership Detail window. Click here for more information.
- the Volunteer Detail window. Click here for more information.
- the Donation window. Click here for more information.
Merging a Letter or Email to multiple Patrons
- A letter can be merged to multiple Patrons at one time. Click here for more information.
- A letter can be merged with an existing Mail List of Patrons. Click here for more information.
Deleting a Merged Letter
- A letter can be deleted from a single Patron record. Click here for more information.
- A batch of letters can be deleted after being merged. Click here for more information.
|
Quick reference information for Merging Form Letters |
Merge Options and Instructions
 |
If you are trying to eblast a group of patrons, and you have created double-opt-in mail lists so that you can confirm to CASL (Canada's Anti-Spam Law), please make sure to include the double opt-in mail list as part of your criteria in any of the search options.
This means you should have at least one criteria that says belongs to mail list is one of [the double opt in mail lists of interest] |
Merging through the Patron Window
When adding a Form Letter or Email to a single Patron's record, it is often easiest to merge using the capabilities of the Patron window.
- Open the Patron's record from the Patron List window.
Click here for more information on this process.
- Click on the Letters Tab at the bottom of the Patron window.
- Click the Add
 button and choose whether to add a Letter or an Email.
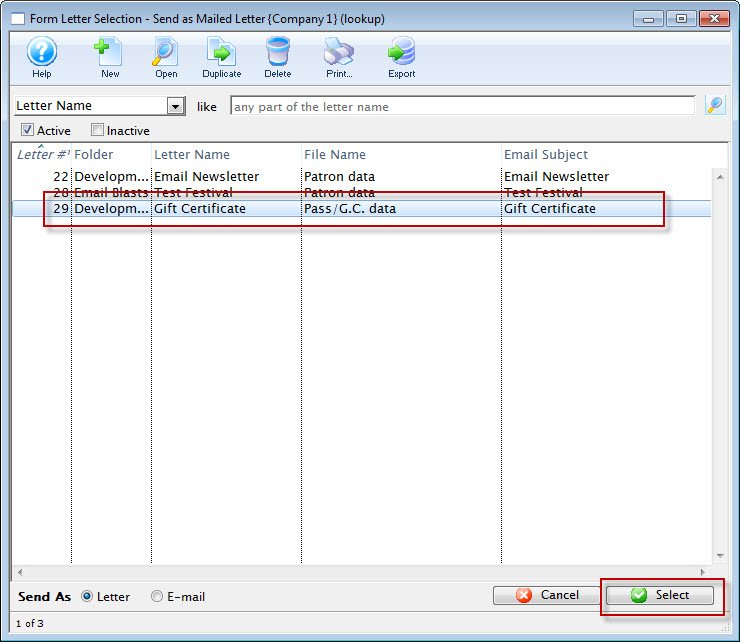
This will open the Form Letter Selection window.
- Enter the search parameters or simply click the Search button.
If no search parameters are entered, Theatre Manager will return a list of all form letters.
- Click on the letter(s) to add to the patron to select them.
To select multiple letters, use the OPTION key (Mac) or the CTRL key (Windows).
- Check whether the letter will be sent as a Letter or an Email with the radio buttons in the bottom left of the window (will match the choice you made when you first clicked Add), and click the Select
 button at the bottom right of the window.
An email address and SMTP mail server must be entered into Company Preferences to send emails. Patrons to whom emails are being sent will need an email address entered into the Patron record.
- The Form Letters Selection window will close and the user will be returned
to the Patron window.
The Letter or Email will be added to the Patron's Letter
tab for later
printing.For more information about printing the letter or sending the email, click here.
Merging a Letter through the Membership, Pass G/C Detail Window
When adding a membership to a Patron, it is possible to also add a letter to the Patron. This can be done from the Membership Detail Window. To access this window:
- Open a patron record
- Select the Membership
 tab.
tab. - Select the appropriate membership from the list and click Open

- From the Membership Detail window, click the Letter tab.
Click here to learn how to sell a membership.
- Click the Add
 button and choose whether to add a Letter or an Email. The Form Letter Selection window opens.
- Click on the letter to add to the Patron to select it.
- Click the Select
 button at the bottom of
the window.
button at the bottom of
the window.
An email address and SMTP mail server must be entered into Company Preferences to send emails. Patrons to whom emails are being sent will need email addresses entered into their Patron records.
The user is returned to the Membership Detail window and the letter is displayed.
Click here for more information about printing the letter or sending the email.
Merging a Form Letter through Volunteer Activity
This method is used to merge a letter with a specific volunteer activity performed by the patron. If the patron has not performed any volunteer activities a letter cannot be merged until an activity is entered.
- Open the Volunteer History window.
Click here to learn how to open the window.

- Under the Position
 tab in the top right, select an Activity from the list.
- Click on the Letters
 tab.
tab.
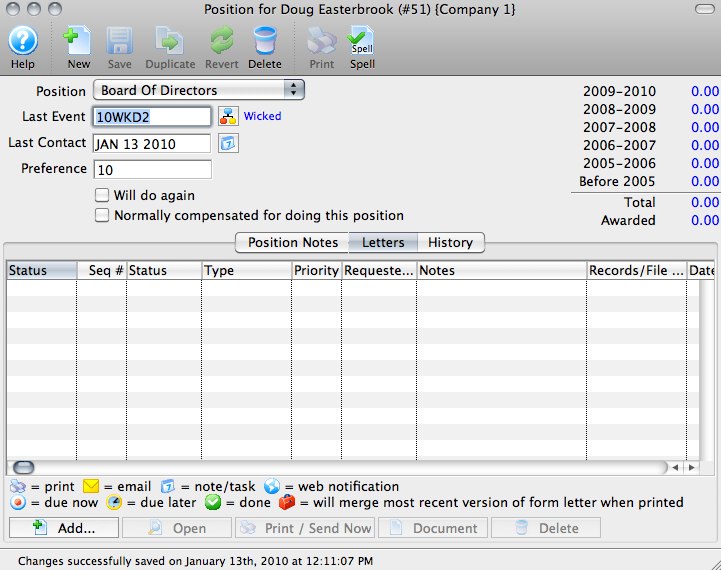
- Click the Add Button button.
The Form Letter Selection window will open.
- Enter search parameters in the From and To fields, or simply click the
Search button.
If the search parameters are left blank, a list of all letters will be displayed.
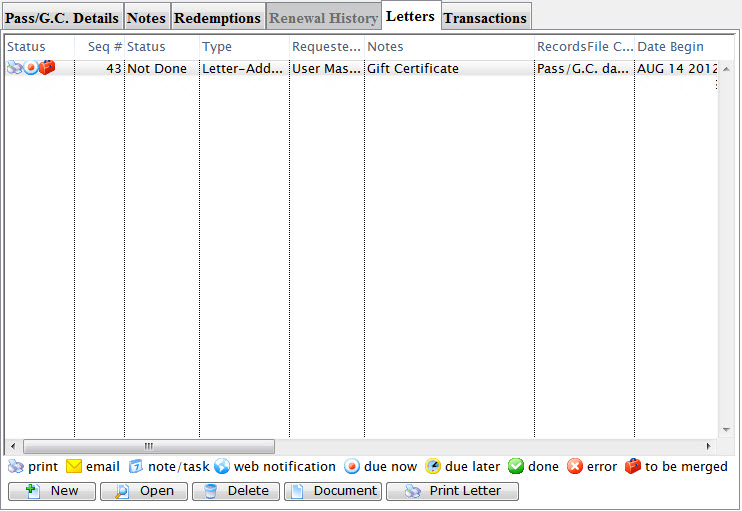
- Click on the letter to be used.
- Click on the Add Letter button or click on the Add Email button.
An email address and SMTP mail server must be entered into Company Preferences to send emails. Patrons to whom emails are being sent will need email addresses entered into their Patron records.
- The user will be returned to the Volunteer Activity Detail window.
The letter will now appear under the Letters
tab
of this window. The letter will also appear under the Letters tab
of the Patron window.To find out more information about printing this letter, click here.
This will open the Activity History Detail window.
Merging Form Letters with Donations
As you are creating a new donation for a patron Theatre Manager gives you the option to merge the donation with a form letter. This letter could be a Thank You or Invitation to special donor only events. A variety of letters can be easily setup using Theatre Manager to create new letters. For more information on Form Letters click here. If you require to merge letters with many donations or tax receipts refer to Merging Letters & Tax Receipts using reports.
To merging a Form Letter with a Tax Receipt, you perform the following steps:
- Insert the donation.
Click here to learn how to insert donations.
- Selection the Donation in the Patron Donations tab.
- Click the Open button.
- Select the Receipts
 tab.
tab.
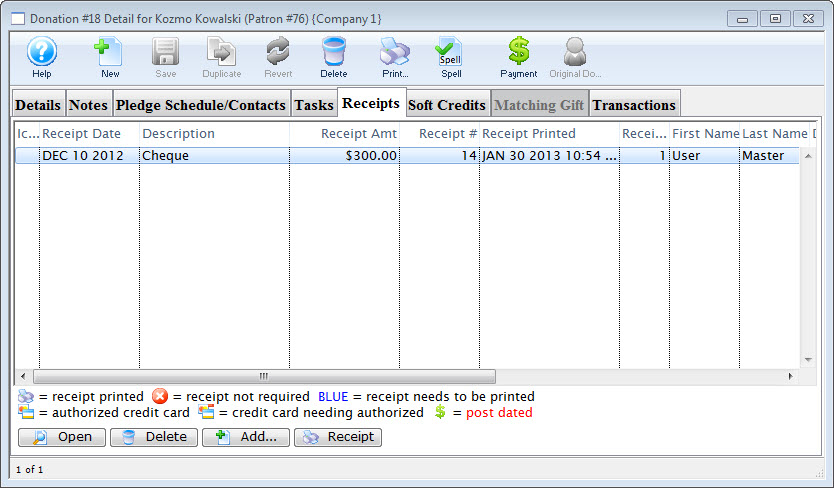
- Select the receipt to merge the letter with.
- Click the Add button.
The Form Letter Selection window will open.
- Click the Search button to generate a list of Form Letters.
- Select the Form Letter to add to the donation.
Single click on a letter to select it.
- Click the Select button button.
The selected letter(s) have now been merged with the receipt and will be printed when the Batch Function "Print Charitable Receipts for Donor" function is initiated.
To merge a Form Letter with a Donation
- Insert the donation.
Click here to learn how to insert donations.
- Select the Donation in the Patron Donations tab.
- Click the Open button.
- Click the Pledge Schedule/Contacts
 tab.
tab.
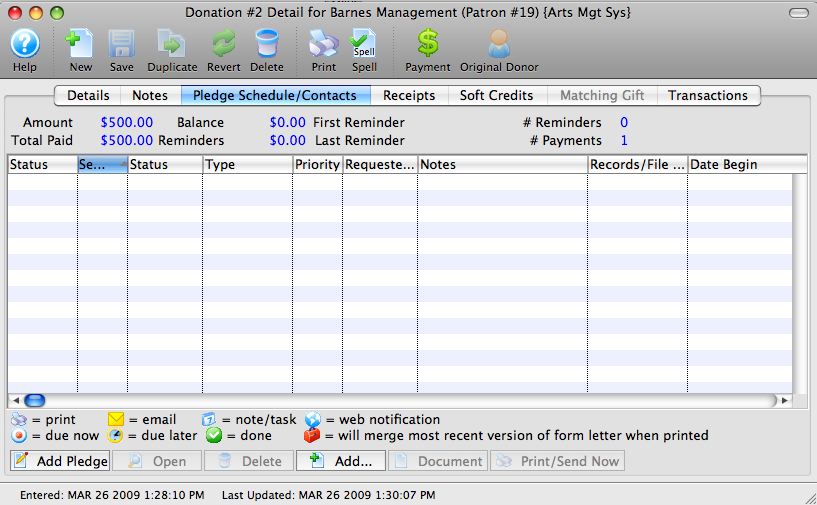
- Click the Add button.
The Form Letter Selection window opens.
- Click the Search button to generate a list of Form Letters.
- Select the Form Letter to add to the donation.
Single click on a letter to select it.
- Click the Add button.
The selected letter(s) have now been merged with the donation and is ready to print. Click here to learn more about printing letters.
Merging a Form Letter to a Batch of Patrons
- Click on the Form Letters menu, and go to the Form Letters >> Form Letters menu.
The Form Letter list window opens.
- Click on the letter to be used in the merge.
If there are a large number of letters the search function at the base of the window may need to be used. You can type in part of the letter name to search for and click the Search
 button.
 - Click on the Letter Merge
 button
at the top of the window.
button
at the top of the window.
The the Letter Criteria window opens.
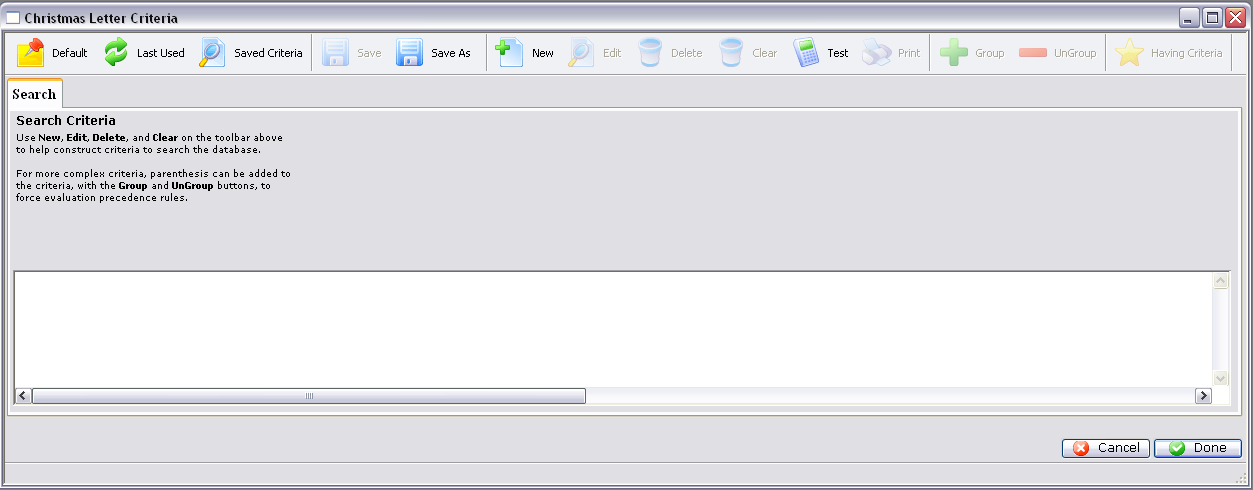
- Click the New button in the Letter Criteria window toolbar / ribbon bar, to add criteria.
The Add/Edit Parameter window opens.
- Enter the criteria that is to be used in merging the letter.
In this example we will be adding all Patrons who have numbers between 1 and 50. For more information on criteria, click here.
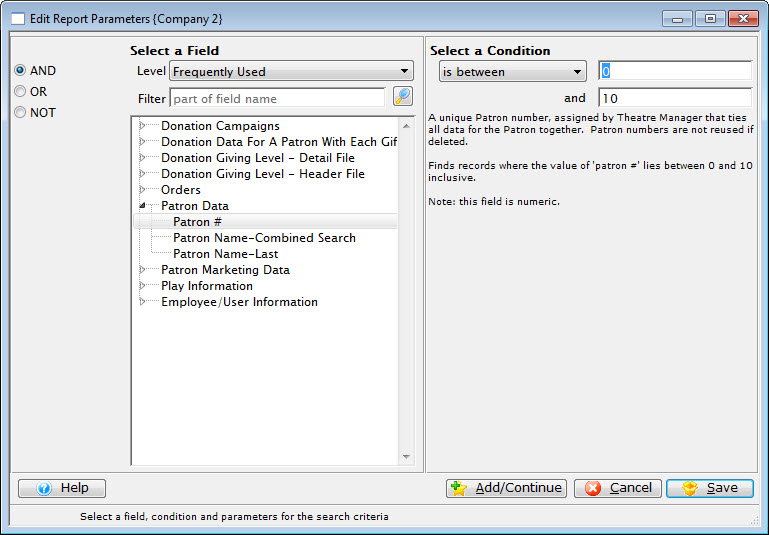
- Click the Add/Continue
 button
to add additional criteria, or click the Save
button
to add additional criteria, or click the Save  button
to save and return to the Letter Criteria window.
button
to save and return to the Letter Criteria window.
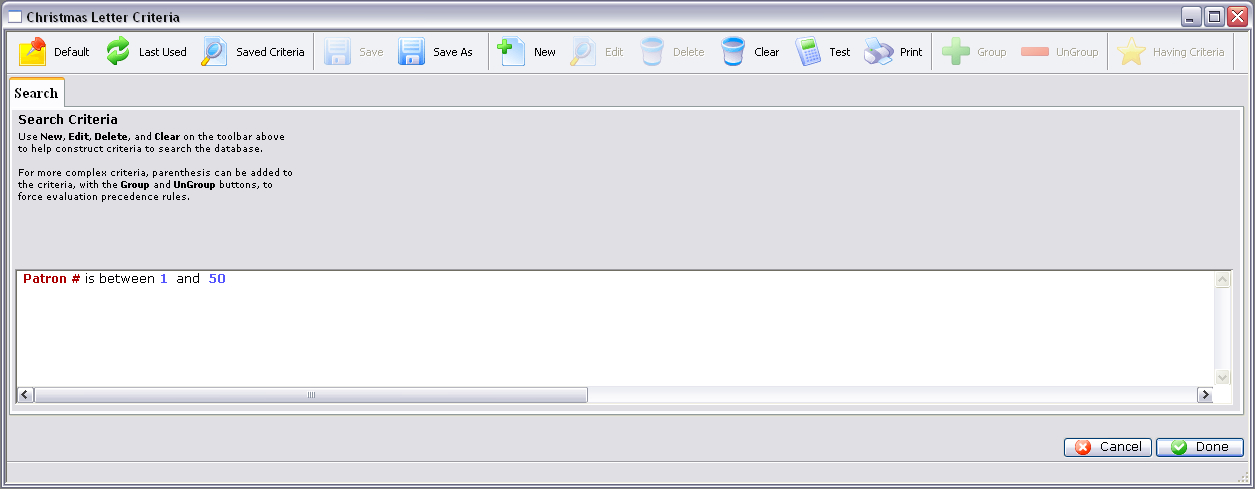
- Click the Done button.
The Merge Form Letter window will now open displaying all of the results based on the criteria.
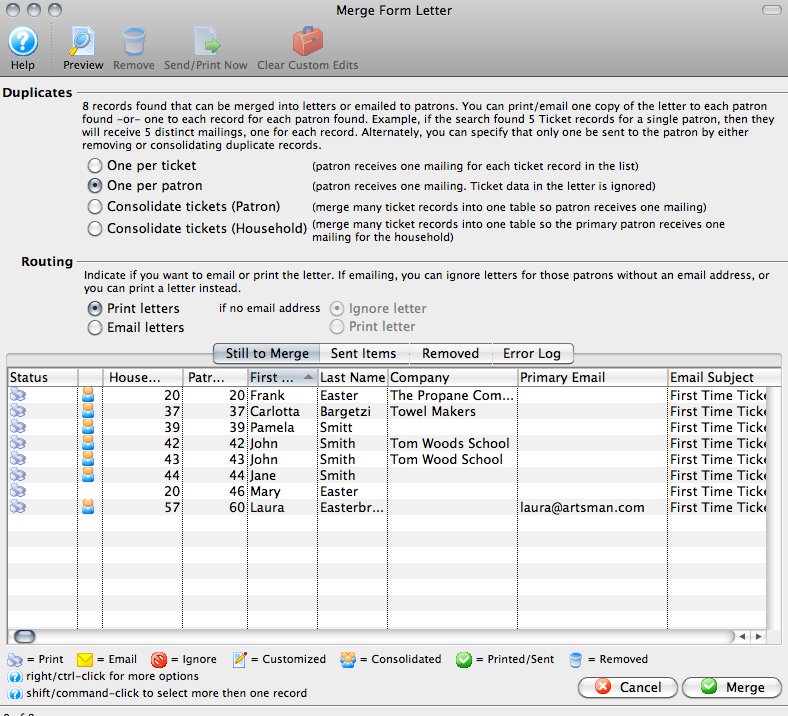
- Make any changes to the letters as needed.
Click here for more information on this window and the actions that can be performed.
- When all actions have been completed, highlight the letters to be merged,
and click the Merge
 button.
To highlight all of the letters, click on any letter and then use OPTION + A (Mac) or CTRL + A (Windows).
This opens the Merge Parameters window.
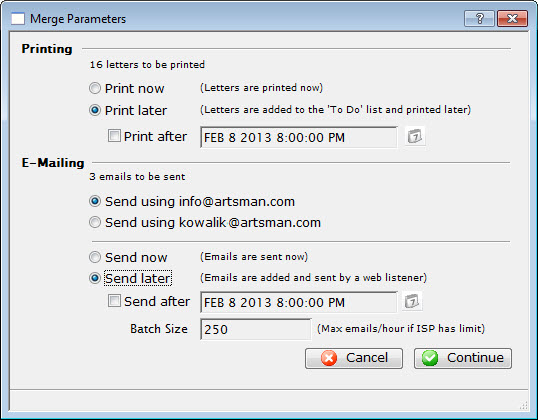
- Adjust the Parameters as necessary.
For more information on this window, click here.
- Click the Continue button to execute the Parameters.
If "Print Now" was selected, then the user's Print Dialog will open. If the "Print Later" option was selected, then the letters will be merged and stored for printing at the set time. Remember that at least one user must be logged in for the letters to print if an after-hours time was selected. If no user is logged in, then the letters will print the next time a user logs in, after the time set has been reached.
For emails, if "Email Now" was selected, then the emails would be merged and immediately sent. If "Send Later" was selected, then the emails would be merged and stored to be sent at the set time. For emails to be sent a Web Sales Listener must be active. The Web Sales Listener handles the sending of all emails, especially if the emails were sent in limited batch amounts.
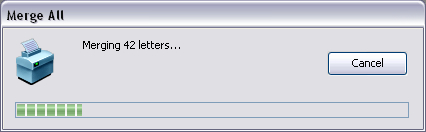
- When the Merge is completed, the user will be returned to the Merge
Letter window with a report of the merge now displayed.
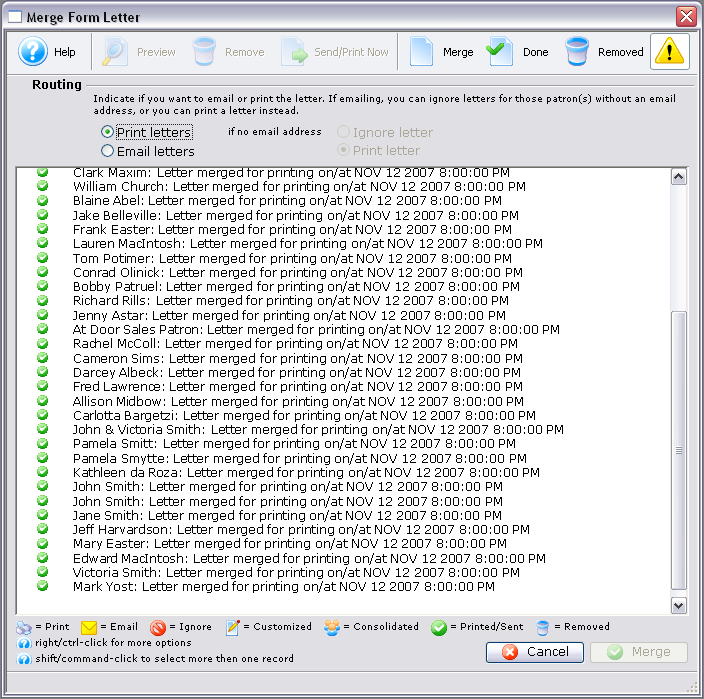
- The user can now close this window and continue other operations.
Merging a Mail List with a Form Letter
Theatre Manager has a powerful marketing tool for postal mailings or email blasts built right in to the software. One of the most commonly used merge features in the Letters module allows a user to merge a mail list with a form letter both created using information contained in your database. The following few pages describes and illustrates the process of merging a mail list with a letter then either printing the result or sending it via email to the intended recipients.
|
Quick reference information for Merging Form Letters |
Selecting the Letter
- Choose Form Letters >> Form Letters.
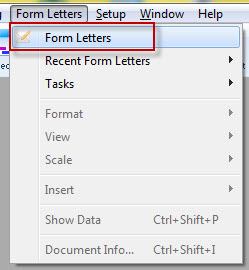
Alternatively, select the Letters
 button in the Theatre Manager ribbon bar / toolbar.
 The Form Letter List window opens.
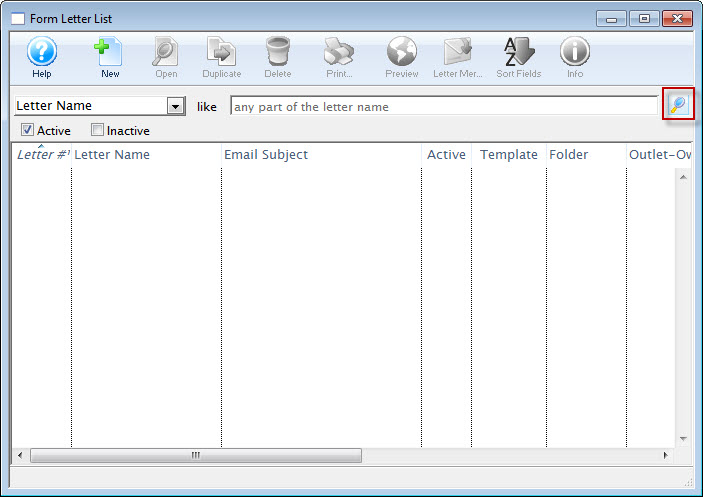
For more information about the Form Letter List Window, click here.
- Click the Search button and select the letter to use in your mail list merge.
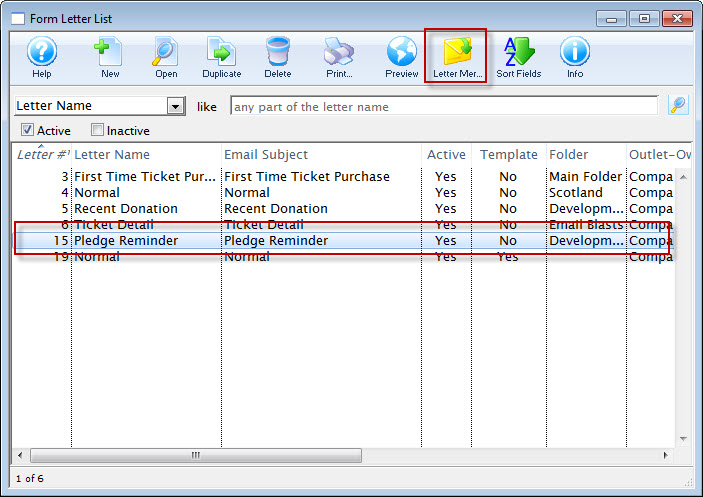
- Click the Letter Merge
 button.
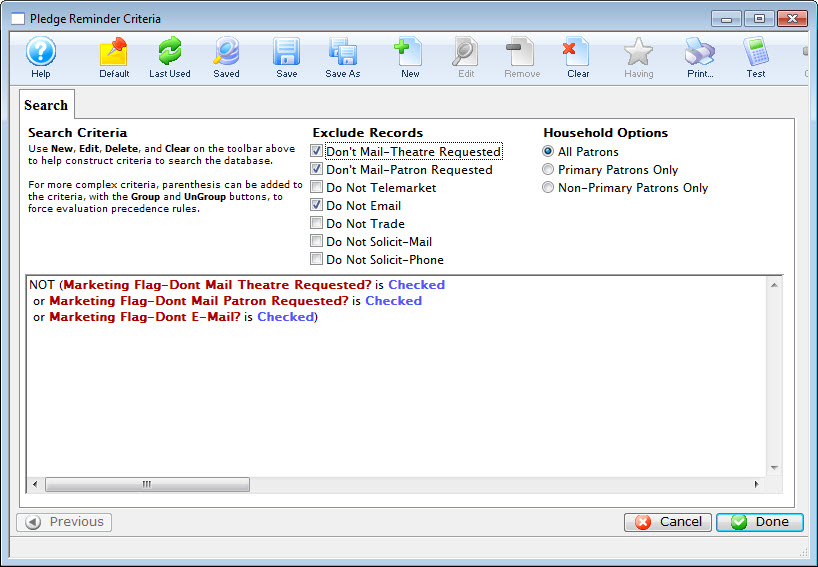
The Form Letter Criteria window opens. click here, for more information on creating mail lists.
Attaching the Letter to a Mail List
- You can exclude those patrons who have indicated they do not wish to receive mailings, by ensuring the appropriate Exclude Records radio buttons are selected and that the criteria reflects that information.
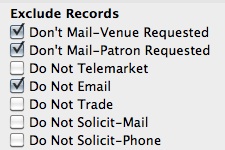

- To add any new piece of criteria, including a specific Mail List, click the New
 button.
- To initiate a merge based on an existing mail list, select the Criteria category Patron Marketing Data > Marketing Patron Belongs to Mail List.
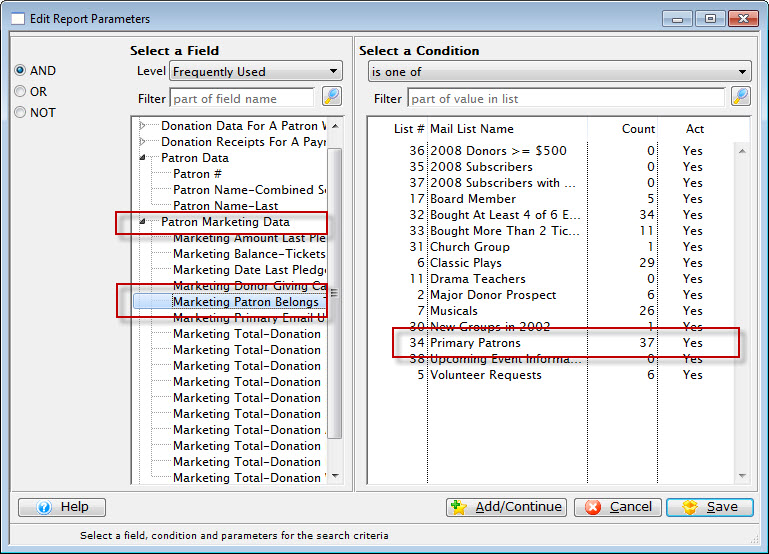
- On the right side, choose the mail list of patrons to whom you'd like to send your letter.
- When you have made your selection from the list of Mail lists, close the criteria window.
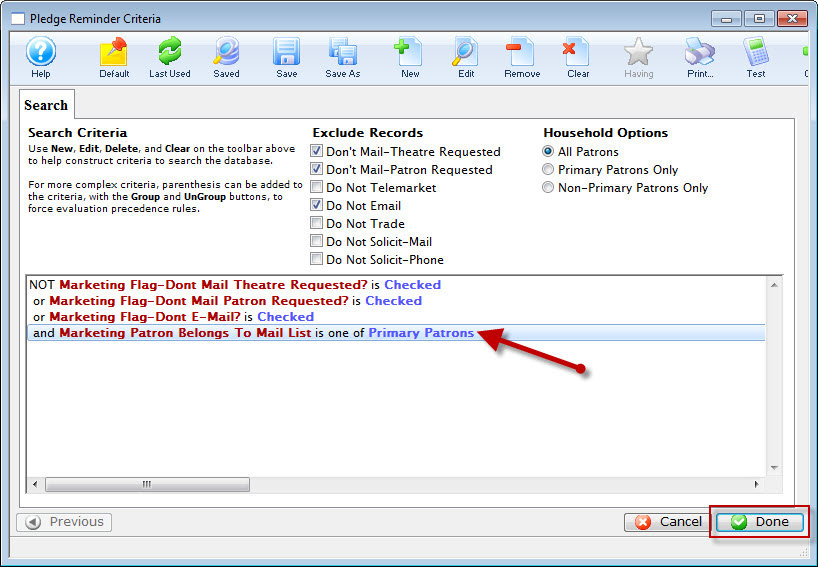
The selected mail list is added to the criteria.
If you do not have an existing mail list, you could enter criteria to build a new mail list to use for this mailing.
The process is the same whether you're using an existing one or creating a new one. For more information on creating mail lists, click here. - Click Done in the bottom right to start the merge.
Setting Sending and Routing Options
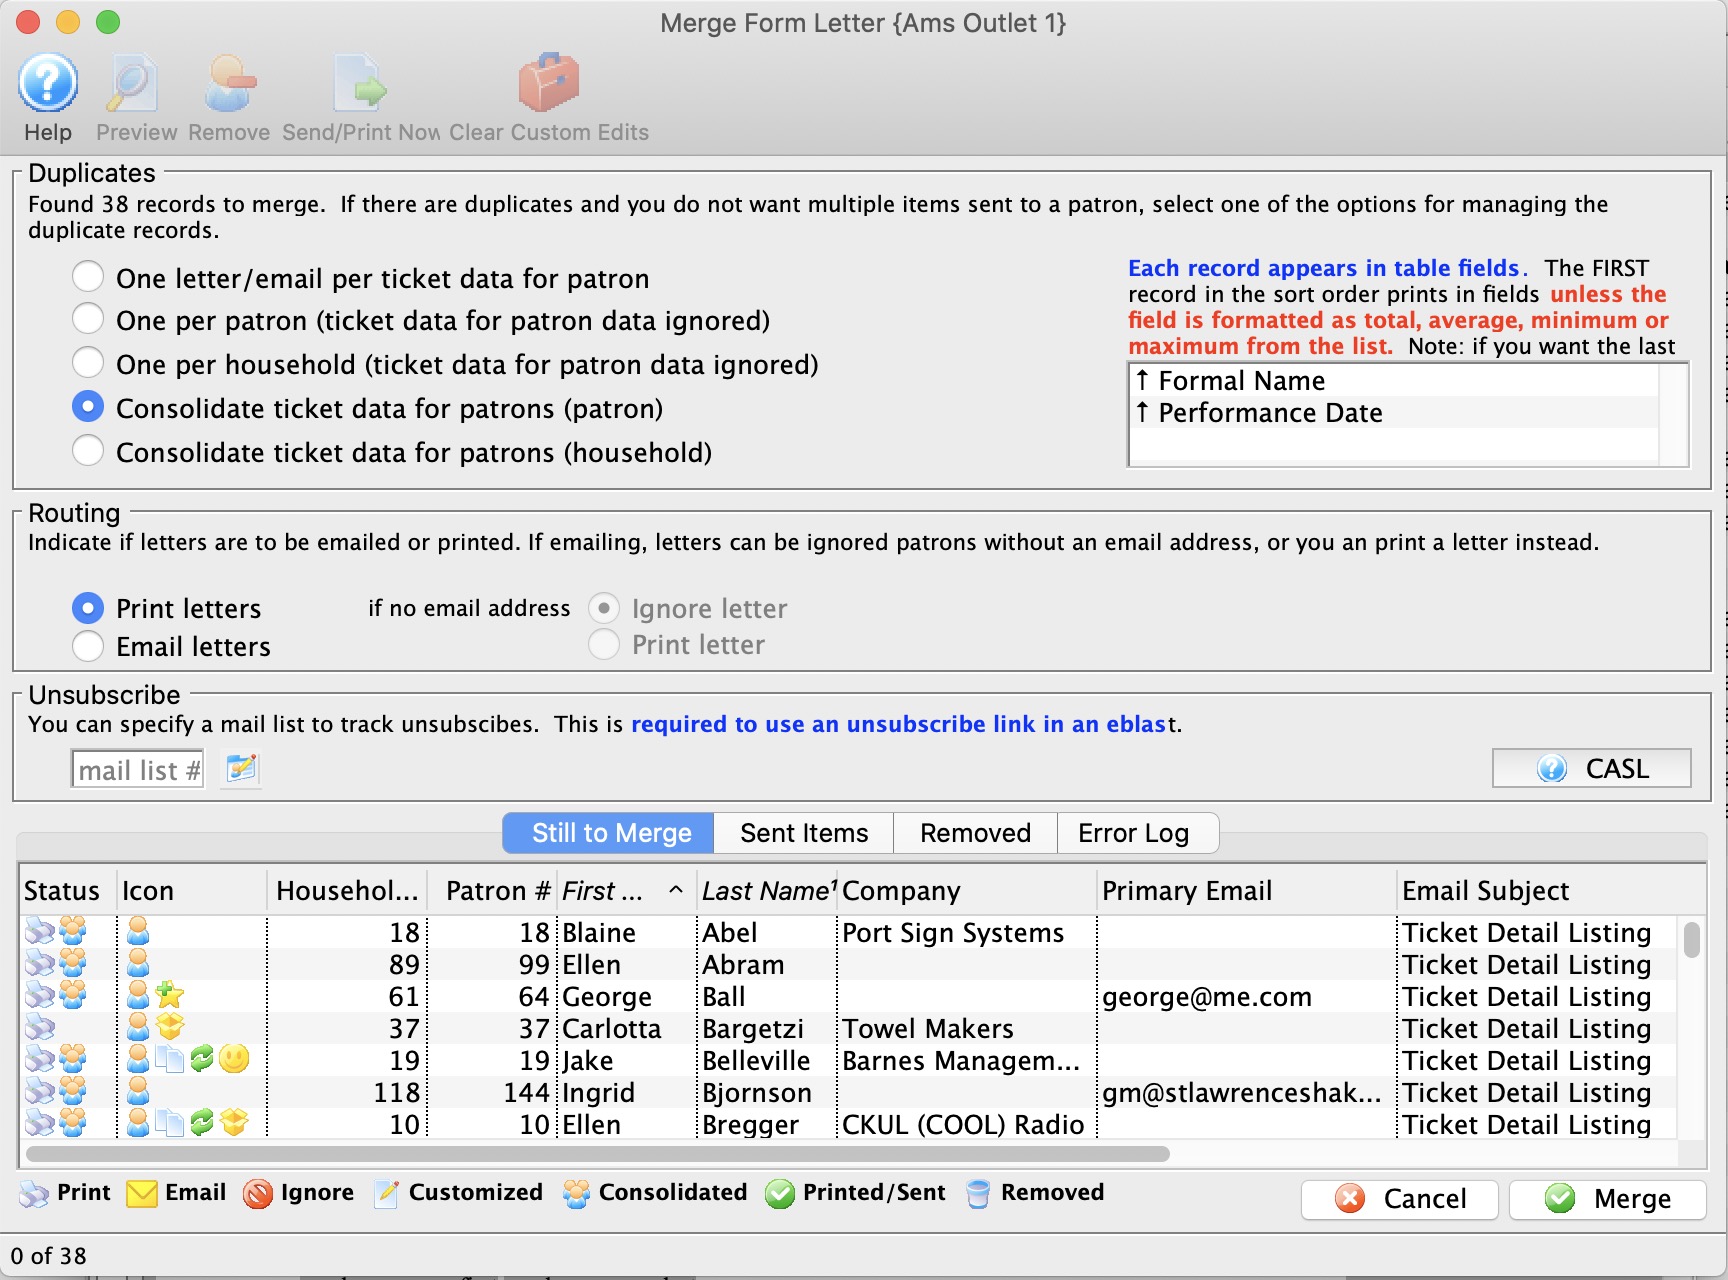
For more information about the Merge Letter Window, click here.
- Make the following selections appropriate to your needs.
Duplicates Set the radio buttons to reflect the type of letter output you'd like for your mailing. Choices are: - One per receipt - there will be one letter for each receipt in the record.
- One per patron - Patron receives just one mailing and the Receipt data in the letter is ignored. While this will limit the number of letters to a single patron, several patrons in the same household could receive letters.
- Consolidate tickets (Patron) - the receipt data is consolidated into a table (rather than being ignored) and each patron will receive one letter based on that table of receipts. Several patrons in the same household could receive letters.
- Consolidate tickets (Household) - Generates one single letter for the primary household patron. This is the method to ensure one letter or mailing for each household
Routing Set the routing for your letter to - Print or Email. If you choose Email, you can then choose "If no email address", then either Ignore or Print the letter. Unsubscribe If you are sending emails to people, you may want to include a mail list that will be used to track unsubscribes. This mail list can be: - the main mail list used to find patrons to send the emails to
- one of your other mail lists whose main function is simply to track unsubscribes. This could be used in the future to eliminate people who have declined receiving emails
- a default mail list specified for the letter - which you can change if to want
You do not have to provide an unsubscribe mail list when e-blasting. For example, you:
- WOULD NOT use an unsubscribe mail list if you were sending out an advisory about the event coming up that people have already purchased tickets for - or a quick eblast to board members.
- WOULD likely use an unsubscribe mail list if it was a marketing newsletter.
You can see all emails associated with this mail list in the email tab on the mail list window - Click the Merge
 button when you see the list has been narrowed down.
Inserting unsubscribe links
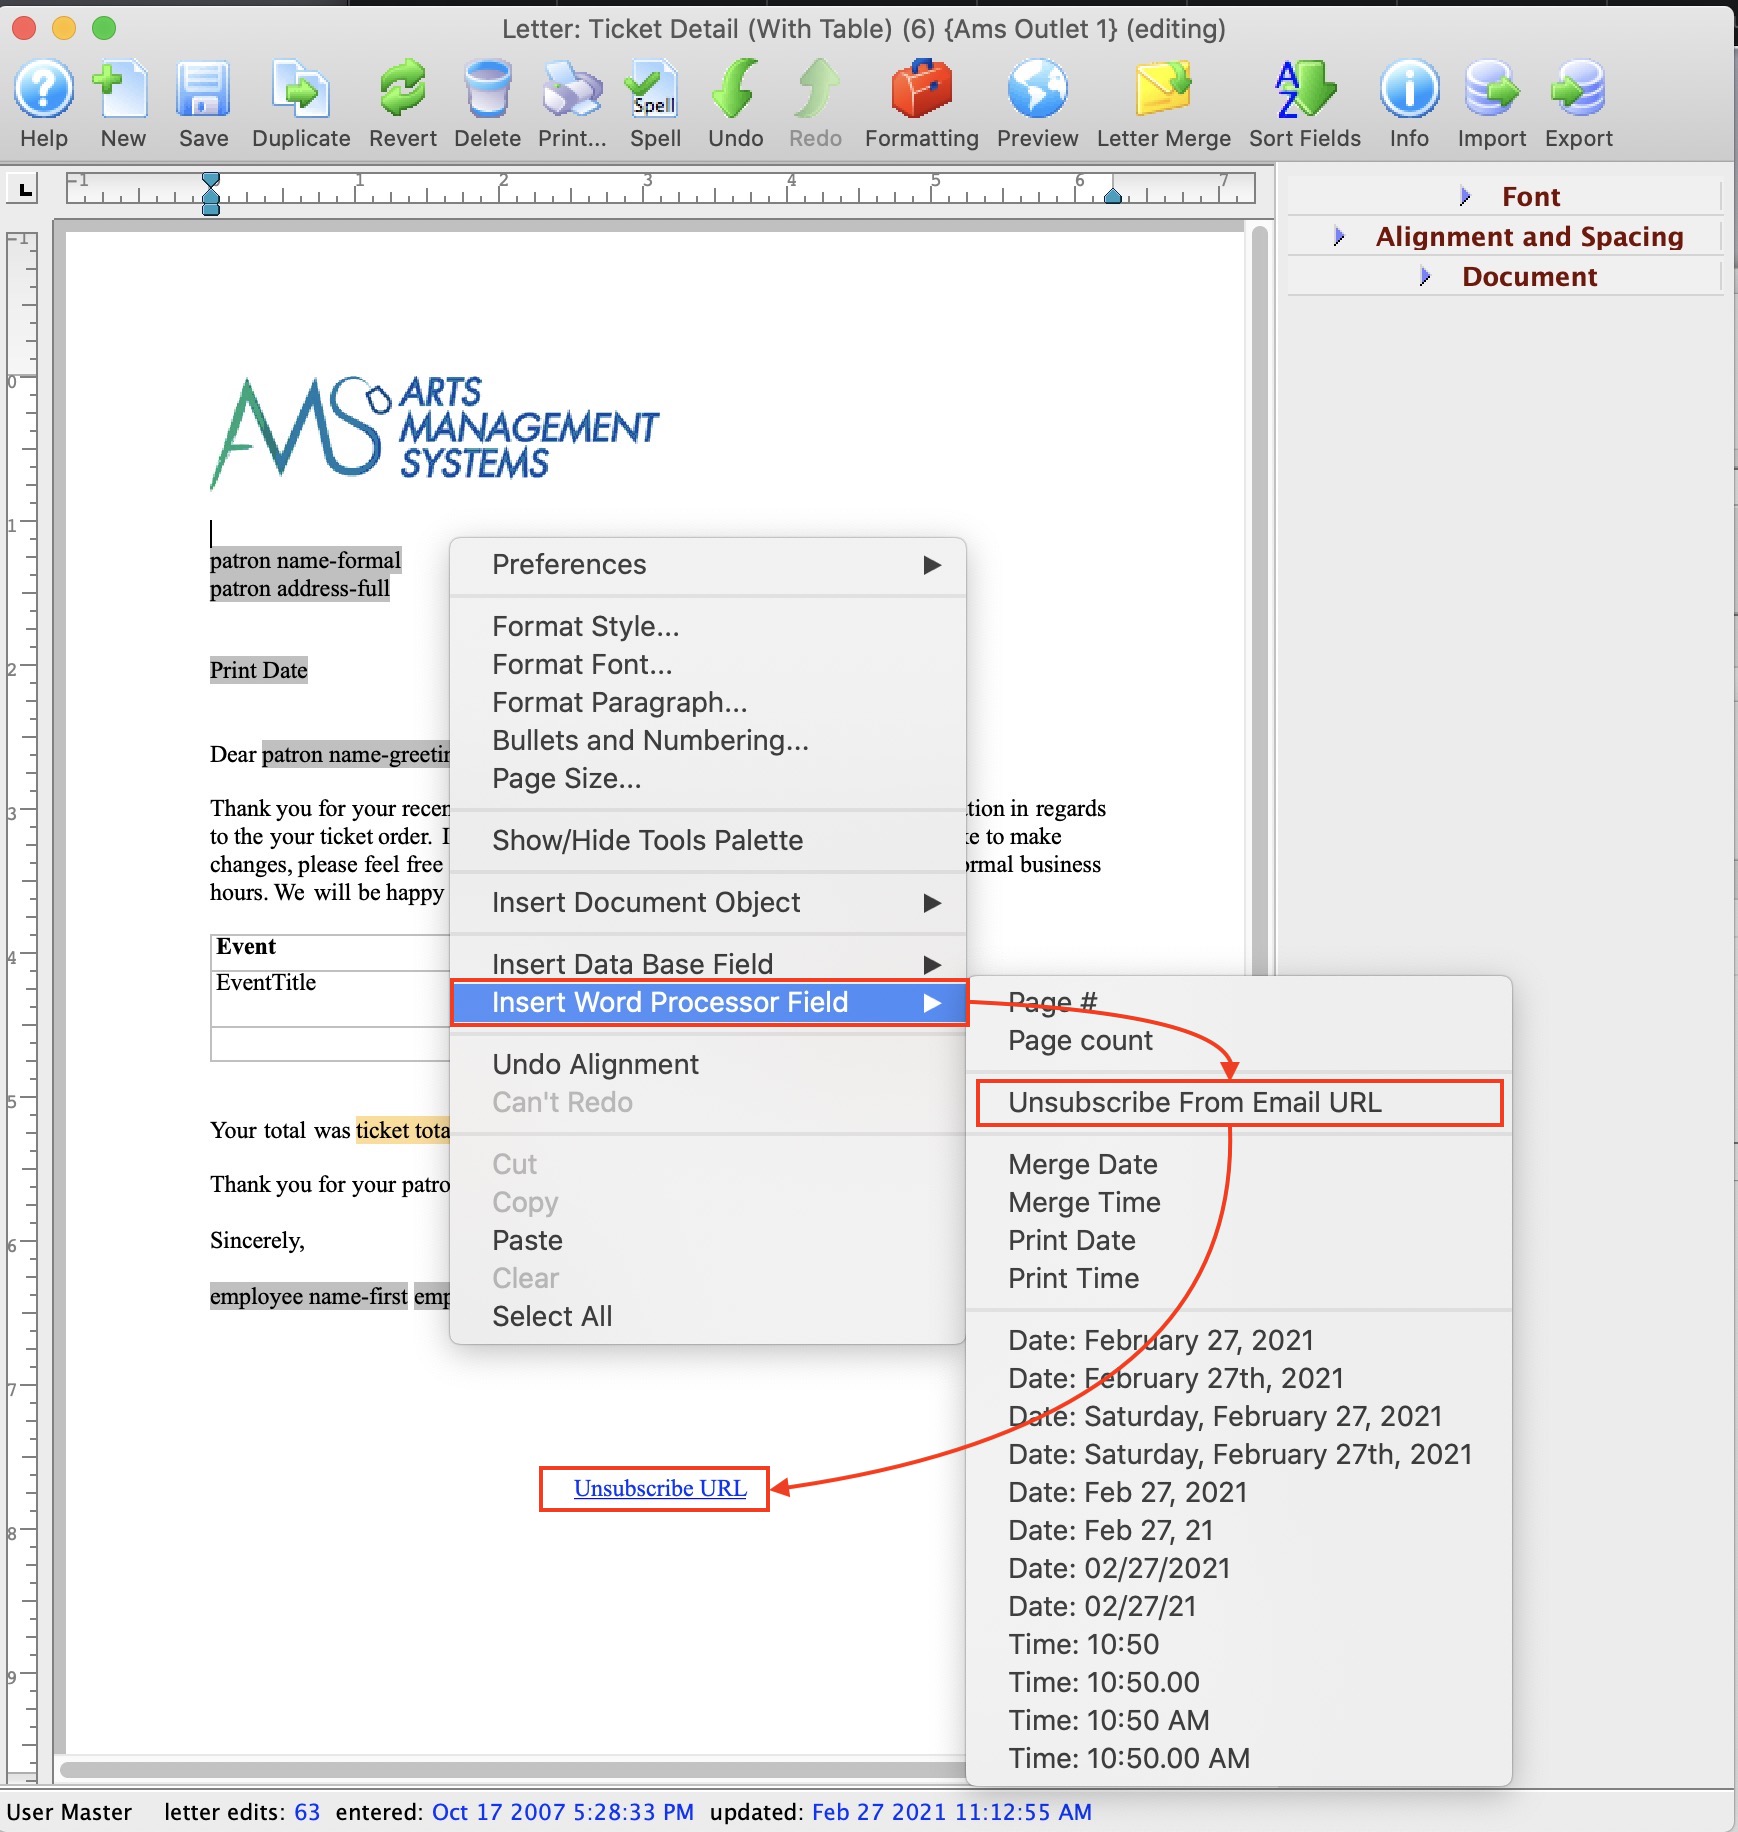 If you want to add an unsubscribe link to your email, there are a few of steps:
- Open your form letter list and find your email/letter to edit it
- Click your cursor on the place in the letter where you want your unsubscribe link to be. Normally it is near the bottom of the email, so you might need a few extra lines
- Right click to get the main context menu for adding items to the document
- Select Insert Word Processor Field
- From the context menu, select Unsubscribe from Email URL
- The field will be added to the letter and a window will open letting you edit the link name displayed on the letter. See below - changing the name of the link
- After saving the link, you may want to:
- centre the text using a keyboard short cut (cmd-shift-C) -or-
- use the editing tools palette to the right of the word processor
- Adjust the font name, size and/or colour if neccessary
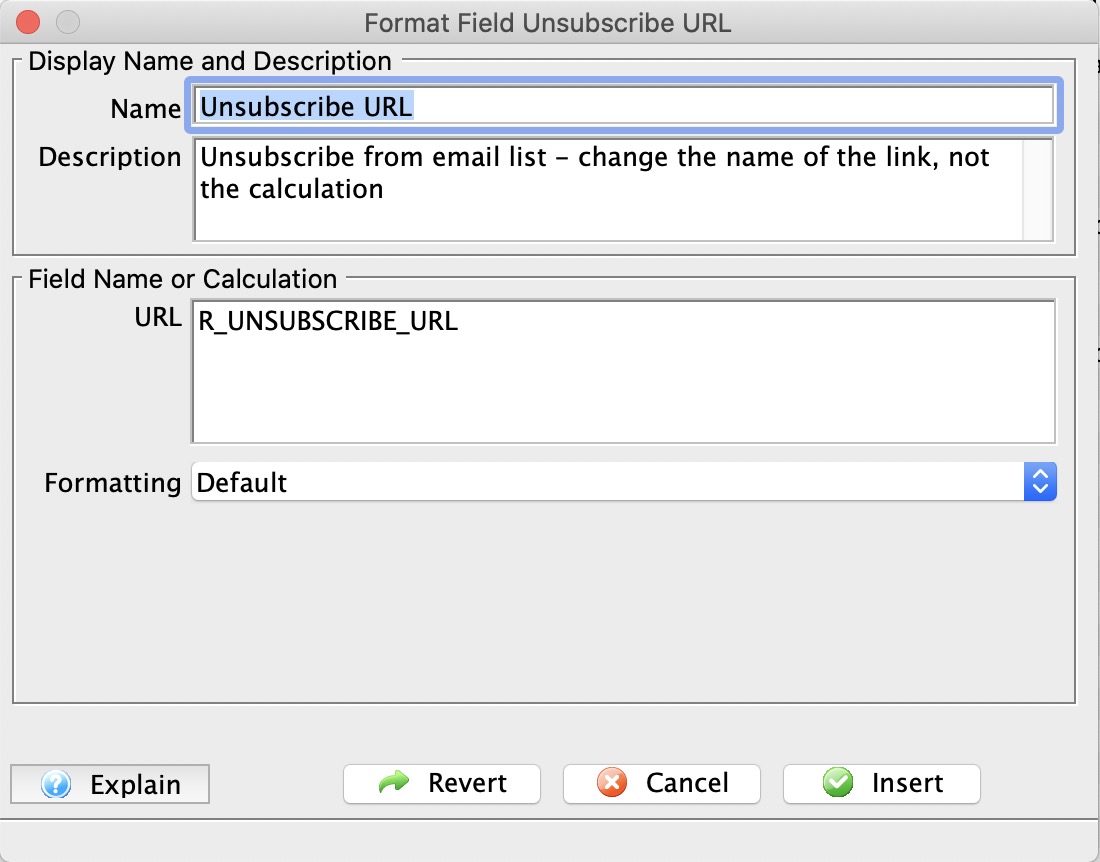
Changing the name of the link
As the unsubscribe link is being added, it opens the window to the right. The text that is displayed on the email defaults to Unsubscribe URL in the name field.
- Name - Change the text in this field to be what you want displayed on the eblast
- URL - DO NOT change the field name.
Setup for Unsubscribe Management
If a mail list is set as default for the form letter, it will appear here automatically. You can:
- Clear it if you do not want to have an unsubscribe link on the eblast
- Change it if you want to use a different mail list to track unsubscribes
- Enter it if there is no default and you want to track unsubscribes for this eblast only
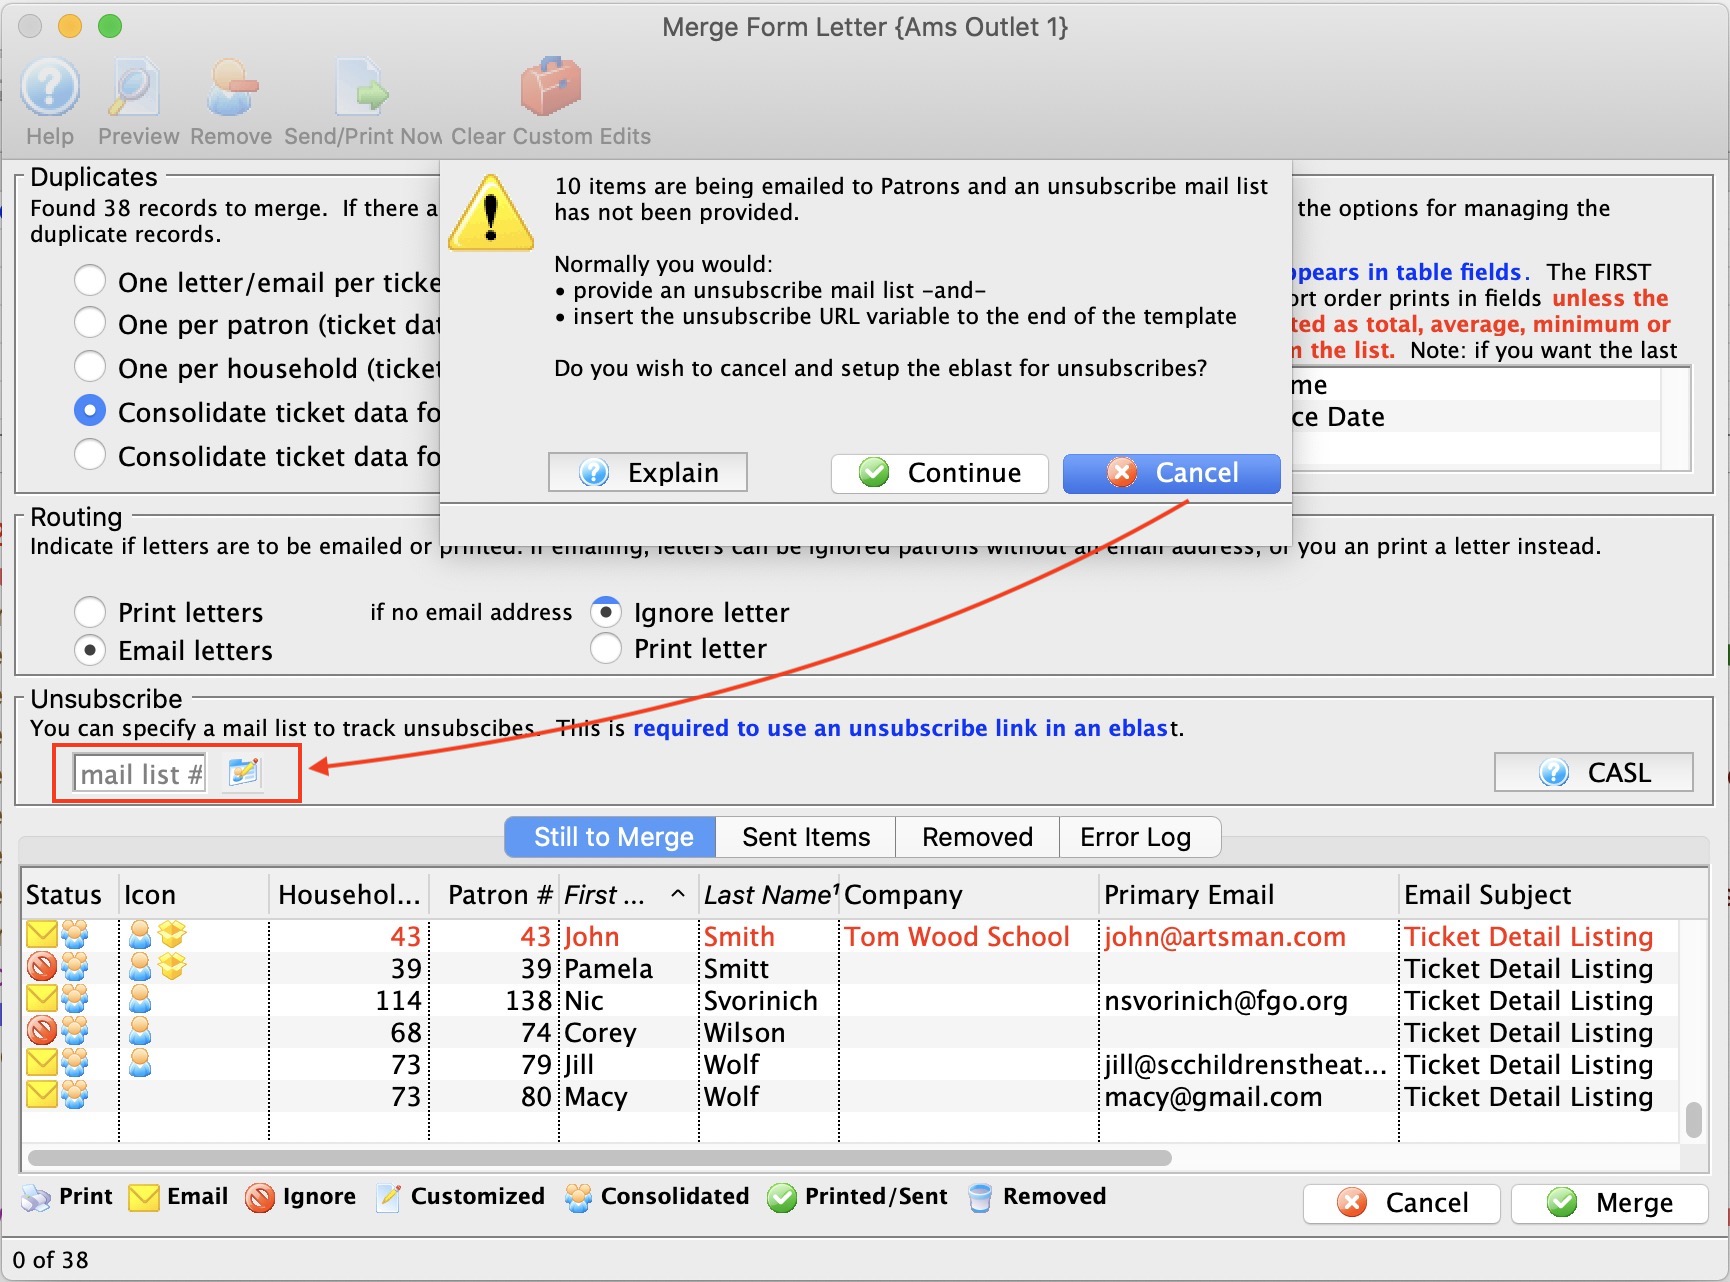
|
You do not need an unsubscribe mail list when emailing. CASL (Canada's Anti Spam Law) generally defines consent as:
|
Requirements for unsubscribe link
There are two requirements to make an eblast unsubscribable:
- Add the unsubscribe field to your email
- Specify the mail list to track the unsubscribe patrons on the merge window (above). It can be set as default for the form letter
|
Note: when the the letter is being printed, the unsubscribe wording does not appear on the form letter |
Complete the Merge and Print or Send
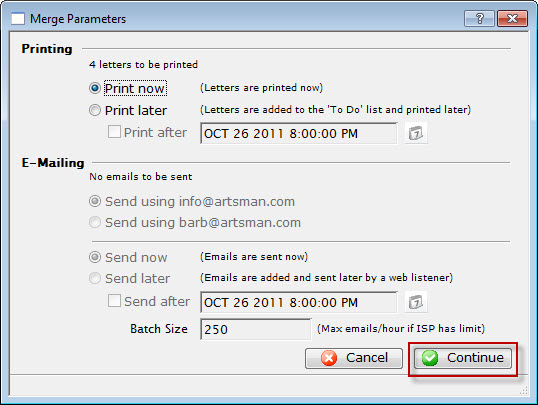
- Set your desired Print and/or Email options and click the Continue
 button.
When the Merge is completed, you are returned to the Merge Letter window with a report of the merge is displayed.
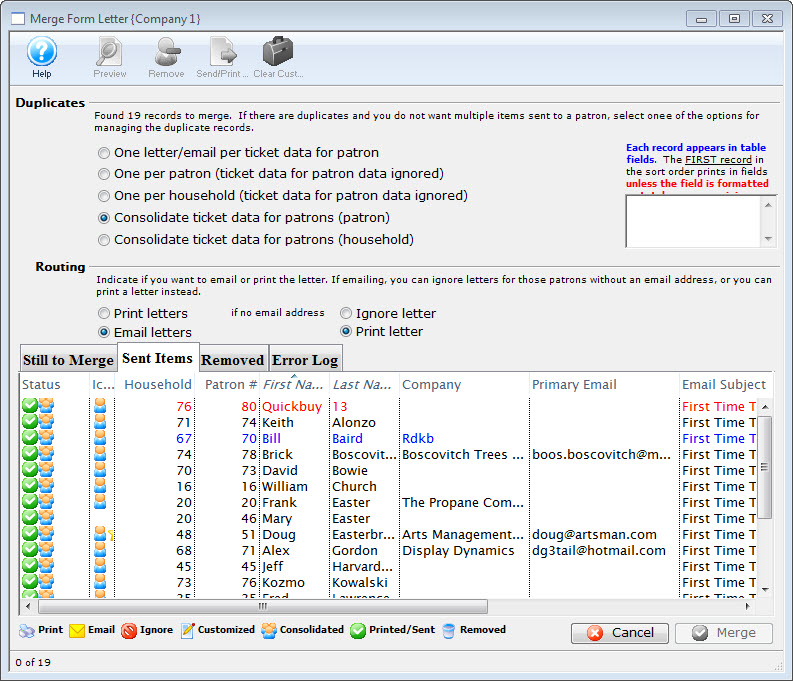
Deleting a Batch of Merged Letters
After completing a merge process, and setting it to print or email later, the user may discover the need to delete the batch.
- Go to Form Letters >> Tasks >> Print Letters/Send Emails.
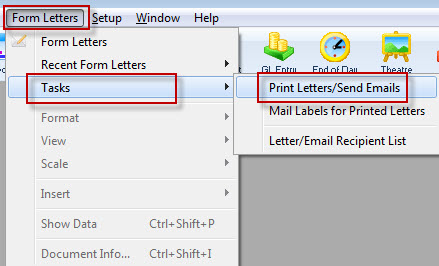
The Print Letters Criteria window opens.
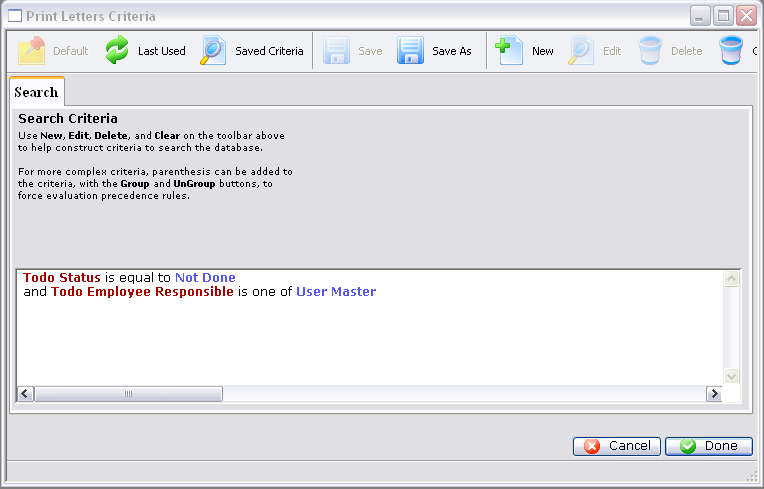
- Adjust the criteria as needed for the employee who created the batch.
To edit a set of criteria, double click on it.
- Click the Done button.
The Patron Letter window opens.
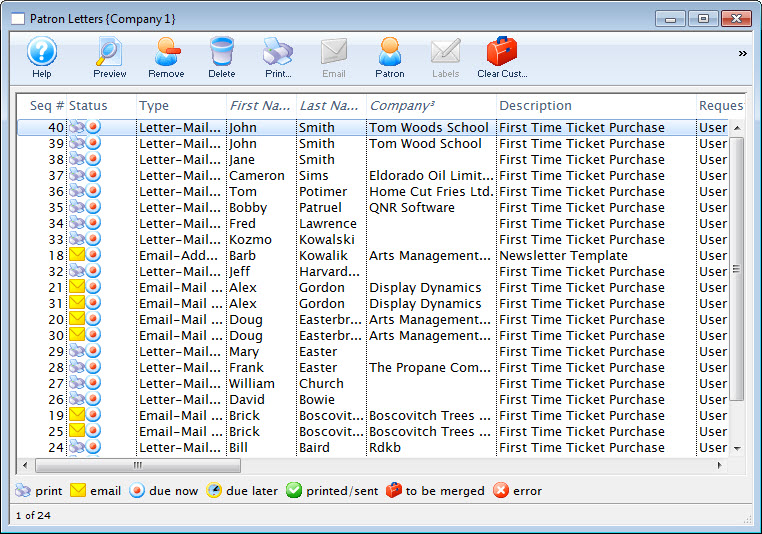
- Select the letters from the batch and click the Delete button.
Multiple letters can be selected by using OPTION + click (Mac) or CTRL + click (Windows).
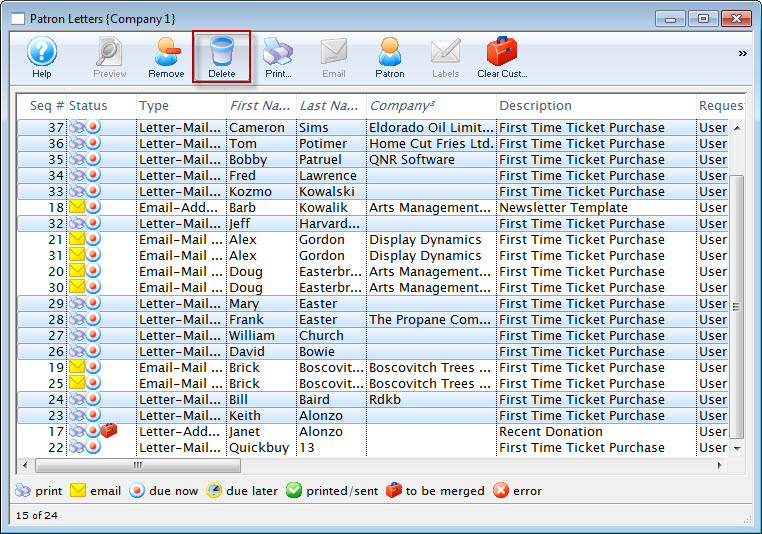
Click here for more information on this window.
A Delete Confirmation opens.
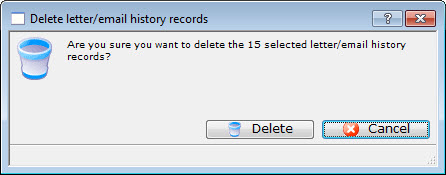
- Click the Delete
 button.
The selected letters/emails are removed from the list.
Merge Windows
Merge Letter Window

| Duplicates | |
| One per ticket (or data set selected) | A Patron will receive an email or letter for each line in the list. If there are duplicate names in the list, consider using another option. The merge result will vary, depending on what you select. |
| One per patron - ticket (or selected data set) data ignored | All duplicate names will be removed so only one letter or email is merged.
Data in ticket (or selected data set) is is cleared and appears as blank fields.when using this option to manage duplicates. |
| One per household - ticket (or selected data set) data ignored | All duplicate names will be removed so only one letter or email is merged.
Data in ticket (or selected data set) is is cleared and appears as blank fields.when using this option to manage duplicates. |
| Consolidate tickets (or selected data set) by Patron | Each record appears in table fields. Indicates the order of data records in a table when merged.
|
| Consolidate tickets (or selected data set) by Household | Each record appears in table fields. Indicates the order of data records in a table when merged.
|
| Routing | |
| Print Letters | This radio button when selected marks all letters as to be printed in the status column. |
| Email Letters Using | Allows the selection of a patron email "Type". For example, it allows selecting the "work" email for a specific Form Letter Merge.  |
| If no email address - Ignore Letters | This radio button becomes active if the "Email Letters" button is chosen. If there is no e-mail address attached to the patron record, then the letter will be ignored. |
| If no email address - Print Letter | This radio button becomes active if the "Email Letters" button is chosen. If there is no e-mail address attached to the patron record, then the letter will be printed. |
| Unsubscribe | |
| Mail List # | Enter a mail list that will be used to track unsubscribes from people receiving the eblast. It is not applicable to printed letters. |
 |
This button will open the selected letter in a preview window so that it can be customized before sending to the patron. This window is similar to the Form Letter window in the features it supports. |
 |
This button will remove the selected letters from the merge process. This can be used if there are patrons who should not be receiving the letter without changing the merge criteria. |
 |
This button will print or email the selected letters immediately based on the setting in the status column. |
| This button will remove any customization or unique characters in the selected recipient letter in the list. This action will only apply to those letters which are highlighted. | |
| Status | An icon of the current status of the letter. There is a legend at the bottom of the window with a description of each icon. |
| Patron # | The patron record number of the patron the letter is being sent to. |
| First Name | The first name of the patron. |
| Last Name | The last name of the patron. |
| Phone/Email/Website | The phone number, email, and website for the patron are displayed here if available. |
| Company | The name of the company associated with the patron if available. |
| Letter Name | The name of the letter currently being sent to the patron. |
| Context Menu | The context menu is opened by right-clicking on a letter in the window. This menu allows a number of actions to be performed. Click here for more information about the Context menu. |
|
Closes the Merge Letter window without completing the letter merge. This does not apply to any letters that have been sent using the Send/Print Immediately button. |
|
Opens the Merge Parameters window to allow completion of the final step of the Merge process. Click here for more information on the Merge Parameters window. |
|
Note: if you are able to consolidate data on the letter, you can change the sort order of the data within a list in the letter by adding one or more sort options to the letter. |
Merge Parameters Window
Printing Form Letters |
|
| Print Now | When this radio button is selected, all letters will be printed immediately. |
| Print Later | When this radio button is selected, all letters will be added to the To Do list to be printed later. For more information on printing from the To Do list, click here. |
| Print on/at | When this box is checked, the letters will be printed at the
date and time set in the field. This is for automating the printing process
during a later time such as after-hours. Remember that a user must be logged
in for the letters to print.
If selected, you can specify a date that the letter is due:
|
| Print to PDF | This option will merge each letter into a separate file and place them in a folder of your choice. Use this option if you want a letter - such as a donation receipt letter - for emailing the patron, while also maintaining a file-based copy that you can keep for yourself.
You will need to provide a folder into which the letters will be merged. After the merge, the files will look like the list below. The name of the file consists of:
 |
| Mark Printed | This is designed to allow the form letter to be added to the patron record for tracking. You might do this if you used a print-house/graphic arts company to print, merge, and mail letters or brochures to patrons in large numbers.
Merging and not printing against the same set of patrons would result in a letter on the patron record that is marked printed, yet it is never actually printed. This can be used for tracking and subsequent building of mail lists for customers that do not respond. |
Emailing Form Letters |
|
| Send using <User> address | This radio button will contain the e-mail address of the user currently creating the batch. When selected, all e-mails will be sent using the user's e-mail address. |
| Send using <Organization> address | This radio button will containt the e-mail address of the company. When selected, all e-mails will be sent using the organization's e-mail address. |
| Send Now | When this radio button is selected, all letters will be emailed immediately. Based on the setting of the Merge Letter window, patrons without e-mail addresses may also begin printing. |
| Send Later | When this radio button is selected, all letters will be added to the To Do list to be emailed later. For more information on emailing from the To Do list, click here. |
| Send on/at | When this box is checked, the letters will be emailed at the date and time set in the field. This is for automating the emailing process during a later time such as after-hours. Remember that a Web Sales Listener must be logged in for the letters to be emailed. |
 |
Opens the mini-calendar for selecting a later date to email the letters. |
| Batch Size | When the Send on/at feature is enabled, a batch size can be set in this field to limit the number of emails sent per hour. This is useful if the organization's ISP has a limit on the number of emails that can be sent per hour. Theatre Manager will take the total eblasts being sent and divide them into 10 minute groups.
You can set a default in Company Preferences->Web Listener tab or you can enter it each time you do an eblast. |
|
Closes the Merge Parameter window without completing the merge. |
 |
Continues the Merge process based on the parameters set. |
Using the Context Menu during a Merge
The Context Menu is available by right-clicking in the Merge Letter window. This menu gives the user access to additional operations that can be performed prior to the merge.
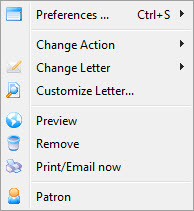
| Preferences | Allows access to window Preference options. |
| Change Action | Allows access to the Action sub-menu. See below for more information on this menu. |
| Change Letter | Will display a sub-menu of all letters available in the system. Allows for changing the letter being sent to the selected patron. |
| Customize Letter | Allows the selected letter to be customized. A letter is customized to an individual patron and will not affect other patrons in the same merge. |
| Preview | Previews the selected letter with all fields filled. The letter can also be customized from this view. |
| Remove | Removes the letter from the merge operation. |
| Print/Email now | Immediately prints or emails the letter based on the icon in the status column of the Merge Letter window. | Patron | Opens the patron record of the selected letter recipient. |
Change Action Menu
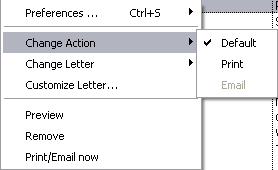
| Default | Leaves the status of the letter as the default action in the Merge Letter window. |
| Changes the status of the letter in the Merge Letter window as marked for printing. | |
| Changes the status of the letter in the Merge Letter window as marked for emailing. |
Previewing a Form Letter
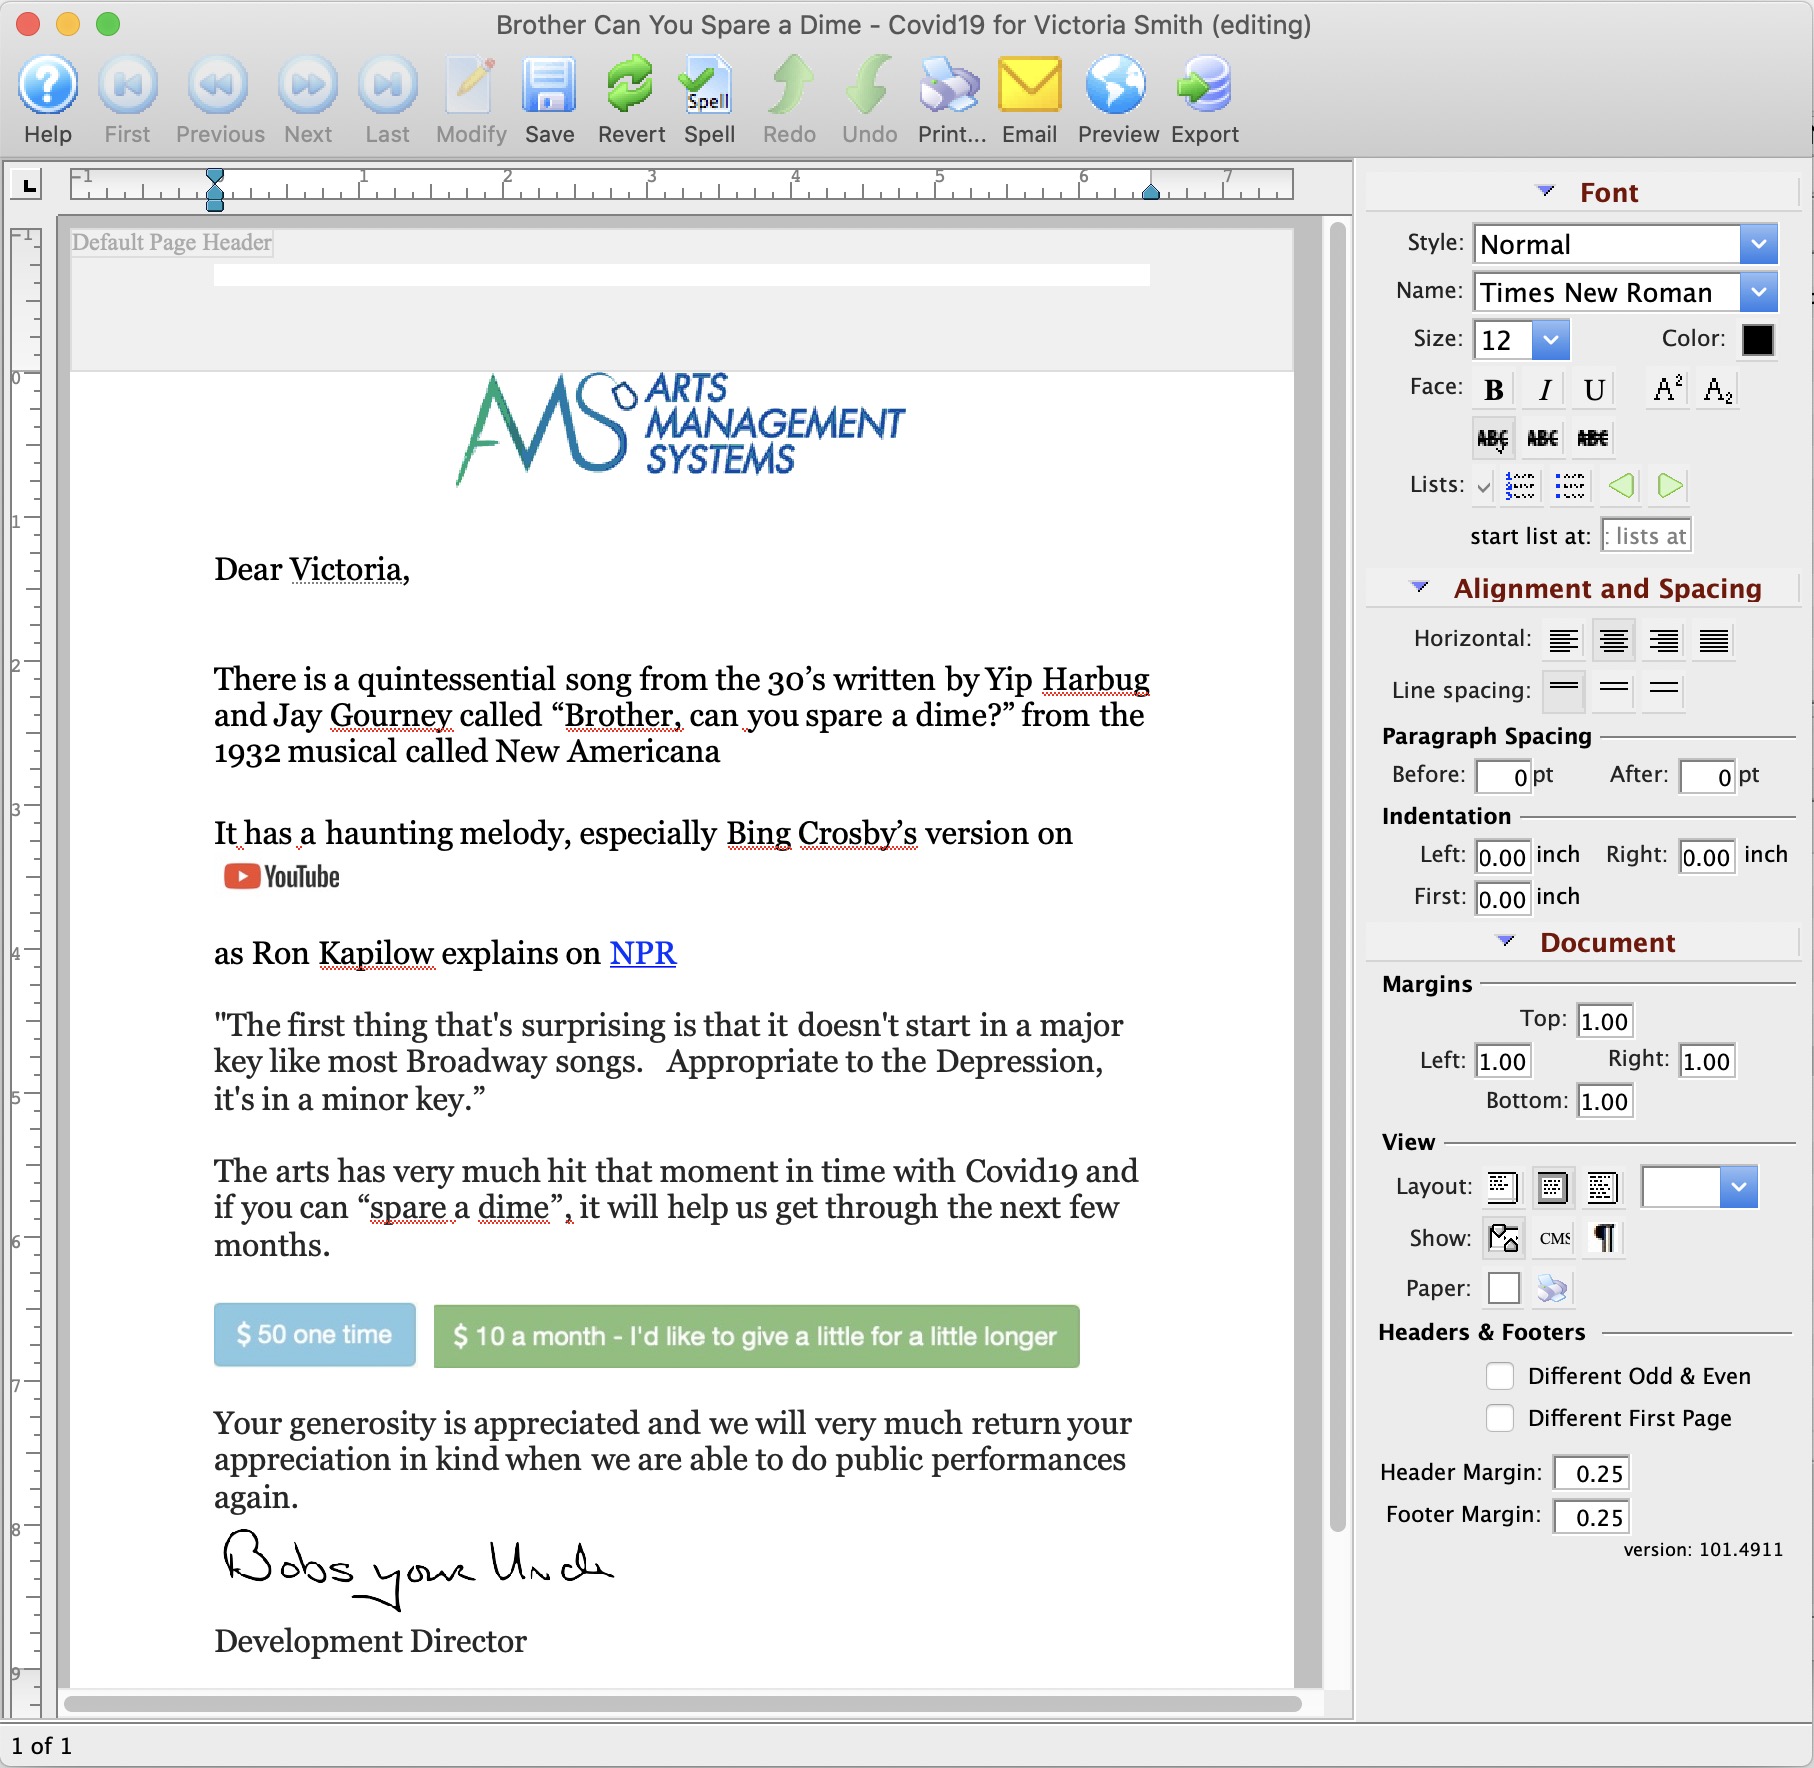
Parts of the Form Letter Preview Window
|
Saves the custom changes to the merged Form Letter specific to the patron. |
|
Reverts to the last saved version of the letter. |
|
Prints the current Form Letter. Click here for more information on printing Form Letters. |
|
Checks the spelling of the current letter. |
|
Exports the letter as an RTF document to be opened in another application. Click here for more information on exporting a Form Letter. |
| Formatting Pallette | The fomatting pallette allows easy access to many common word processing functions. For more information on this feature, click here. |
| Context Menu | The Context Menu, also known as the right-click menu allows for adding new fields and making other adjustments to the letter. For more information about using this menu, click here. |
Merging letters but not printing Them
|
If you make a mistake in the merge, instead of setting the status to done, just find the letters as per step 2 and delete them on the same window. |
There are two steps to do so:
- Merge the letters as you normally would and set the print date to be some time in the future.
We recommend a date that is around the date of printing you want to appear on the patron record, such as a couple of days from the current date.
In the example, it shows a date that is many years away - it is best to choose a date in the next couple of days.
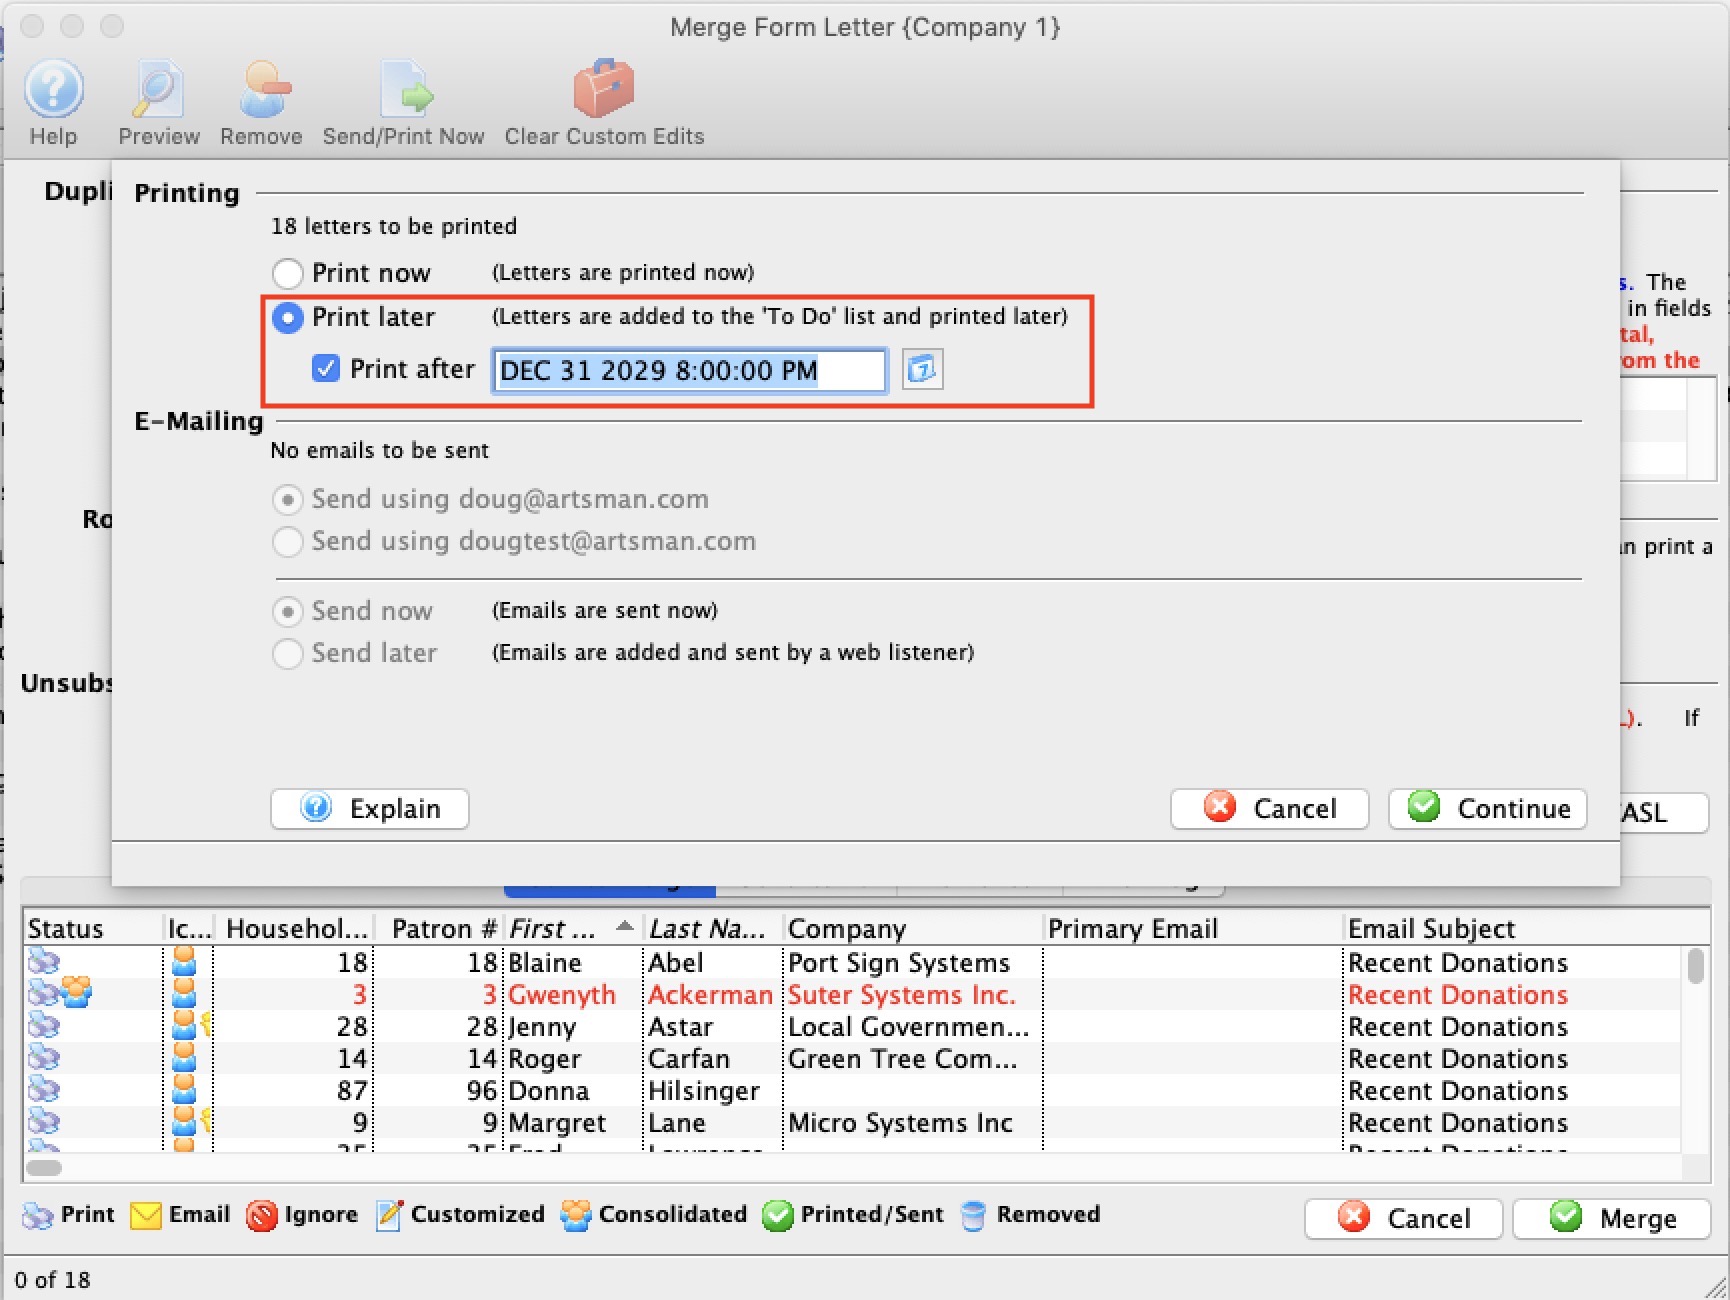
- Then, in the Form Letter->Tasks->Letter/Email Recipient list:
- Find all letters using Date Required with the above date on it.
- Make sure that they are the letters you just merged. Verify the name of the letter, the date and the requestor - so that you don't pick up another employees future letters.
- Select them all
- Right Click, and set the status to done.
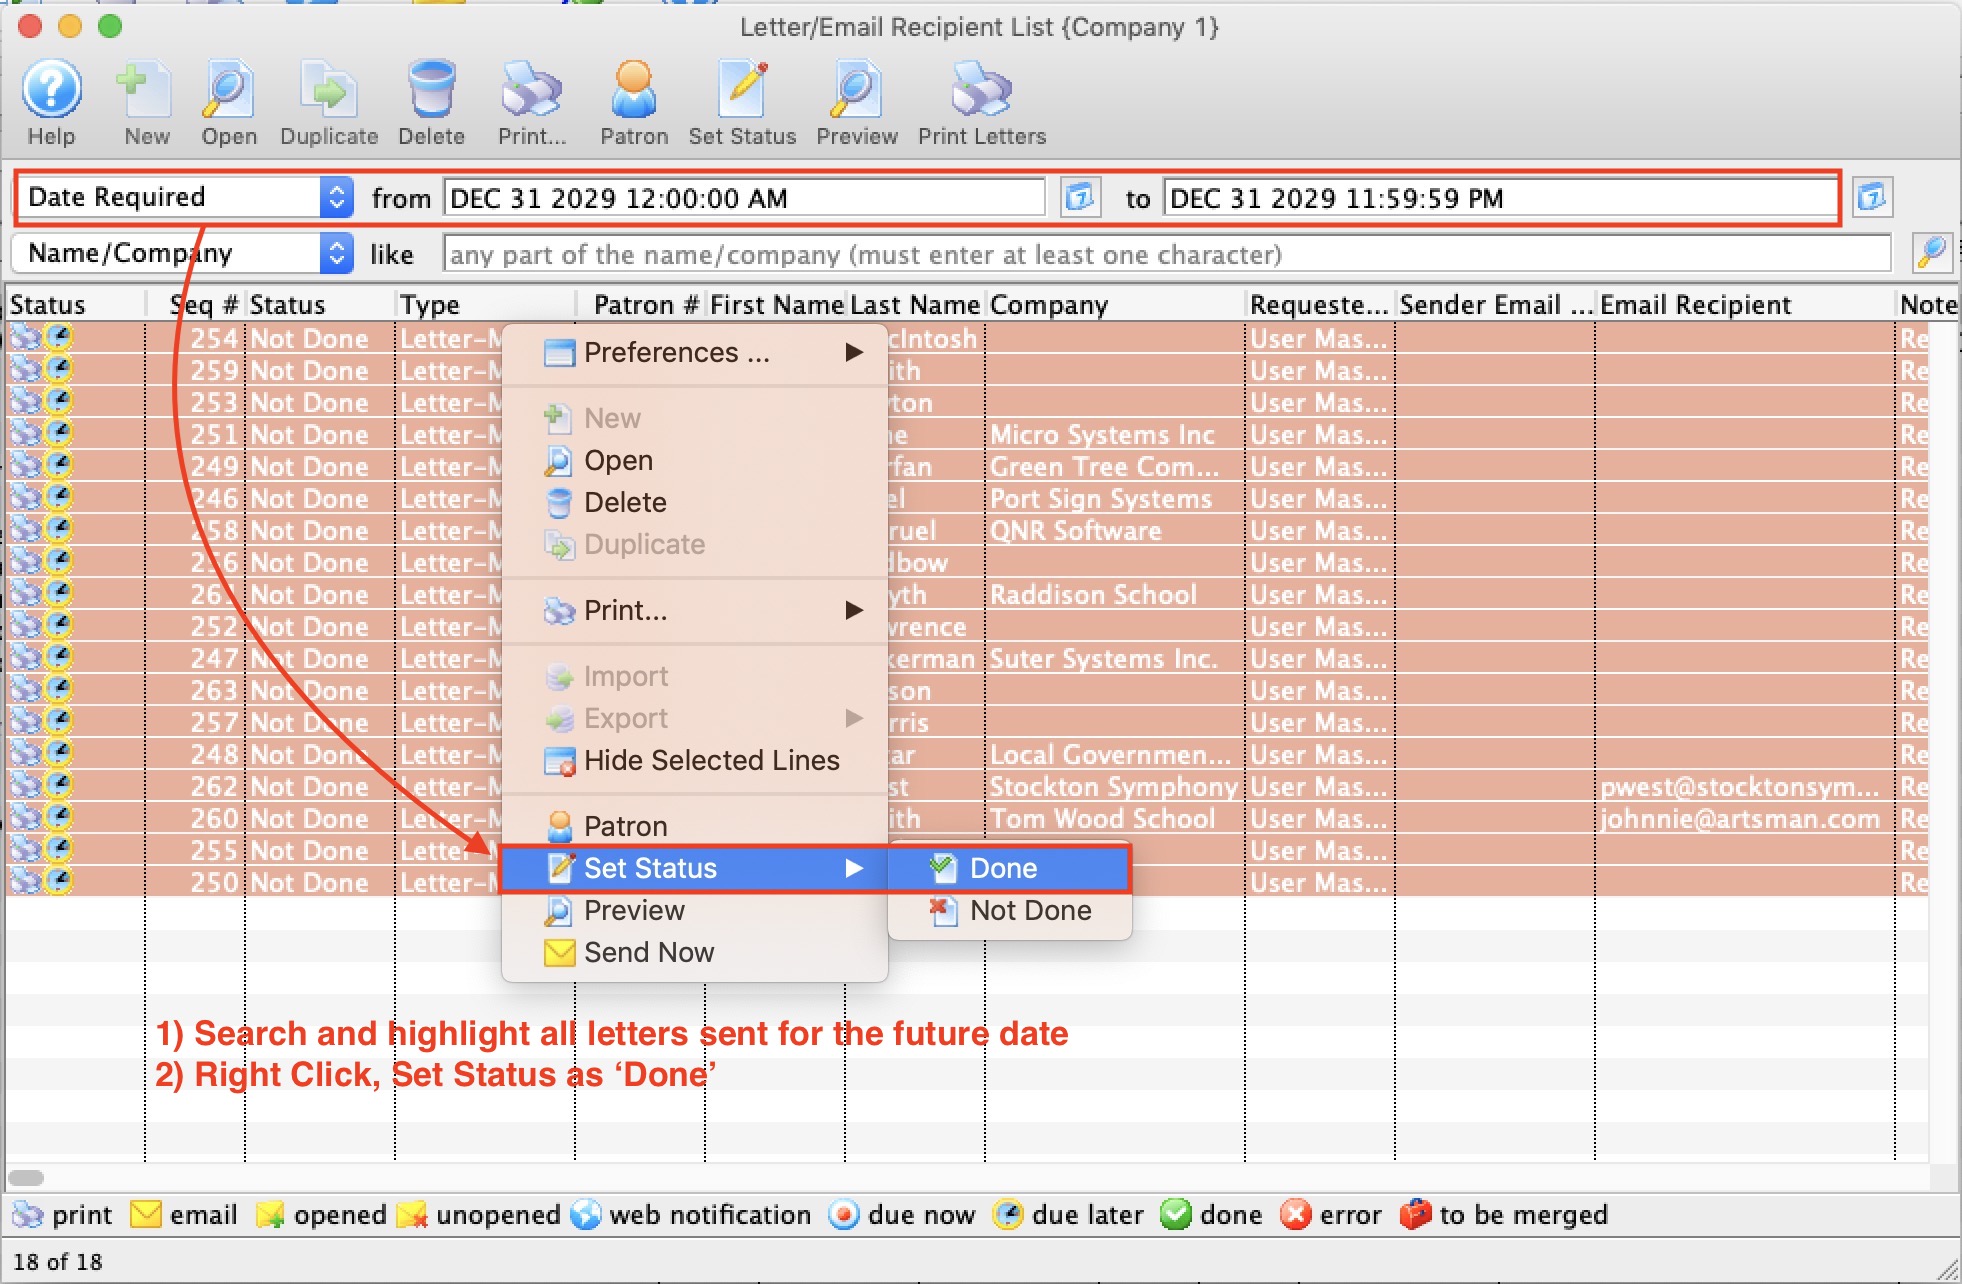
Printing a Form Letter or Email
In Theatre Manager, Form Letters can be printed and emailed. It is also possible to print address labels for letters that have been printed. Printing begins at the Form Letters Menu under Tasks.
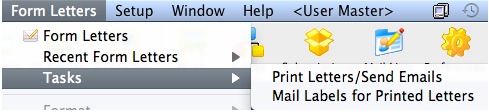
Various criteria can be used to select a batch of letters for printing, but since letters are assigned to or created by specific employees, it is easiest to print unprinted letters using the employee(s) responsible for them. For descriptions of how to do so, follow the links below.
Printing Unprinted Form Letters
- Letters can be printed for a single employee. Click here for more information.
- Letter can be printed for all employees. Click here for more information.
Printing Labels for Printed Letters
- Address Labels can be printed in conjunction with printing Form Letters. Click here for more information.
- Address Labels can be printed for Form Letters well after the letters have been printed. Click here for more information.
Printing Unprinted Letters for an Employee
This print method is used to print all unprinted letters for an employee.
- Go to Form Letters >> Tasks >> Print Letters/Send Emails.
The Print Letters Criteria window opens.
- Adjust the criteria as needed.
If you need to edit a set of criteria, double click on it.
- When complete, click the Done
 button.
The Patron Letter window opens.
- Make any necessay changes to the letters.
Any letters you delete from this window will be also deleted from the Patron's record.
Click here for more information on this window.
- Click the Print button
to print all letters that are not yet printed or the Send
 button
to send all emails.
button
to send all emails.
The print dialog for your operating system opens.
Remember that in order to send e-mails, a Web Sales listener must be active.
- After printing has completed, you are returned to the Patron Letters window.
All printed letters have a green checkmark in the status column.
For more information about printing address labels, click here.
Printing Unprinted Letters for all Employees
To print all unprinted letters for an employee, you perform the following steps.
- Go to Form Letters >> Tasks >> Print Letters/Send Emails.
The Print Letters Criteria window opens.
- Click on the "Todo Employee Responsible" criteria and click
the Delete button.
The criteria changes to now find all letters that are marked as Not Done.
- Click the Done button.
The Patron Letter window opens.
- Make any necessary changes to the letters.
Any letters deleted from this window are deleted from the Patron's record.
Click here for more information on this window.
- Click the Print button
to print all letters that are not done or the Send button
to send all emails.
The print dialog for the operating system opens.
Remember that in order to send e-mails, a Web Sales listener must be active.
- After printing is complete, you are returned to the Patron Letters window.
All the printed letters will now have a green checkmark in the status column.
For more information about printing address labels, click here.
Patron Letters Window
To open the Patron Letter Window, go to Form Letters > Tasks > and Select a Print option (either letters/emails or labels).
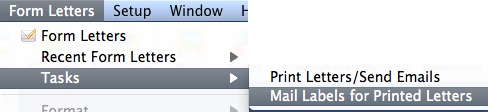
The Print Letters Criteria screen will open with settings to print letters that have not been printed for the current employee. Click Done to open the Patron Letter Window which will show all letters matching that criteria.
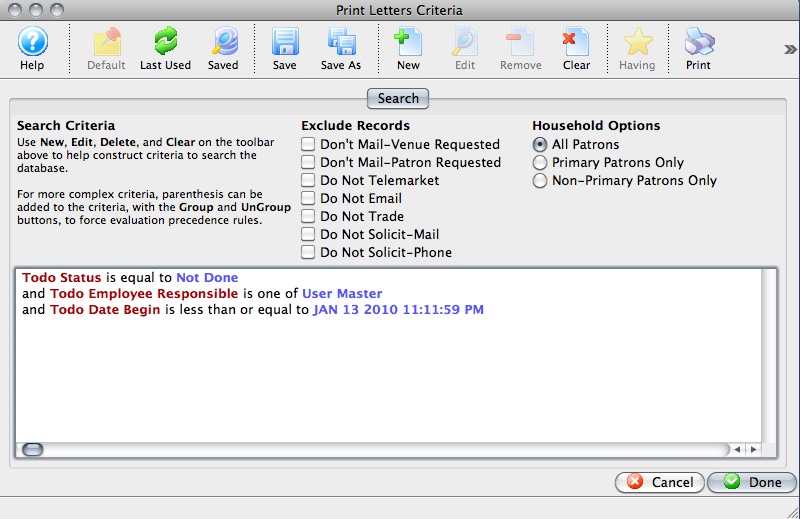
Parts of the Patron Letter Window
|
Opens the selected letter in a preview window similar to the Form Letter window. The letter can be customized from this window. |
|
Deletes the selected letters from the patron's record. |
|
|
Prints all letters marked as Due Now. |
|
Sends all emails marked as Due Now. |
 |
After letters have been printed, allows for printing address labels for the letters. |
 |
Changes the view to show all letters. This is the standard view. |
 |
Changes the view to show all letters marked as Not Done. |
 |
Changes the view to show all letters marked as Due Later. |
 |
Changes the view to show all letters that were done during this session. |
 |
Changes the view to show letters that were done during a previous session. |
 |
Changes the view to show all messages related to letters that were completed. |
| Todo Type | A type code showing what operation is to be performed for the letter or email. |
| Status | Icons representing the status of the letter. Refer to the legend at the bottom of the window for more information. |
| Type | The type of letter or email that is being printed or sent. |
| Patron Name | The full name of the patron that the letter is attached to. |
| Description | The name of the letter or email being used. |
| Requested by | The employee who requested the patron/letter merge. |
| Date Begin | The date and time that the letter or email is scheduled to be printed or sent. |
| Status | The current status of the letter in regards to being Done or Not Done. |
| Priority | Any priority that has been given to the letter. |
| Date End | The date and time that the letter or email is scheduled to be completed by. |
| Date Printed | The date the letter was printed or that the email was sent. |
| Notes | Any notes associated with the letter. |
| Email Address | The email address of the patron. |
| Patron # | The patron's record number. |
Context Menu |
|
| Set Destination | Allows changing the destination for the currently selected letter from printing to email or vice versa. |
| Set Status | Allows changing the status of the currently selected letter from Not Done to Done, and to also change from Due Now to Due Later. |
| Preferences | Allows adjusting and saving the preferences for this window. |
Letter / EMail Recipient List
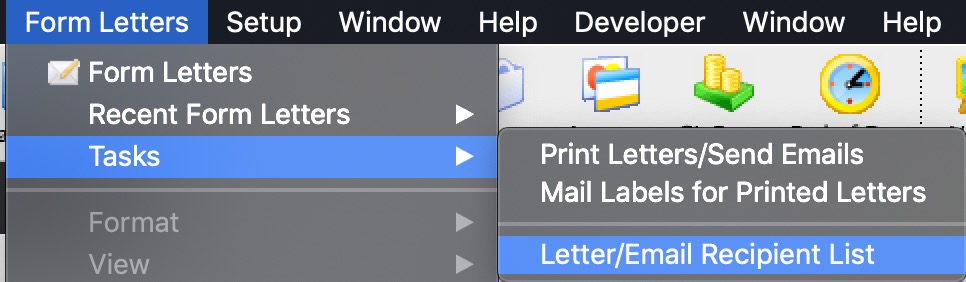 Allows you to find out who received a letter or eblast and/or look at the current status of a series of letters.
You can search by a number of data fields such as when it was sent, the letter, when it was opened, etc. This means that this window can be used to do things like:
- Search by date sent to see what went out on a particular day or for a time period
- Search by letter to see who got a particular bit of correspondence.
- If it was an eblast, you can also see who opened it.
- Highlight a number of the lines based on status to see how many were sent and how many were opened
- Have a look to see what is due the future
- Select a number of emails and:
- change their status to Not Done to resend them -or-
- mark them done if you need to have them on the patron's file but never intended to send them, -or-
- delete them
|
While this allows you to see both sent and unsent letters/emails, you can also use the Manage Pending/Unsent Emails to handle only emails that are not sent. |
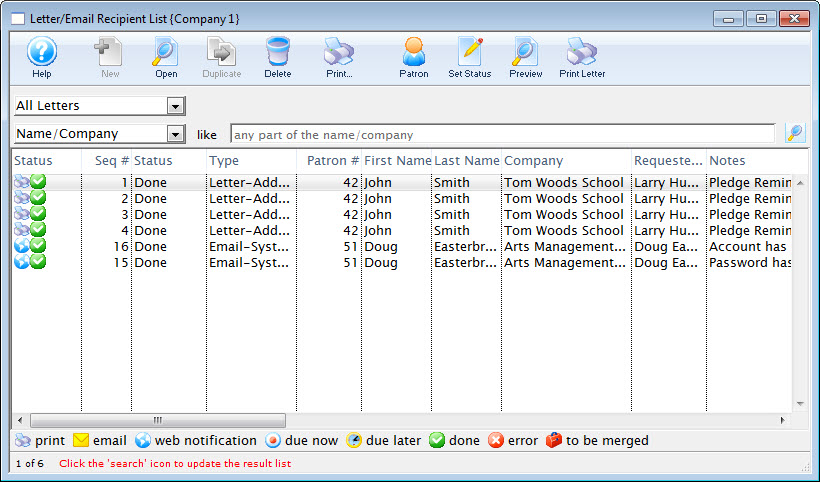
Parts of the Letter / Email Recipient List
|
Opens the Form Letter Window and created a new Form Letter. Click here for more information on creating a Form Letter. |
|
Opens the currently selected Form Letter. Click here for more information on finding a Form Letter. |
|
Duplicates the currently selected Form Letter. Click here for more information on duplicating a Form Letter. |
|
Deletes the currently selected Form Letter. Click here for more information on deleting a Form Letter. |
|
Prints the currently selected Record. |
 |
View or Edit the selected patron. |
 |
Changes the status from done to not done (or vice versa) |
 |
Opens the selected letter for editing. |
|
Prints the currently selected Form Letter. Click here for more information on printing a Form Letter. |
| Status | This column displays the printed status of the letter, whether it is done or not. |
| Type | This column displays the type of the letter, if it was a single letter or was it a merged letter |
| Date Begin | Date the letter was added to the patrons record. |
| Date End | The last date the letter was updated. |
| Date Printed | The date which the letter was printed. |
Tracking Success of the Eblast
- Letter and Correspondence History Tab on the Patron window
- Letter/Email Recipient List
- Donation Pledge schedule
- Managing Pending/Unsent Emails
- Volunteer Letter History
- Facility To-do List Pane
- and more
Email Not Yet Sent
In the first example, the email has not been sent yet. When it is sent, the target icon changes to a green checkmark.
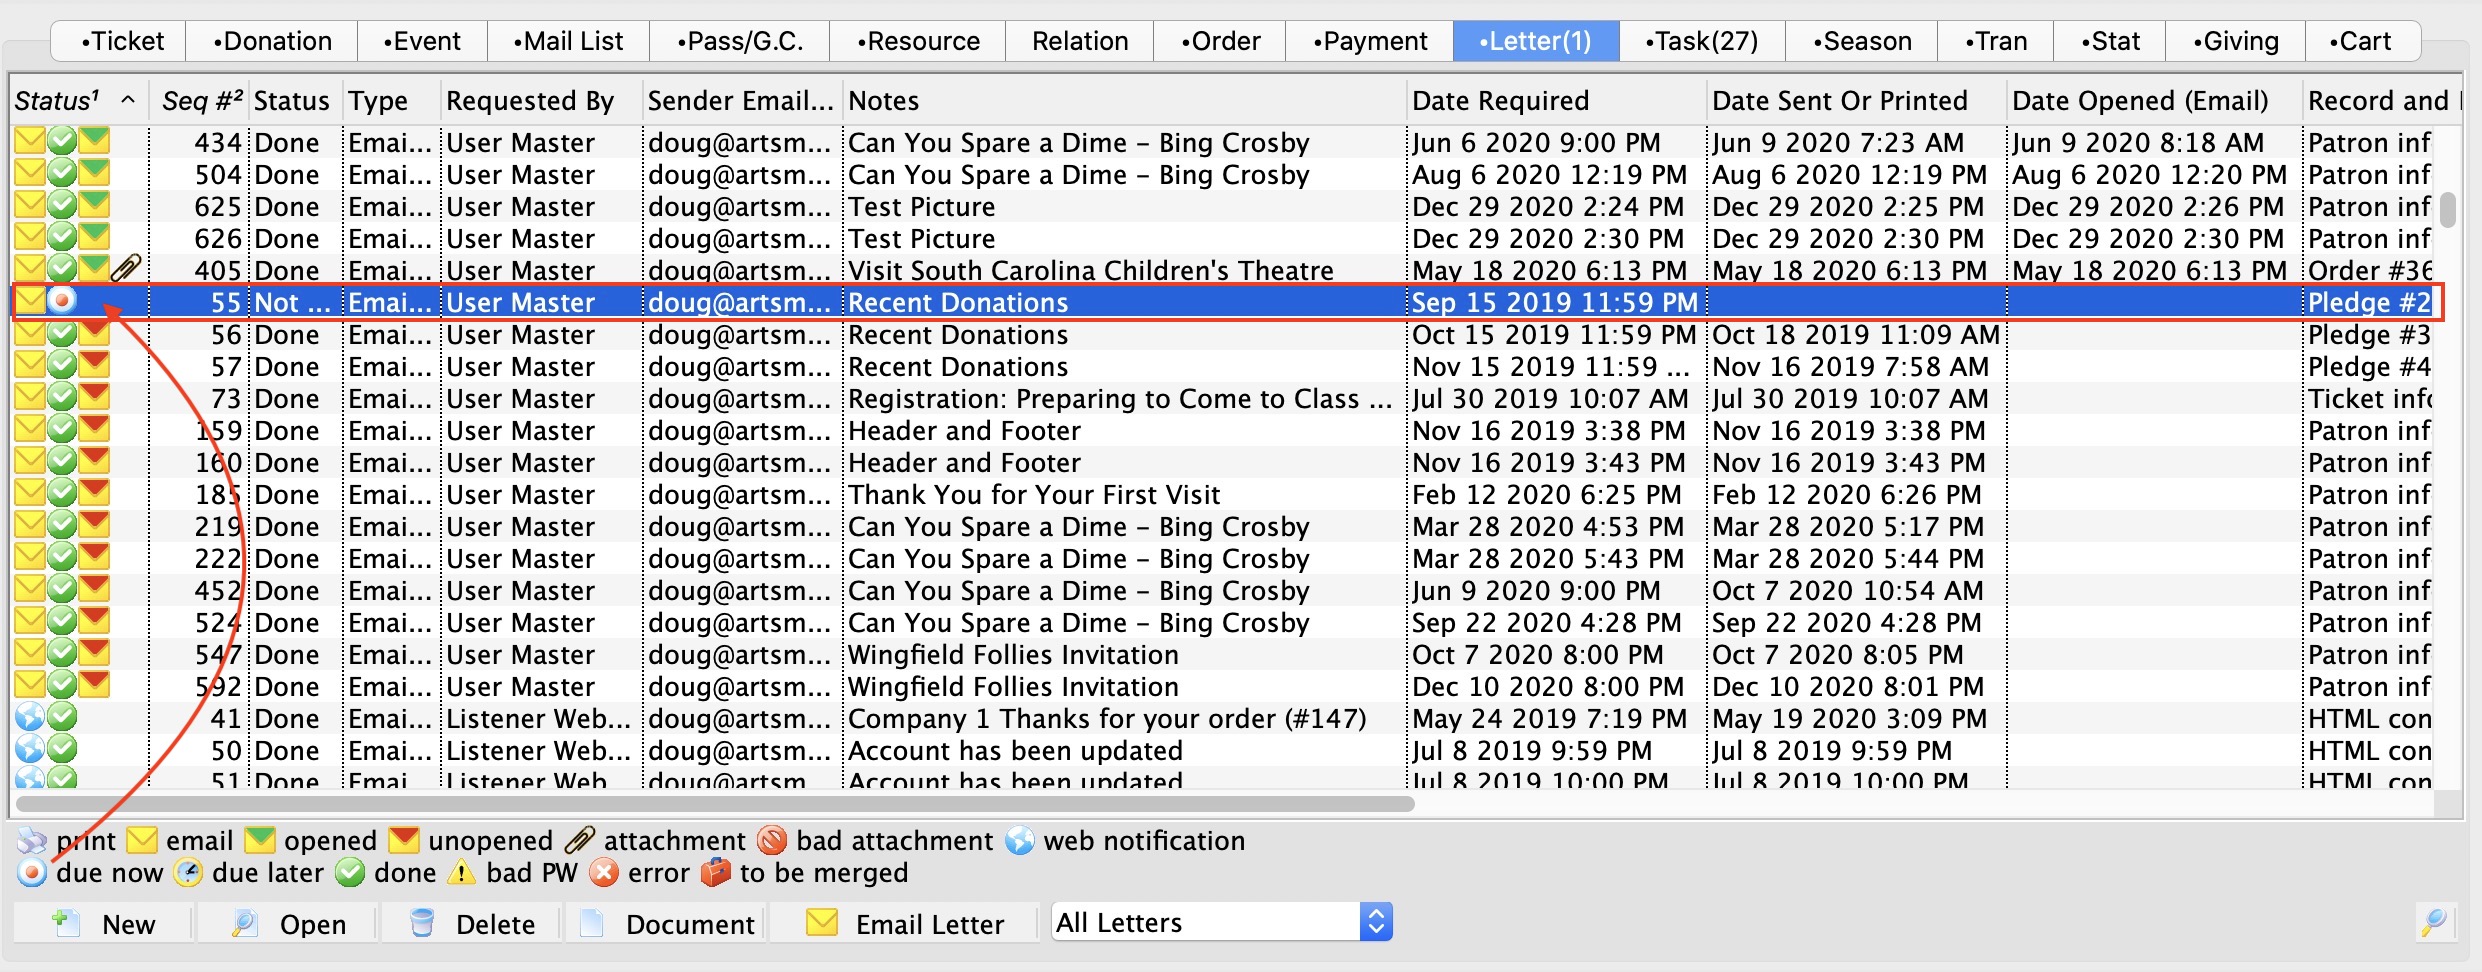
Read vs Unopened Emails
For e-blasts, a third icon appears that looks like an envelope with a red 'tab' on it. This means that the email has gone out, and one of the following happened:
- the patron has not yet opened it.
- the patron deleted it before reading it
- the email could have been put into their spam folder and they didn't see it
- the patron specifically blocks images from displaying on their email client (or their email client is old enough that it only dispalys the text version and does not display images
- the email was not delivered to the person for some unknown reason
|
When the patron opens the letter, the third icon will be a letter with a green 'tab' in it, indicating it has been read, per the image below. |
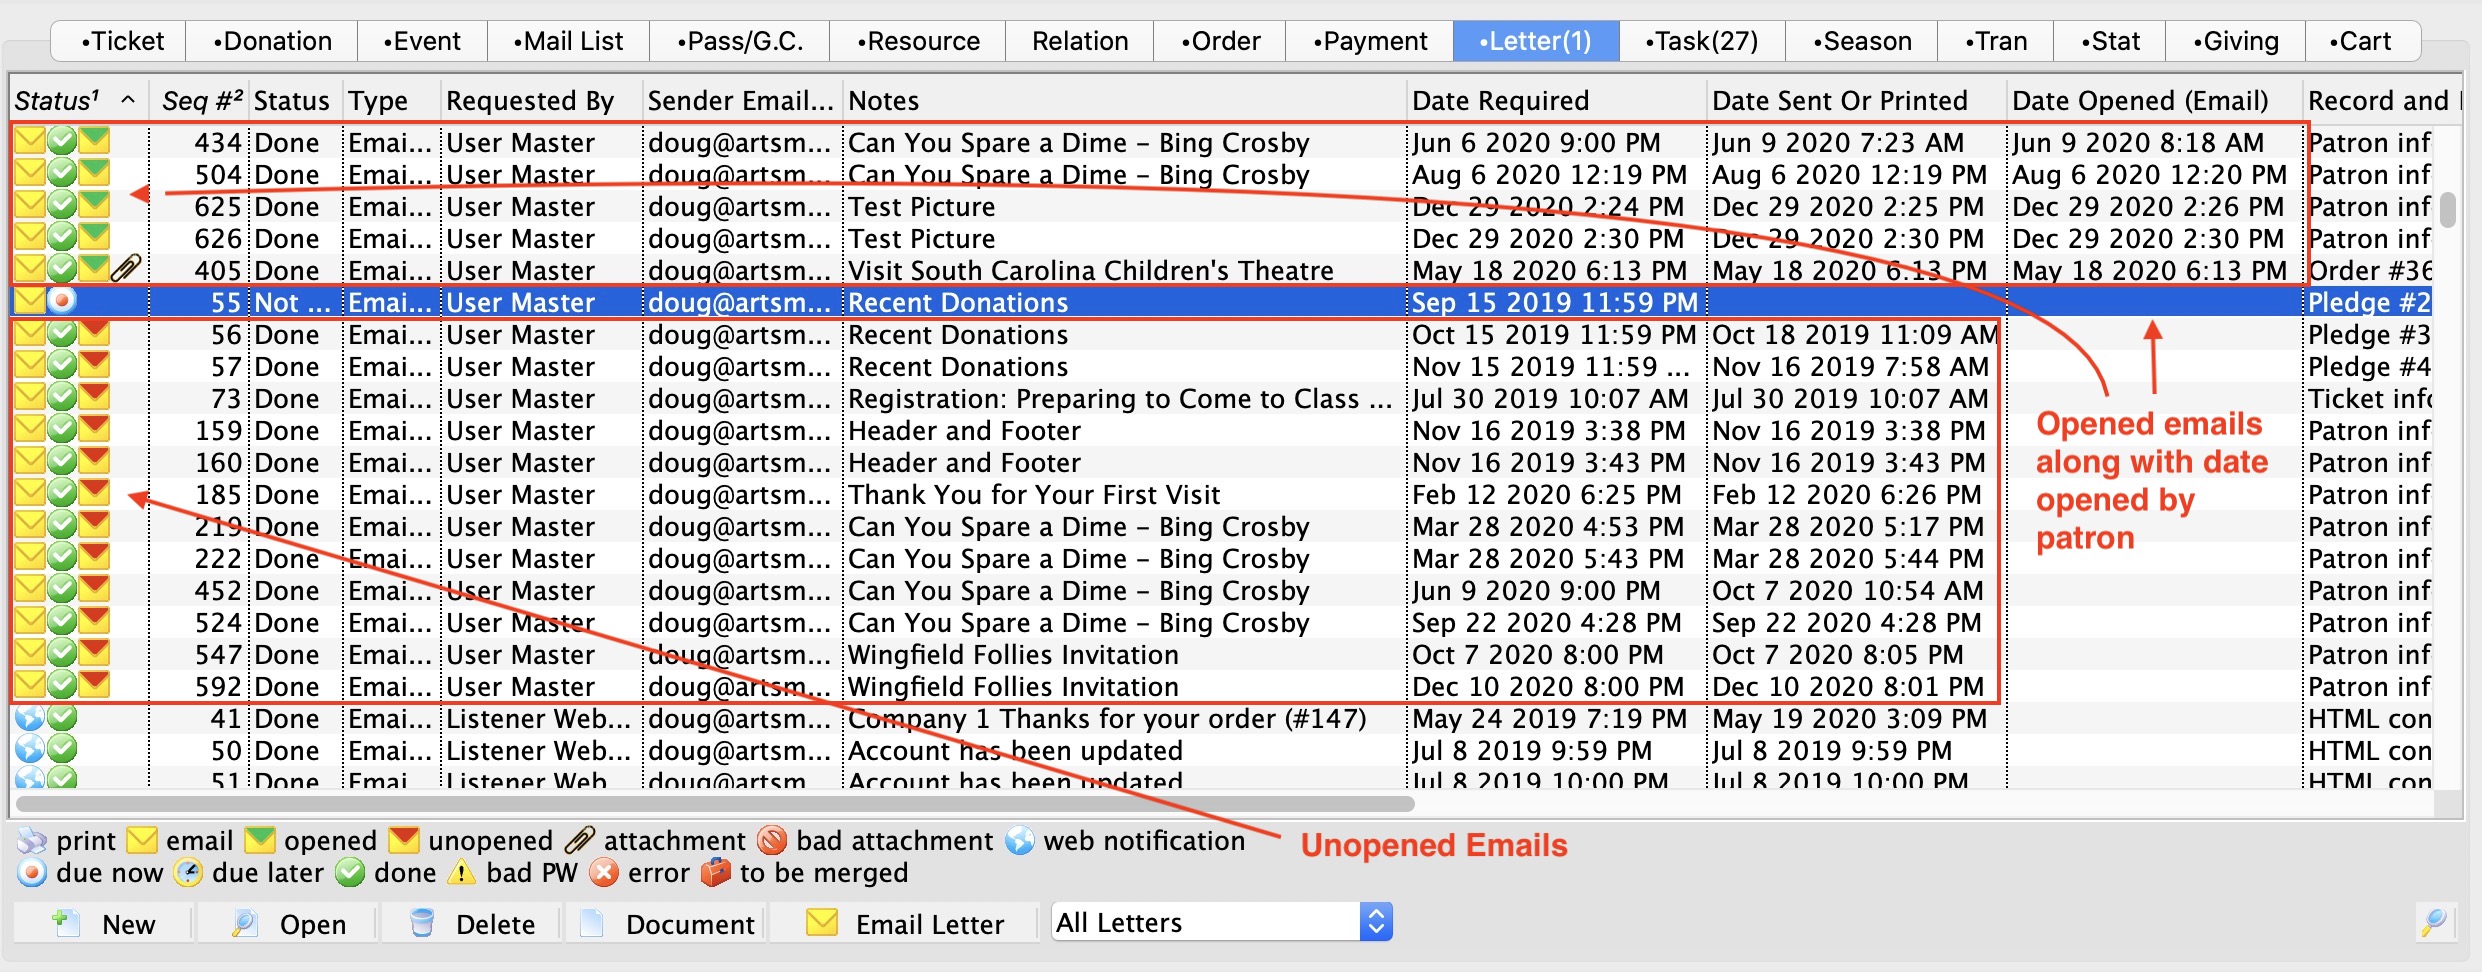
Viewing Envelope information
If you double click on any email, you can see when the email was 'read on' (opened) by the user. Since this is a column in the database, you can see how long it takes for people to read the email after sending.

Address Labels
Employees are often called upon to assist with mailings and creating and printing labels. Theatre Manager can create the labels quickly and easily for you.
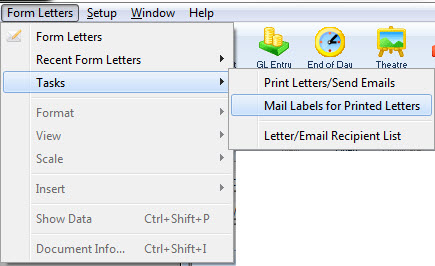
The default Mail List Criteria window opens.
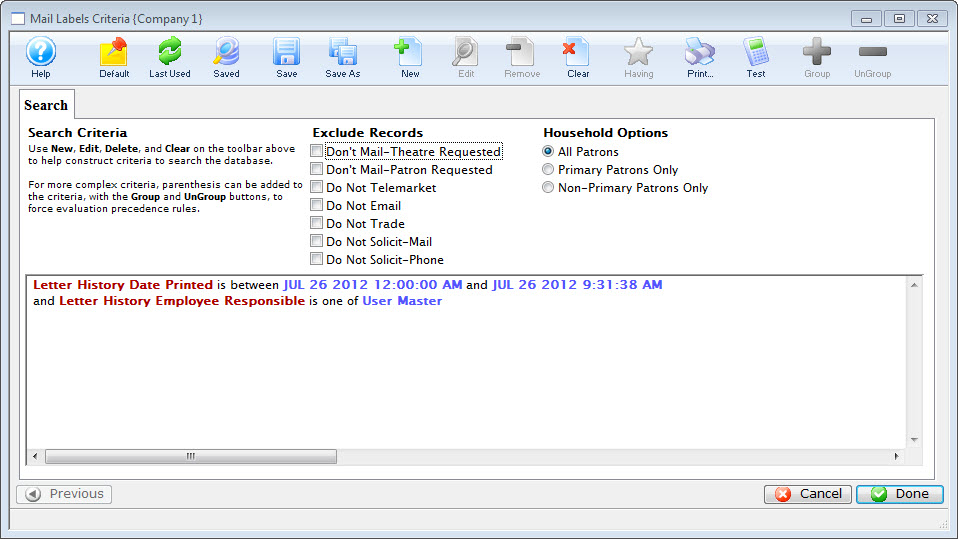
This section contains information on generating and printing address labels to use with Form Letters in Theatre Manager.
Printing Address Labels while Printing Letters
Once letters have been printed, often mail labels will also need to be printed for the envelopes.
- From the Patron Letters window, click the Labels button.
Click here for more information on this window.
- The Patron Address Labels window will open.
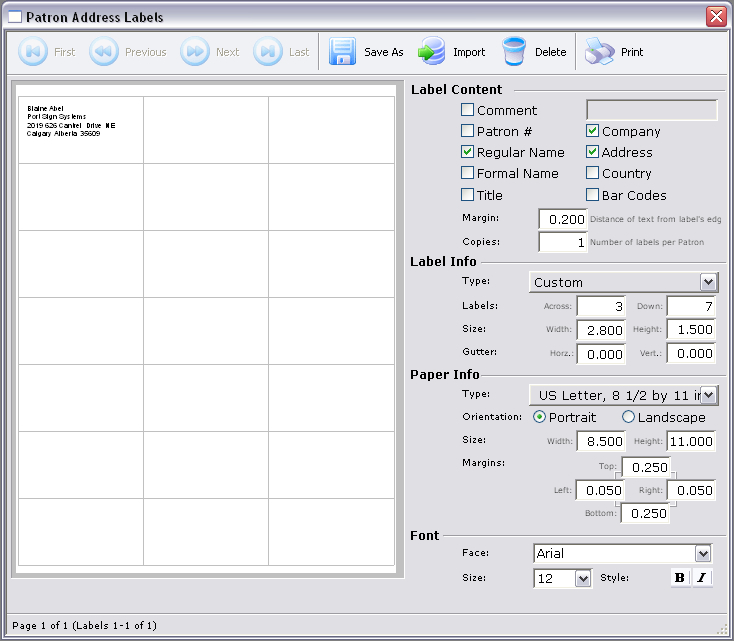
- Adjust all settings as necessary.
For more information on this window, click here.
- Click the Print
 button.
The print dialog for the user's operating system will open.
- When printing is completed, the window will close.
Printing Labels Later
Once letters have been printed, usually mail labels will also need to be printed for the envelopes. If the Patron Letter window has been closed, you can still print address labels for a batch of letters.
- Go to Form Letters >> Tasks >> Mail Labels for Printed Letters.
The Mail Labels Criteria window opens.
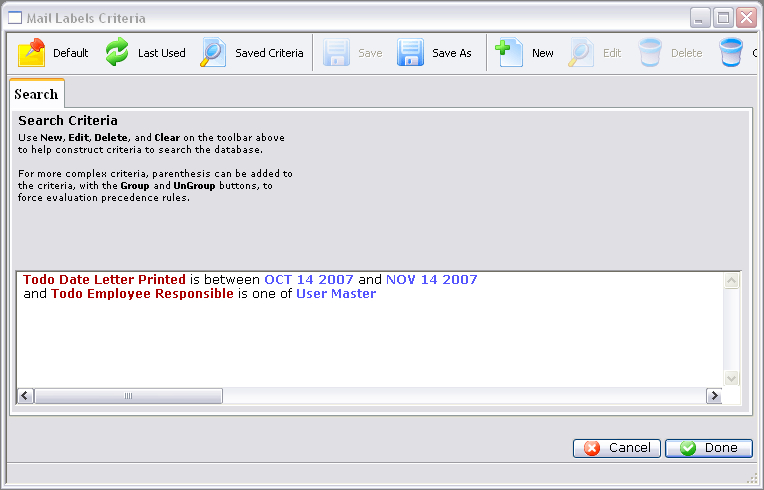
- Adjust the criteria to suit your needs.
To edit a set of criteria, double click on it.
- When complete, click the Done button.
The Patron Address Labels window opens.
- Adjust any settings as necessary.
For more information on this window, click here.
- Click the Print button.
The print dialog for the user's operating system opens.
- When printing is completed, the window closes.
Printing Labels for Printed Letters
- From the main Theatre Manager menu, select Form Letters >> Tasks >> Mail Labels for Printed Letters.
The default Mail List Criteria window opens.
- To create labels for a specific date or range of dates, double click on the Letter History Date Printed critera.
The Edit Parameters window opens.
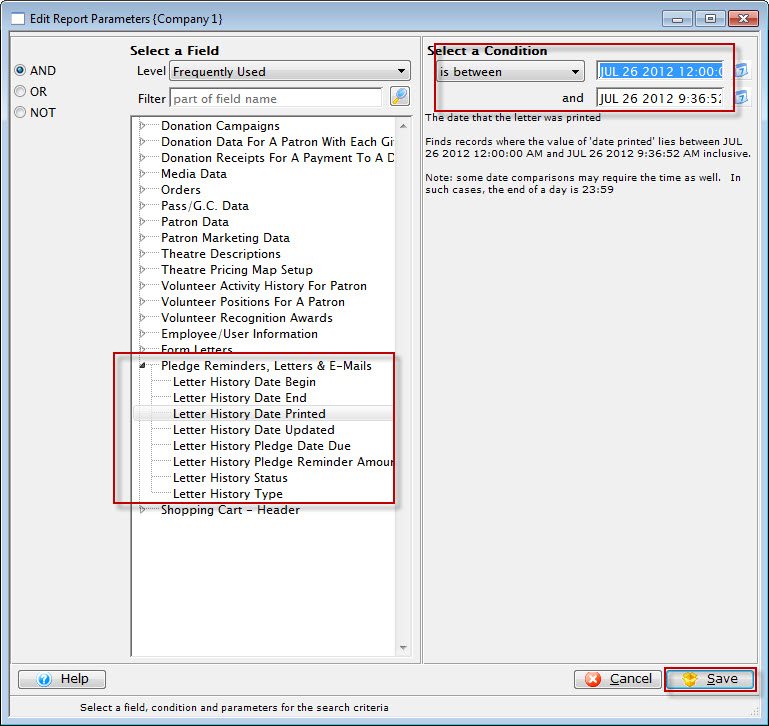
- Make the required changes and click the Save
 button.
You are returned to the Mail Label Criteria window.
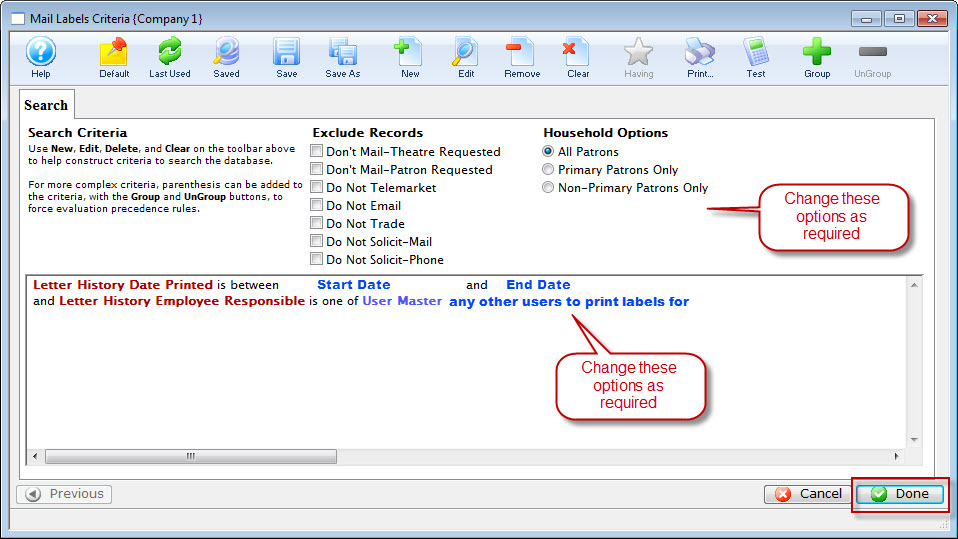
- Make the required changes and click the Done button.
The Patron Address Labels window opens. Click here for more information on the Address Labels window.
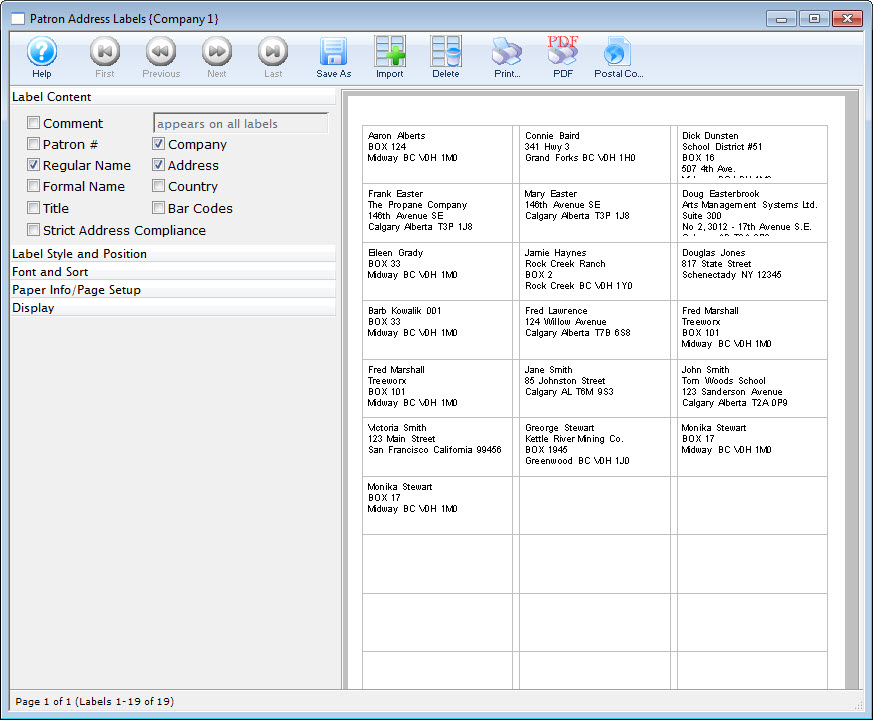
- Adust the labels, Style, Position, Font, Sort, Page layout as necessary.
- When the labels are as you would like to have them printed, click the Print button.
Patron Address Labels Window
Parts of the Patron Address Label Window

 |
Changes the view to the first page of labels. |
 |
Changes the view to the previous page of labels. |
 |
Changes the view to the next page of labels. |
 |
Changes the view to the last page of labels. |
|
Saves a copy of the current label details under a different name. |
 |
Import a RTF document containing a label template. Normally these are obtained from the Avery Website. Click here for more information on importing an RTF file. |
 |
Deletes the current label details from the list of templates. Click here for more information on deleting templates. |
|
Prints all labels. |
 |
Prints all labels to a PDF file. |
 |
Prints a Postal Code Count report. Click here for more information on the Postal Code Record Count Criteria report |
Label Content Check Boxes
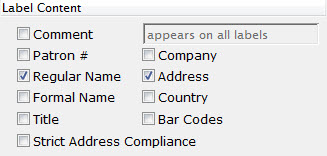
| Comment
|
When this is checked, a comment may be entered into the field on the right to be printed on the labels. |
| Patron # | When this box is checked, the patron number will be added to the label. |
| Regular Name | When this box is checked, the regular name (first name, last name) of the patron will be used. |
| Formal Name | When this box is checked, the formal name (salutation, first name, last name) of the patron will be used. This will override the regular name. |
| Title | When this box is checked, the patron's title will be added to the label - but only if the address type in the location code table is marked to print company/title |
| Company | When this box is checked, the patron's company name will be added to the label - but only if the address type in the location code table is marked to print company/title |
| Address | When this box is checked, the patron's address (address, city, state, zip) will be added to the label. |
| Country | When this box is checked, the patron's country will be added to the label. |
| Bar Codes | When this box is checked, a postal bar code will be added to the label based on the zip or postal code. |
| Strict Address Compliance | Standardized address information enhances the processing and delivery of mail. |

Label Style and Positions
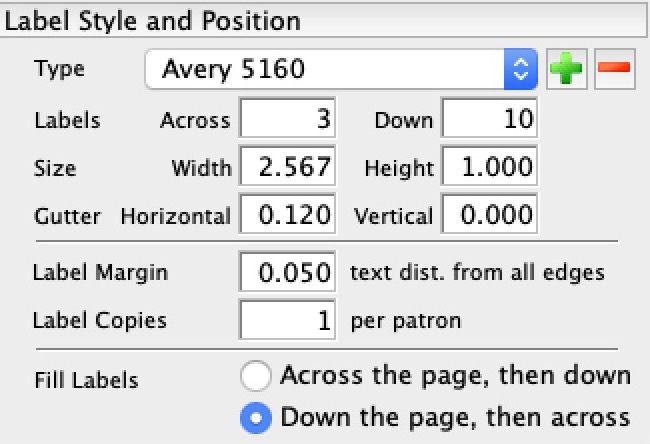
| Type | Drop Down listing of the Label templates. You can add or remove templates using the:
Add Delete |
| Labels | Across - allows you to specify the number of labels to print across the page
Down - allows you to specify the number of labels to print down the page. |
| Size | Width - allows you to specify the width (in inches) of the labels
Height - allows you to specify the height (in inches) of the labels. |
| Gutter | Horizontal - allows you to specify the height (in inches) of the gutter between rows of labels
Vertical - allows you to specify the width (in inches) of the gutter between the coulmns of labels. |
| Label Margin | Allows you to specify the width (in inches) of the margin between the labels and the edge of the page. |
| Label Copies | The number of copies of the label that you would like printed. |
| Fill Labels | 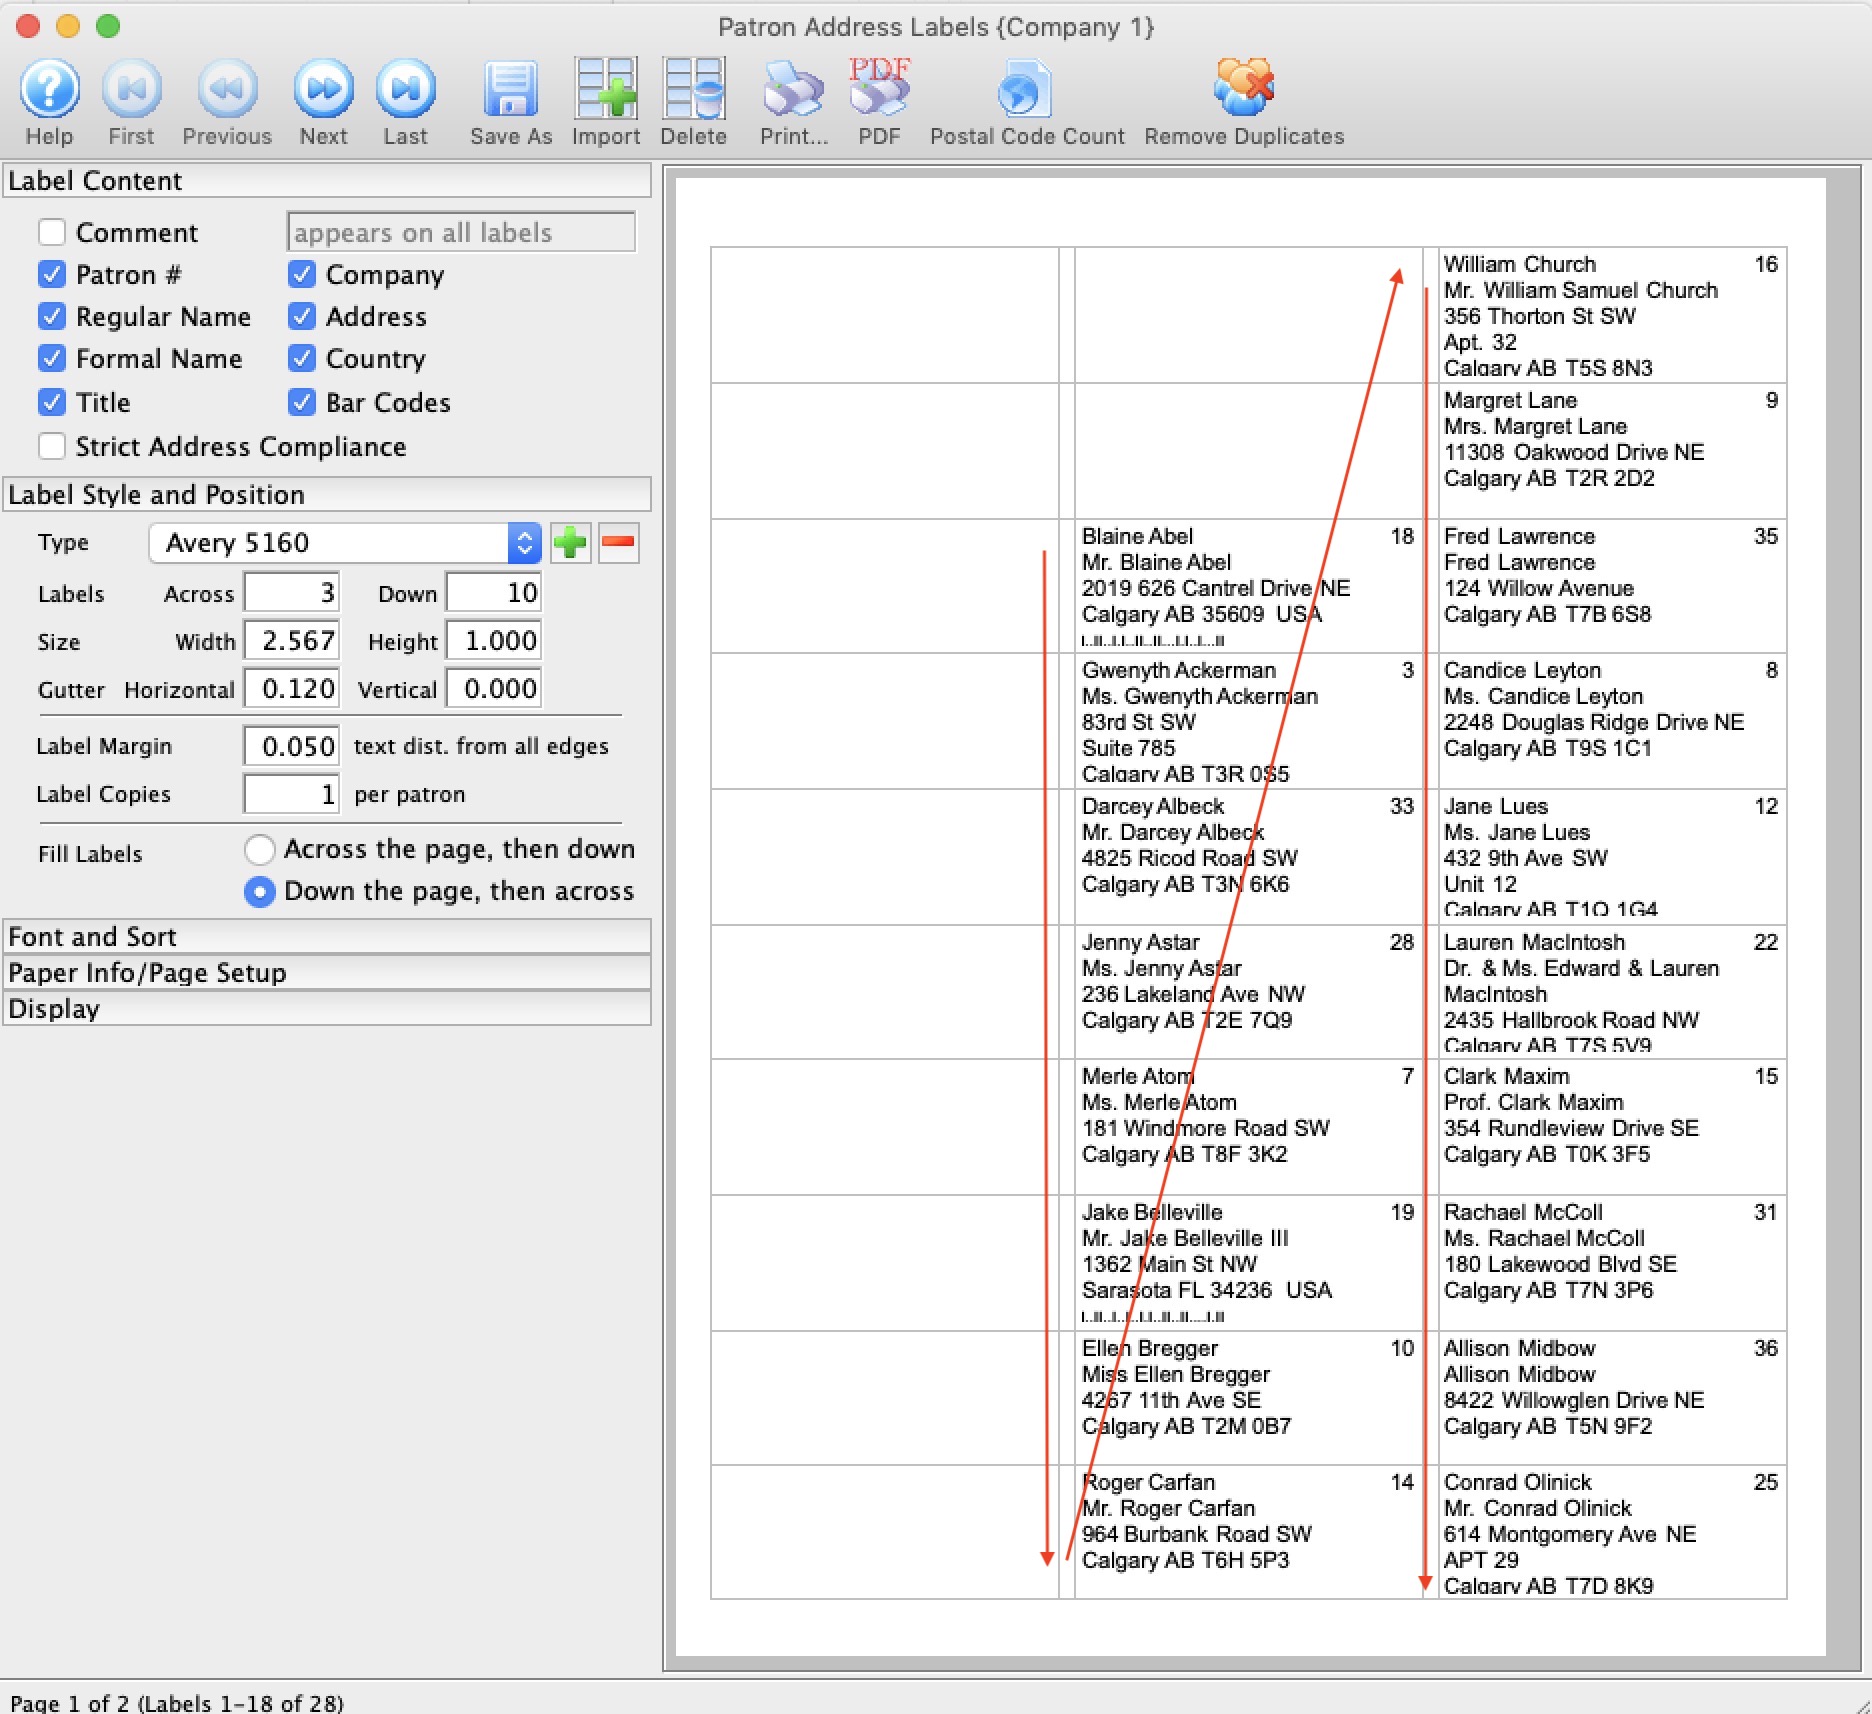 There is a choice to print the labels across the page (the default) or to print them down the page. The image to the right shows them printing down the page (then across) where as the image at the top of the page shows them printing across the page (then down).
Printing down the page may help those who find it easier to work down the label page when transferring them to envelopes. |
 button,
  button,
 Font and Sort
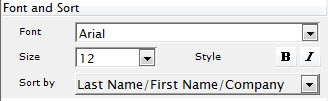
| Font | Drop Down list of the Fonts available on your system. Changes the Font of the lettering on the labels. |
| Size | Changes the size (in points) of the font on the labels. |
| Style | Allows you to bold or italicize the font on the label. This only applies if the font used allows Bolding and Italicizing |
| Sort By
|
Allows you to Sort your labels. Choices are:
Last Name/First Name/Company Postal Code/Last Name/First Name/Company Postal Code/City/Address |
Paper Info/Page Setup
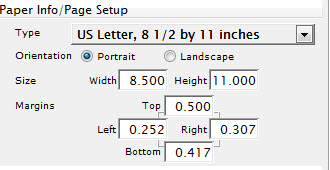
| Type | The drop down menu contains a list of standard paper sizes. It also has a custom option if the paper being used is not found on the list. |
| Orientation | The orientation of the paper is either portrait or landscape. |
| Size | If a default paper size is used, the size will appear here. If a custom paper size is used, then the width and height can be adjusted. |
| Margins | Allows for setting the top, left, right, and bottom margins for the paper size being used. |
Display

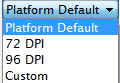 |
Selecting from the drop down list allows you to change the display of the labels so you can better see for editing. |
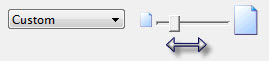 |
Allows you to change the display of the labels by movong the box from left to right so you can better see for editing. |
Right Click Context Menu
| Start Here | When this option is selected, the labels will adjust to start at the current position. This is used for when a few labels have been used on the page. All labels will adjust from this position. |
| Edit Details | When selected, the details window will open allowing for adjustments to be made to the label. |
| Remove Duplicate Patrons | Sets Theatre Manager to go through the labels and remove any duplicate labels. |
| Remove This Patron | Removes the current label from the page. |
Adding and Importing Label Templates
Theatre Manager comes with a limited number of standard label templates. If you want to add more of your own, a good source is the Avery label template page - get the Microsoft Word version in RTF format.
To add a new template, you perform the following steps:
- Open the Patron Address window.
Click here for more information on how to open the window.
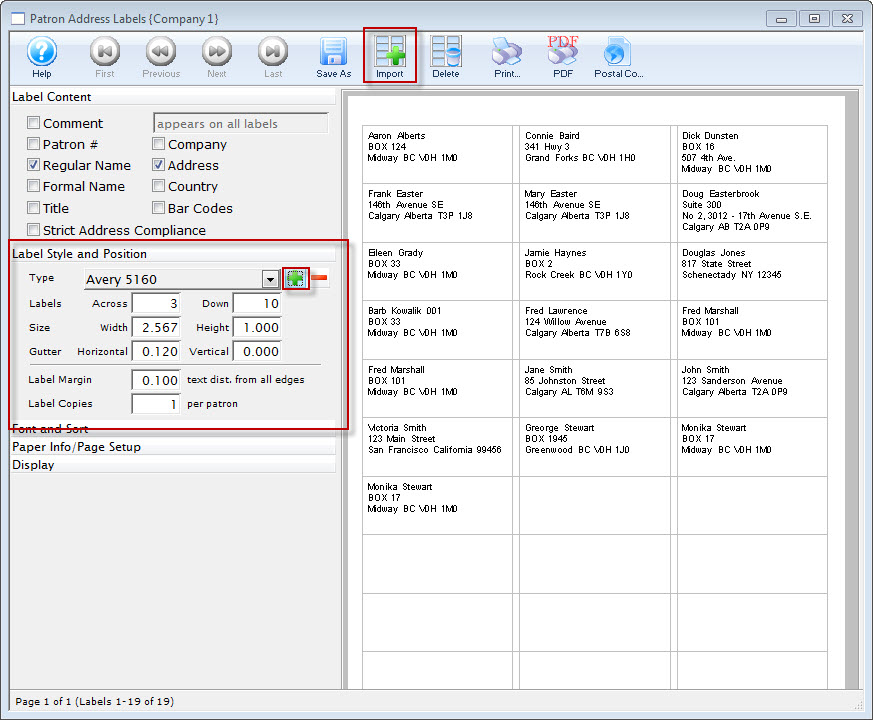
- Expand the Label Style and Postion.
- Click the Plus
 button, alternatively, click the Import Labels button.
The Import Selection dialog opens for your operating system.

- Find the RTF file to import and click Open.
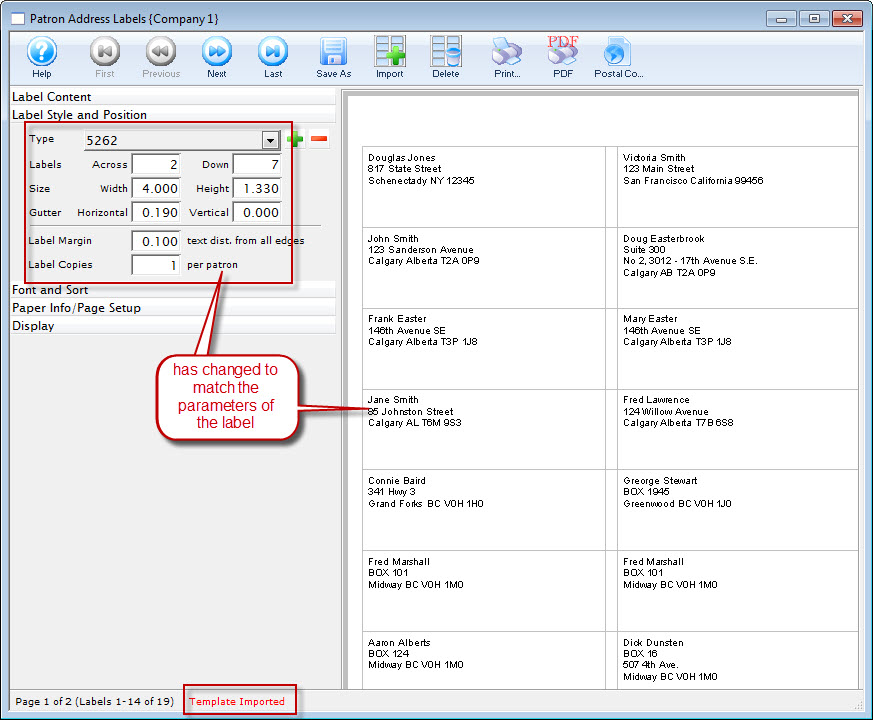
The Address Labels window displays the new format.
Deleting a Template
To remove a lable template, you perform the following steps:
- Open the Patron Address window.
Click here for more information on how to open the window.
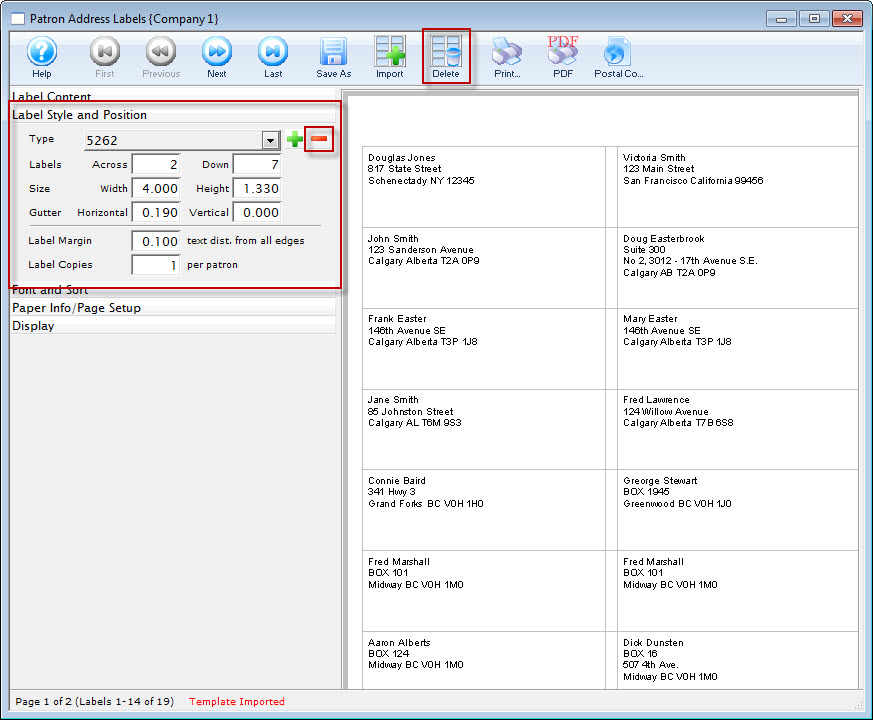
- Expand the Label Style and Postion.
- Click the Minus
 button, alternatively, click the Delete Labels button.
The delete label dialog opens.
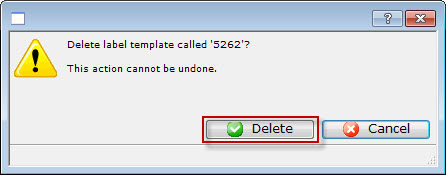
- Click the Delete
 button.
Theatre Manager loads the next template in the list. If the template is a different size, another confirmation opens.
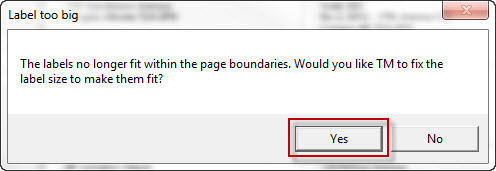
Postal Code Report
To create a report of the Postal Codes of your labels, you perform the following steps:
- Open the Patron Address window.
Click here for more information on how to open the window.
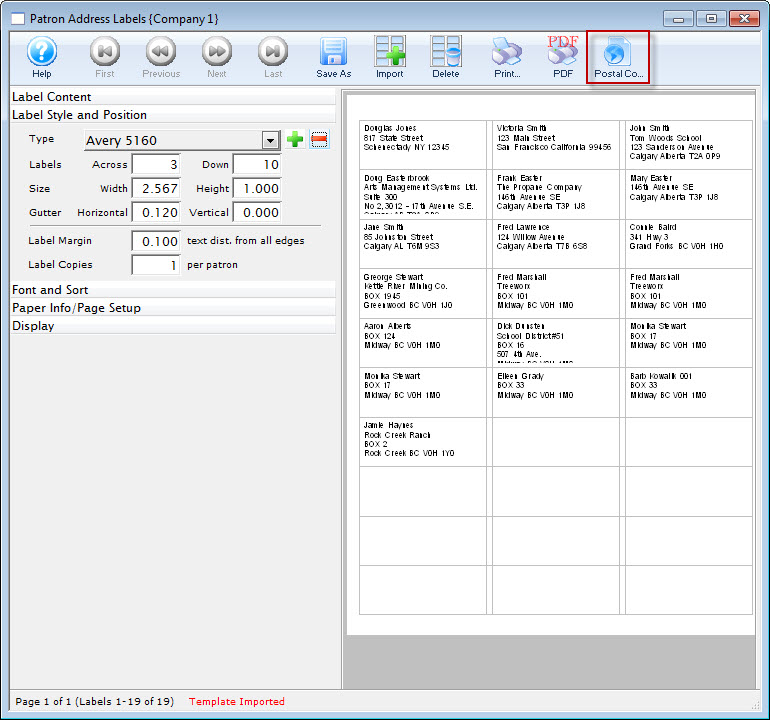
- Click the Postal Code button.
The Record Count Criteria window opens to the Sort & Subtotal Tab.
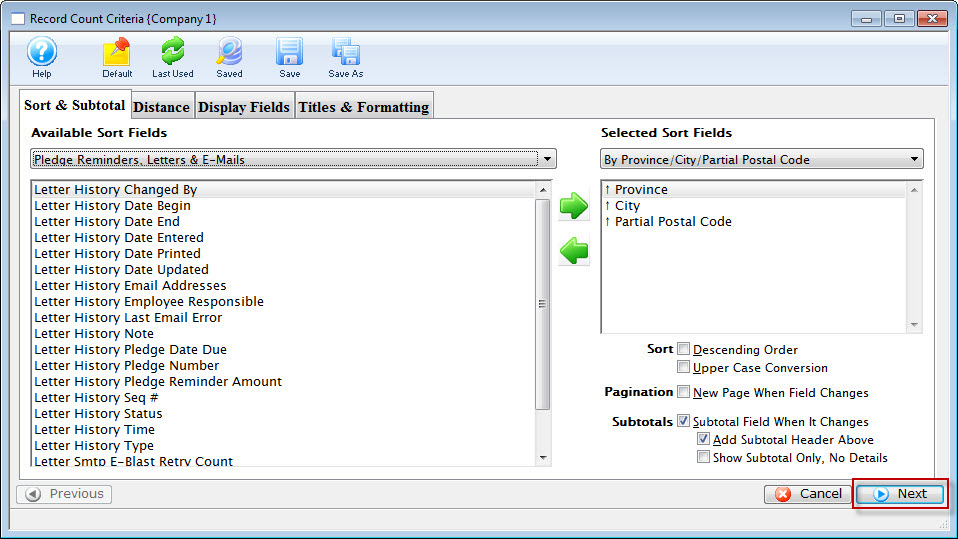
For information on how to change a Sort, click here.
- Review the sort fields, making any afdditions, deletions or changes as necessary.
- Click the Next
 button.
The Distance tab opens.
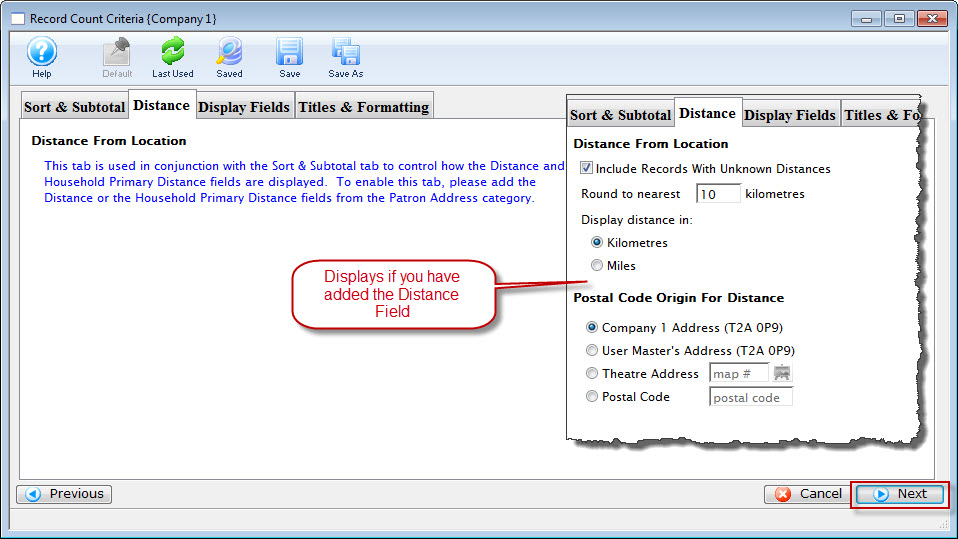
- Review the tab, when complete, click the Next button.
The Display Fields Tab opens.
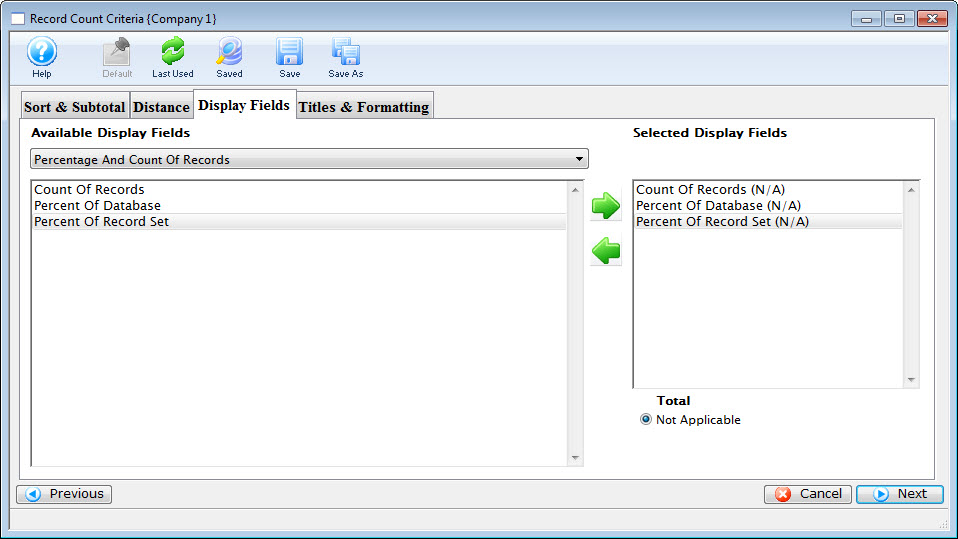
- Review the tab, when complete, click the Next button.
The Titles and Formatting Tab opens.
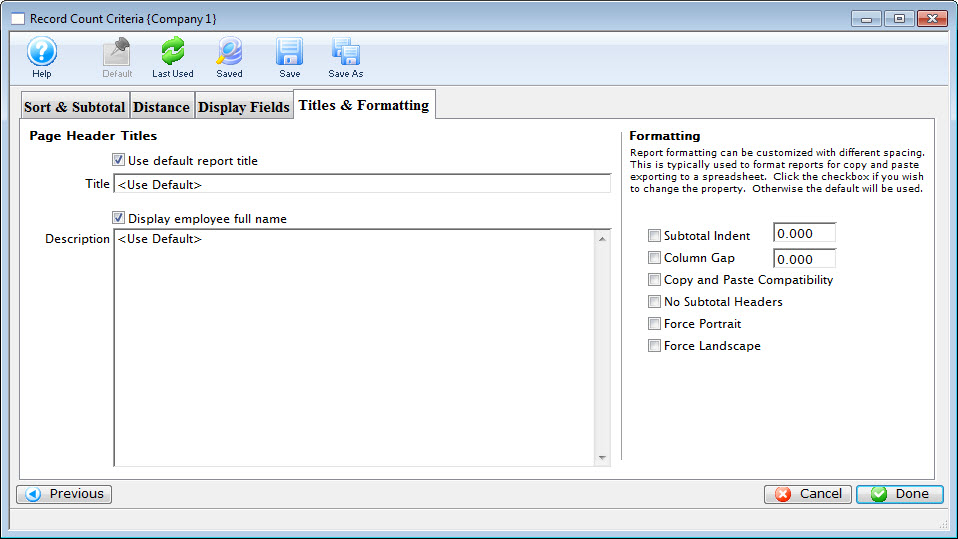
- Review the tab. Click here for more information on this tab.
- When complete, click the Done button.
Your report is displayed.
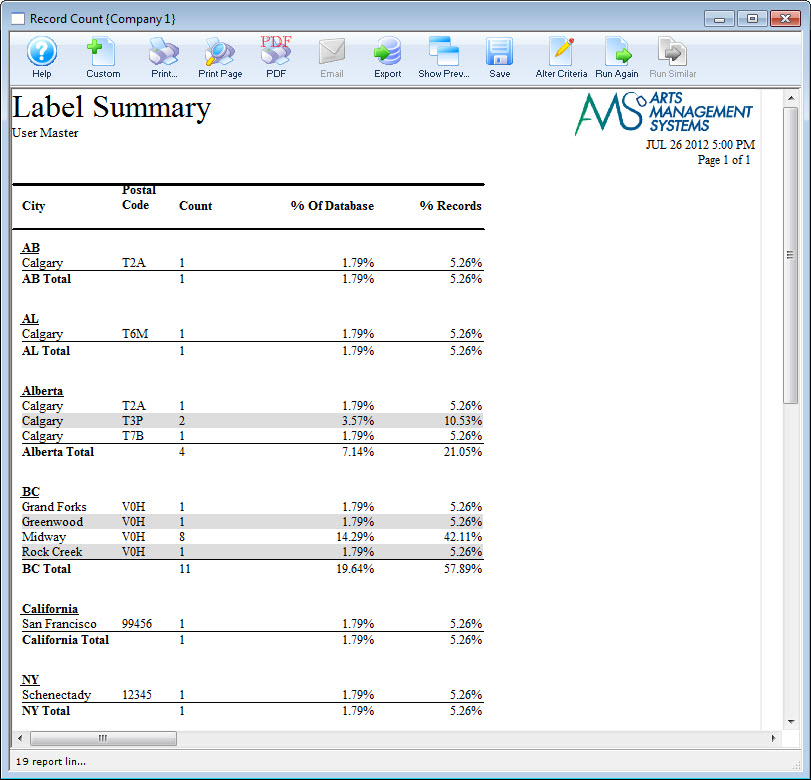
Custom Letter Examples
Creating a "Last Show Patron Bought Tickets to" Letter
Occasionally, you may wish to create a form letter that highlights the last show the patron purchased tickets to. This type of letter (or email) is the same concept as a Donation Thank You Letter. When we create a thank you letter for a donation, you need to attach it directly to the donation you are thanking them for. This is because a Patron can have multiple donations, and if you attach the letter to the Patron Record, Theatre Manager will not know which donation the to pull the merge information from.
The same applies to "last event". While Theatre Manager knows the patron has purchased tickets, it does not know which was the last ticket purchased. For example, a patron has purchased a ticket to the fourth show in a season and then comes back one month later and purchases tickets to the first show of the season, Theatre Manager only know the patron has purchased tickets to both the first and fourth shows and not the order they were purchased in.
To achieve the proper information in the letter, you need to perform several different functions.
- Create a new letter.
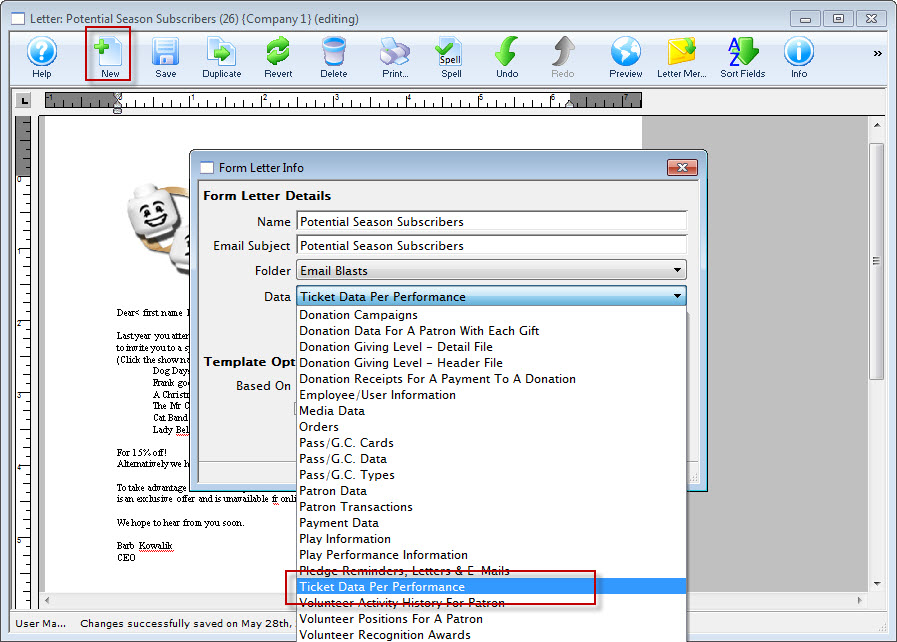
- When choosing the Data file, select Ticket Data per performance.
- Complete the letter.
Click here for more information on creating a form letter. When the fields are in the letter, you may also want to consolidate some fields so you can show totals, averages, etc.
- Click the Save button.
- Click the Sort
 button.
The Consolidated Letter Sort window opens.
To get the required letters, set up a sort order for the letter, so that it is in Date Order (descending) or in Order Number (descending).
- Select the sort order using the left and right arrow keys to added the appropriate sort fields.
- When complete, click the Done button.
Merging
- Click the Letter Merge
 button.
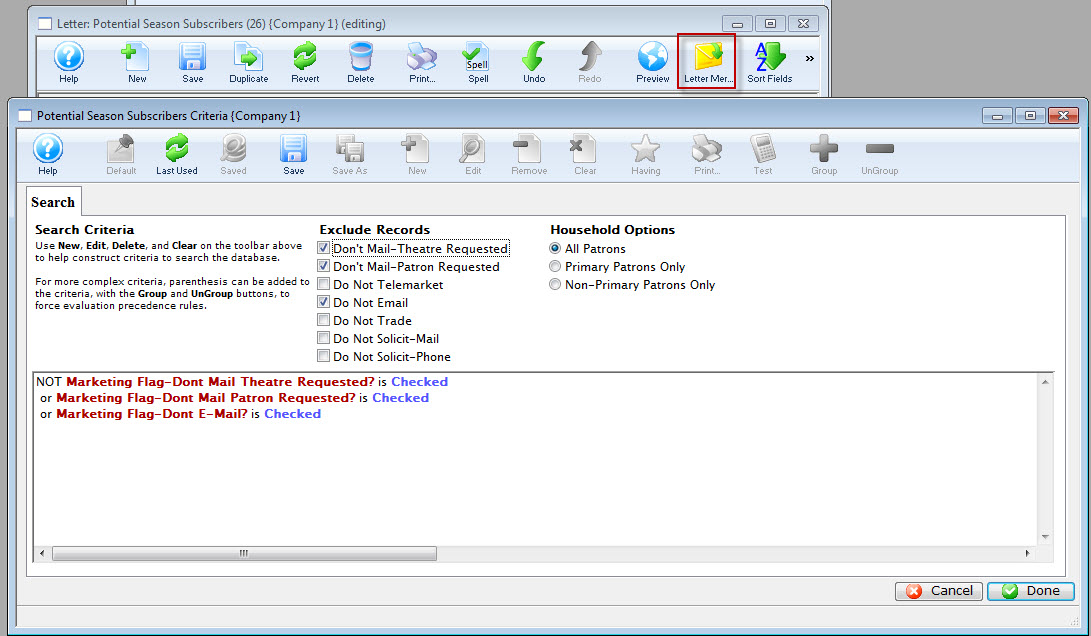
The Search Criteria window for the Form Letter merge opens. Criteria allow you to refine the amount of information - before generating the letter. Criteria can be used to find specific information and using criteria speeds up the process of generating a letter. Click here for more information on the Criteria window.
- Click Last Used or Save to enable the toolbar.
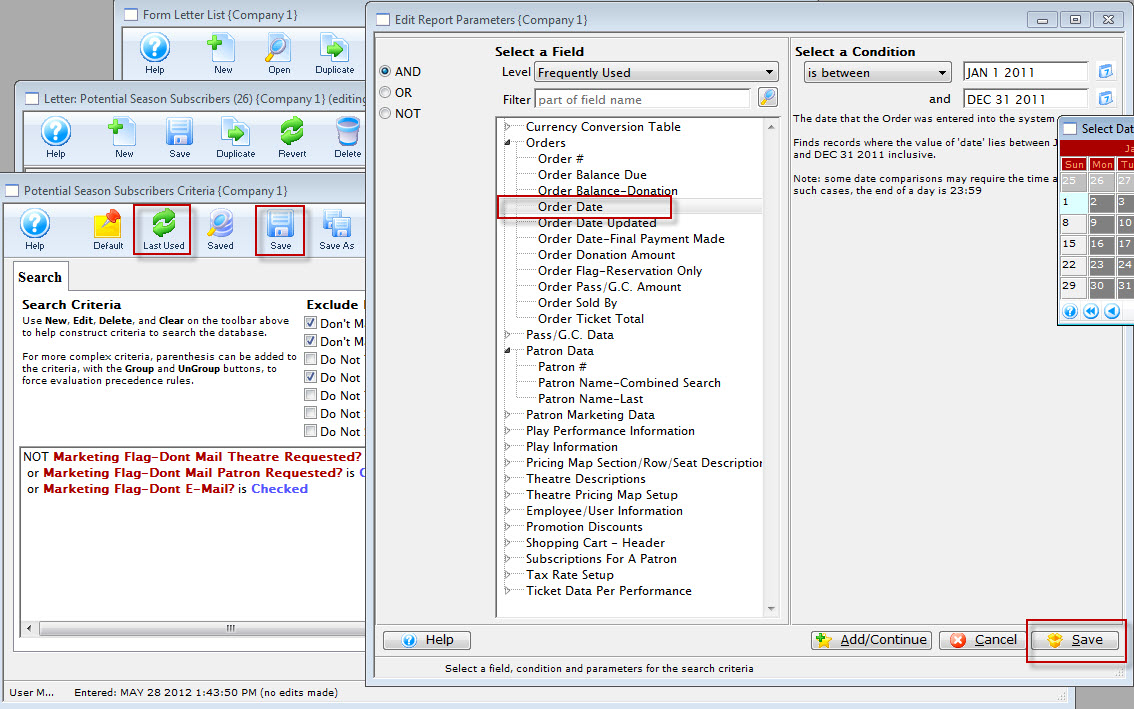
- Click the New button to add the first parameter..
The Add/Edit Parameters window opens.
Click here for more information on the Add/Edit Parameter window.
- Select an Operator.
Operators are on the left hand side of the window. They are "AND, OR, NOT."
AND
This criteria and all previous criteria will be used in the search.
OR
This criteria or all previous criteria should be used in the search.
NOT
All previous criteria but not this criteria will be used in the search.
- Select a data field.
Clicking on the plus symbol (+) next to a data category expands it to show a list of fields.
choose indexed fields when possible as Reports generated with indexed fields generate much faster.
- Select a condition.
Conditions determine how the parameters react.
Click here for more information on conditions.
- Set the parameters.
Depending on the data field and condition, the parameters may be a single number, a range of numbers, or a list of items.
If a list of items is shown, multiple items can be selected by using the OPTION key (Mac) or the CTRL key (Windows).
- At the bottom of the window, click the Save button.
The Add/Continue
 button may also be used to add this criteria, and select additional criteria without leaving the window.
 - Click the Save button to merge the letter.
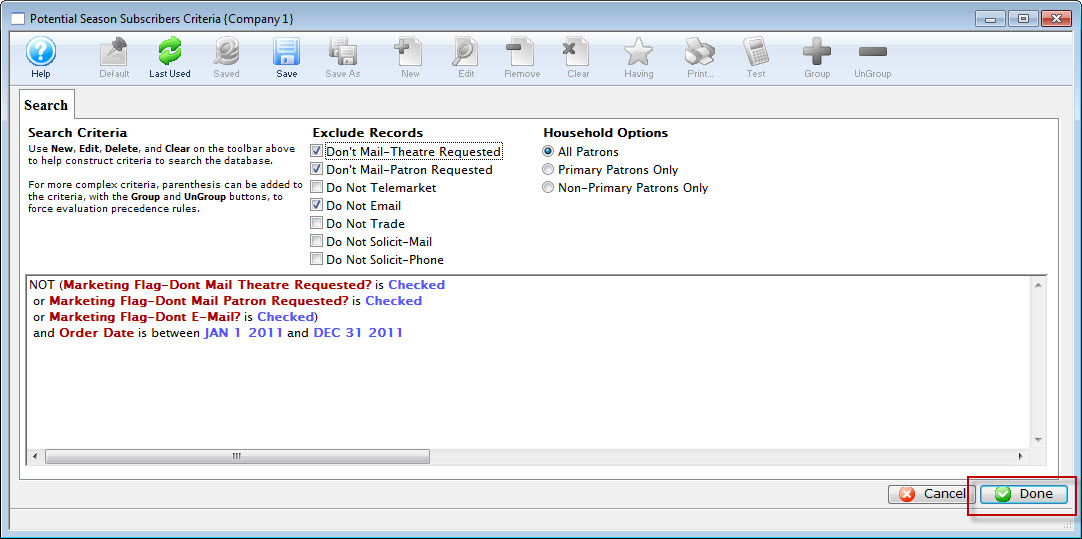
You are returned to the Search Criteria window.
- Review your options and criteria.
To add more criteria, click Last Used
or Save to enable the toolbar. - To create your letters, click the Done button.
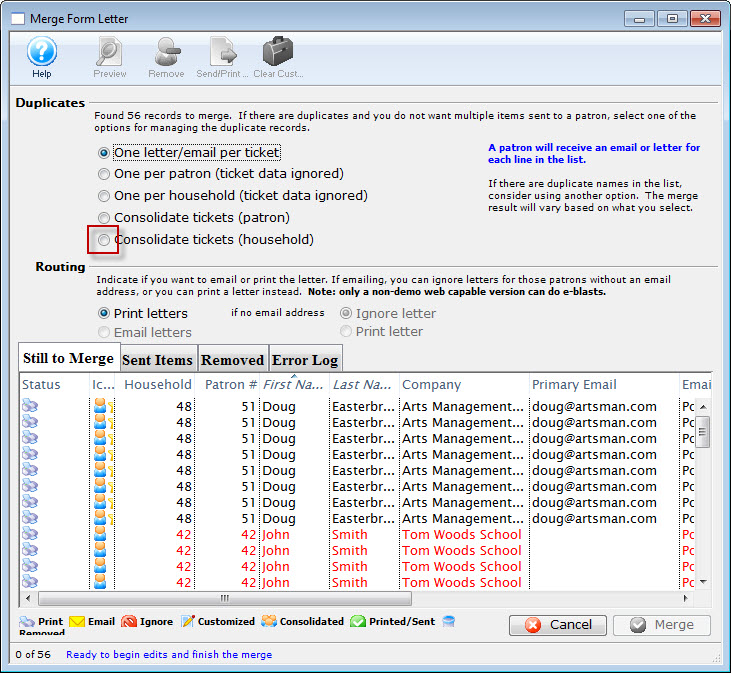
The Merge Form letter window opens.
Click here for more information on the Merge Form Letter window.
Reviewing the Still to merge tab, the list needs to be refined.
- Make a Duplicates selection. In this example, Consolidate tickets (household) has been selected.
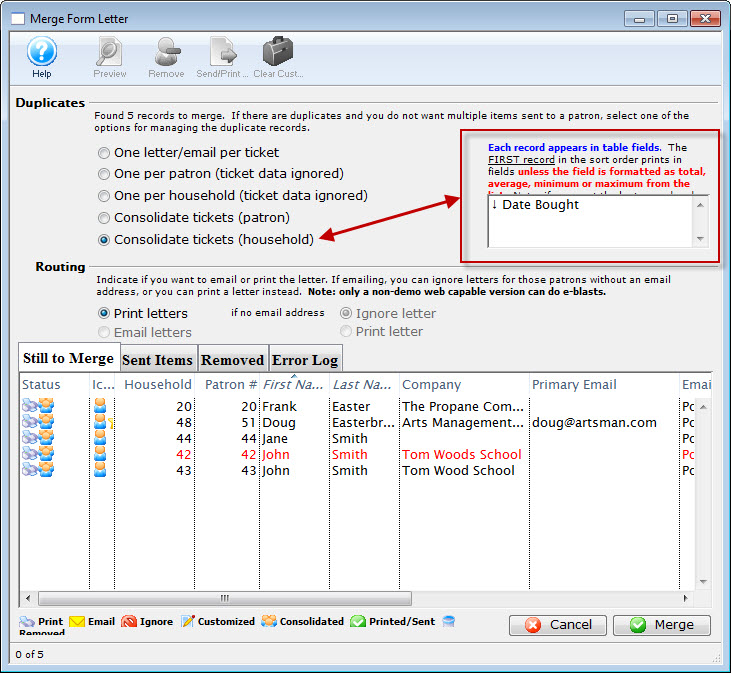
Notice the parameter selected - Date Bought is displayed. This tells you The first record for Date Bought prints in the field.
- Click the Merge
 button.
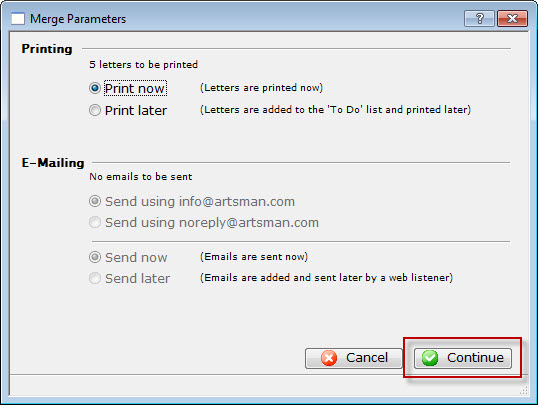
- Click the Continue
 button.
Review your printed letters.
Creating a Ticket Confirmation Form Letter
If you need to send an email (or printed) confirmation letter to the purchaser, there is an easy invoice function right in the BUY window (and on the patron record). But if you are using it as an internal email notification, you'll need to build a Form Letter.
There is an important difference between form letters and Invoices. Form Letters (with Row Field Data) look at several records, so it will list every ticket individually. There is a row for Ticket 1, because it is Seat A-101, then there is a row for Ticket 2, because it is a different seat; Seat A-102. So each ticket will come out as a separate row.
Invoices look at the order as a whole, and can summate the contents of the order in different ways - individual tickets (or donations/Gift Certificates), or grouping them by event, series, promotion and other options.
The two items are different for a reason - you have the best of both worlds. If you want to have a summary of the order, use the Invoice and choose the appropriate summary options when you generate it. If you want a line by line listing of the tickets, use a form letter.
In Form Letters, you can add row field data which will pull data from the database and insert it in your letter "table style."
You can accomplish this by using the following steps.
Build a new Form Letter
- Click on the
 icon, and choose from the icon bar in the search window.
 - Give the letter a name, and a folder.
- Choose Ticket Data Per Performance as the Data file
- Click

You may either copy and paste your letter in here, or begin writing it directly into the word processor.
Add a Row Field Table
- Right click in the location where you want the Row Field table to go
- Click the green hooked-arrow
 on the right side and select the first field you wish to include.
 - Change the Column Header to something appropriate for your table (as you would like it to appear) in the final document.
- In the final column (PRICE), click the
 box. This will total this column in your table.
 - Click
 , and the table will appear in your document
Select Insert Document Object>>Row Field
The insert Row Field window will appear.
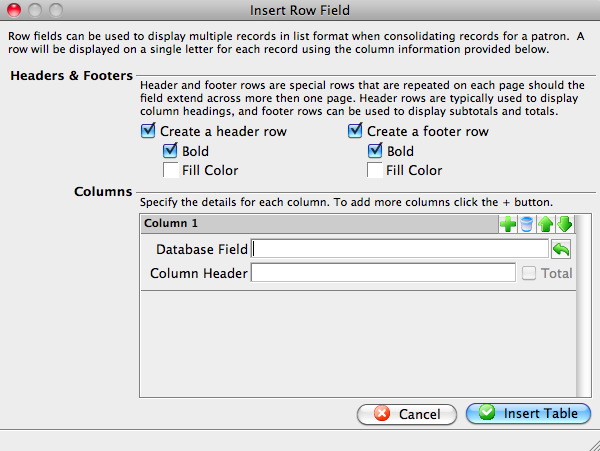
To add additional columns to your table, click on the 
Be sure to edit the Column Header names.
Adjust the column width or height as you would in any word processing program by clicking between the columns and dragging the lines left/right, or up/down. This allows you to allot more space for Event Title, and less for Row and Seat, for example.
To edit the way data is displayed:
- Double click on the Data Cell (for example, TicketTotalPrice)
- Click on the CELL tab
- Click MODIFY
- Edit the Formatting to the desired display. In this case, Currency.
- Click Apply
- Click Apply again on the Row Field Properties window
- You can also edit the format of the table itself.
- Highlight the cells you wish to format
- RIGHT click (Control Click) on the cells
- Select the item you wish to format (Style..., Font...., Paragraph..., etc.)
|
You can also edit the formula for the calculation right here in this window. For example, you may wish to display the ticket price plus fees. Edit the PS_TOTAL_COST like you would a ticket face calculation to (PS_TOTAL_COST+ORD_TIX_ORD_FEE) |
Complete and save your Form Letter