Facility Management

Overview of Facility and Workflow Management Module
We have created the Facility and Workflow Management module for you to coordinate events, people, and resources across your organization's available venues. You can pull from and create information in your database to manage your venue, your staff and volunteers, your resources and your clients. With this module, the data coordination is presented in multiple visual ways allowing you to easily view and understand the relationships among all those variables. Some of these are:
- The events occurring in different venues
- The resources needed at each location at a particular time
- Staff members or volunteers needed at different locations (or times)
Examples of relationships that can be viewed include:
- which events are occurring in each venue
- the resources needed at each location at a particular time
- staff members or volunteers needed at a location
- tasks requiring completion from quick 1-person ToDo items to entire operations involving several people (like "Set Construction" or "Rehearsal")
- an ordering of tasks and their dependencies on each other (ie. "Painting" can't begin until "Construction" is complete)
- and grouping of similar items together.
Setting up and using Facility Management will help your organization with:
Scheduling
- People (staff and volunteers)
- Places (e.g. venues)
- Resources/Supplies (e.g. projectors)
Distribution
- Calendars can be updated internally by everybody
- Some calendars may need to be publicly available for viewing on the internet (e.g. those used by volunteers)
Billing
Create a quote and turn it into an invoice for- Labour
- Rental
- Supplies and other resources
Task Lists
- Of what to do today (or for a designated time frame)
- Alarms and reminders
- Add staff members, volunteers, or anyone in your patron database to a task
Meeting scheduling
- With people and notification status
- Reminders (alarms or email notification)
Gantt Charting
- Enter data as a Gantt chart (i.e. there is a grouping of activities related to a project)
- View it as a calendar or in the chart view

Definitions
| Calendar | A calendar is a grouping of information that can be displayed in multiple formats associated with dates. They can represent information available to be displayed to the public at large, within the organization or privately. Calendars can be displayed by:
Click here for more information and instructions on Calendars. |
| Consumable | A consumable is an item that is permanently used up. These would be items from inventory such as cups, concession items, etc. It would not include permanent items like tables, projectors or chairs.
A resource is marked as consumable in the Task Resource setup. Click here for more information on Task Resource setup. |
| Filters | You can use filters to determine which information to show on a given calendar or report. These can be defined by a user (or group) or can be available to all users of the system.
Click here for more details on Filters. |
| Gantt/Project chart | A Gantt chart is a visual representation of a project schedule. A type of bar chart, a Gantt charts show the start and finish dates of the different required elements of a project.
Gantt charts are useful in planning how long a project should take and helping to sequence the events by laying them out in the order in which the tasks need to be completed. Tasks are shown on the tree, and the project time span is represented on the horizontal axis. Each task has a corresponding bar that shows the time span required for that task. Gantt charts also indicate dependencies, those tasks that are dependent upon other tasks. Tasks for a project can only be entered via the project, however you can add existing tasks to a project. They can be viewed in other calendars however, you cannot see their temporal relationships there. Click here to see how Gantt Charts work within Projects. |
| Play/Event | These are considered synonymous. They will be tracked as plays currently are, but are not restricted to plays.
Click here for information on Plays/Events setup. |
| Resource | Some physical items are needed to perform a task, needed for an event or performance, or assigned to a venue. Resources can be permanent or consumable. A variety of properties can be associated with a resource, defined by the individual client.
Click here for information on Resources. |
| Task | Tasks are the core of Facility and Workflow Management. They represent something that needs to be accomplished. Tasks can be assigned to an employee or patron. Tasks can be associated with a client/patron as something that needs to be done for them, associated with an event, or a specific performance. Resources can be assigned to tasks. The tasks can have a temporal correspondence to each other, such that the completion of one task may affect another, etc. Tasks can be assigned to multiple people. Reminders for tasks can be received via visual and auditory clues. If a task is assigned to multiple people, changing the date or other information on it changes the information for all associated people. If a task that is part of an ordered group has a date/time changed, the date/time of subsequent grouped tasks may be changed by an appropriate amount, depending on the type of grouping.
Click here for information related to Tasks. |
| Time | Time is an important component in all tasks and venues. This temporal component is used to determine conflicts and availabilities of people and resources. Nearly every part of the Facility and Workflow Management module is dependent on time information. |
| Venue | A location for some activity. It can be a theatre, conference room, meeting room etc. If a physical location has multiple configurations, it will be considered to consist of multiple venues, each with its own map. Resources can be assigned to a venue to be used as a pick list when creating a rental agreement for a venue.
Click here for more information on Venues (also referred to as "Theatre Maps"). |
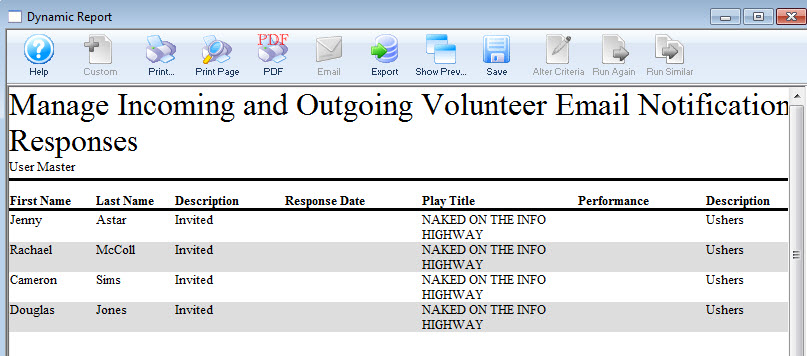
What does an Event mean for the Box Office vs Facility Management?
|
Tasks in Facility Management and Event / Performance in box office ticketsales are different, yet related. |
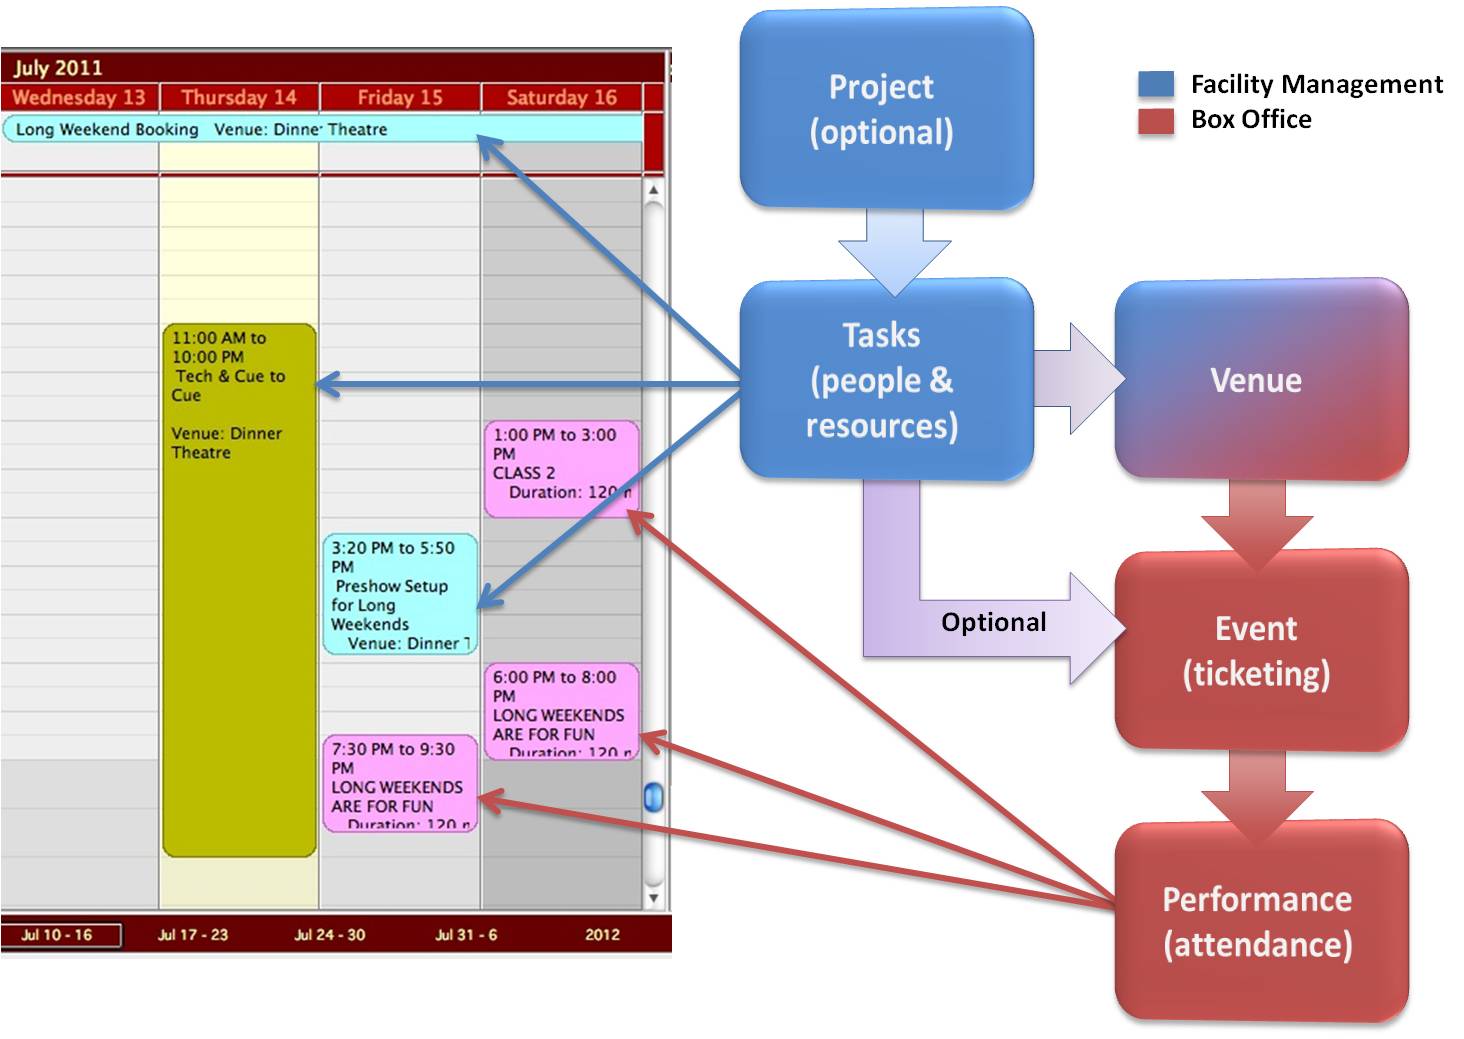
In the image, the Calendar is on the left, Theatre Manager’s data structures on the right.
- Red - The Data Enitity/Tables you use in Theatre Manager if you are not using Facility Management
- Blue - Added to Theatre Manager if you are using Facility Management
- Make a person responsible for it.
- Attach the event to a venue.
- Add resources to the event and when they need to be there.
- Attach the proposed contract.
- Attach the proposed schedule of equipment (not actuall set up the equipment, but record what they might need, when they might need it).
- Who is presenting.
- Accounting information.
- Icons for Ticket Trove marketing.
- Move in
- Set up
- Staffing
- Tear down.
- Tech cue
- Pre-show
- Set ups, etc.
For Example:
If you think of an Event as a Calendar item - Potential Booking - you could:
You now have a task called
From this task, the box office can assign the prices. After, the information will show on the calendar - with no additional work. The Potential Booking now becomes the Actual Booking - the actual performances show in the calendar.
Because you are selling it (the event), you can think of how to make it work from a production perspective:
You can start to add more tasks:
When you have completed the event, you can now look backwards to all the tasks needed for that event (box office event) to happen, seeing the times, resources and people required to make it happen. You can now use this Project to plan similar events in the future.
Facility Management Set Up

- Tasks
- Projects
- Orders & Billing
Before you can use Tasks effectively, you need to set up:
| Resources | A physical item needed to perform a task, needed for an event or
performance, or assigned to a venue. Resources can be permanent or
consumable. A variety of properties can be associated with a resource,
defined by the individual client.
Click here for more information on Resources. |
| Calendar Types | Built-in codes you do not have to set up.
Click here for more information on Calendar Types. |
| Task Types | Assigns a particular type to a task, such as Meeting, Holiday,
Attached to Event, etc.
Click here for more information on Task Types. |
| Project Types | Assigns a particular type to a project, such as Wedding, Conference,
etc.
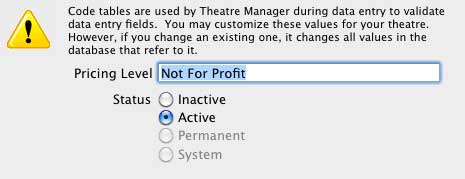
Click here for more information on Project Types. | Pricing Levels | Sets different pricing levels for resources.
Click here for more information on Pricing Levels. |
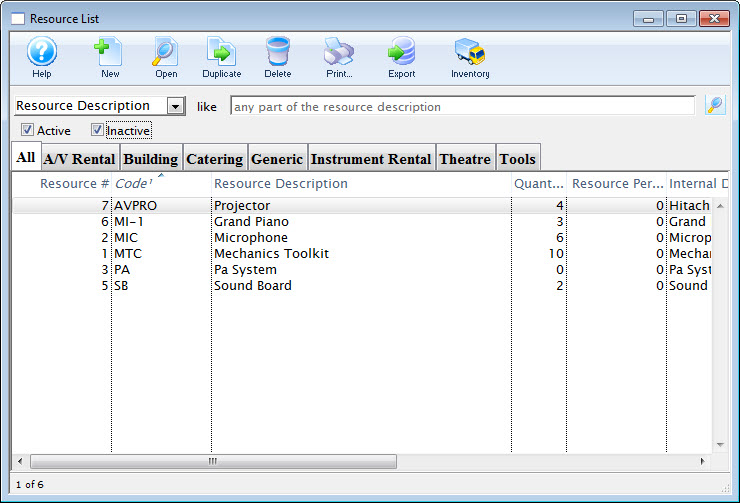
Resources
A resource is a physical item needed to perform a task, needed for an event or performance, or assigned to a venue. Resources can be part of the venue (e.g. lightboards), rentable (e.g. stage components), or consumable (e.g.coffee). A variety of properties can be associated with a resource, defined by the individual client.
To set up a resource, you assign a cost (incurred by the venue for purchasing the item, with associated accounts), and a fee structure (where appropriate) for use of or rental of the resource. Those fees can then be invoiced and billed to your customer.
There are some items to be set up for Resources to be used effectively. To set them up:
- To set up the Resource Code Table, select Setup >> System Tables >> Code Tables.
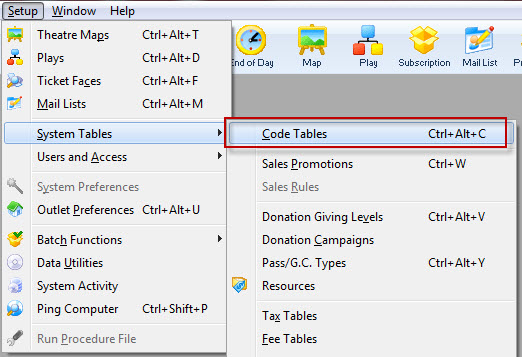
The Code Tables Data window opens.
- Choose Facility Resource Groups.

Any resources set up will display on the right. Click here for instruction on setting up this code table.
Task Resources Setup

Adding Editing and Deleting Resources
Venue Standard Resources
- The conference room may always include a projector.
- The main theatre may always include the sound and light boards.
For more information about default resources for a venue, click here.
Facility Calendar Types
Facility Calendar Types are built-in codes you do not have to set up. They are found in the system tables at Setup >> System Tables >> Code Tables >> Facility Calendar Types.
Click here, to go to the Facility Calendar Types section in the online help.

There are 6 task types and 2 that are used internally:
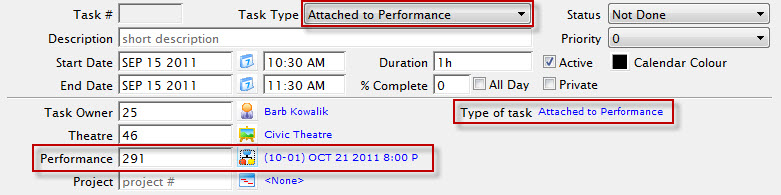
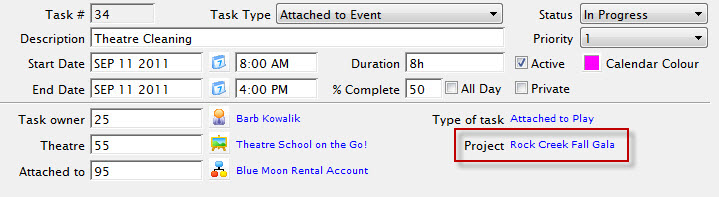
| Attached to Event | The task is associated with a particular event, which must be assigned. |
| Attached to Performance | The task is associated with a particular performance, which must be assigned. |
| Background | The task is will appear as a background event that colours the entire background of the calendar for that day. This is used for things like holidays or items of significance to everyone, such as "Board meeting all day". |
| Meeting | The task is a "normal" event, not associated with any particular event or performance. This is the most commonly used type. |
| Notification | The task is to show for everyone as a notification or announcement. It will appear on everyone's calendar without having to add them as a participant. |
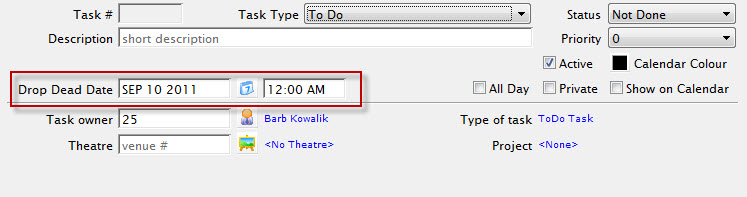
| To Do | The task represents some deadline. It does not have a starting date, only a Drop Dead date. It must be completed before a certain date, but doesn't matter when it is done, such as a grant deadline. |
| Internal Only | |
| Project | The task record is actually a project that has other tasks associated with it. |
| Task | Internally assigned to each task that is not a project. |
While you cannot change the meaning of each of these, you can change the description to something more meaningful to your organization.
These are used as the general types for the Facility Task Types you will use to define the type of each task.
Click here, to learn more about Calendars.
Facility Task Types
There are some items to be set up for Facility Task Types to be used effectively. To set them up:
- To set up the Facility Task Types Code Table, select Setup >> System Tables >> Code Tables.
You use these to assign a particular type to a task, such as, Meeting, Holiday, Attached to Event / Play, etc.
- You also use these to categorize Tasks.
Each task type is attached to a calendar type that influences its behavior.
For example, if the calendar type is Attached to Performance, a performance must be entered. If the calendar type is ToDo, it has a Drop Dead date, but not a beginning date.
- Each task type can be assigned a color.
If this colour is left at black, then the default color for tasks or projects is used on the calendar. If you assign a colour, that colour is used for all tasks of that type, unless you override the colour for a specific task or project
Facility Project Types
There are some items to be set up for Facility Project Types to be used effectively. To set them up:
- To set up the Facility Project Types Code Table, select Setup >> System Tables >> Code Tables.
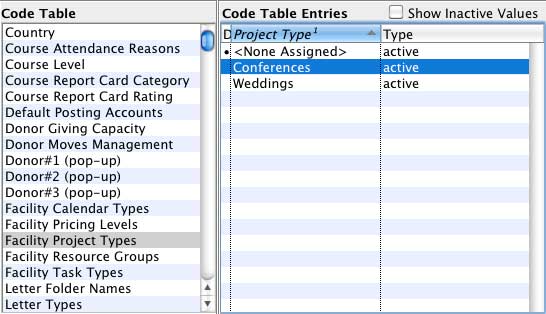
They are used to assign a particular type to a project, such as Wedding, Conference, etc.
Click here to go to the facility Project Types code table information.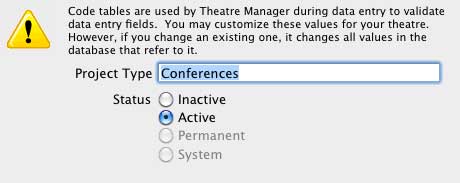
Facility Resource Types

Facility Pricing Levels
The code table for Facility Pricing Levels is discussed in full under System Setup >> System Tables> > Code Tables Help Section. For a direct link to that page,

They are used to set different pricing levels for resources.
Calendars
The calendar window displays a lot of data in a limited amount of space and has powerful filtering features that make it "Command Central" for managing and viewing tasks, performances, volunteer activities and projects.

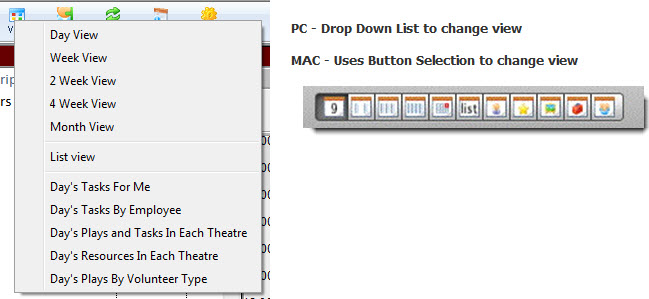
The 'trick' is to get the calendar to display in may ways so that it provides you with the results/information you need - like a Rubik's Cube®, with the sides being:
- date, people, resources, venues
- Week view, month view, people view, venue view
- Not everyones will be the same as it depends on what you want to see.
| Standard Calendar Views
Click here, to see what the calendar looks like in these views. |
|
| Facility Management Calendar View
Click here, to see what the calendar looks like in these views. |
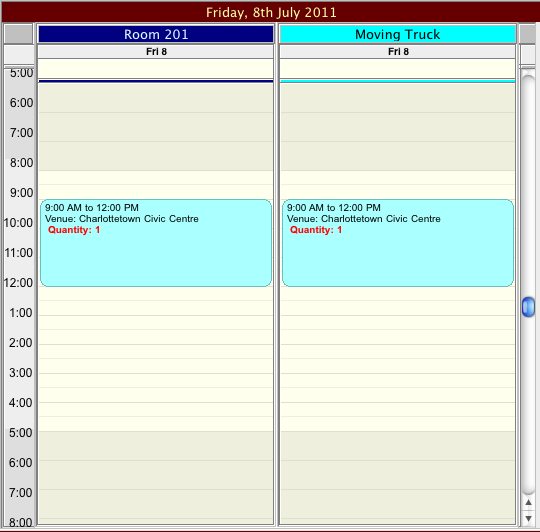
1. Venues- Shows what is going on in the selected venue. |
| 2. Resources - Is a particular resource (e.g. Projector) available | |
| 3. Employees /Personnel - Is the particular employee available (to avoid double booking) | |
| 4. Volunteers - Specific jobs, is a volunteer booked for a required role |
To navigate through the calendars is as simple as clicking a button to change the view. Data carries across calendars and will display if the calendar type supports the task type (for example, a task must have a venue associated with it to appear on a venue calendar).
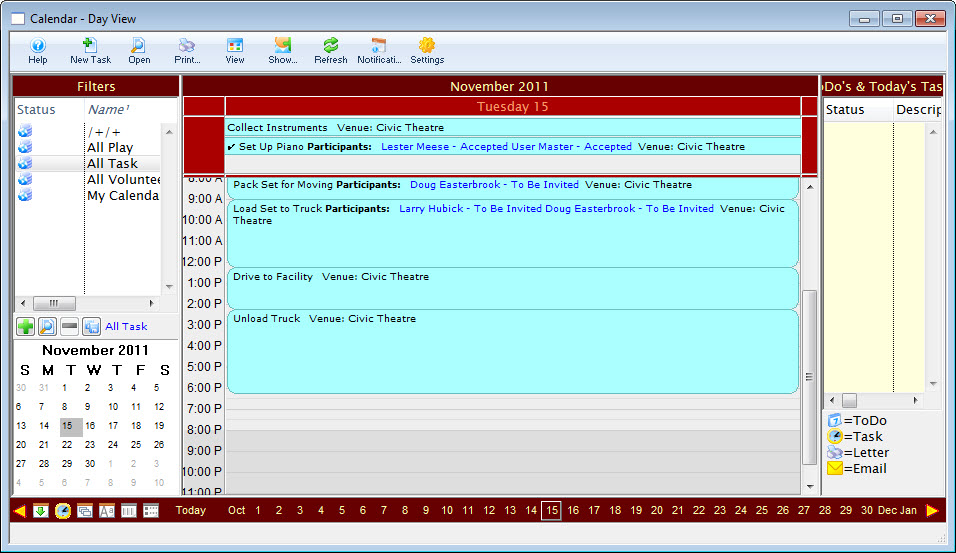
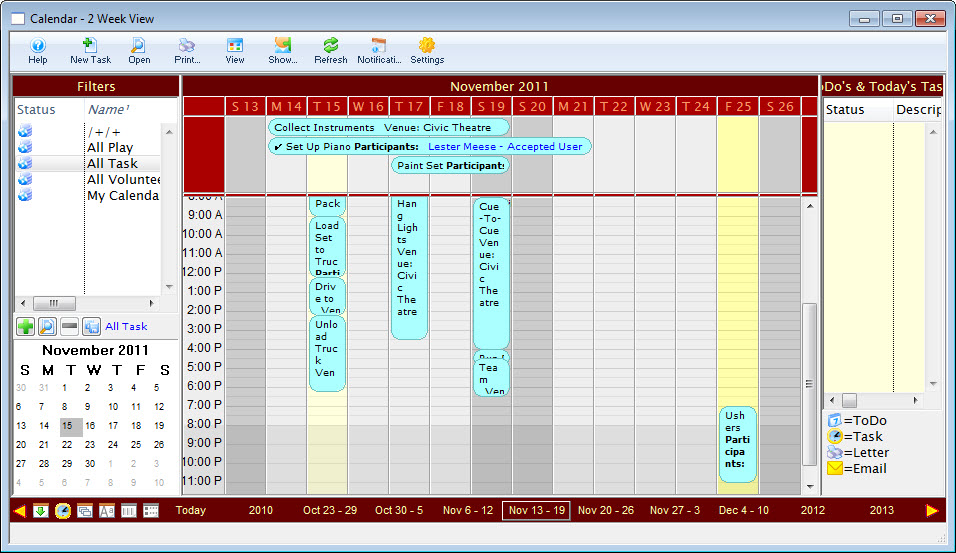
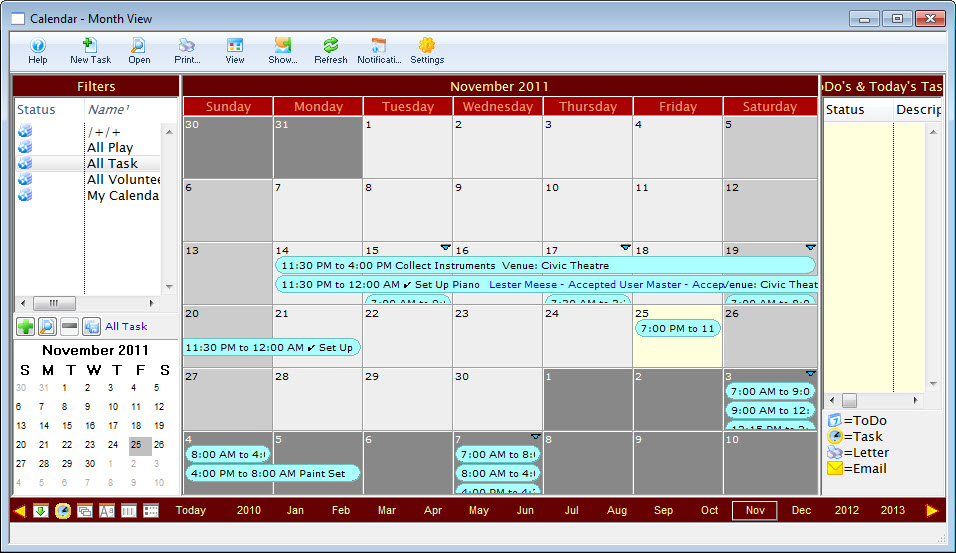
Standard Calendar Views
| Standard Calendar Views | Day View
|
| Week View
| |
| 2 Week View
| |
| 4 Week View
| |
| Month View
| List View | Displays a task listing
|
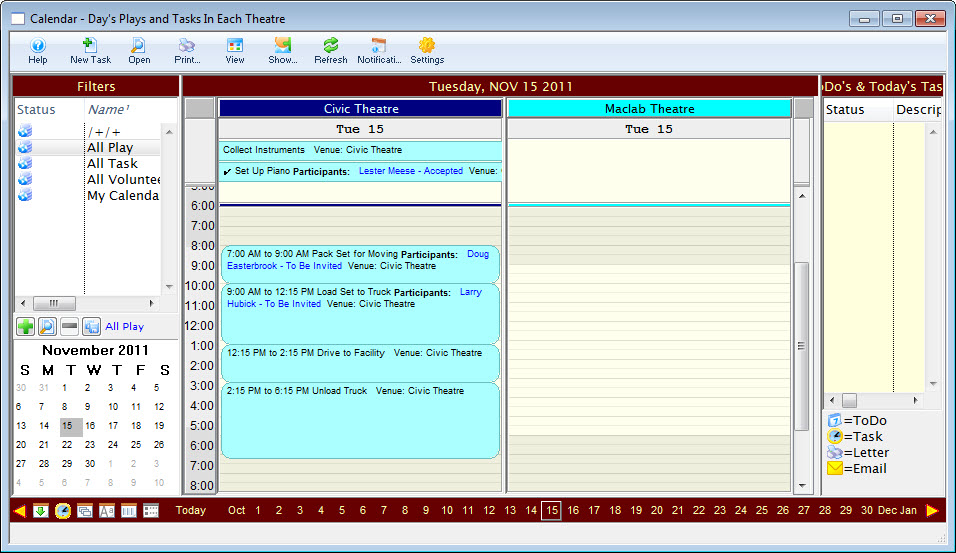
| Facility Management Calendar View | Day's Plays and Tasks in Each Theatre
|
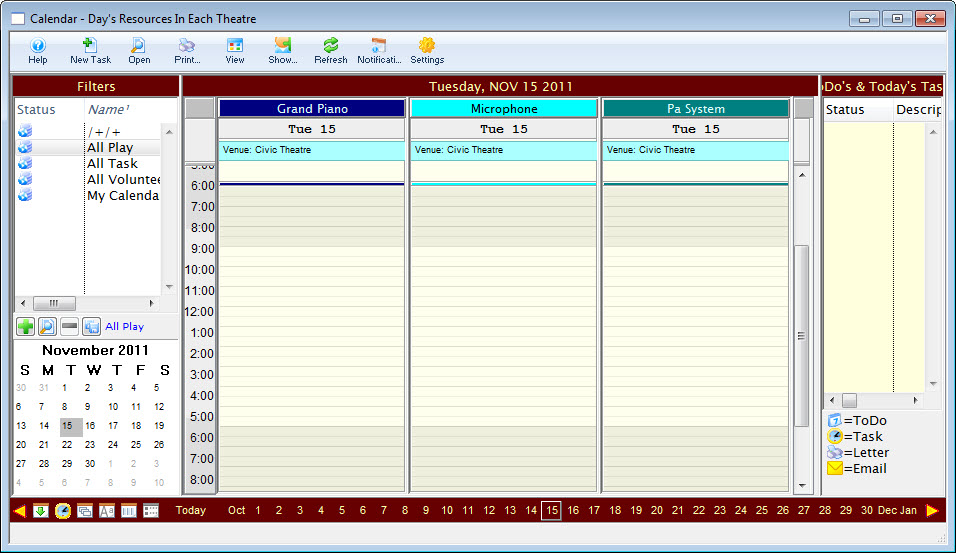
| Day's Resources in Each Theatre
|
|
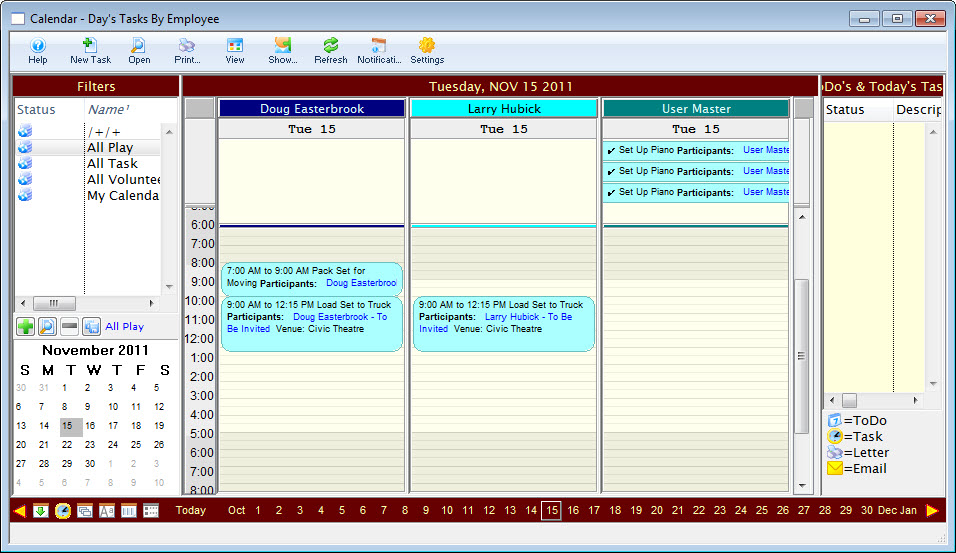
| Day's Tasks by Employee
|
|
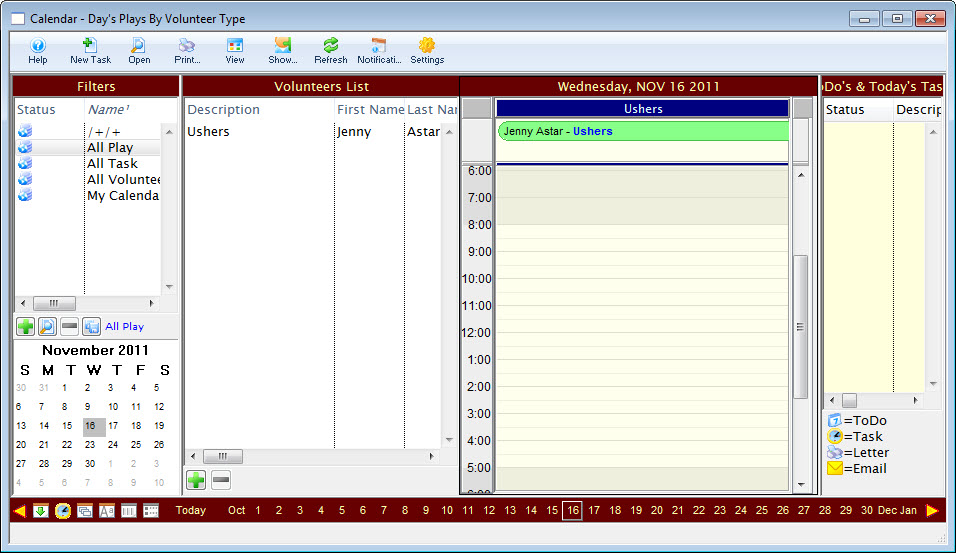
| Day's Plays by Volunteer Type
|


To navigate through the calendars is as simple as clicking a button to change the view. Data carries across calendars and will display if the calendar type supports the task type (for example, a task must have a venue associated with it to appear on a venue calendar).
Other than in Month view, each of the calendars displays the hours down the left side and an All Day portion at the top. Items that are scheduled for all 24 hours of the day, or which overlap from one day to the next will show in the All Day portion at the top.

In each of the views, except Month view, you can click-and-drag in the time range you want to create a task and the Task Detail window will display, with the date and time you selected already filled in. You can also create a new task by right-clicking to bring up the context menu and selecting New Task. In that case, it uses the time you clicked on as both the starting and ending date.
The Calendar Pane
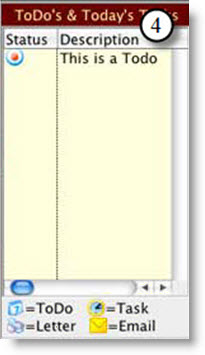
The Calendar pane is in the center of the window and is where most of the data is displayed. It can be viewed as a normal monthly calendar, or in many other views.

In the Calendar pane, you can view:
- Tasks
- Events (performances)
- Volunteer Activities
- Projects
These four types of data are displayed in different colours so you can tell the difference at a glance. You can change these colours, or any other colours in the Calendar window in Preferences. By default:
- Tasks are pastel blue
- Events are pastel pink
- Volunteer Activities are pastel green
- Tasks that are part of a Project are pastel yellow
These colours can be overridden in several ways.
- A specific task can have its colour overridden in the Detail Task window.
- A specific type of task can have its colour overridden in the Facility Task Types window in Code Table setup.
- A specific project can have the colour of all its tasks overridden in the Project Detail window.
- A specific play can have its colour overridden in the Play Detail window.
- A specific project can have the colour of all plays/tasks associated with it overridden in the Theatre Map window.
- Each item in the calendar takes the colour of the lowest level at which a colour is set.
For example, if a project has had its colour overridden but an individual task within that project has also had its colour overridden, the colour of the task is displayed.
Any of the items displayed on the calendar can be viewed in slightly more detail by hovering over the item and viewing the tooltip. Full details can be viewed by double-clicking on the item.
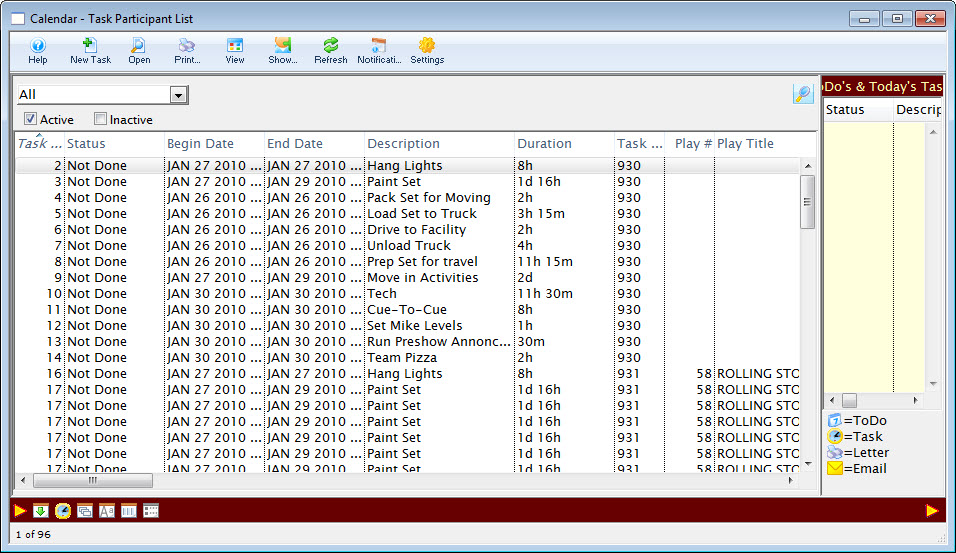
List View
The List view can be selected by clicking on the individual button on the toolbar for List  (Mac) or by clicking on the View
  button (Windows) and selecting List View.
When in List view, the filters are hidden because they are not applicable.
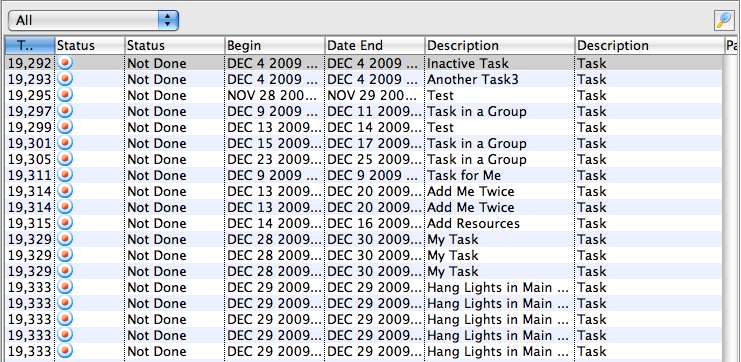
The List View shows tasks from the database like any other list in Theatre Manager. You can select from the dropdown to search for different kinds of tasks.
Once you make a selection from the dropdown, click the search button  to populate the list.
List View
You can also select items in the list and from the context menu add them to a new project, if they are not already part of another project.
Group Calendars
Group calendars provide specific views of the calendar not possible using just the normal calendars. They can also show multiple calendars on the same window.
The group calendars are accessed by clicking on the individual button on the toolbar for the group calendar you want (Mac) or by clicking on the View button (Windows) and selecting the group calendars in the bottom portion of the list.
In most group calendars some of the filters will also apply.
Below we'll go through each window in detail.
Day's Tasks for Me
In the Day's Tasks for Me group calendar, you can see only your Tasks for the selected day.
Day's Tasks for Me
Day's Tasks by Employee
In the Day's Tasks by Employee group calendar, you can see the Tasks for any employee for the selected day.
If you DO NOT specify which employees you want to see in the Filter on the left, the group calendar will display only those employees that have tasks on that day.
If you DO specify which employees you want to see in the Filter on the left, the group calendar will display only those employees you have selected, whether they have tasks associated with them or not.
Day's Tasks by Employee
Day's Events and Tasks in Each Venue
In the Day's Events and Tasks in Each Venue group calendar, you can see the Events and Tasks in each venue for the selected day.
If you DO NOT specify which venues you want to see in the Filter on the left, the group calendar will display only those venues that have events or tasks.
If you DO specify which venues you want to see in the Filter on the left, the group calendar will display only those venues you have selected, whether they have events or tasks associated with them or not.
You can also display only tasks for specific employees by selecting specific employees in the Filter on the left.
Day's Events and Tasks in Each Venue
Day's Resources in Each Venue
In the Day's Resources in Each Venue group calendar, you can see the resources needed in each venue for the selected day.
If you DO NOT specify which venues you want to see in the Filter on the left, the group calendar will display only those venues that have resources needed on that day.
If you DO specify which venues you want to see in the Filter on the left, the group calendar will display only those venues you have selected, whether they have resources associated with them or not.
Day's Resources in Each Venue
Day's Events by Volunteer Type
The Day's Events by Volunteer Type group calendar is a special kind of calendar. It displays the events for a day and the volunteers associated with that event, by volunteer type. For more information on volunteer management in Theatre Manager, click here .
This group calendar has 2 parts: the list of volunteers for this day on the left, and the individual columns for each volunteer type on the right.
Day's Events by Volunteer Type
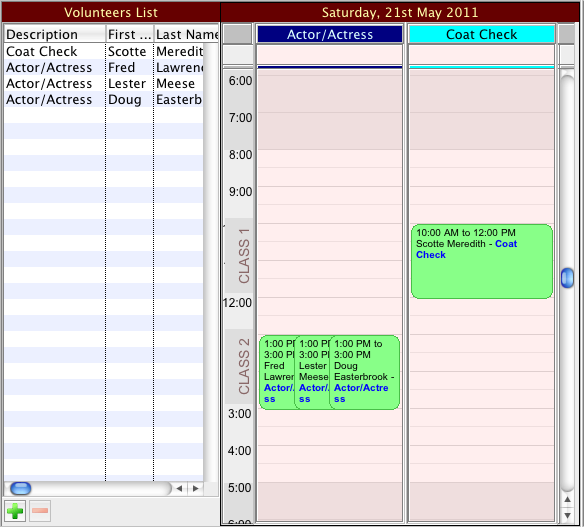
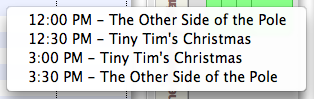
When this window first opens, if there are any volunteers assigned to work on that day, they will be filled into the list of volunteers and a calendar will be created for each volunteer type that has been assigned. On the calendar, overlayed on the time area, the performances on that day are indicated. The time for the performance is indicated by a darker band in the time area. If there are multiple performances in a day, or if the titles of the play are long, there may be some overlap of the text.
If there are no volunteers assigned, the list will be empty and there will be an empty calendar with no volunteer activity type description at the top.
If you DO NOT specify which volunteer activity types you want to see in the Filter on the left, the group calendar will display only those volunteer activity types that have volunteers assigned.
If you DO specify which volunteer activity types you want to see in the Filter on the left, the group calendar will display only those volunteer activity types you have selected, whether they have volunteers assigned to them or not.
This window can be used to schedule volunteers very easily.
To schedule volunteers, click on the Plus button  under the list. This brings up a list from which we can select volunteers. Select Volunteer Code # from the filter dropdown and select the type of volunteer you want to schedule.

You can now drag volunteers of that type into the list or the calendar. In order to make volunteer scheduling as easy as possible, the window will help you through the scheduling.
If you drag a volunteer onto the list, it first asks which performance this position is for (if there is more than one).
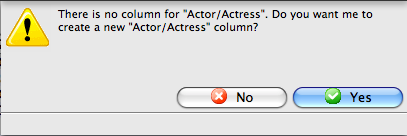
Next, it checks to see if this volunteer activity type is already one of the calendars in the window. If it is, it adds the volunteer to both the list and to that column. If it is not, it asks if you want to add the new column, or if perhaps you dragged this in inadvertently.
When dragging to the list, the time for the volunteer activity is assigned to be the same as the time spread of the performance
You can also drag the volunteer to a specific column at a specific time. This sets the starting time for the volunteer activity to the time you selected. The ending time is set based on the length of the play or event.
You can change these times later by moving the item on the calendar, or by dragging on its borders to change the length of the activity.
If you should drop a volunteer on a calendar where the activity does not match the type you are dragging, it will ask whether it should put it into the correct column (if one exists) or create a new column (if it does not already exist). If you say No, no record is created.
When you click on any line in the list, the appropriate volunteer activity is also selected in the appropriate calendar. If you click on a volunteer activity in any of the calendar lines, the appropriate volunteer in the list is also selected.
To remove a volunteer, select it in the list and click on the Minus button  .
.
Calendar Pane Features
Adding Items to the Calendar
Items can be added to the calendar in a number of ways.
In any calendar except Month view and the Volunteer Scheduling calendar, you can create a new task by dragging across the time period where you want the task. A task detail window will pop up with your date/time filled in. Depending on which calendar you are doing this in, other fields may be filled in as well.
Items from lists can also be dropped on a calendar when appropriate. Dropping a volunteer onto an empty area of the calendar will create a volunteer history record starting with that time. Dropping a volunteer onto a task will associate the volunteer with that task and use the task starting/ending times as a starting point. Dropping a volunteer onto another volunteer record will ask if you want to replace the volunteer or create a duplicate record using this volunteer; if it is a placeholder volunteer, it will be replaced with the volunteer you dropped. Patrons or employees can also be dropped onto tasks to add them as participants.
You can bring up a list of volunteers, employees, or patrons by clicking on the Show button at the top of the calendar.
Editing a Task
A task or volunteer activity length can be changed in any view except Month view by moving the cursor to the top or bottom of the task or volunteer activity. The cursor will change to a double-headed arrow and you can drag the starting or ending time to whatever you want.
You can also double-click on the item in the calendar and edit the dates and times (or any other information for the task or volunteer activity) by hand. When you save the task or volunteer activity, the calendar is updated.
Moving a Task
A task or volunteer activity can be moved from one day to another or from one time to another by clicking on the task and dragging to the new location on the calendar. Depending on which view the calendar is in, you may get different visual feedback.
Tasks or volunteer activity can also be altered by dragging on the beginning or ending edge of the item in the calendar.
You can also double-click on the item in the calendar and edit the dates and times by hand. When you save the task or volunteer activity the calendar is updated.
You cannot change performances within the calendar. This must be done within the Events Setup window (Setup >> Events) of Theatre Manager, where other controls are in place.
A task or volunteer activity can also be moved to the All Day portion of the window at the top. This will set the starting time to midnight on that date and the ending time to 11:59 PM.
The calendar will not allow you to drag a task or volunteer activity when it is not appropriate. This may be due to permissions, whether you are the owner (or designated editor) for the task, whether the task is in a project and has dependencies, or due to a number of other factors.
Calendar Window
The calendar window displays a lot of data in a limited amount of space and has powerful filtering features that make it "Command Central" for managing and viewing tasks, performances, volunteer activities and projects.
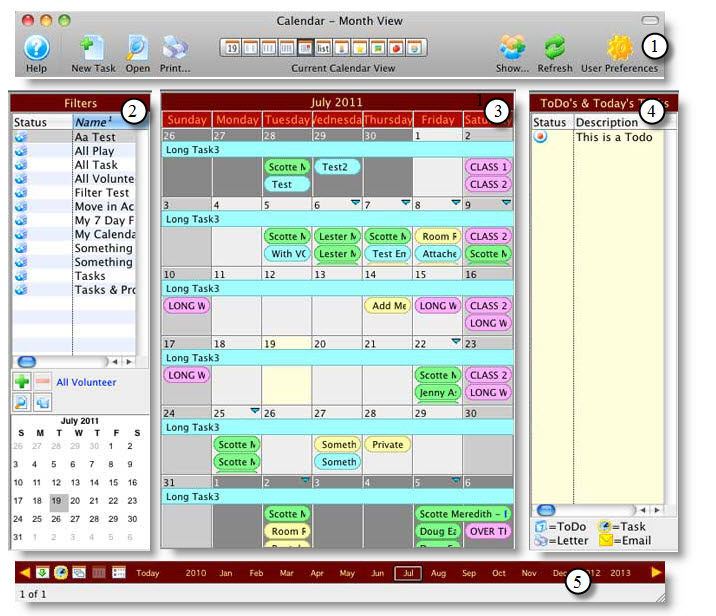
The calendar window consists of:
| 1 | The Calendar Toolbar / Ribbon Bar at the top of the window and
contains the basic functions available in all views.
Click here for a detailled description and its functions. |
| 2 | 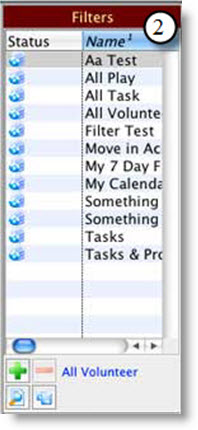 The Filter Pane is on the left side of the window and can be used to show
only certain information on the calendar pane. Filters are stored in the
database and are used to select and display only a portion of the tasks,
performances, volunteer activity and/or projects. The Filter Pane is on the left side of the window and can be used to show
only certain information on the calendar pane. Filters are stored in the
database and are used to select and display only a portion of the tasks,
performances, volunteer activity and/or projects.
Click here, for more information on setting up, editing and removing filters. |
| 3 |
The Calendar Pane is in the center of the window and is where most of the data is displayed. It can be viewed as a normal monthly calendar, or in many other views.
Click here for more information on the different Calendars. |
| 4 |
 The ToDo Pane defaults to the right side of the window, although you can set a preference to display it on the left side instead. It displays a list of today's tasks, ToDo's that are upcoming and past due, and a "Today" view that always shows an hourly breakdown of tasks, regardless of what view the Calendar pane is currently displaying. Click here for more information on To Dos. |
| 5 |
The Navigation and Settings Tool Bar The display automatically changes depending if the Month, Week or Day view has been selected in the Calendar Toolbar. However, you can navigate through the Months, Days and Hours by clicking on the desired Month, Day or Hour.
Click here for more information on the Navigation and Settings. |


Calendar Toolbar / Ribbon Bar
The Calendar is central to taks and Facility Management. The Calendar can be opened in the following two ways:
- By clicking the Calendar
 button in the Theatre Manager ribbon bar.
or
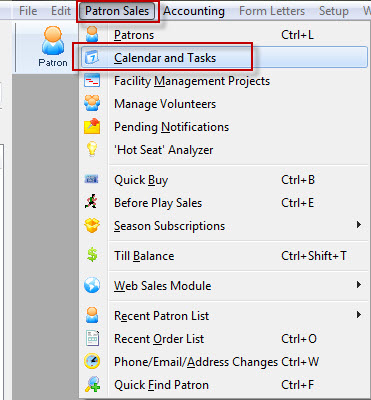
- Use the Patron Sales menu and clicking on Calendars and Tasks.

PC Toolbar / Ribbon bar

MAC Toolbar / Ribbon bar
Functions
Click on a link to learn more about the features.
|
|
Opens the Help file for Calendar. Click here to view the Help page. |
|
|
Creates a new task. Click here for more information on Createing a New Task. |
|
|
Opens a selected calendar item to edit. |
|
|
Prints the selected calendar and criteria. Click here for more information on printing calendars. |
|
|
Changes the Calendar View. These can be selected by clicking on the individual button on the ribbon bar for that view |
|
|
Displays a popup menu where you can select the list you wish to display: Volunteers, Employees, or Patrons. This allows you to drag and drop into the appropriate places on the calendar. |
|
|
Refreshes the window with the current filters. This may be used if someone else has entered tasks that you want to see. |
|
|
Opens the Preferences window to change calendar colors and options. Click here for more information on preferences. |


Printing Calendars
Currently, only the 5 main views of the calendar can be printed. The groups calendars will be printable in the future.
Single Calendar Report
Any of the standard calendar views can be printed: Daily, Weekly, 2 Weekly, 4 Weekly, and Monthly.
When you print, you have a few options to format the calendar.
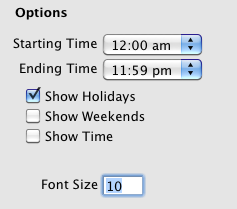
You can selecting the starting and ending time to show on the calendar. If nothing is showing before noon, for example, there is probably no need to display the calendar before noon.
Show Holidays displays holidays on the calendar. Show Weekends shows Saturday and Sunday in a darker colour. Show Time shows the starting/ending time on the various calendar items. Font Size gives you an opportunity to increase or decrease the size of the font that is used in the report.
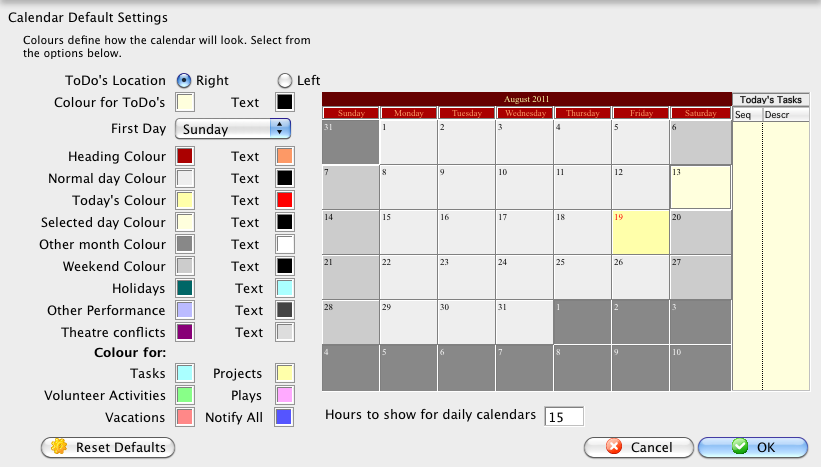
Calendar Preferences
The Preferences  button in the Calendar toolbar gives you access to the customizable features of the calendar. The Calendar Preferences window gives you the option to change any of the colours of the different parts of the calendar, as well as the colour to use to display the tasks, events, volunteer activities, and projects.
You can also select the default first day of week  and the location of the ToDo pane
  .
.
The colors change on the preferences window so you get immediate feedback on how your selections will look.
Employee Preferences also effect the ability to edit Calendar items. There you can delgate people who can edit your tasks. Click here for more information on the Emplyee Preferences Facilities tab.
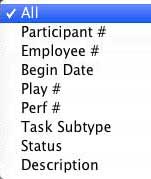
The Filter Pane
Filters are a key part of the calendar.
- You decide what data you want to see on your calendars, that is, you do not see data that does not match the filter.
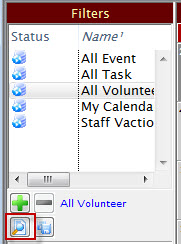
- There are a standard 4 filters available to all users. These show the maximum amount of data.
- You can change the filter you are using to show you what you need to know.
- You can customize filters for specific positions or staff, that way they don't see data they don't need.
- The starting filter can be customized.
- All Plays
- All Tasks
- All Volunteers
- My Calendar
- Click the Add icon to create a new filter. Click here to learn more about creating a filter.
- Click the Delete icon to delete a filter.
- Click the Edit icon to modify a filter. Click here to learn how to edit an exisiting filter.
- Click the Save Current icon to save the current view and filter as a new filter. This is most often used if you have opened this window from within a Project (or other area where this feature is available) to display all it's tasks in a new calendar. The current view and filter are saved to a new filter.
For example: You only want to see what is happening in the venue. You don't care about who owns it or what needs to be done. You weant to start with the Month, Week or Day view. These custiomizations are just an appearnace. You can view any or all just by changing your filter. Remember the Rubic's Cube®.
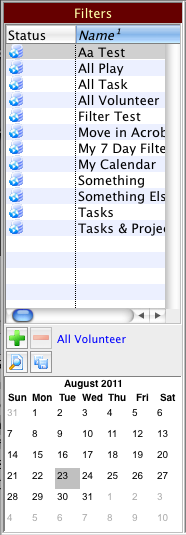 |
The Filter pane is on the left side of the Calendar window and allows you to quickly and easily subset your data by selecting a filter. You can select which data to see and which data not to see.
A filter allows you to select which tasks, performances, volunteer activities, and projects to display. It also allows you to select the visual display for the calendar, such as the view, and whether certain calendar features display or not. All these are stored in the filter. You are able to create an unlimited number of different filtures based on your own specific requirements. When you initially open the calendar window, whatever filter was last selected when the window was closed is restored when the window is reopened. Theatre Manager has 4 standard default filters that cannot be deleted or modified. They are the only filters available to someone without the Facility Management module. If you do not have the Facility Management module, you cannot create any new filters. The 4 standard filters are: |
 |
The filter pane has 4 buttons: Add, Delete, Edit and Save Current.
|
Adding a New Filter
Calendar filters are used to describe how you want a particular calendar to look and the data you want to inlude in the calendar. To add a new filter, you perform the following steps:
- Click the Add
 button, or select Add
  from the right click context menu.
The Edit Filter: (inserting) window opens.

- Enter a Filter Name. Filter Name is a mandatory field.
This is the name of the filter that appears in the filter list.
- Enter a Description. The Description is a mandatory field.
Enter a description that describes in a few words what the filter does. This way others will not create the same filter. You can also choose via the Public Filter checkbox if others can view and use the filter. If you disable the checkbox, the filter will not appear in others' filter lists.
- Only the Filter Owner or Administrators can edit a filter. If you want others to edit it as well, remove the owner; then anyone can edit it.
You can set up the various pieces of the filter in the tabs on the window: Views, Tasks, Theatres, Volunteer Activities, Projects, Plays, and Query (currently unused). The Publish tab lets you set up the filter to be manually (and in the future, automatically) published as a shared calendar to the Internet.
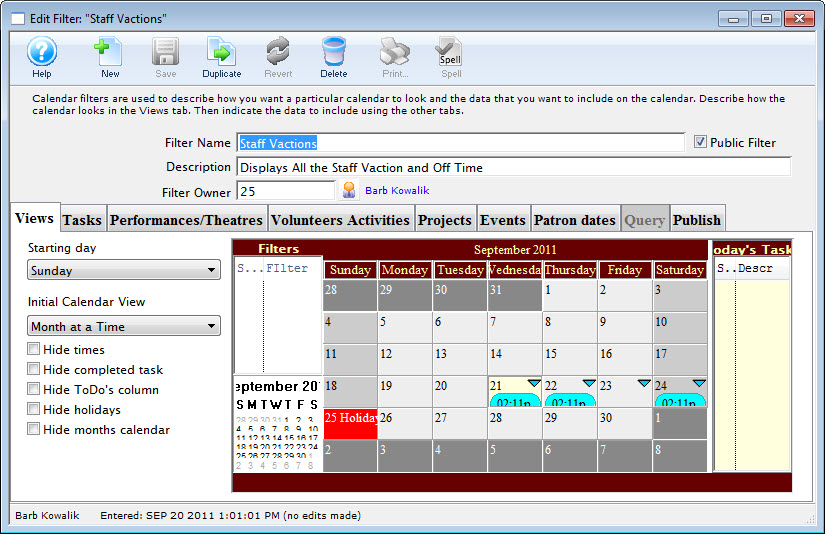
Views Tab

The Views tab is used to select options for the visual display of the various items on the list.
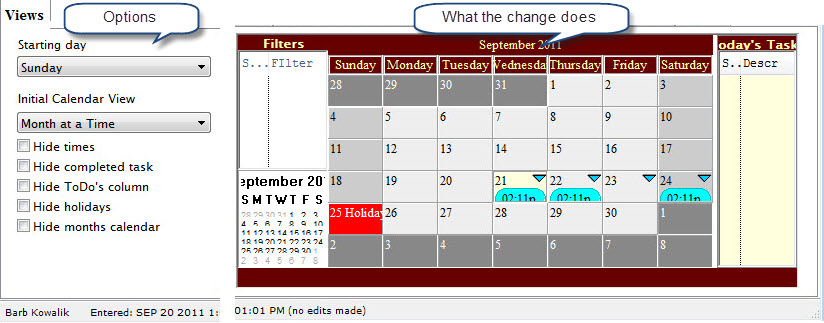
As you make changes to on the Views tab, the mini-calendar on the window changes so you can see what the effects of the changes will be.
Parts of the Views Tab
| Starting Day | 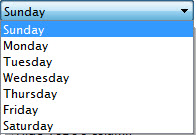 The dropdown list lets you select the starting day for the week. Sunday is the default.
 |
| Initial Calendar View | 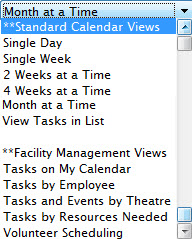 Determines the initial view of the calendar. You can select between typical calendar views and group views that may show more than one calendar column at a time. Determines the initial view of the calendar. You can select between typical calendar views and group views that may show more than one calendar column at a time.
|
| Check Boxes | Hide times - determines if the times will show on the individual calendar items. |
| Hide completed tasks - hides any tasks whose Status is "Done" or "Cancelled". | |
| Hide ToDo's column - hides the Today's Tasks and ToDo's column on the right of the calendar. | |
| Hide holidays - Hides holidays. | |
| Hide month calendar - hides the month calendar in the bottom left of the calendar. |
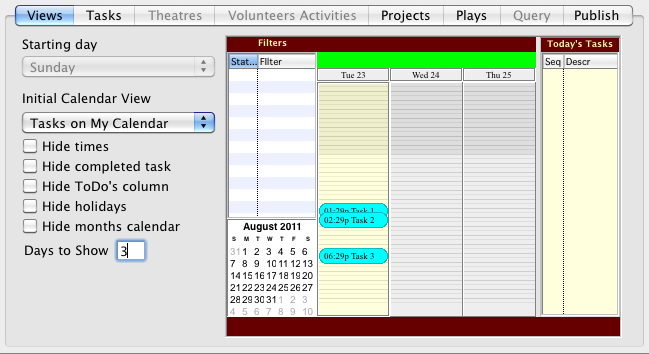
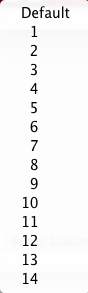
If you have selected an appropriate group calendar, Days to Show will display, enabling you to show more than one day at a time for each calendar column, as you can see in this example:
Tasks Tab

The Tasks tab is used to select whether tasks display for the filter and which ones.
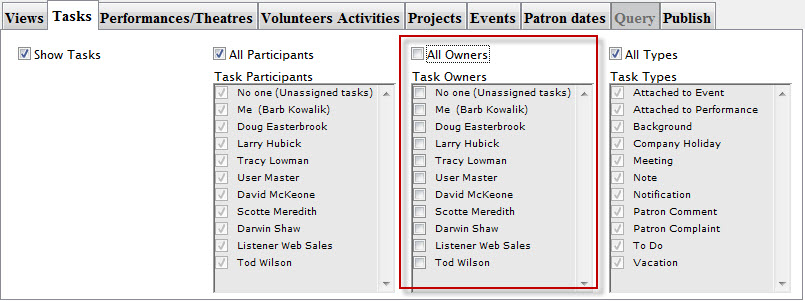
If Show Tasks is selected, tasks will be displayed on the calendar. By default, All Participants, All Owners, and All Types are shown.
If you turn off All Participants, you will be able to select individual task participants (employees only) to show. You also have the special options of "No one", meaning tasks that have no one assigned to them, and "Me", which will show the tasks of whomever you are logged in as.
If you turn off All Owners, (as in the above image) you will be able to select only tasks owned by particular employees. You also have the special options of "No one", meaning tasks that are owned by no one, and "Me", which will show the tasks of owned by whomever you are logged in as.
If you turn off All Tasks, you will be able to select only tasks of certain types that you wish to see.
Performance/Theatres Tab

You use the Performances/Theatres tab to select the venues to display for the filter.
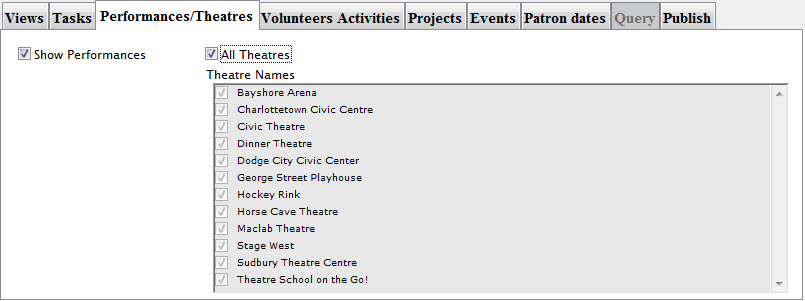
If Show Performances is selected, performances will be displayed on the calendar. By default, All Theatres are shown.
If you turn off All Theatres, you will be able to select individual theatres or venues to display.
Volunteer Activities Tab

The Volunteer Activities tab is used to select whether volunteer activities display for the filter and which ones.
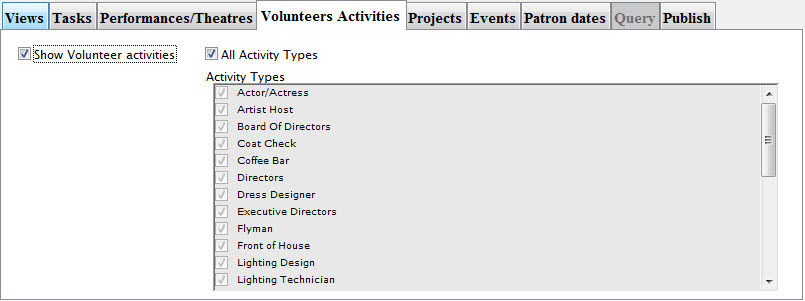
If Show Volunteer activities is selected, volunteer activities will be displayed on the calendar. By default, All Activity Types are shown.
If you turn off All Activity Types, you will be able to select individual activity types to display.
Projects Tab

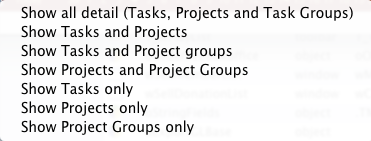
The Projects tab is used to select whether projects display differently for the filter and which ones.
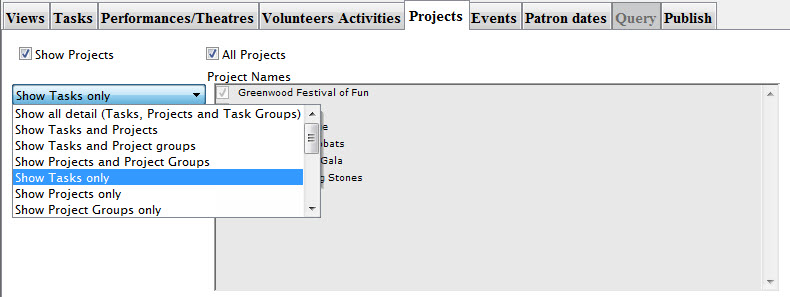
If Show Projects is selected, project tasks will be displayed on the calendar using their default project colour instead of the task colour. By default, All Projects are shown.
Turning off All Projects, you can select individual projects, so that only their tasks are displayed.
|
If you had only selected the Tasks checkbox you would have seen these project tasks as well. When you select Projects, it shows the projects tasks using your default colour (usually yellow), while the non-Project tasks remain in the task default colour (usually blue). |
You can also determine the level of detail to show for projects, such as whether the project record or the group records display. The default is for only the tasks that are part of the project to show.

Events / Plays Tab

The Events / Plays tab is an additional filter that can be applied on top of the others. It is used to select whether only tasks, performances, volunteer activities, or projects attached to particular plays/events will be seen in the calendar.
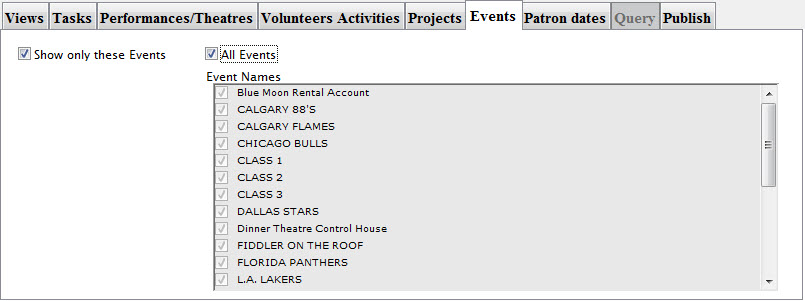
If Show only these Plays is selected, then the additional filtering is applied. By default, All Plays are shown.
If you turn off All Plays, you will be able to select individual plays/events so that only calendar items attached to those plays/events are displayed.
Patron Dates Tab

The Patron Dates tab is used to select whether birthdays, anniversaries and spouse birthdays display on the calendar.
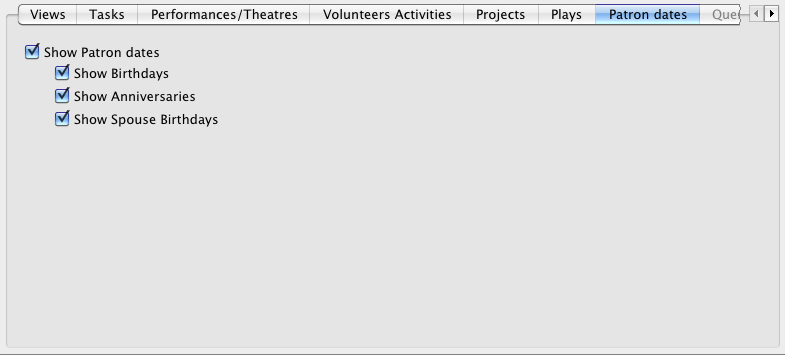
If Show Patron dates is selected, you can choose whether to show birthdays, anniversaries and/or spouse birthdays on the calendar.
Click here for more information on these fields in Patron Data.
|
If the date is on February 29 and the current year is not a leap year, it is shown on February 28 instead. |
Query Tab
The Query tab is unavailable at this time.
Publish tab

You use the Publish tab to upload a shared calendar file to the internet.
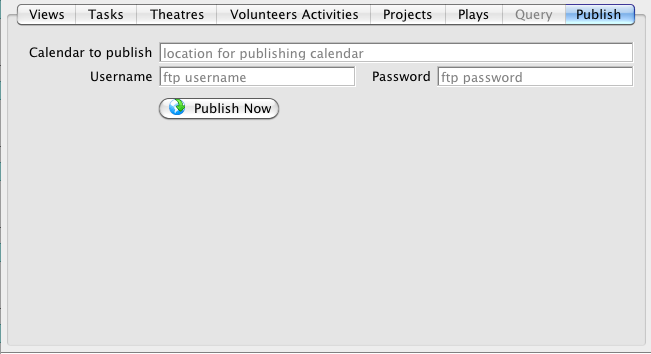
To publish a calendar, you perform the following steps:
- In the Calendar to Publish entry box, enter the web location of the calendar.
The format will resemble:
www.example.com/calendars/public/MyEventsCalendar.ics

This does not have to be any special calendar location, it just needs to be a location where a file can be FTP'd to.
- Enter the Username for the ftp account.
- Enter the Password for the ftp account.
- Click the Publish Now

You will be asked to enter a starting and ending date. All items on the calendar that match the filter criteria and between the starting and ending dates will be packaged up into an industry-standard iCalendar file (.ICS extension) and FTP'd to the location on the web.
If the starting date is omitted, all calendar items into infinity past will be included. If the ending date is omitted, all calendar items into infinity future will be included.
The resulting calendar can be subscribed to from iCal or Outlook by entering the file location in these programs. Or you can supply a link to the calendar in the form:
webcal://www.example.com/calendars.public/MyEventsCalendar.ics
Clicking on the link will open their calendar program and ask if they want to subscribe to the calendar.
This feature can be used to publish a calendar of all performances for the season to your website. Patrons can subscribe to the feed and when you re-publish in the future with new performances, their calendar will be updated with the new performances as well.
It can also be used to publish work schedules for people. If they are subscribed they will also get all the changes in their personal calendars.
|
The subscribers to these calendars DO NOT have to have a copy of Theatre Manager for this to work. |
Editing an Existing Filter
Calendar filters are used to describe how you want a particular calendar to look and the data you want to inlude in the calendar. To edit an existing filter, you perform the following steps:
- In the Filter pane of the Calendar window, highlight the filter you wish to edit.
- Click the Edit
 button, or select Open
  from the right click context menu.
The Edit Filter: "Fliter Name" window opens.
You can now change the filter.
You can also change the various pieces of the filter in the tabs on the window: Views, Tasks, Theatres, Volunteer Activities, Projects, Plays, and Query (currently unused). The Publish tab lets you set up the filter to be manually (and in the future, automatically) published as a shared calendar to the Internet.
Filter Context Menu
To open the context menu, right click when your mouse is in the Filter Pane. The following flyout opens.
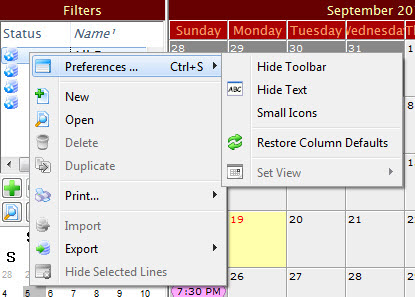
Parts of the Filter Context Menu
| Preferences | Hide Toolbar / Show Toolbar - Toggles between displaying and hiding the Calendar window toolbar.
Hide Text / Show Text - Toggles between showing and hiding the text underneth the icons in the Calendar window toolbar. Small Icons / Normal Icons - Toggles between showing large or small icons in the Calendar window toolbar Restore Column Defaults - If you have moved or changed the width of any colmns in the Filter display, this selection restores them to the default. Set View - Not available in this window. |
| New | Opens the Edit Filter window. Click her for more information. |
| Open | Opens the selected filter for editing. |
| Delete | Deletes the selected filter. You cannot delete the 4 basic filters. |
| Duplicate | Duplicates the selected filter. You cannot duplicate the 4 basic filters. |
| Prints the list of filters as shown. | |
| Import | Not available in this window. |
| Export |
Exports the selected filter in the following formats:
|
Filter Pane Features
The last item in the filter pane is the calendar selector. It provides an easy way to select a date and update the calendar.
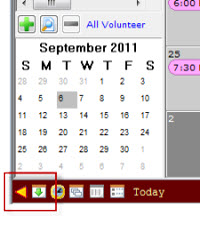
The purpose of this calendar is to to display the current month. This allows you to see the context of where you are, especially helpful when viewing the group or daily calendars.
Additionally, you can change the date by clicking on the date you want.
If there is no calendar pane showing at the bottom of the Filter pane You can show or hide the calendar by using the toggle buttons.
 Click to close the Filter Pane. Click to close the Filter Pane. |
 Click to open the Filter Pane. Click to open the Filter Pane. |
 Click to close the filter Calendar Click to close the filter Calendar |
 Click to open the filter Calendar. Click to open the filter Calendar. |
You can also adjust the size of the panes in the Filter pane by dragging the borders of the different sections, similar to how you can in other Theatre Manager windows.

There is a handle between the main calendar and the Filters portions of the window.
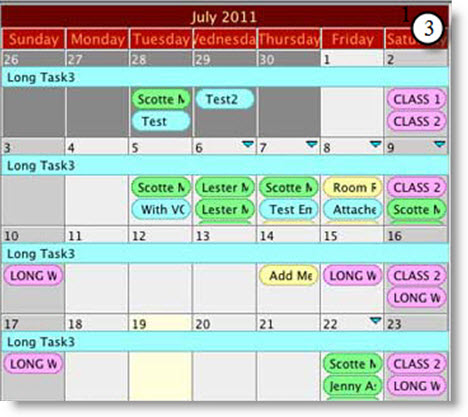
Today's Tasks and ToDo's Pane
The Today's Tasks and ToDo's pane displays any tasks for today and any ToDo's that have not been marked as Done.
ToDo's are items, such as grant proposals, that do not need to be done on a certain date, but instead have a deadline by which they must be completed.

Right-click and select New to create a new ToDo.
Click to close the ToDo Pane. |
Click to open the ToDo Pane. |
You can also adjust the size of the ToDo pane by dragging the borders of the different sections, similar to how you can in other Theatre Manager windows.
There is a handle between the main Calendar and the ToDo portions of the window. This size will become the default for the window the next time it is opened.
Navigation and Settings Toolbar
At the bottom on the calendar is the navigation and settings toolbar. It is context based on the selected calendar view.
The display automatically changes depending if the Month, Week or Day view has been selected in the Calendar Toolbar. However, you can navigate through the Months, Days and Hours by clicking on the desired Month, Day or Hour.

|
You cannot change the view in the Navigation and Settings Toolbar, it auto changes depending on the view selected in the Calendar Toolbar. |
Month
Week

Day

Navigation Buttons
Left to Right
|
Click to close the Filter Pane. Click to open the Filter Pane. |
|
Click to close the filter Calendar Click to open the filter Calendar. |
 |
Hides or displays the starting/ending times on the items in the calendar. |
 |
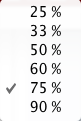
Indicates the overlap percentage of items sharing the same date/time on the calendar.
|
 |
You use this button to indicate the number of days to see at a time in the group calendars.
|
 |
You use this button to indicate the level of detail to see when displaying calendars that include project tasks.
|
|
Click to close the ToDo Pane. Click to open the ToDo Pane. |
Calendar Context Menu
The Calendar may display a different context menu, depending on which view is showing. Options in the menu may be disabled if they are not available in the current context, or if your security profile does not allow for it. For example, if you have not selected a calendar item, the Open option is not available.
Functions
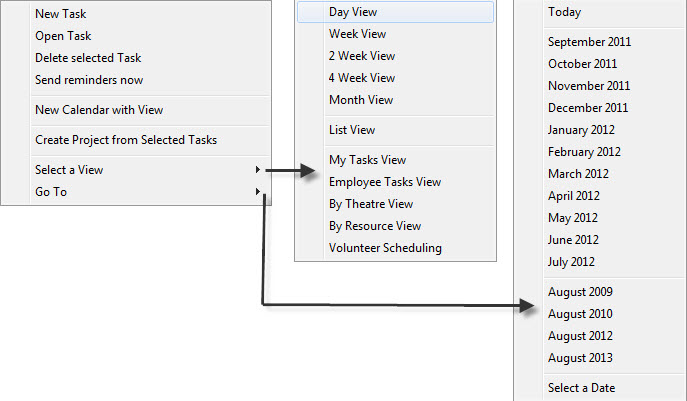
| New Task | Opens the Task Detail window where you can create a new task. |
| Open Task | Opens the selected task in the task detail window. You can also double-click on any item to open it in its proper window. |
| Delete Selected Task | Deletes the selected task. |
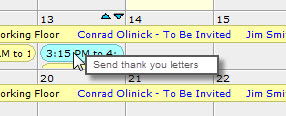
| Send reminders now | Sends task reminders out for the selected task. |
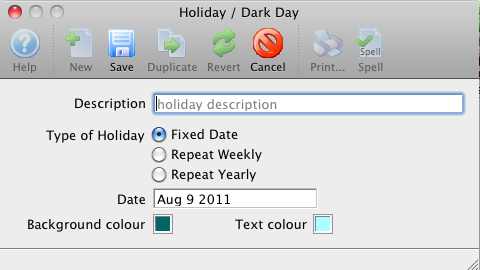
| New Holiday | Creates a new holiday for the selected day.
The description and date are required. You can indicate whether this has a fixed date (is only displayed once), is repeated weekly on the same day (i.e., dark days), or is repeated yearly (i.e., Christmas). You can also indicate a background colour to colour the entire day and the text colour to use. These default to the default calendar settings. Open Holiday will open the detail holiday window where you can edit the holiday details. If there is more than one on the given day, a popup menu asks which you wish to edit. Delete Holiday will delete holiday on the selected day. If there is more than one on the given day, a popup menu asks which you wish to delete. |
| New Calendar with View | Opens a new calendar with the view and options currently selected for this calendar. |
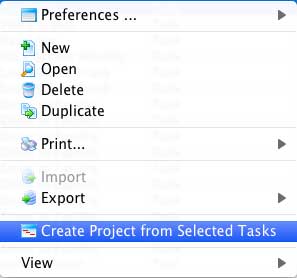
| Create Project from Selected Tasks | Create a new project using the tasks you have selected on the calendar. Hold down the Command or Ctrl key to select multiple tasks. | Select a View | Displays a popup menu to change to a new view. It is no different than selecting the view from the toolbar at the top of the calendar. |
| Go To | Displays a popup menu to select a date based on the most likely ones for your current context. You can also choose Select a date to popup a calendar from which to select a date. |
Group Calendar Context Menu
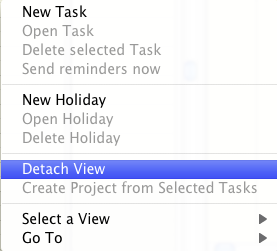
The group calendar context menu has an additional item called Detach View. If there are multiple calendar columns in the group calendar, it will detach that column into a new calendar and remove it from the original calendar. If there is only a single calendar column the effect is to just open a duplicate calendar.
Volunteer Scheduling Context Menu
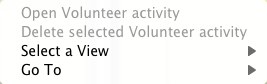
The volunteer scheduling context menu is a slimmed down view of the other context menus. You can only open the selected volunteer activity, delete the selected volunteer activity, change the view or go to a different date.
Rubik's Cube View of the Calendar
Just like any other electronic calendar, you can set up appointments and meetings. But now you can move the calendar task around in different views and perspectives.
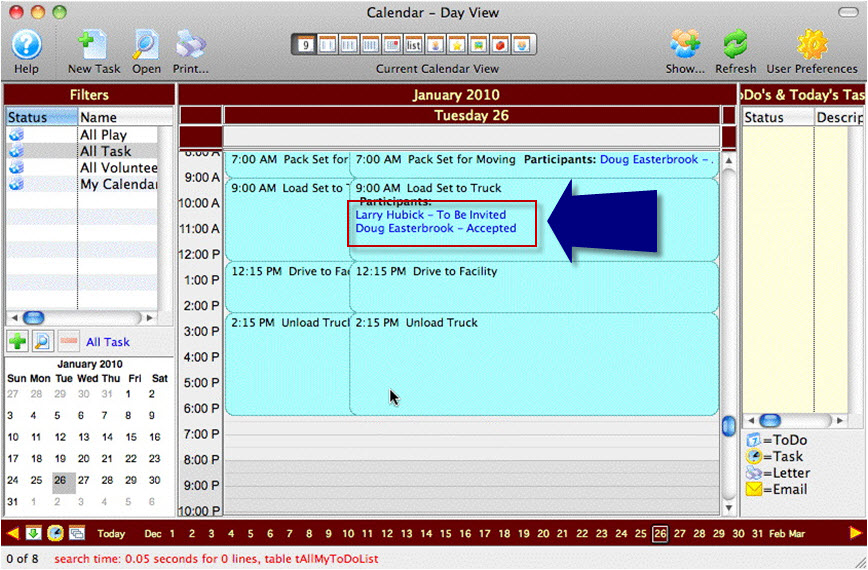
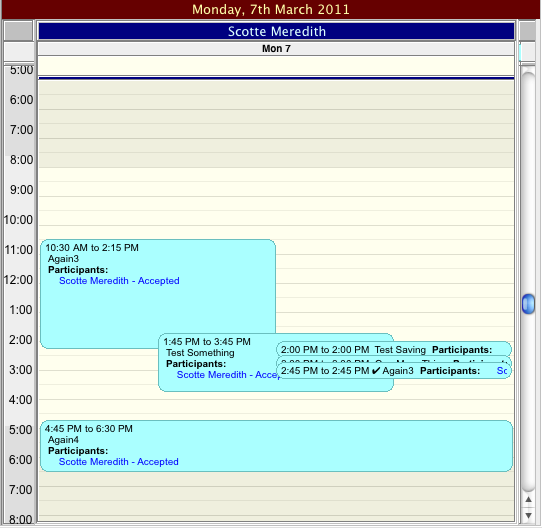
You open the day view and see this calendar item has participants.
- Doug has accepted the task to Load Truck.
- Lary has not yet accepted.
Larry may be internal to the organization or he may not. As long as he is a patron in the Theatre Manager database, he can be invited to participate. When you set him up in the database, you can flag them as having accepted or you can send them an email everytime you send a task notice. Click here, for more information.
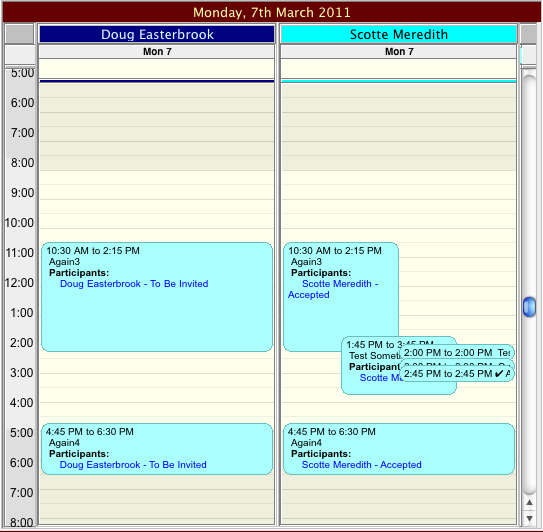
Next you want to see what is haoppening in your venues, you choose Day's Plays and Tasks in Each Theatre. Once again it looks like a daily calendar.
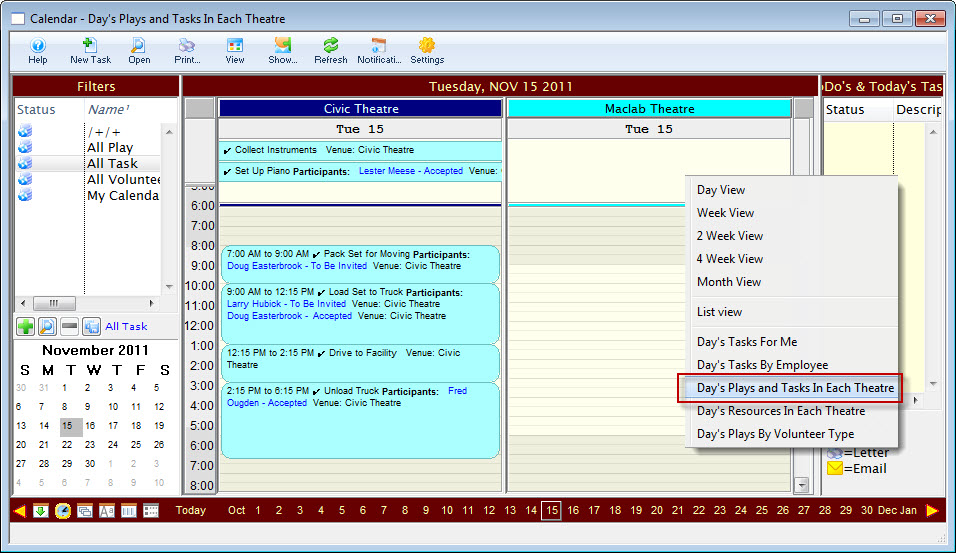
In this view, you can see the different venues you are responsible for and the tasks that take place in each venue. This means you can associate a task to a venue. How many venues can show?
Multiple venues can show across the screen depending on your filter that you define in the view. Each day you can see what is happeing in each venue.
Now you want to see what everybody is doing that day. Where is Doug? What is Larry up to? What time can you expect Fred? You choose the Day's Tasks by Employee view.
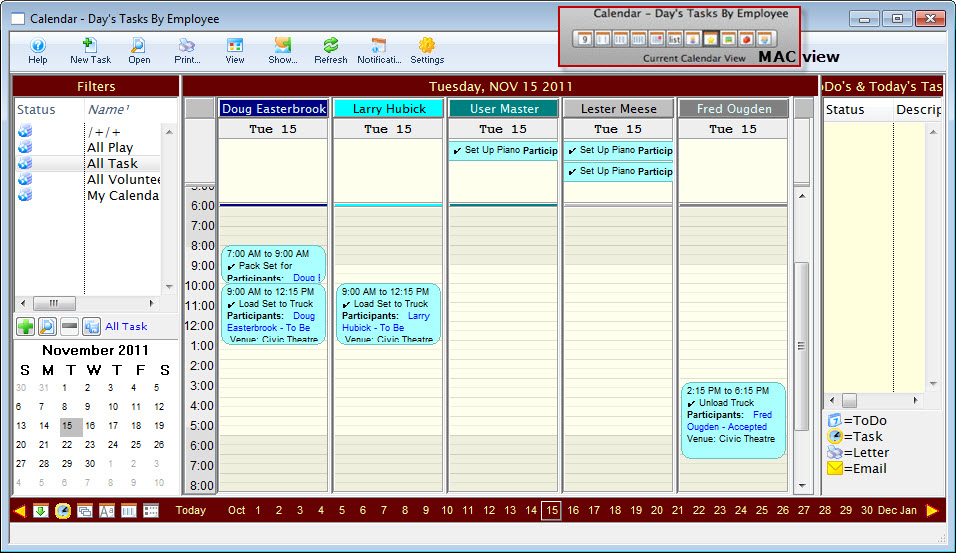
In this view you can see what everybody is supposed to be doing. You did not have to create the the calendar or put it in their calendar, all you had to do was create the calendar event/task and indicate these people are doing it and it is at this venue. One entry seen many different ways.
You can set up these items, even for people who do not have access to Theatre Manager. For example, your ushers. You can plan and schedule other people using this tool, even if they do not work for you.
You use the Volunteer Module. Click here for more information on Volunteer Management.
The trick will be to make this work within your existing work flow. You know you need to do stuff. If you have a group of people (say 20) but only need 4, you may still need to do an email blast out to all 20, but then only update the calendar with the 4 people who ended up being assigned the task. (the best 4, or the first 4… it depends) This is a choice of work flow design. Its not a software decision, rather a human decision.
With that in mind, there is a facility in TM that allows you to say I need 4 ushers (un-named), 1 electrician, 1 costume designer, 3 sound techs, 1 bar caption, 2 front of house for this event/project. So when I am duplicating a project for another event, it still carries across the requirements (ushers, electrician, designers, techs) that you can go back and assign as you know them or as people confirm that they are willing to take on that role.
Integrating Tasks and Calendars
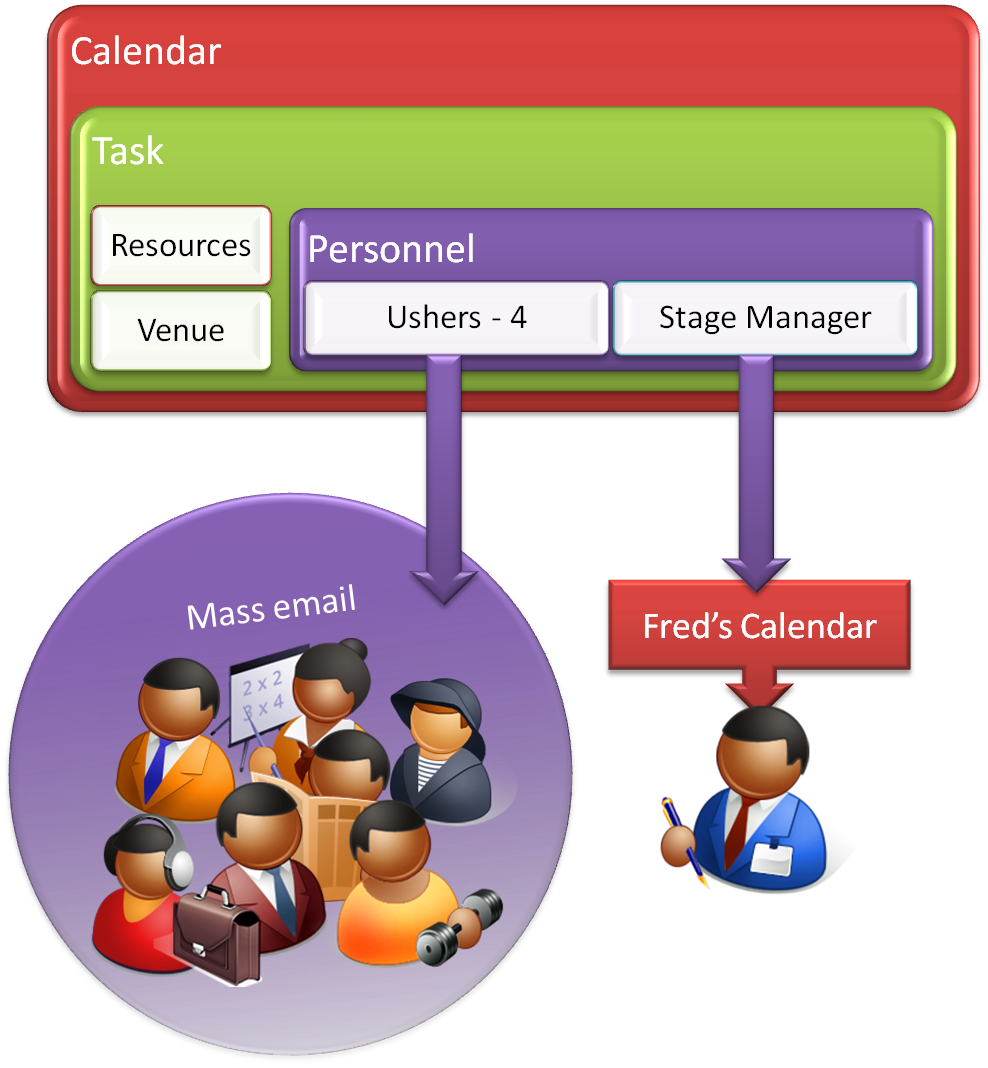
The key for optimizing the calendar is the task – everything centers around what you do on this window. Its much like Market Circle’s Daylite, Outlook or iCal – except it does much more and spreads the integration outside your organization

Here we see the Theatre Manager Task window and 2 different Calendars. The common items on all three windows are:
- Date
- Time
- Description
- Colours
In this picture, a Task Type called “Attached to Event” is selected. It is a code table entry defining what type of task this is.
In the database 8 standard types of Calendar Type Tasks have been defined:
- Project
- Task
- Unattached
- Attached to Event
- Attached to Performance
- To Do
- Meeting
- Background
From those standard 8 types, you can create unlimited number of custom named task types to suit your needs. The goal is to allow you to customize the view, colours and edits within that customized task. There is no limit to the number of Task Types you can create. You can easily extend this to create an Usher item. It then becomes a calendar mechanism to allow you to quickly pull out or show only the ‘sound engineer’ tasks/calendar items.
Click here, for more information on entering Task types and associating them to calendars.
Tasks
Tasks are at the heart of the Facility Management module.
For more information about the Facility Management module click here. To read more specifically about tasks and their place within Facility Management, click here.
|
Some task and calendar features are available to users who do not have the Facility Management module, but their usage is limited. |
Calendars show tasks to be done in a variety of formats. Gantt charts (part of Projects) show tasks that are associated with each other and the relationships between the various pieces. Invoices use tasks and the associated people and resources as line items in an invoice to bill clients.
Tasks can be associated with any number of people who are responsible for making sure it gets completed. Tasks can be reminders to yourself about upcoming deadlines. Tasks can be used to schedule your time. Tasks can have physical resources assigned to them that may be billed or not.
Notifications or reminders can be set up for tasks so you don't miss a meeting or appointment.
Tasks can be associatied with calendar time, or they can roll forward everyday until you do it (the task).
You can enter tasks in a variety of places, but the most common are probably from the Calendar window and from the Project window
The Calendar is the easiest and often the most convenient way to enter Task information. With the filters, you can show (or hide) items om the calendar for the project / task that you want to look at. You also change tasks most often from the calendar, however, you can also change tasks from:
- Venue window
- Event window
- Donation window
- Project Detail window
- Project Gantt View Window
- Volunteer window
- Patron window
- Order window
It does not matter where you move or change a task, once you move or edit it, it changes it everywhere.
What is a Task?
A task can represent anything you want to have show up on a calendar or appear on an invoice for a client. Because of its flexibility, it is important to understand all the different kinds of information that can be stored in a task so that you can determine which options to use for your particular situation.
- Tasks can be associated with plays or events
- Tasks can be associated with a particular show or performance
- Tasks can be associated with patrons or employees
- Tasks can show in the background of a calendar for all users
- A person can be assigned as the "owner" of a task
- Individuals can set alarms on tasks for themselves
- Tasks can have date and time ranges, such as meeting start and end times
- Tasks can be indicated as ToDo-type tasks that have only a necessary completion date
- Tasks can have resources assigned to them, such as the number of chairs needing to be set up in a venue, equipment being rented, or the actual rental of a room
- Tasks can have personnel assigned to them, such as the worker's billing hours for an event
When you ask the question "Can I use a task for .....?" the answer is probably Yes.
Adding a Task
- the Menu bar
- the right-click context menu in the Project window
- the New button at the bottom of the Project window
- The new task button in the Calendar toolbar / ribbon bar.
No matter how you get to the task window, data entry is the same.
- Select a Task Type. Task Types can change some of the fields in the Detail window.
Task Types tell TM the other fields which need to be required in the lower half of the window. It is the edit checking process to ensure you enter all the right information. The task you are creating then has a cross-check or edit-check based on it.

Click here for more information on the Detail Window and a description of its functions.
- Enter a start date and time.
To use the calendar and clock, click the
 button. The duration is calculated for you.
 - You can select a status and a priority from the drop-down lists.
These are helpful if there are a number of participants. You can keep track of who has done what and where they are at in the timeline.
- Choose Active or Private. This displays events differently, depending who you are.
- You can choose a Calendar Colour. Different colours can help you to keep track of different types of scheduling, or different projects.
- The task owner can be changed if necessary. By default the task owner is the person who is creating the task.
- If a Task is associated with a project, the Project number will also appear on the description.
For a complete description of this window and the changes different Task types can make, click here.
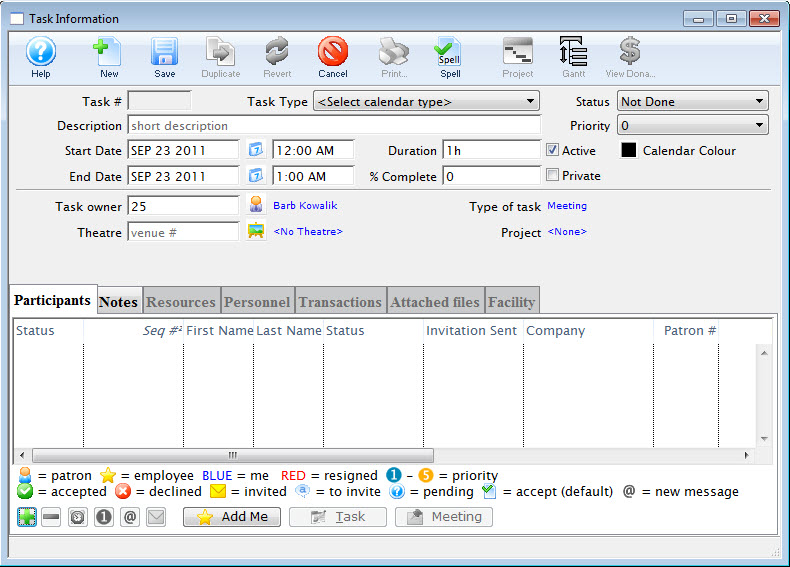
Task Detail Window
The Task Detail window is where you define your tasks.
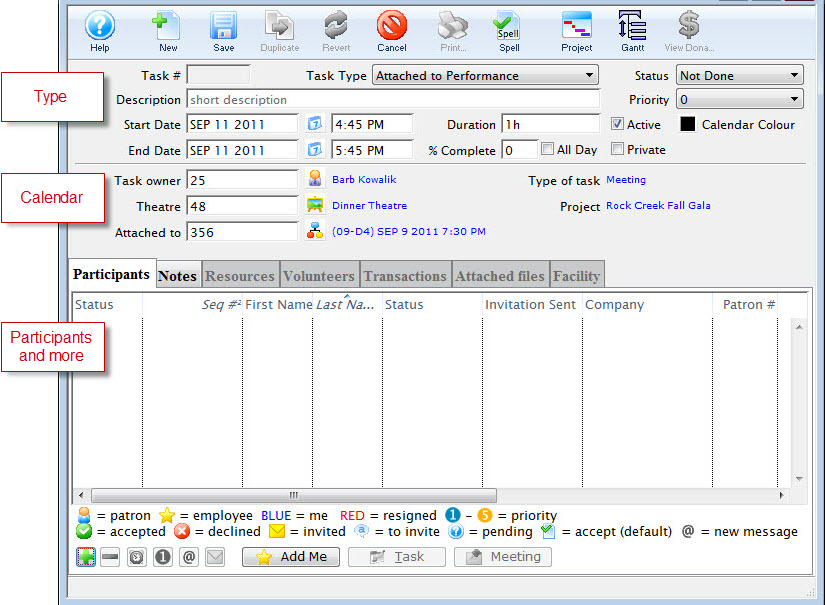
Parts of the Task Detail Window
| Task Type | Task Type tells Theatre Manager which other fields need to be required in the lower half of the window. It’s the EDIT checking process to make sure that we have all the right information. The task you are creating will then have a cross-check or edit check based on the task type. Theatre Manager comes with 8 standard task types. |
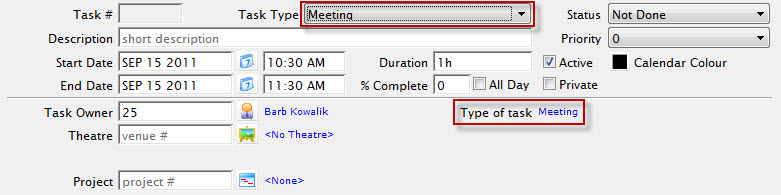
| Meeting | A Meeting task is just a normal task that is not connected to a particular event / play or performance.
|
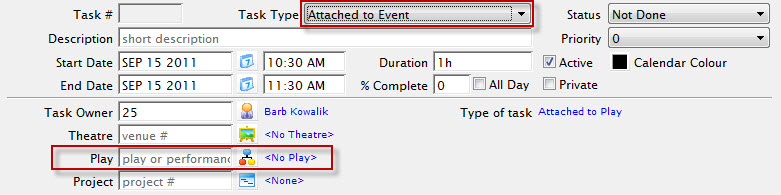
| Attached to an Event / Play | If you choose to attach a task to a particular event / play, an additional
field will display on the window where you can select which one to attach it to.
|
| Attached to a Performance | If you choose to attach a task to a particular performance, an
additional field will display on the window where you can select which one
to attach it to.
|
| Background | 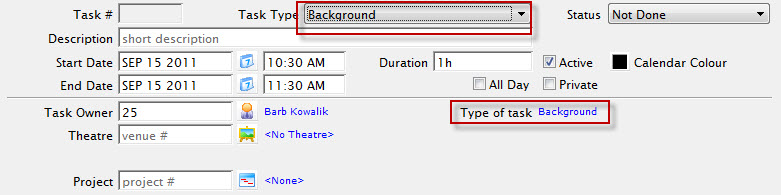 |
| Notification | Only the Note tab is available
|
| ToDo | ToDo Tasks do not have a starting and ending date and time, as a meeting would have, or painting the floor would have when preparing for a performance. They only have a "drop-dead" date... the very last day that this task/ToDo needs to be completed by.
You cannot have a ToDo Task as part of a project, because items in a project must have beginning and ending dates. ToDo's only show in the sidebar for the Calendar and remain until they have been marked as Done. ToDo Tasks would typically be used for things like project or grant deadlines. By clicking the Show on Calendar checkbox, the ToDo will also show on the calendar. (This is not the default behavior for ToDo items.)
|
| Project | If a task is part of a project, the project name will be displayed.
|
| Status | To change the Status, click the Status Drop down. |
| Description | Enter a Description for the task. |
| Priority | |
| Duration | The duration of the project is indicated (but cannot be edited). A duration of 1w 5d 10h 30m would indicate an elapsed time of 1 week, 5 days, 10 hours, 30 minutes. |
| Start and End Date and Time |  To use the calendar and clock, click the |
| Active flag | Tasks with the Active flag unchecked are not normally found in queries or on calendars. Private shows the events differently, depending who you are. |
| Colour |
|
| All Day Checkbox | Marking a task as All Day sets its starting and ending date from midnight to 11:59 PM and displays it in the all-day area for calendars displaying in one of the day views. |
| Private | Marking a task Private will only display the description on the owner's calendar, the calendar of designated editors, and those who are participants in the task. Others just see "Private" |
| Task Owner | By default, the person entering the task is the owner.  Information about the task can only be changed by the owner, an editor assigned by the owner, or a system administrator. Information about the task can only be changed by the owner, an editor assigned by the owner, or a system administrator. |
| Theatre | Displays the venue number if a venue has been assigned to the task. Clicking the Theatre button opens the Theatre Maps List Lookup. Click here for more information on the Theare Maps List. button opens the Theatre Maps List Lookup. Click here for more information on the Theare Maps List. |
| Event / Play | Displays the Event / Play number if one has been assigned to the task. Clicking the Event / Play  button opens the Event / Play List Lookup. Click here for more information on the Event / Play List. button opens the Event / Play List Lookup. Click here for more information on the Event / Play List. |
| Tabs | |
 |
Click here to go to the Particpants Tab page for a complete expanation of the tab and its functions. |
 |
Click here to go to the Notes Tab page for a complete expanation of the tab and its functions. |
 |
Click here to go to the Resources Tab page for a complete expanation of the tab and its functions. |
 |
Click here to go to the Personnel Tab page for a complete expanation of the tab and its functions. |
| Click here to go to the Transactions Tab page for a complete expanation of the tab and its functions. | |
 |
Click here to go to the Attached Files Tab page for a complete expanation of the tab and its functions. |
 |
Click here to go to the Facility Tab page for a complete expanation of the tab and its functions. |

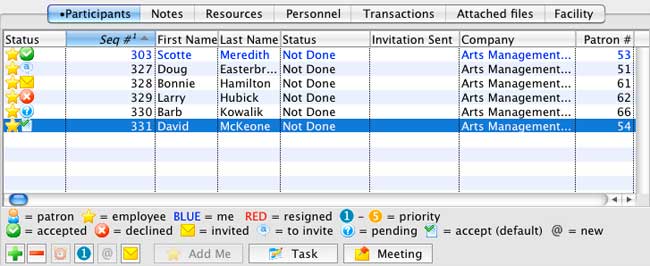
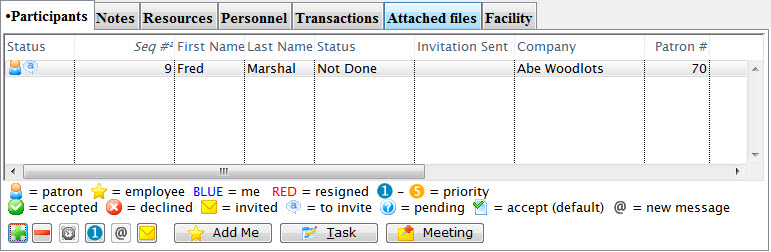
Participants Tab
Task Participants are people you wish to associate with the task. If volunteers are associated with the task, you will see them both on the volunteer tab and in the task participants list.
In the participants tab:
- You can select employees or patrons
- You can invite external people and place on their iCal/Outlook calendar
- Volunteers dragged here automatically create a volunteer history record
- You can add all people from a mail list (e.g. board members, staff list)
- You can set priorities
- You can set alarms
- You can accept meetings and set status
The main sections are listed below. Click on a link to learn more about the features.
Parts of the Task Participants Window
| Status |
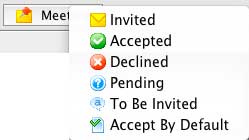
Up to 3 icons can be displayed for each participant. these are:
A participant's status is changed by selecting a line and clicking the Meeting |
| First /Last Name | First and last Name of the Patron selected to be a participant in the task |
| Status | Displays the status selected using the Task button |
| Invitation Sent | Displays the date the invitation was sent to the participant |
| Company | |
| Patron # | The Theatre Manager Patron number for the participant |
| Priority | 1-5 as selected using the Priority  button button |
| Response Date | Date the participant responded to the task request |
|
|
Opens the Contact List so you can add a participant to the task. Click here for information on adding a participant to a task. |
 |
Removes the selected participant from the task. |
 |
Participants can set an alarm for themselves. Click here for more information on setting Alarms. |
| |
Sets the priority for the selected participant. 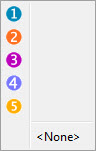 |
 |
Acknowledge a meeting response. When a task participant has responded to an Email request to come to a meeting, the Status of that person displays an "@". To acknowledge that you have seen the change, select the line and click the button. The indicator will go away. It will also no longer show in the Notifications window. |
 |
Resets the selected participant to recieve Email messages. |
 |
Add Me (the current user) as a task participant. When you add yourself to a task, the meeting status is automatically set to Accepted, since it is assumed you know about and intend to go to a meeting you have put yourself in. |
 |
Each participant can mark the status of their
portion of the task by selecting a line from the list and clicking the
task button. Choices from the flyout menu are: Not Done, Done, In Progress, or Cancelled. Once the last person has marked their portion of the task as Done, the task itself is automatically marked as as Done. |
 |
You can set the status by clicking on the Meeting button. |
 - Patron or
 - or an Employee
  - Invited
  - Accepted
  - Declined
  - Pending
  - To Be Invited
  - Accept by Default
  or can be left at 0 for tasks not requiring a priority setting. The priority can be changed by selecting a line in the list and clicking on the Priority
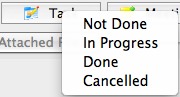
 . The status is also changed if the person responds to the iCalendar invitation sent out by Email.
A line in the list will display in  for My record and
  if the employee is no longer active.
Adding a Participant to a Task
Participants can easily be added to a task. To add a participant, you would perform the following steps:
- In the Calendar window, click the New
 button.
The Task Information window opens.
- Enter the Details for the Task (task type, description and other relevant information), and click the Add button.
The Contact List window opens.
- Highlight the patron you want to add as a participant and double-click or click the select button or drag and drop the selected participant.
If the participant you want is not in the contact list, you must add them to the patron list.
Click here for more information on adding patrons to the database.
- The participant is added to the task.
Responding to a Task Request
If you have added another patron/employee/volunteer as a participant to a task, they are set to To Be Invited or Accept by Default, depending on the default settings in Company Preferences.
Click here for more information on Company Preferences.- When a participant to a task logs in to the database, a Notifications window opens, if they have not responded to the invitation.
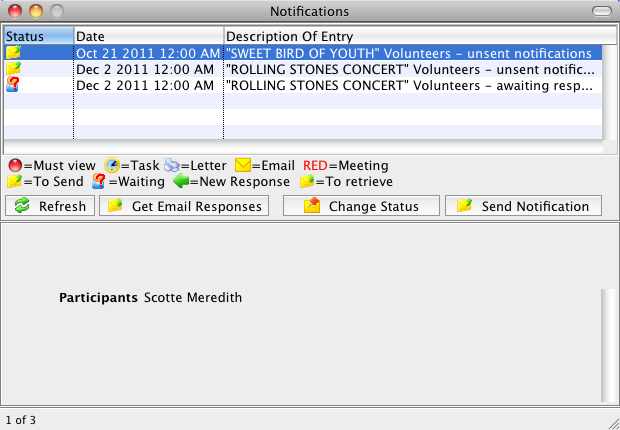
- You respond to an invitation by selecting your name in the task participants list and selecting a meeting status of Accepted, Declined, or Pending (have not decided yet).
When a task participant (or volunteer) is assigned to a task, if their status has been set to To Be Invited, they will appear in the Notifications window indicating that an Email needs to be sent to let them know about the meeting (or volunteer opportunity).
- When you select the lines in Notifications and Send Notification, an Email is sent with an iCalendar attachment.
The information is loaded into their calendar on their individual machine. When they respond back to the meeting, Theatre Manager will update the meeting status.
Click here for more information on Notifications.
- Double-click on a line in the list to see that task and respond to the invitation.
Notes Tab
The Notes tab allows you to provide additional text description for some task types. Note you create are sent with meeting invitations - agenda style, plain text.
Notes can also be included in invoices.
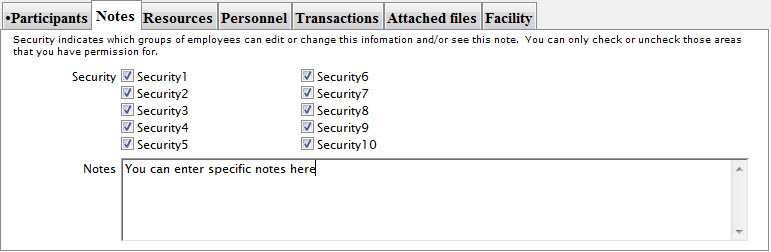
Notes also can have security associated with them. The levels of security are defined by the levels you have set for the functioning groups in your organization. For example:
- Marketing
- Finance
- Administration
- Box Office
- Development
- Sound
- Backstage
These descriptions for ‘Security1, Security2, Security3, etc.’ can all be changed. Who should be able to see/know about this task. It’s a way to restrict to only having certain departments access to the data.
Notes can be included on invoices. For example, you can allocate a ‘cost’ for this task. These notes may help justify the reasoning for the ‘cost’.
Resources Tab
The Resources Tab shows all of the resources that have been associated with a task. Resources can include actual items either in inventory (consumable items) or capital items (i.e., sound boards, chairs, etc.) as well as space rental details or anything else necessary for completing this task. These resources and their prices can be part of the invoice if these tasks are part of a project that is billed.
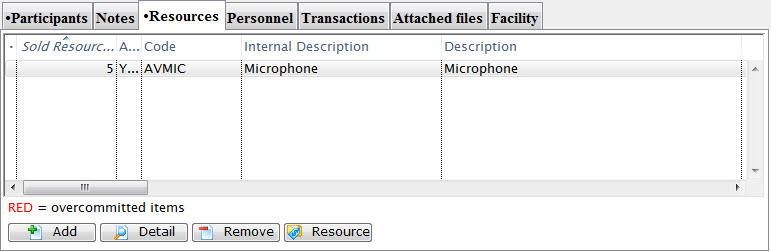
For information on how to enter your organization's Resources into Theatre Manager, please visit the help page for setting up Task Resources.
Parts of the Resources Tab
| Active | Status of the resource (generally active or inactive) |
| Code | A unique code that has been assigned to the resource |
| Interal Description | Name that shows in the resource list and elsewhere in Theatre Manager |
| External Description | The name of the resource that is viewable by the general public |
| Quantity | Numbers of the resource selected |
| Notes | Any notes specific to the resource as defined on the Resource's Notes tab |
| Cost | The replacement cost per unit of the resource |
| Price | The amount charged per use of the resource |
| Group | The resource group to which the resource belongs |
| Task # | The task number as displayed in the task # field of the Task window |
| Resource # | The unique number in the database assigned to the particular resource |
| Income Acct | The income account used for the selected resource when it is sold or rented/ |
| Expense Acct | The 'Cost of Goods' expense account to be used for the resource when it is purchased for later sale. |
| Date Entered | The date the resource was assigned to the task |
 |
Adds a new resource to the Task. Click here to learn how to add a resource to a task. |
 |
View the detail for the selected resource |
 |
Removes the selected resource from the task |
 |
Opens the resource window for the selected item. Click here for more information on the Resource Detail window. |
Adding a Resource to a Task
To add a resource to a task, you perform the following steps:
- In the Task window, Choose the Resources tab and click the Add button.
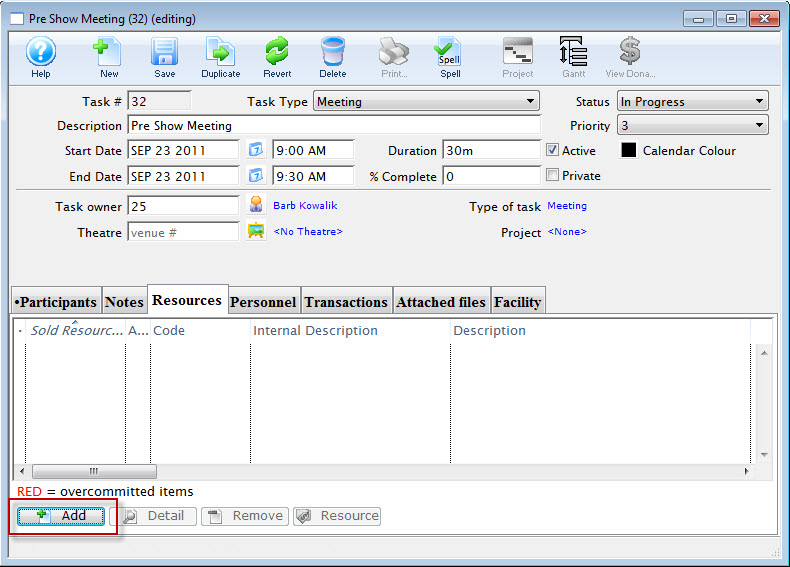
The Resource List Lookup opens.
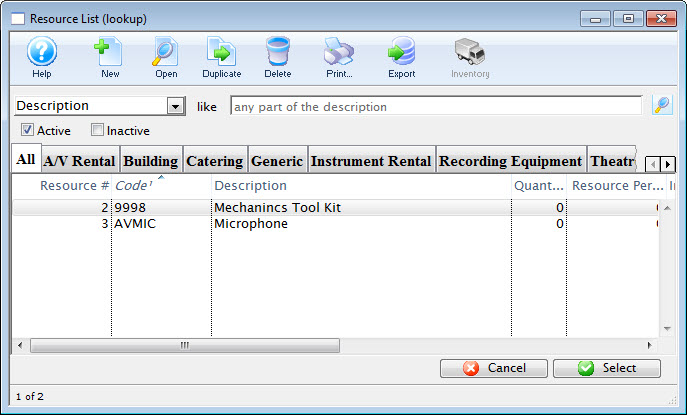
- Choose the resource you require from the listings and double click or click the select button.
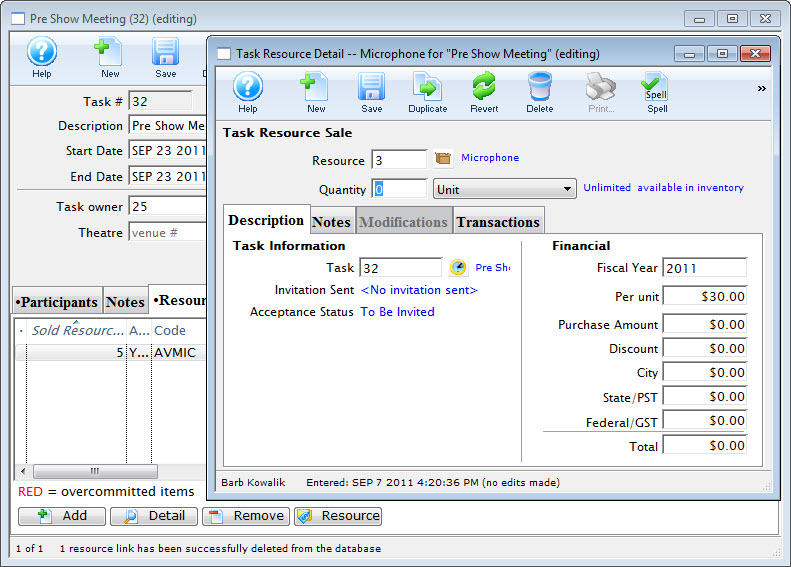
The resource is added to the task and the Task Resource Detail dialog opens.
- Review the Detail and close the dialog.
The resource is now "booked" for the task.
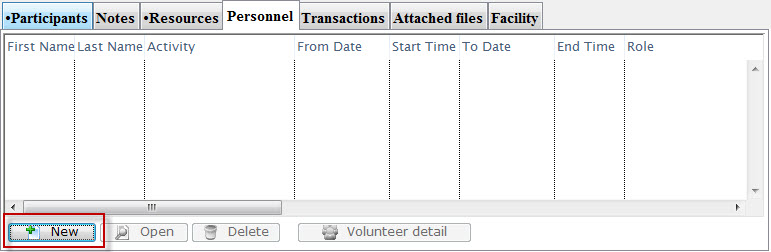
Personnel Tab
Personnel associated with a task are different then volunteers. Personnel is where we are tracking people based on their abilities - or - their skill levels. For example:
- Master Carpenter
- Sound Technician
- Light Technician
- Costume Designer
- Backdrop Painter
The Personnel Tab shows all of the Personnel (or volunteers) with the skill required for the task.
Personnel refer to any person associated with a task for billing purposes. The personnel must be set up as volunteers (whether or not they are being paid for their work) with specific activities assigned to them, allowing the personnel to perform that duty/function. This is the only way to bill for hours worked on a project. These personnel and their costs can be part of the invoice if these tasks are part of a project that is billed.
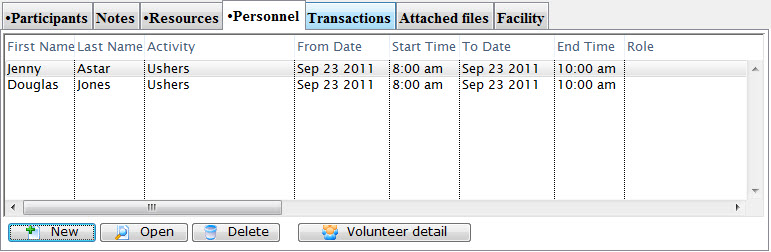
In this tab, you can add a volunteer to the record and aggregate hours.
Dragging a volunteer into this tab creates a participant record automatically. For information on how to enter your organization's Volunteers into Theatre Manager, please visit the help pages for setting up Volunteer Activities and Personnel Management - Volunteer Window.
Parts of the Personnel Tab
| First/Last Name | The First / Last Name of the selected Personnel | |
| Activity | The Activity selected for this personnel. Cick here for information on the volunteer activity code table. | |
| From / To Date | The From and To Dates the personnel selected will be associated with the task. | |
| Start / End Time | The Start and End Times the personnel selected will be associated with the task | |
| Play Code | If an event / play is associated with the task, the code for the event / play is displayed | |
| Play Title | If an event / play is associated with the task, the Title for the event / play is displayed | |
|
Adds new Personnel to the Task.  |
Opens the Activity window for the selected Personnel |
 |
Removes the selected Personnel from the task | |
 |
Opens the Volunteer History window for the selected Personnel. |
Adding Personnel to a Task
To add a personnel to a task, you perform the following steps:
- In the Task window, Choose the Personnel tab and click the Add button.
The Active Volunteer List Lookup opens.
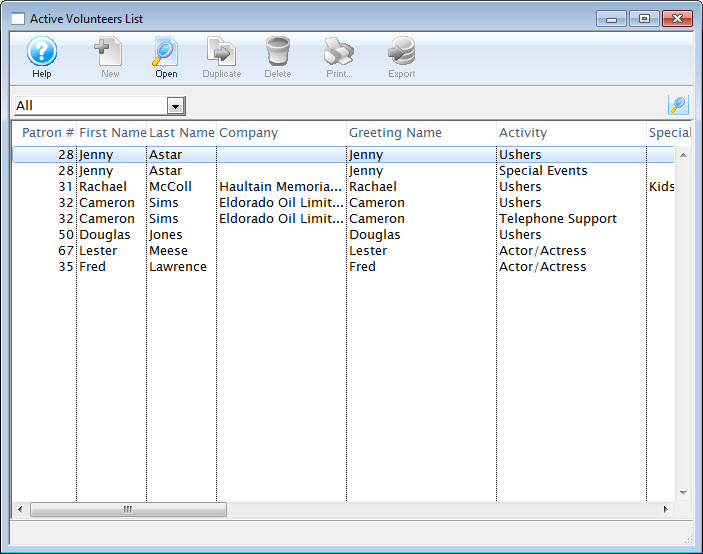
- Click on the Personnel you want, hold and "drag" the names from the volunteer listing to the Task window.
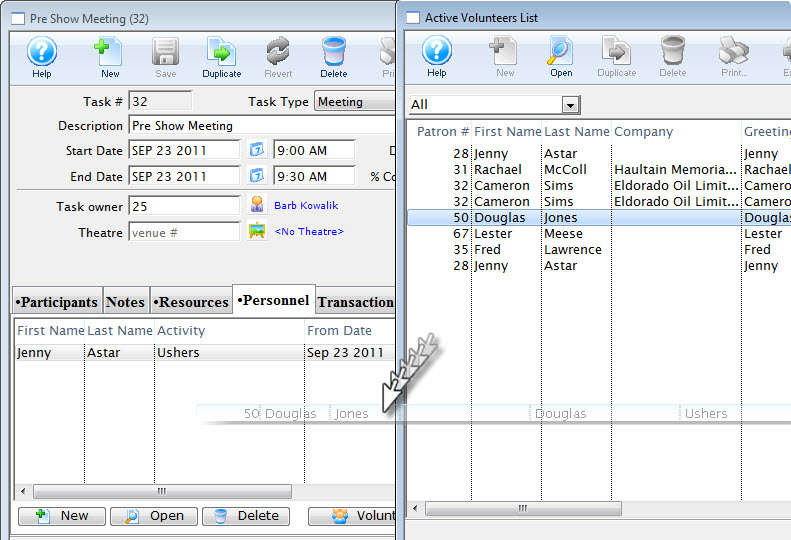
The resource is added to the task and the Task Resource Detail dialog opens.
The personnel are now "booked" for the task.
Transactions Tab
![]()
The Transactions tab displays any transactions associated with the task, after the project status has been changed from 'Estimate' to 'Invoice'. The transactions can be viewed in this screen, but cannot be edited.
![]()
Attached Files Tab
Files of any type can be attached to a task record in the database. These files are then stored in the database. This is safer than storing on file server, for example, grants, directions, budgets and documents. Because they are stored in Theatre Manager, they can be opened right out of Theatre Manager.
|
If you make changes to the file and save them, you MUST drag the file back to the list to save the current version when you are done.
Theatre Manager has no way to tell if you have made changes to the document and saved those changes, so you must explicitly re-save the document back to the database by dragging it back into the list. |
|
If you drag a file of the same name as exists in the task, Theatre Manager will ask if you want to:
|
|
If you try to extract the file from the database and it finds that it still exists in the original pathname, Theatre Manager will ask if you want to replace that existing one with the one from the database |
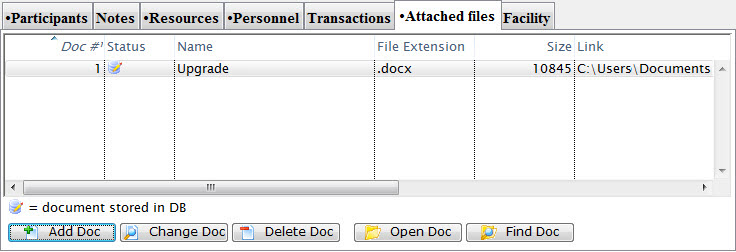
Parts of the Attached Files Tab
| Doc | The Number of the document in the database. |
| Status | Indicates the document is loaded into the database. |
| Name | The file name for the document. |
| File Extention | The type of document (as indicated by it's extention). |
| Size | The size of the document. |
| Link | Where the document was ORIGINALLY located on your computer. Theatre Manager will check that pathname when trying to export -- to make sure that the file does not exist. if it does exist, you'll get a warning asking if you want to replace it. |
| Date Entered | The date the document was uploaded to the database. |
| Date Updated | The date a document was changed. |
| Changed By | The Employee number of the participant who attached the document to the task. |
| Task | The task number the document is attached to. |
 |
To attach a file or document, click on the Add Doc button, or drag the file from your hard drive to the list. A line will be added to the list indicating the name of the file, its location on disk, size, etc. |
 |
To change the document, click on the Change Doc button, or drag the file from your hard drive to the list. (If a file of the same name is dragged to the list, it will ask if you want to replace that file with the one just dragged in. The line in the list will be modified to show the current information. |
| Delete Doc | To delete a file or document, click on the Delete Doc button. This will remove the file from the database, but will not touch the original item from the disk. |
 |
To edit a file or document stored in the database, click on the Open Doc button. If the file is found on disk already, you will be asked if you want to replace the file on disk or open the one on disk. If it is not found, you will be asked where to save the file. It is then opened. |
 |
To view the location on disk of a file or document, click on the Find Doc button. The folder where the original was stored (the Link displayed in the list) will be opened. |
Facility Tab
The Facility tab shows task information most often used if the task is part of a project. When printing invoices for projects, either estimates or actuals can be used. The values to use are seen on the Facility tab of each Task Detail window.

Parts of the Facility tab
| Estimate and Actual | If a project has a billing type of Estimate, the value in the Estimate column is used. If a project has billing type Invoice, it uses the values from the Actual column, based on the actual resources and personnel records attached to the task. |
| Check Boxes | Include in Statistics - Uncheck to exclude a task from Statistics. (Not yet implemented)
Include in Invoice - Uncheck to suppress printing of a specific task on the invoice. |
| Task Vendor | A Vendor may be attached to a task. This indicates that the vendor is responsible for performing this task and allows you to subcontract out portions of a project to others. While you can attach the vendor at this time, vendors do not yet show up in reports. |
| Order # | The order number displayed, is the one Theatre Manager has assigned to the Project this task is attached to. |
| Date Posted | The date the Order was posted. |
| Attendance | You can track the expected attendance (Expected) and actual number who attended (Attended) for a task. This is useful when have a meeting or gathering and wish to track the expected number, for planning purposes, and the actual number attended, for historical purposes. |
Task Toolbar
Most of the items on the toolbar perform the expected standard functions.

An exception is the Duplicate button. It will create a duplicate of the current task in a new window, ready for editing. It does not duplicate the task participants.
If the task is part of a project, click the Project to open the Project Detail window.
If the task is part of a project, click the Gantt to open the Gantt window for the project.
If the task is attached to a donation in the donation window, click View Donation to open the Donation window for the associate donation.
Tasks in the Event / Play Window
Any tasks associated with an event / play can also be seen in the Event / Play window. From here you can add tasks and associate them with resources, so you can create all the tasks needed for a particular event / play. These can then be added to a project and billed.
Tasks are added on the left side. Once a task has been added, you can select the task and add the resource on the right side.
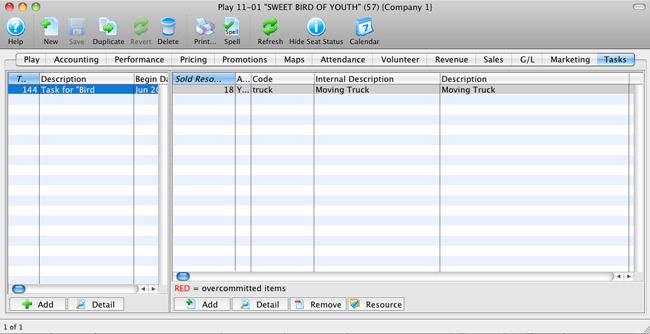
Click on the Calendar button in the window's top toolbar to view all tasks, performances, and/or volunteers associated with the event / play in a new calendar.
Tasks in the Client Window
Many times, the use of tasks is better than entering dated notes into the patron notes window.
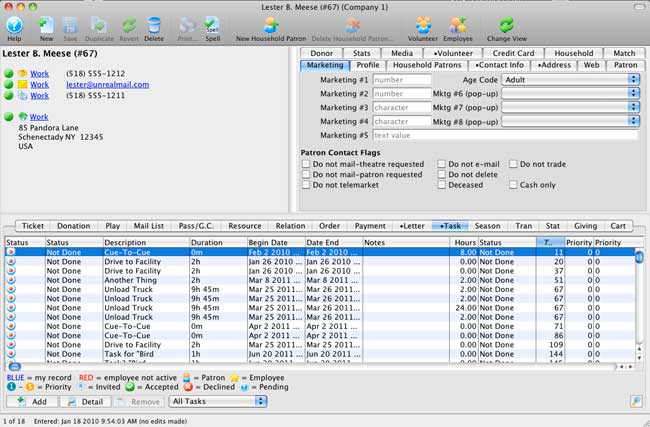
Tasks in the Donation Window
Setting Alarms
To set an alarm for a task, you perform the following steps:
- In the Task window, click the Alarm button.

The Task Alarm settings open.
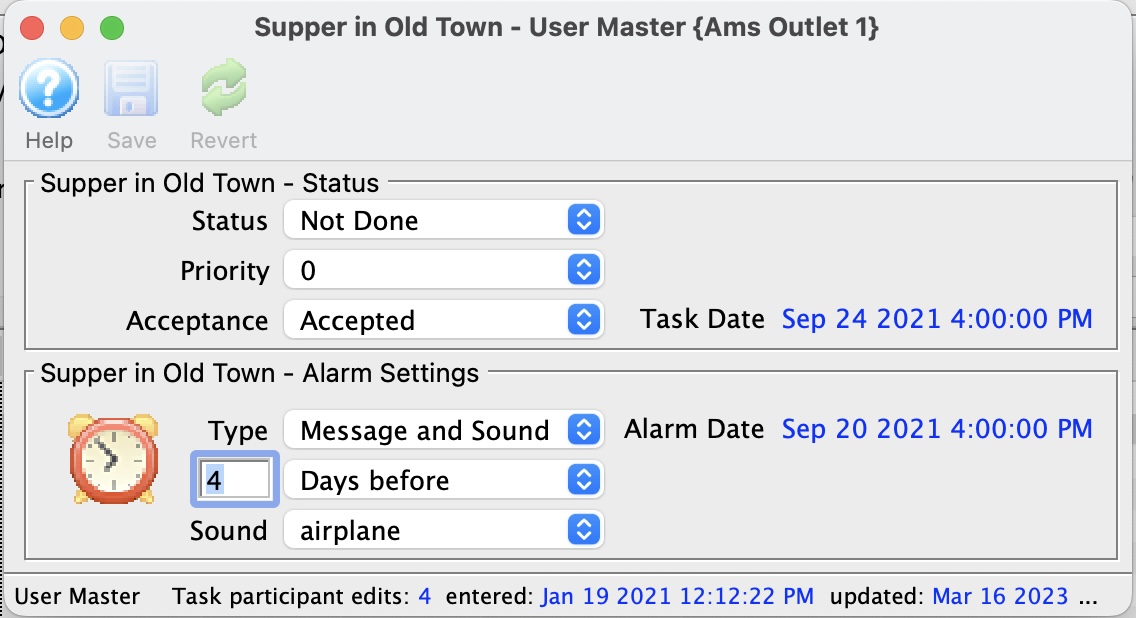
- You can enter the Status, Priority and Acceptance.
Values entered or changed and save here, affect the individual participant and are displayed in the participant's line of the participant tab of the Task window. - Select the Type of Alarm.
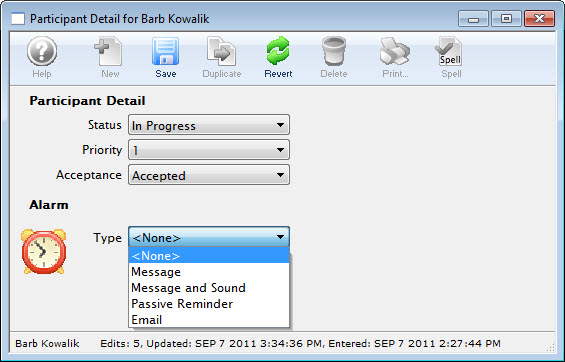
- Once you have made your selection, you have the opportunity to choose the timing of the alarm.
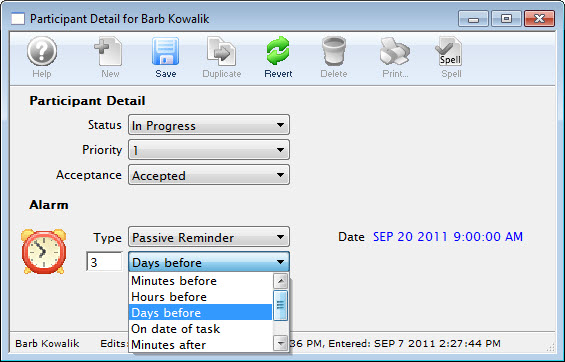
- Choosing Message and Sound adds another drop down list - Sound.
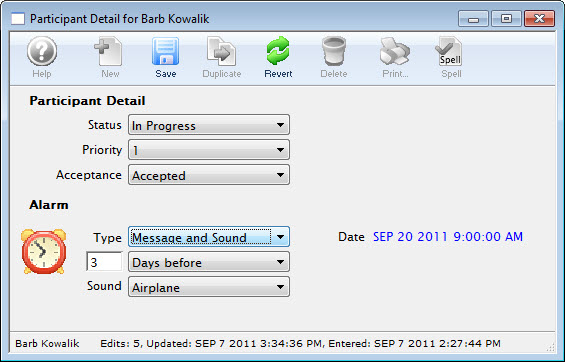
There are some Default sounds that are part of Theatre Manager. You can add your own sounds by creating a 'sounds' folder in the Theatre Manager Preferences directory and placing '.wav' files in it.
When the time comes for the alarm to go off, if you have selected you want a visible alarm instead of a background alarm, the following window displays as a notification:
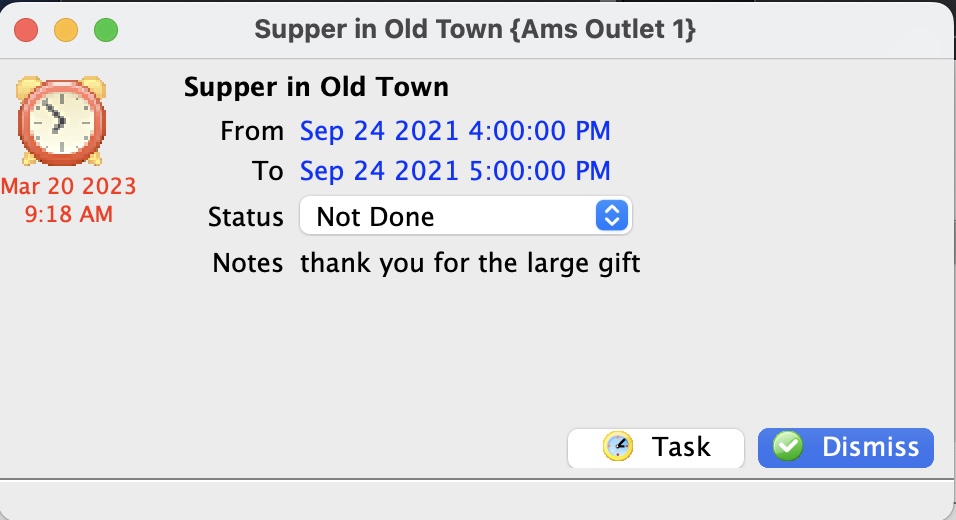
You can also dismiss the alarm outright or snooze it for a little while by clicking the dismiss button and indicating what you want to happen to your alarm:
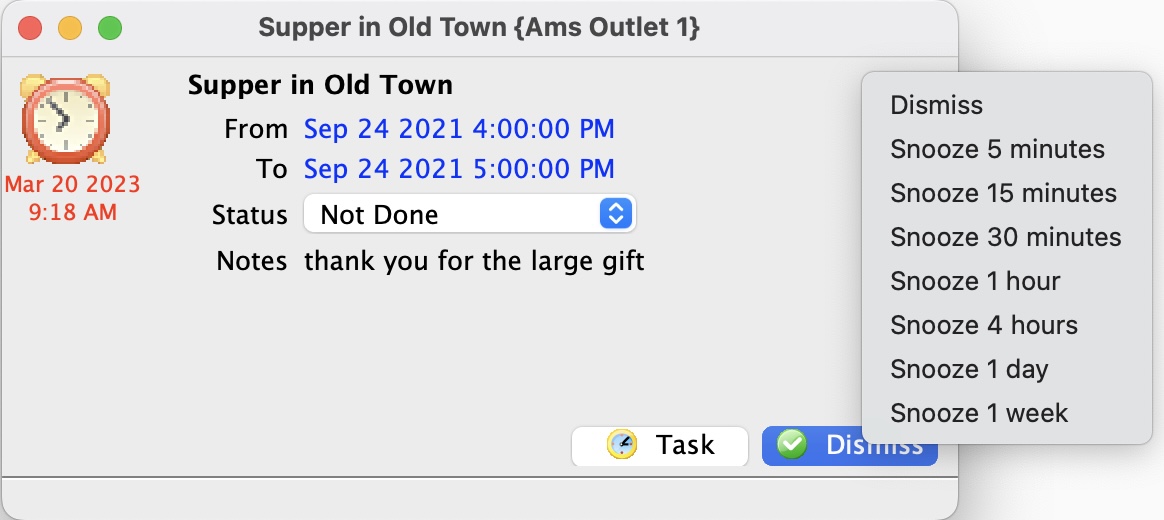
Conflict Checking
When adding task participants or volunteers to a task, the Facility Management module will check to see if that person is already scheduled within one hour of that time to help avoid double-booking. You will be asked if it is OK to schedule this person so closely.
It also checks when you try to book tasks into the same venue at the same time that are not part of the same project. If the possible conflicts are part of the same project there is no warning because it would be expected that multiple tasks could be occurring in the same venue.
Projects
What is a Facility Management Project?

A Project:
- Is a way to group tasks together and create relationships between the various tasks that make up that project.
- Can be as simple as somebody booking a conference room at your facility or as complicated as bringing in a Broadway show and including all the builds and move-ins and resources associated with it.
- Can be billed to a particular client and an invoice created.
- Is displayed in a typical Gantt chart. This way you can see the relationships between the tasks. Individual tasks can be suspended for a period of time
For example, construction has to stop for a day or two while a rehearsal happens.
- Relationships can be established between different tasks so one cannot start until the previous one is completed
For example, or two tasks must begin or end at the same time or on the same day.
When you look at this window, down the left side - in what is called the tree list - are the tasks. The Gantt chart on the right shows the tasks, linked together. It shows that task A needs to be complete before you start task B.
Each of the tasks can be further grouped within the Gantt chart.
For instance, all the build tasks can be grouped under Construction, or all of the production meetings can be put under a group titled Meetings.

If you find that you have projects that follow a particular pattern, you can create a project to use as a template with the basics filled in. When you need to create a projecte of this type, duplicate the project template and modify it accordingly.
Project List Window

 A Facility management Project can be accessed through the Patron Sales Menu or by clicking the Projects button in the top toolbar / ribbon bar.
The Project List window opens:
From this window you can search for projects, create a new project, edit projects, open an existing project, or duplicate projects.
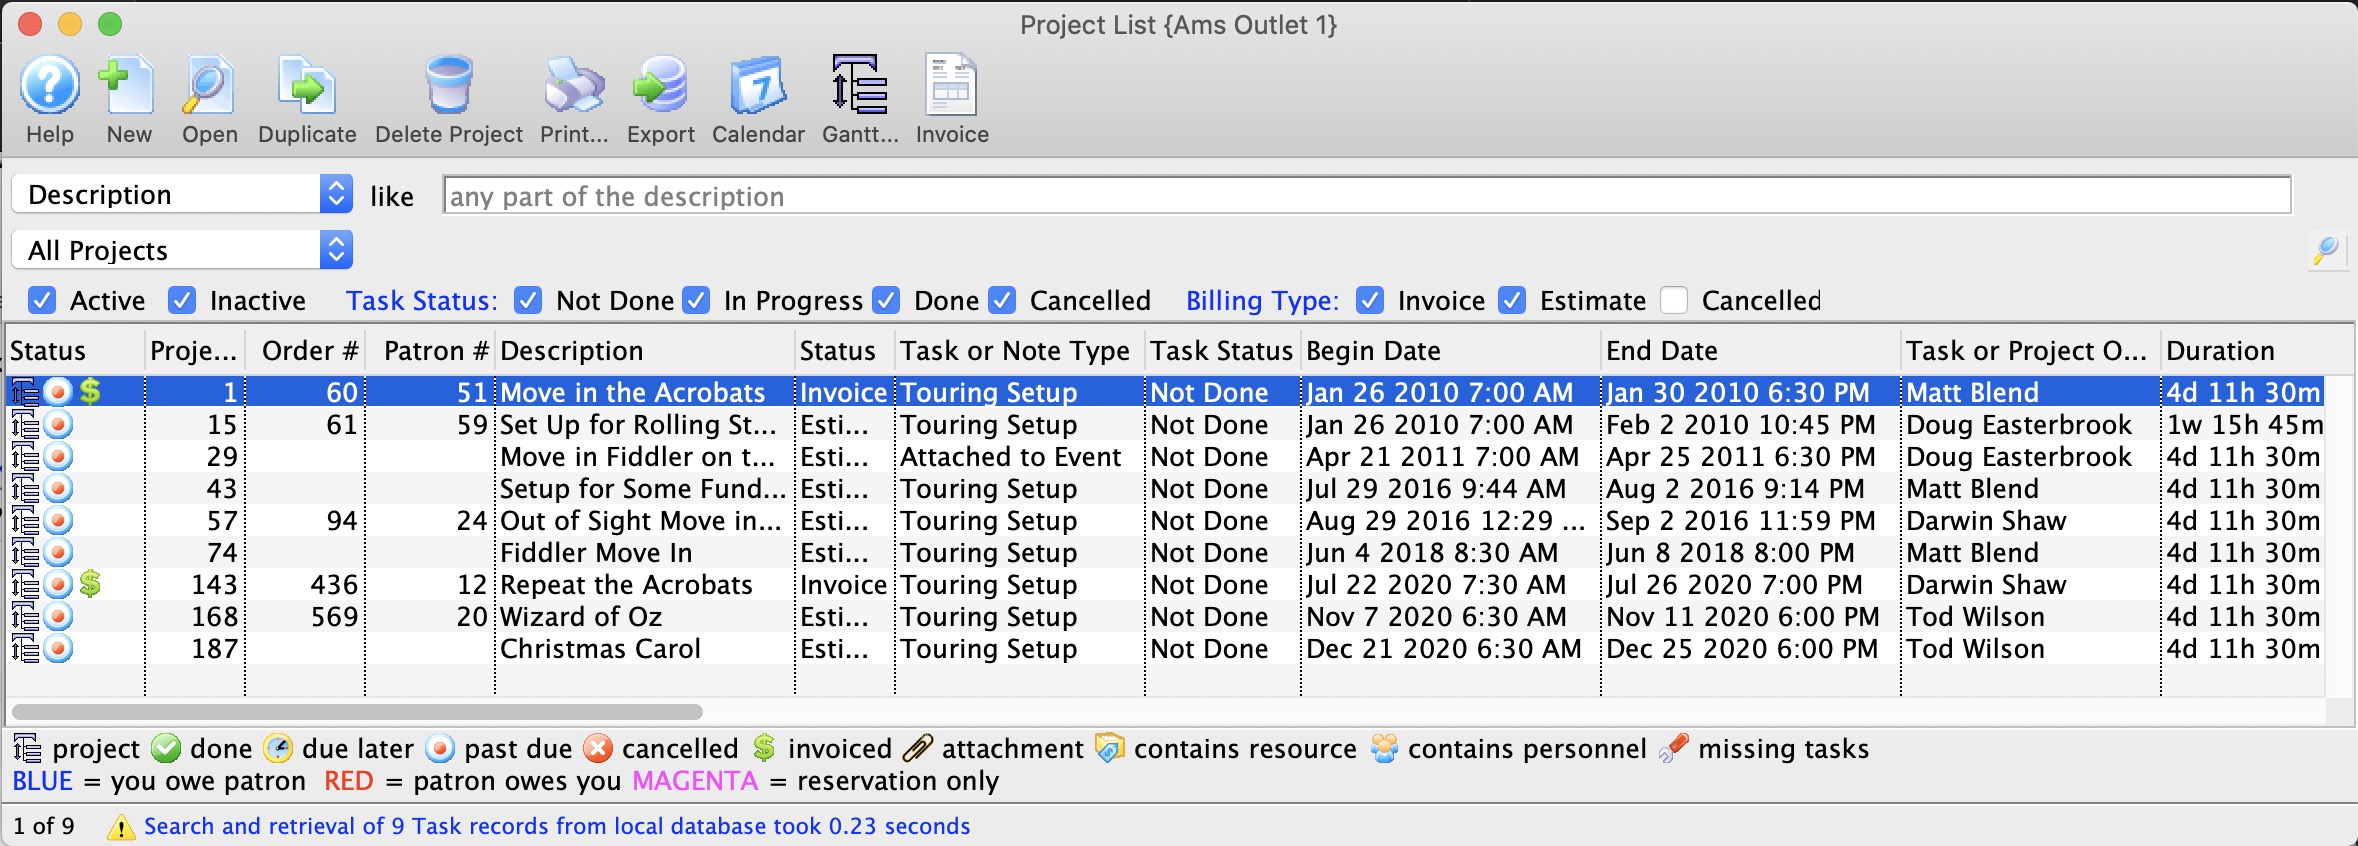
Adding a New Project
A project is a method for your organization to group tasks together and create relationships between the various tasks that make up that project. Your projects can be as simple as somebody booking a conference room at your facility or as complicated as bringing in a Broadway show and including all the builds and move-ins and resources associated with it.
To create a new project, you perform the following steps:
- Click the Projects Button in the toolbar.
The Project List Window opens.

- To Add a new project, click the New Button.
The New Project (inserting ) window opens.

- Enter a Project Description.

This is a required field.
- When initially creating a project, Billing is set to Estimate.
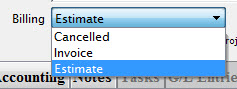
As the project goes along, this can be altered to any of the other selections in the drop down menu.
- Projects can be inactivated by turning off the Active checkbox.
Projects deactivated will not display, unless specifically asked for.

- Each project can have a type.
Project Types are set up in Setup >> System Tables >> Code Tables >> Facility Project Types. Using project types allows you to groups similar kinds of projects together. Click here for more information on the code table.
Click here to continue to the Description Tab.
Project Description Tab
Project Status | Billing Status |
A project has 3 main billing stages:
|
| Start Date | The Start Date is the date the project starts. This will change as the project progresses, based on the tasks in
the projects.
To change the start date, click the Date Note: The start dates and end dates cannot be changed after posting to the GL (except by changing the project plan) since that affect deferred revenues to the Project. |
| End Date | The end date will be modified as well as tasks are added. |
| Duration | The duration of the project is indicated (but cannot be edited). A duration of 1w 5d 10h 30m would indicate an elapsed time of 1 week, 5 days, 10 hours, 30 minutes. |
| Completion | When a project has been completed, its completion date is filled in for you. |
| Status | 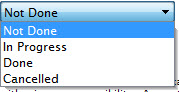 Status displays the current status of the project. Status displays the current status of the project.
To change the Status, click the Status Drop down. |
| Priority | 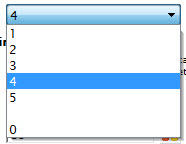 You can set a Priority for the project. (0 is considered "No Priority".) This is the default priority given to any tasks associated with this project.
|
| Project Colour |  You can select a specific colour from the Project colour pallete to override the standard colour of a task associated with this project in the calendar.
 |
Defaults for Tasks in the ProjectA project can contain a number of tasks within it. These tasks contain costs, activities, venues, events / plays and/or employees with primary responsibility. Any settings made here will be the defaults for all new tasks that are created. With some items, filling in one field will default others to an appropriate value. For example, entering a performance will automatically enter the event / play for that performance and its theatre / venue. | |
| Owner | The person who "owns" the project.
To change the Employee, click the |
| Play | To add or change an event / play, click the  button. button. |
| Performance | To add or change a performance, click the button. |
| Theatre | To add or change a venue, click the  button. button. |
Project Notes | |
| Access | Define the access that people have to the project |
| Notes | Any general notes you want about the project. |
Project Accounting Tab
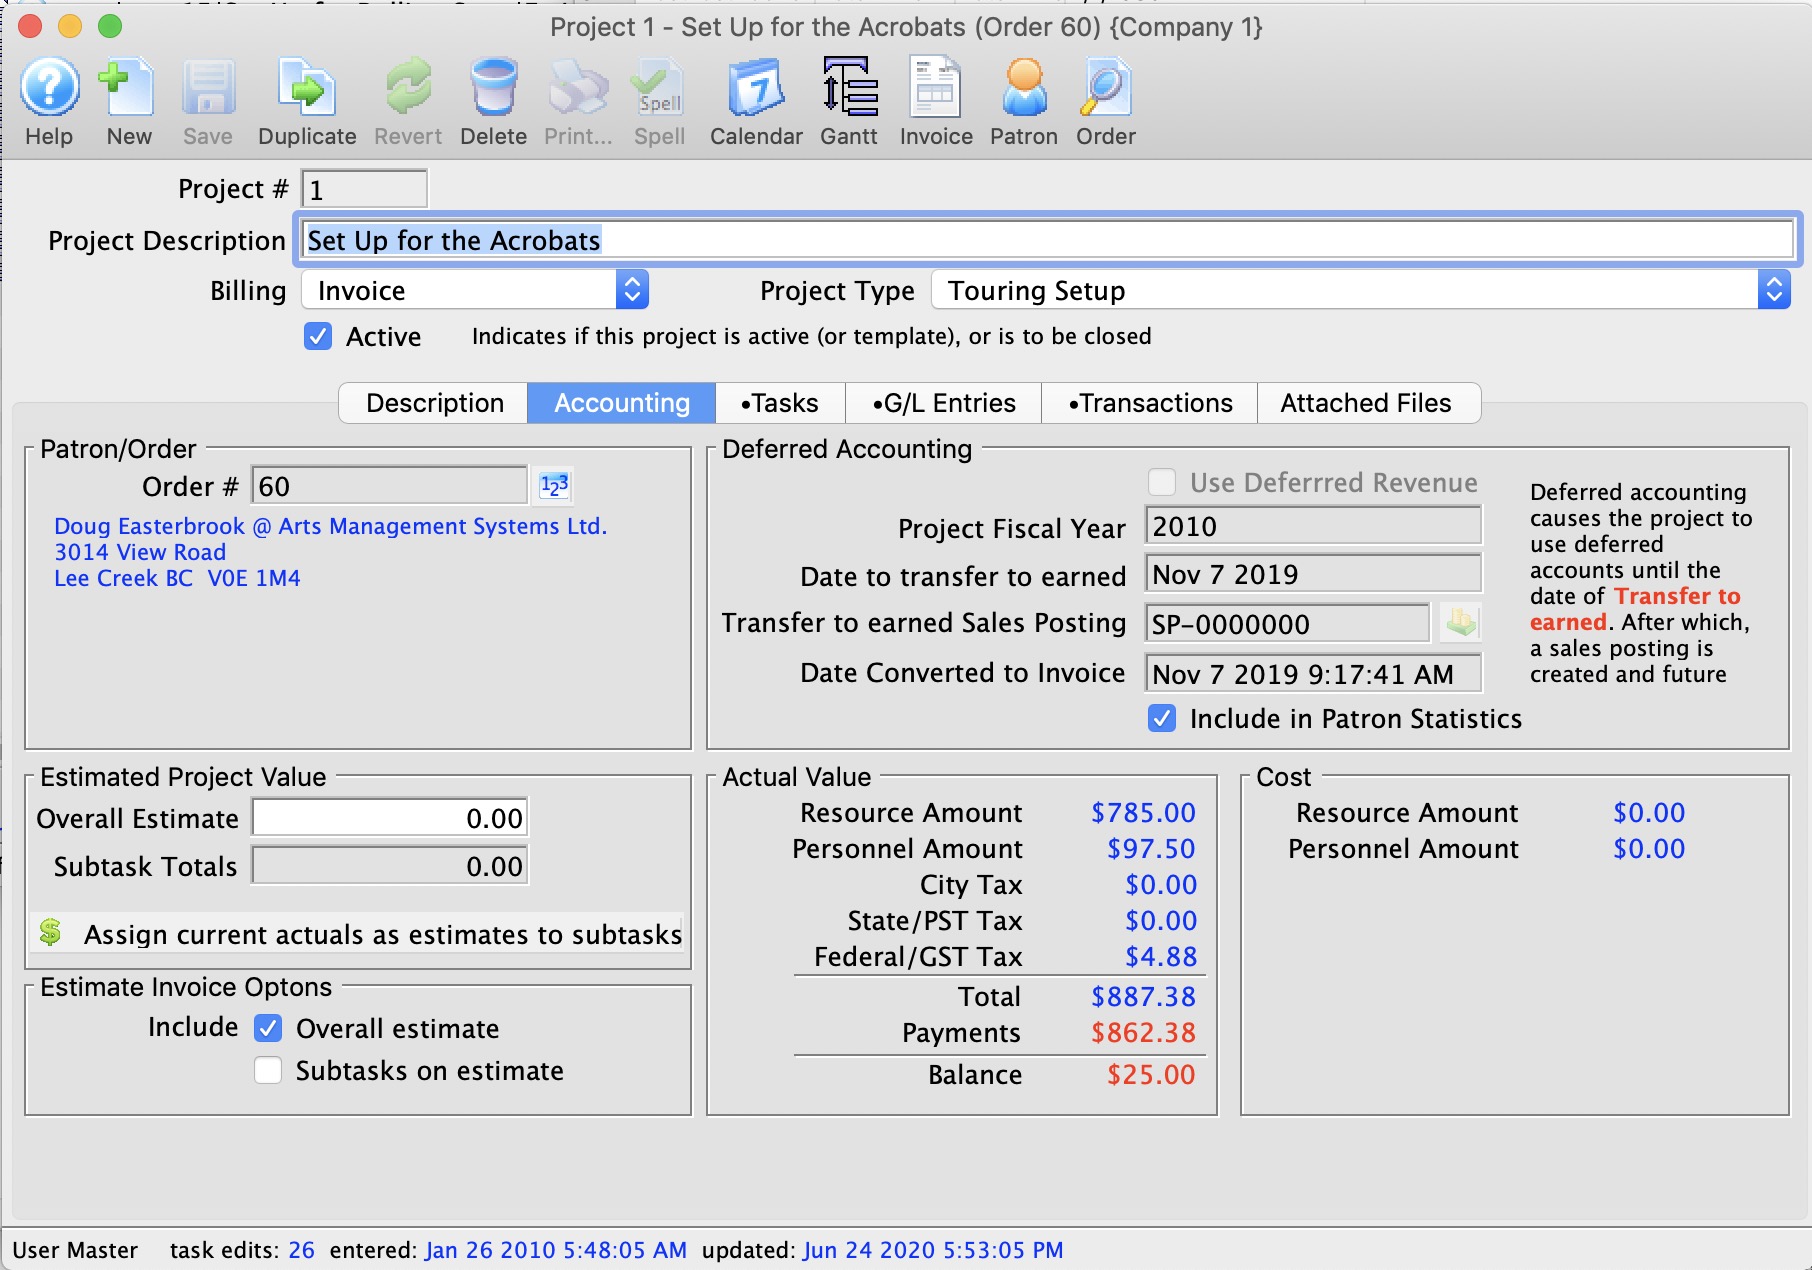
Patron/Order |
|
| Order Number |
 Click the Order
  button to Select the Order # to associate with this project. You can choose to create a New Order or select an existing Order.
When selected, some of the order notes (internal and external) will appear, along with the patrons name and address. Click for more information on the Order Window and what you can see in the order process. |
Deferred Accounting |
|
| Use Deferred Revenue | If selected, you will also need to provide the date to transfer to earned.
Deferring revenue means that the deferred accounts for resources and volunteer/staff activities will be used instead of the earned accounts (if they are individually set up for deferred accounting). |
| Project Fiscal Year | Enter the Fiscal Year for aggregating this project into patron statistics. Defaults to current Fiscal year. |
| Date to transfer to earned | The date to transfer to earned revenue is the date that end of day will convert any of the deferred revenues for this project earned revenues. |
| Transfer to earned Sales Posting | This is the sales posting that caused any deferred revenues to transfer to earned revenues after the Date to transfer to earned.
If the sales posting is:
|
| Date Converted to Invoice | When the project is converted to 'invoice' status and the first transactions is posted to an order, this date will be filled in for you. Before that time you can alter the use deferred revenue status. After that point, you cannot. |
| Patron Statistics | To include the project in patron statistics tab, mark the Include in Statistics checkbox. |
Estimated Value of Project |
|
| Overall Estimate | If a project has a billing type of Estimate, the values in the Estimated column is used when printing the invoice. |
| Subtask Total | You can see the total of these tasks in the "Subtask Total" field. |
| Print Options | If "Include subtasks on estimate" is checked, the estimates entered into each task on the Task Detail window in the Facility tab are used.
Individual tasks can be excluded from printing on the invoice by unchecking the "Include in Invoice" box in the same Facility tab. If "Include subtasks on estimate" is not checked, individual lines for each task are not shown and only the value from "Overall Estimate" is used. When printing invoices for projects, either estimates or actuals can be used. The values to use are seen on the Facility tab of each Task Detail window. If a project has a billing type of Invoice, it prints the Actual numbers, based on the actual resources and personnel records attached to each task of the project. |
| Actual Value | Subtask Total
Resource Total equals:
These will be calculated for you and displayed. |
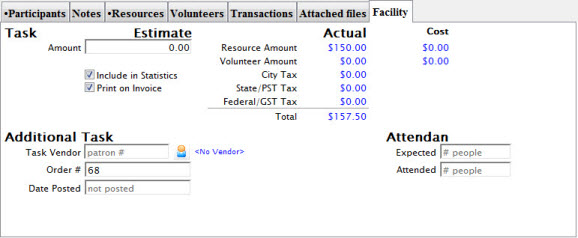
Project Tasks Tab

You can drag a task from the calendar or from another task list to this project window. If the task is already part of another project, you will be asked if the task should be moved and the previous transactions reversed.
Functions
| Status | Indicates the status of the task. statuses are:
|
| Task # | The task number as displayed in the task # field of the Task window |
| Status | Status of the task - Done, Not Done, In Progress, Cancelled |
| Begin / End Date | Dates as entered in the Task Detail window |
| Description | Name that shows in the resource list and elsewhere in Theatre Manager |
| Duration | The duration of the project is indicated (but cannot be edited). A duration of 1w 5d 10h 30m would indicate an elapsed time of 1 week, 5 days, 10 hours, 30 minutes. |
| Task Sub-Type | |
| Event / Play # | Displays the Event / Play number if one has been assigned to the task. |
| Project # | Displays the Project number of the Project |
| Event / Play Title | Displays the title of the Event / Play number if one has been assigned to the task. |
| Event Code | Displays the Event / Playcode, if one has been assigned to the task. |
| Performance #, Event #, Date, Time | These columns display the Performance Number date and times, if one has been assigned to the task |
| Estimate | Estimate of the costs of the task if any costs are associated with the task |
| Resource Cost | The replacement cost per unit of the resource |
| Complete | Indicates if the task has been completed |
 |
 Clicking 'insert' to add a new task has the following behaviour:
|
 |
Opens the Task Detail window for the highlighted task. |
 |
 This provides a popup like the one on the right that will ask you if you want to:
|
| Description |
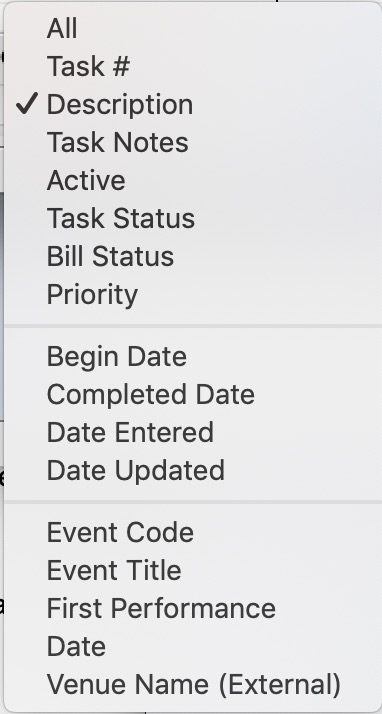 You can search for a number of items within most task lists using the various variables to the right.
|
Project G/L Entries Tab
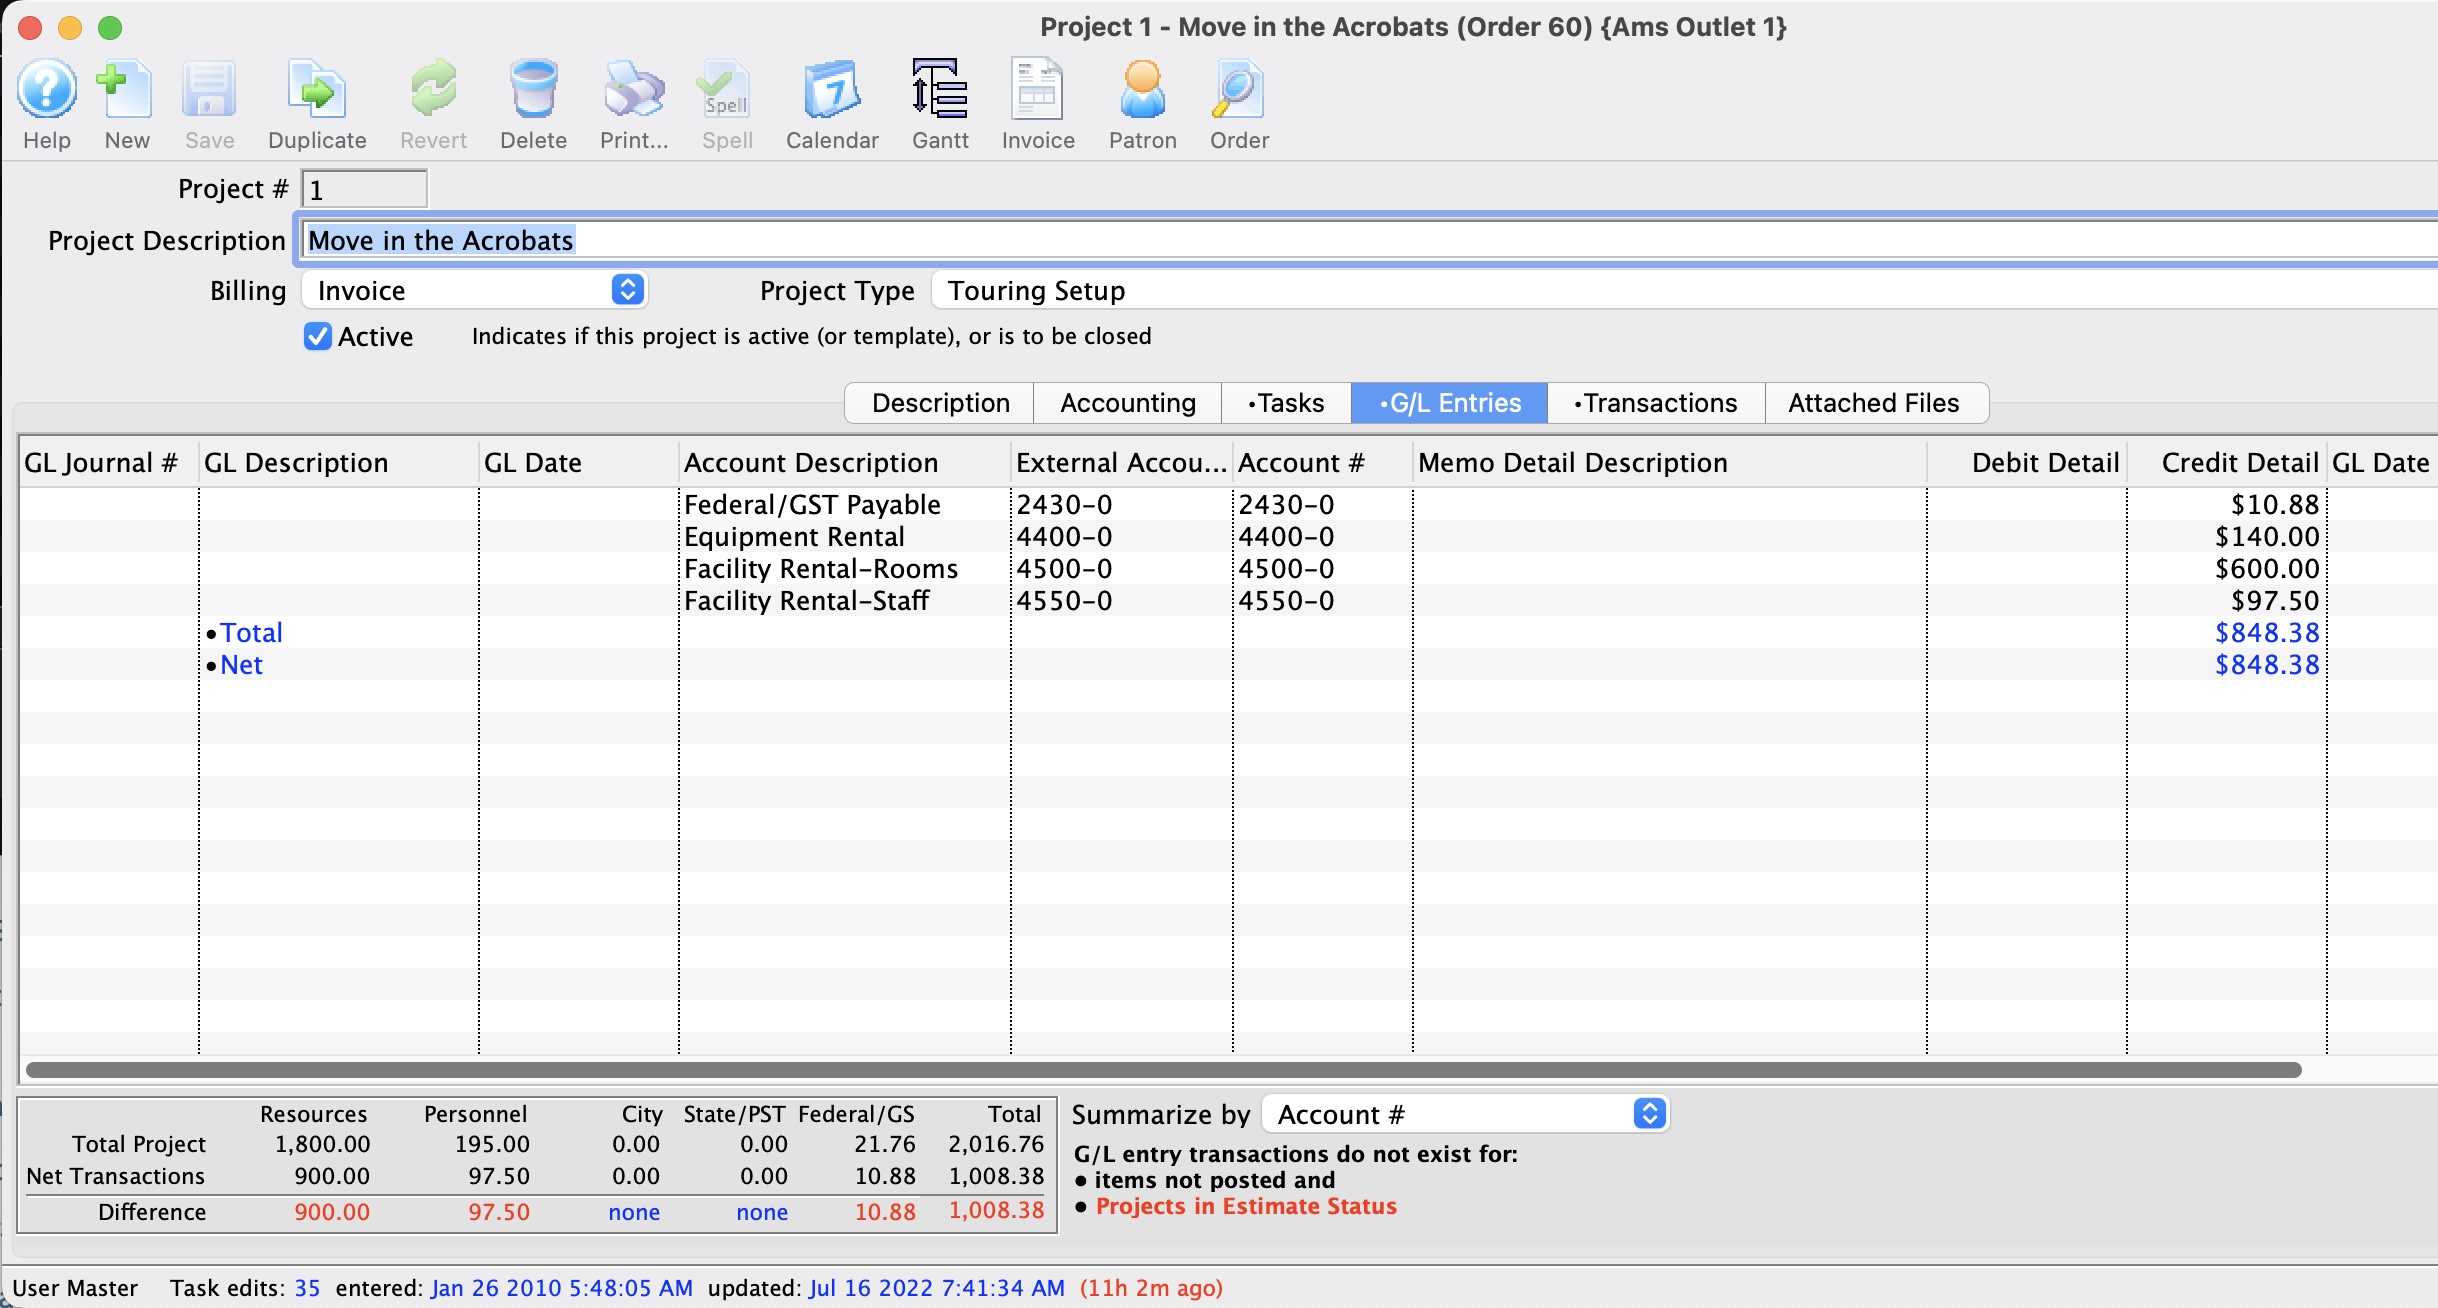
Project Transactions Tab
![]()
Project Attached Files Tab

Click here for a full description of this tab and how to use it.
Editing an Existing Project
To edit an existing project, you perform the following steps:
- Click the Projects Button in the toolbar.
The Project List Window opens.
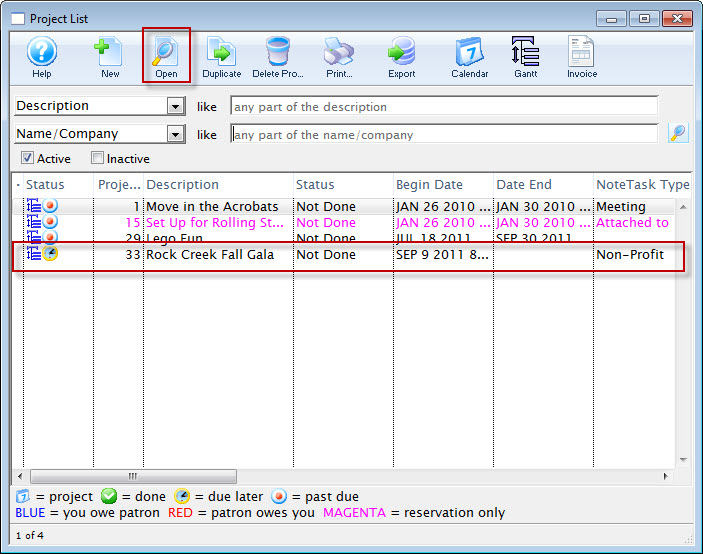
- Select the oproject you want to edit by double clicking on the project line or by clicking the Open
 Button.
The Project Window for the selected Project opens.
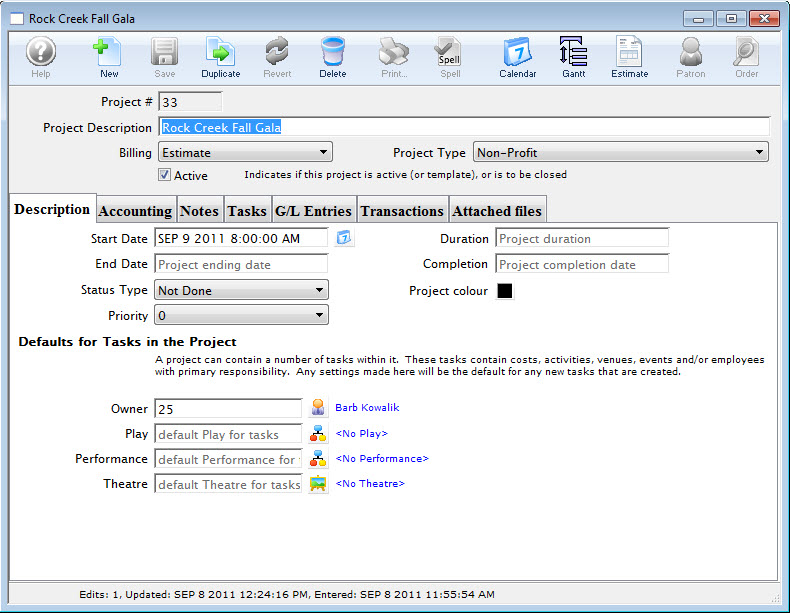
You can now make and changes to the selected project.
Duplicating a Project
Certain types of projects can have very similar pieces and may make good templates for other projects. For example, if you have shows that go up in your facility that have certain general steps, such as "Build Set", "Move In Set", "Hand Lights", "Rehearsals", etc., you can make a project that is a template that includes the groups and typical tasks associated with a project of this type. This can then be used as a template that is duplicated, along with all tasks and task participants.
You may also want to duplicate a projects like "2011 Auction", or "2010 Dinner Fundraiser".
When you duplicate a project, you use a wizard with a series of screens where you can make a variety of decisions to indicate how you want to make changes to the original project when creating the duplicate of the project.
Step 1 - Selecting Default Information
To duplicate an existing project, you perform the following steps:
- From the Project list window, highlight the project you want to duplicate and click the Duplicate
 button.
Click for information on opening the Project List window.
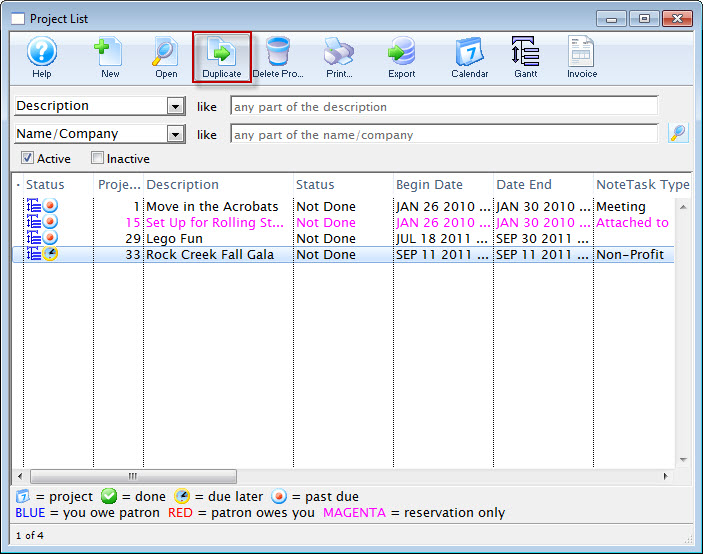
The Duplicate Project Step 1 window opens.
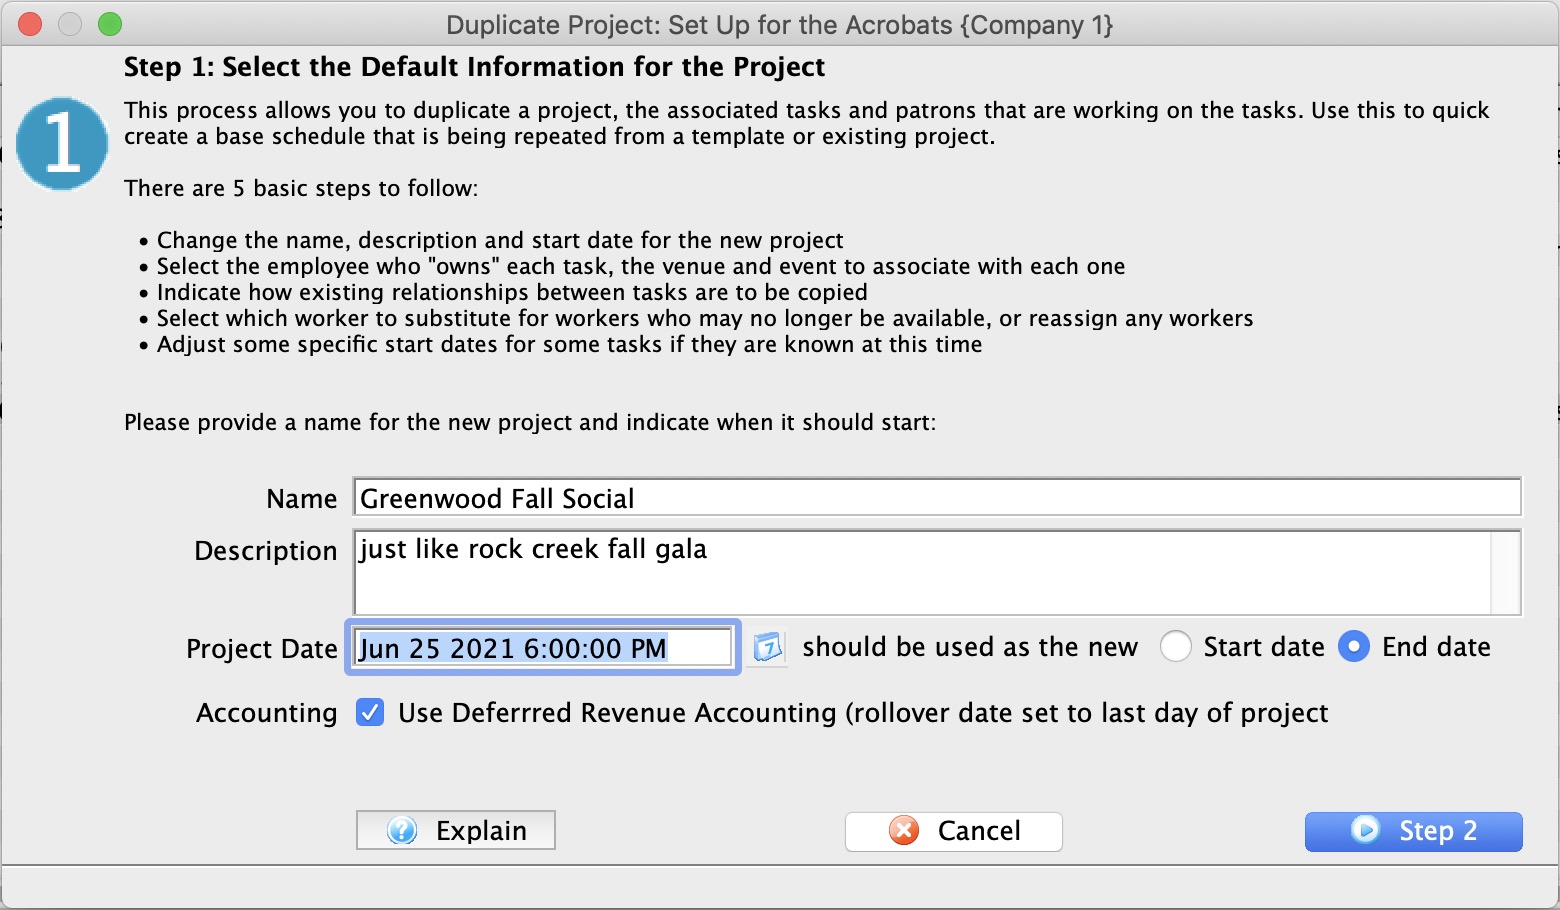
- Change the name of the Project.
For example: You have a recurring yearly auction.You could change "2010 Auction" to "2011 Auction" leaving all the auction project tasks available for the new auction.
- Add or change the description of the Project.
- Change the Date, click the Date button to enter a new starting or ending date and time for the project.
Click the 'start date' or 'end date' radio button to suit your purpose. If you click: - start date the project time for the first project is defaulted to 8:00am - all other tasks are forward adjusted from that time. This means you are planning the new project forward from the date specified - and it ends when it ends.
- end date the project time for the lat project is defaulted to 6:00pm - all prior tasks are backward adjusted from that date. This means you are planning the project backwards from the 'drop dead' date which is must be done by.
In a later step, you can decide if you want all tasks associated with the project to be offset from those in the original project by the same number of days the duplicate project's starting date if offset from the original starting date. - Indicate Use of Deferred Accounting
You can choose that the accounting goes into deferred accounts for resources and volunteer/staff activities.
The rollover date will automatically be set to the date of the last task in the new project. It can be changed later in Project Accounting Setup if need be.
- When you have updated the Name, Description and Date, click the Step 2
 button.
To cancel the Duplication, click the Cancel
 button.
Step 2 - Set Task Ownership, Venue and Play Settings
- In Step 2a, you can change the Project Owner clicking the button.
You also have the option of:
- Maintaining the same owner of each task. This is advantageous if you want a different employee to be able to edit their own tasks since the task owner and the project owner can edit a specific task.
- Setting the task owner to be same as the owner of the project. This means that only the project owner will be able to edit tasks in the new project.
The tasks can pertain to activities within a theatre/venue. If you assign them to a main theatre, you will be able to manage them on a calendar window for that theatre or switch the task into another theatre.
- In Step 2b, You can change the Theatre and Play settingings.
Click the
button, to change the venue.Click the
button, to change the Play. - When you have updated Step 2, click the Step 3
 button.
To cancel the Duplication, click the Cancel
button.To return to Step 1, click the Step 1
 button.
Step 3 - Set Task Relationships and Suspensions
In this step, you indicate whether the Relationships between the tasks should be carried forward, if the suspension of specific tasks should be included and if all the dates from the original project should be offset. That is changed to match the new project start date.
- Choose your relationship.

For Relationships, choose between Clear all current relationships between tasks (which will remove any "Start to Start", "Finish to Finish", or "Finish to Start" relationships between any tasks in the project) and Retain any existing task relationships (which will retain those relationships).
- Choose suspensions for tasks when duplicating a project.

For Suspensions, choose between Clear any existing suspensions (which will remove any periods of time during the tasks when there must be a suspension of work) and Retain any suspensions in current tasks (which will not remove those suspensions).
- Choose the starting date for tasks for the new project.
>
For Starting Date, choose between Set start date of all tasks to be start date of project (which will make all tasks align their start dates with the starting date of the project) and Retain task start date as offset from start of project (which adjusts the starting date of each task in the new project from the start date of the new project, to the same time/date offset as in the original project).
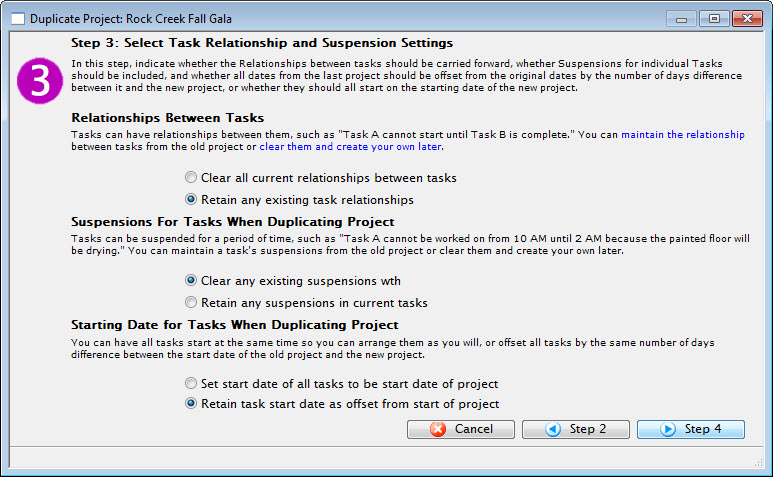 >
> - When you have updated Step 4, click the Step 4
 button.
To cancel the Duplication, click the Cancel
button.To return to Step 2, click the Step 2
 button.
Step 4 - Performance Substitutions
In Step 4, you can make a global change to tasks that are attached to different performances in a new project. A list of performances associated with the Project are displayed.
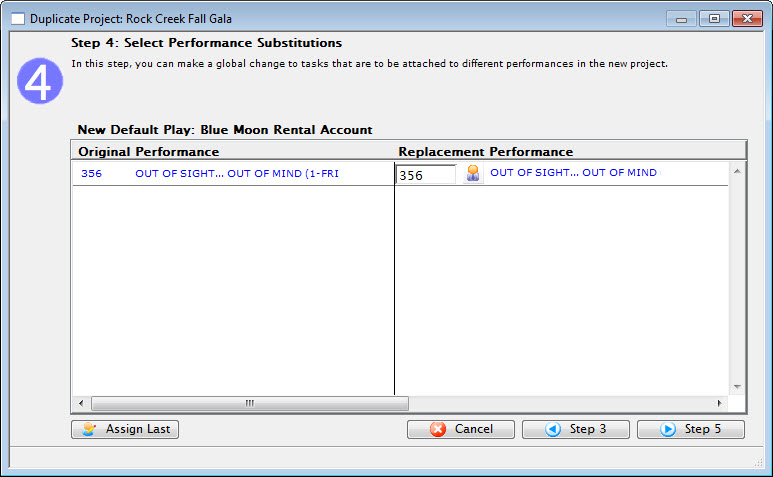
- To change the number of the new performance, enter the new number.

- To Search for a new performance for this task, click the button.
The Performance List Lookup window opens.
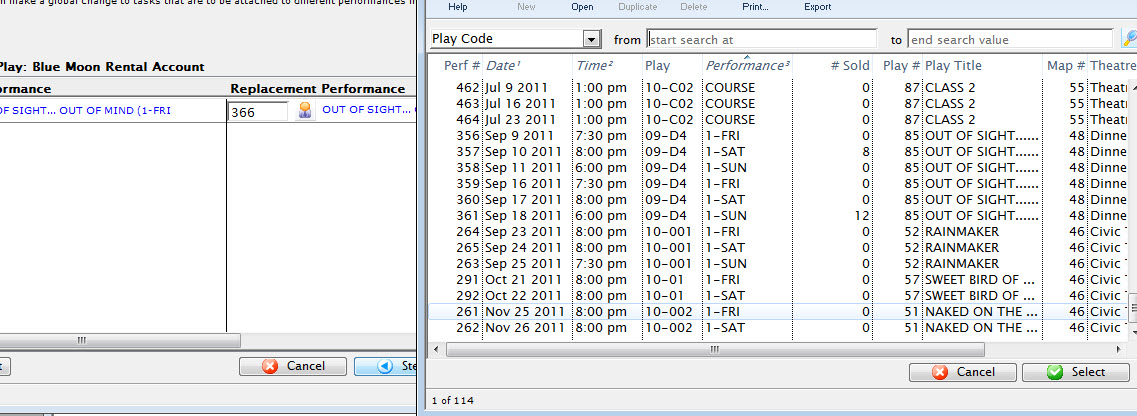
- Make your selection, by double clicking on it or by highlighting it and clicking the Select
 button.
You are returned to Duplicate Project Step 4 and your selection is in the Replacement Performance pane.
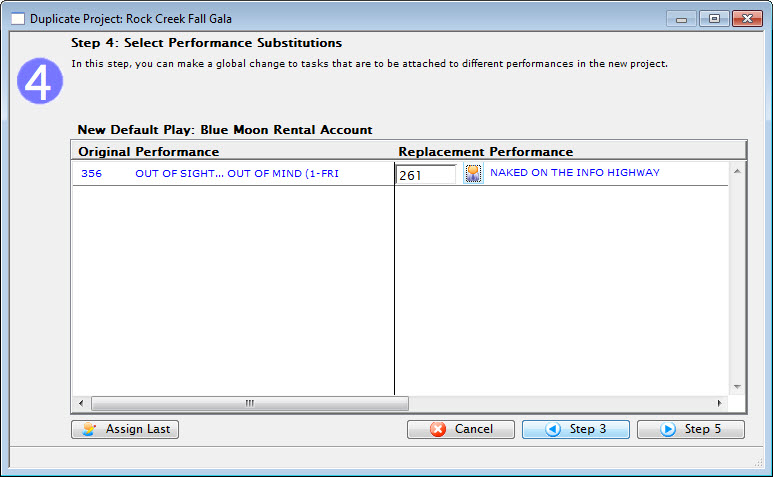
Click the Assign Last button to assign all replacement performances to the original performance. (This is the default.)
- When you have updated Step 4, click the Step 5
 button.
To cancel the Duplication, click the Cancel
button.To return to Step 3, click the Step 3
 button.
If there are any conflicts, such that you have tasks scheduled in the same venue within 1 hour of some previously assigned task, you will be asked to confirm if you want to overbook the tasks into this venue.
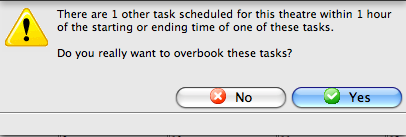
Step 5 - Select Worker Substitutions
To Change the Workers:
- To remove a worker, change the assignments to employee #0.

This removes the person from the Task Participants.

- To change a worker, click the button.
If the individual is an employee or Patron, you have the option to select which list to choose them from Patron or Employee.

If the individual is a Volunteer, the Volunteer List opens for selection.
- To remove all of the Replacement Workers, click the Clear All
 button.

All of the Replacement workers are removed.

- Click the Assign Last
 button to assign all replacement workers to whom they were originally assigned to.

This is the default setting when the window opens.

- When you have updated Step 5, click the Step 6
 button.
To cancel the Duplication, click the Cancel
button.To return to Step 4, click the Step 4
 button.
Step 6 - Finalize dates
- You can drag tasks to a different day to move them prior to saving the duplicated project. Use the navigation buttons in the upper right to select a different month.
Possible conflicts in venue will be displayed as background tasks on the calendar.
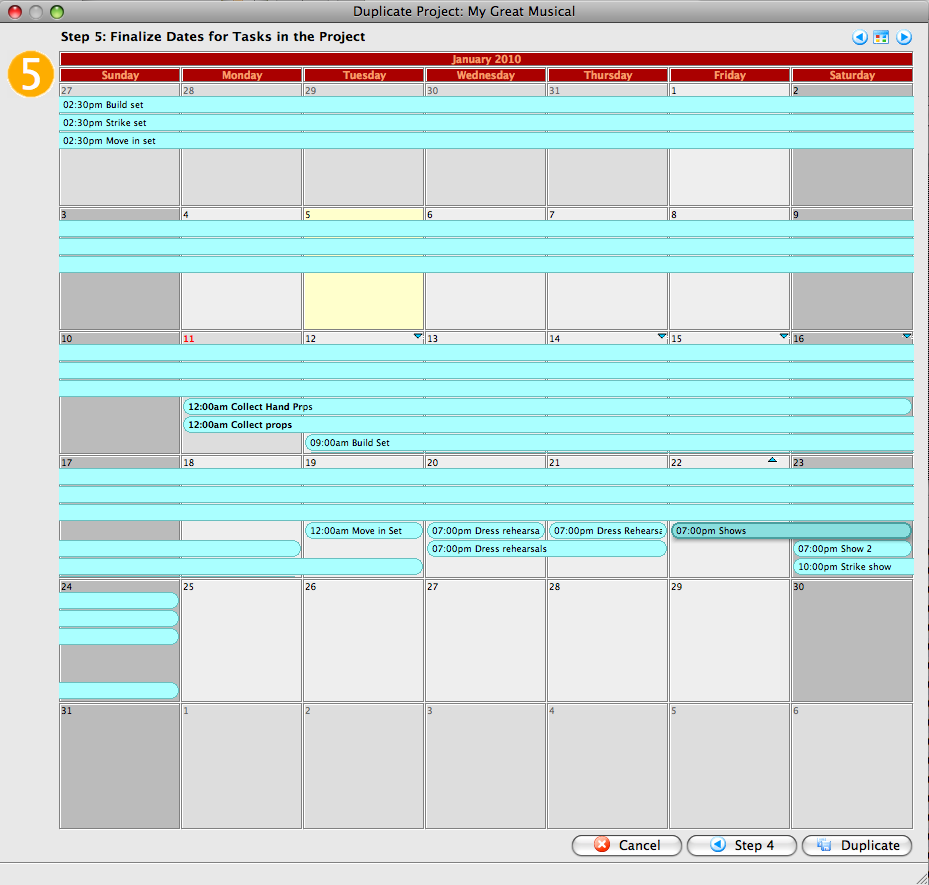
- When you have updated Step 6, click the Duplicate
 button to duplicate the projects and the associated tasks.
To cancel the Duplication, click the Cancel
button.To return to Step 5, click the Step 5
button.
In Step 6, you will see a calendar displaying the tasks associated with this project.
Project Window
This window displays information about the selected project. To access this window, you perform the following steps:
- Click the Projects Button in the toolbar.
The Project List Window opens.

- Click the Gantt
 button.
The Projects Window opens.
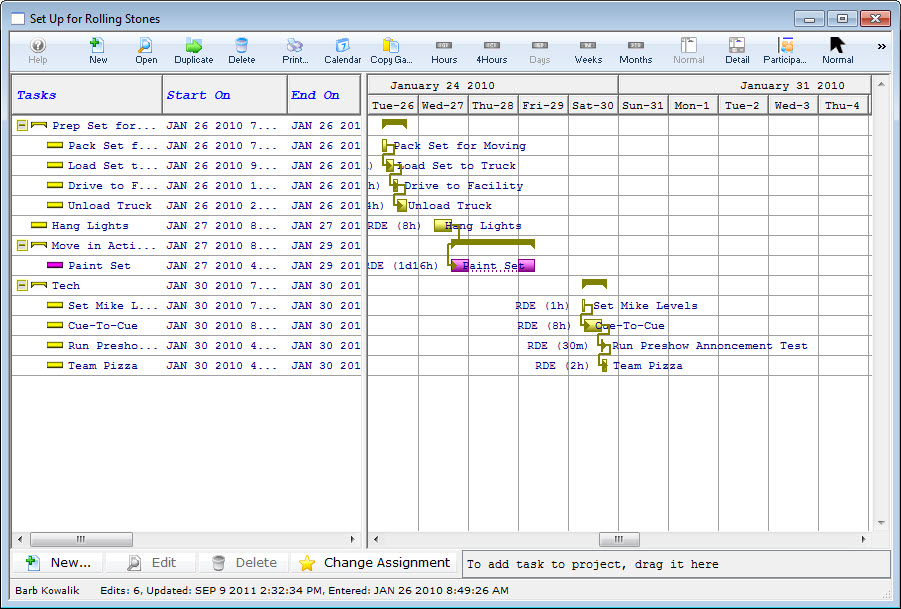
The project window displays a lot of information about your project in a small space.
|
This window saves information a little differently from other portions of Theatre Manager. As soon as a change is made, it is saved. This allows immediate feedback and changes in this window. When editing this way, you MUST press the Return key to save the data. |
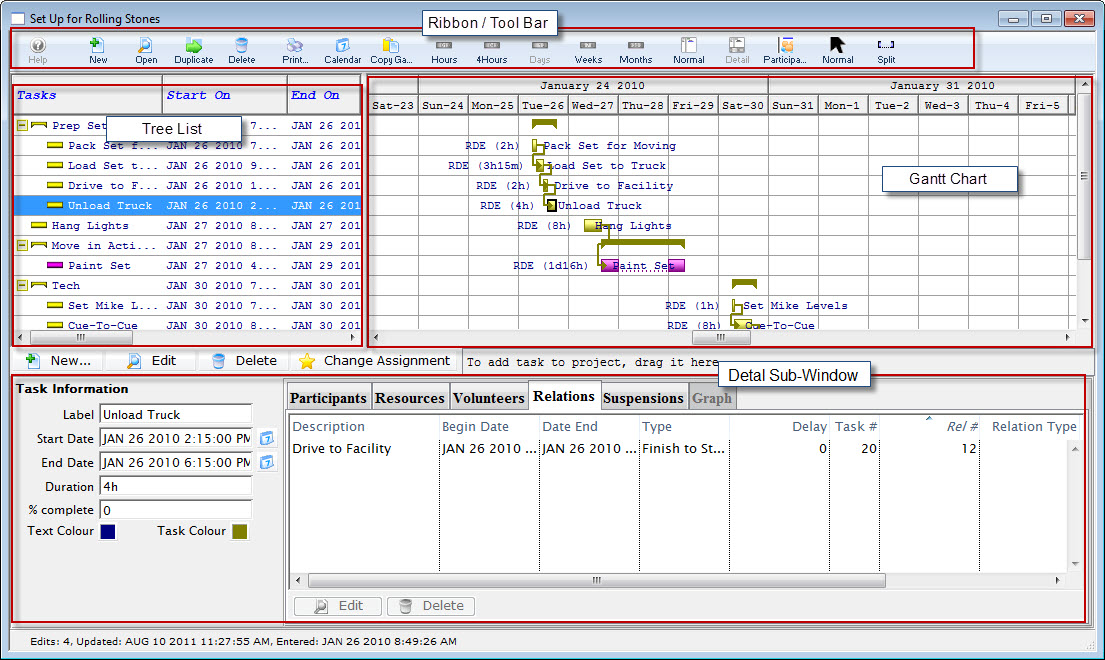
Parts of the Window
| Ribbon Bar / Toolbar | The Projects Ribbon Bar / Toolbar has a number of different selections that do not appear in other windowsd. Cick here For a more detailed description. |
| Tree List | On the left is the treelist. It displays the parts of the project along with their groupings. You can have a hierarchy of tasks, allowing for lists of tasks to be grouped together under a common title. You can change items in the treelist by double-clicking on the text you want to change. Click here for more information on the Tree List. |
| Gantt Chart | A Gantt chart is a type of bar chart that illustrates a project schedule. Gantt charts illustrate the start and finish dates of the terminal elements and summary elements of a project. Terminal elements and summary elements comprise the work breakdown structure of the project. It displays in a graphical form some of the details for each task in the project, including any temporal (time-related) relationship between tasks, how close it is to completion, etc. Click here for more information on using Facility Management's Gantt Charts. |
| Task Detail | By single clicking on a task in the Gantt chart, you can see a detail subwindow showing the details of the selected task. Click here for more information on how to use the Detail Editing sub-window. |
Project Detail Toolbar / Ribbon Bar

Function Definitions
Click on a link to learn more about the features.
 |
Opens the Help file for Projects. Click here to view the Help page. |
 |
Creates a new project. Click here to go to the Task Detail window. |
 |
Saves any changes made to the open project. |
 |
Duplicates the entire project. Click here for information on the Duplication Wizard. |
 |
Undoes any changes to the current project since it was last Saved. |
 |
Deletes the current project. |
 |
Opens the Gantt Print dialog. Click here for more information. |
 |
Unavailable in this window. |
 |
View the project as a Calendar. Click here for more information on calendars. |
 |
Opens the Gantt Chart of the project. Click here for more information on Gantt charts in Facility Management. |
  |
The Estimate/Invoice button changes name depending on the status of the Billing dropdown menu. When printing an Estimate, the estimate values are used. When printing an Invoice, the actual values are used. |
 |
The Patron button displaysopens the Patron record for the patron whose order is attached to the project. Click here for more information on Patron records. |
 |
The Order button opens the Order record for the order attached to the project. Click here for more information on Orders. |
Gantt Chart and Treelist Project Viewing
A Gantt chart is a graphical representation of the duration of tasks against the progression of time. A Gantt chart is a useful tool for planning and scheduling projects.
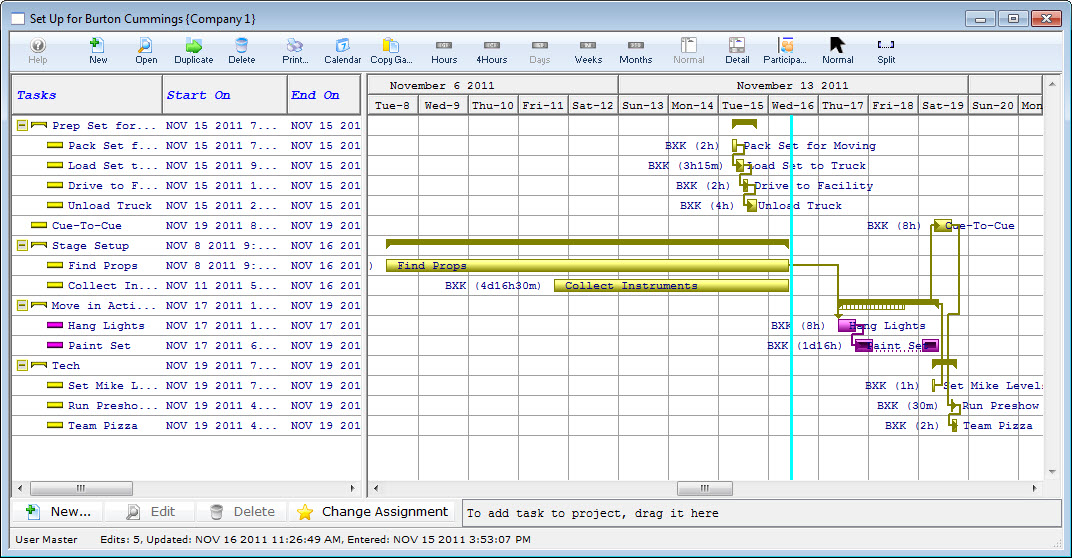
A Gantt chart is helpful when monitoring a project's progress. A Gantt chart is a type of bar chart that illustrates a project schedule. Gantt charts illustrate the start and finish dates of the terminal elements and summary elements of a project.
Terminal elements and summary elements comprise the work breakdown structure of the project. They also show the dependency relationships between activities. When you are planning, scheduling and monitoring a project, you can use a Gantt chart to plan how long a project should take. It lays out the order in which the tasks need to be carried out. When the project has started, a Gantt chart lets you see immediately what should have been achieved at any point in time and then lets you see how remedial action may bring the project back on course.Also available in the charting window is the Treelist. Simply defined the treelist represents the structure of the project in a heirarchical format. It works very much like the table of contents in a book, allowing you to group together tasks. How you organize groups and tasks in the Treelist, organizes them in the Gantt Chart.
To Open the Gantt Chart, you perform the following steps:- Click the Projects button in the main Theatre Manager toolbar / ribbon bar.
The Project List Window opens.
- Highlight the Project you want to view and click the Gantt button.
The Projects Window opens.
|
This window saves information a little differently from other portions of Theatre Manager. As soon as a change is made, it is saved. This allows immediate feedback and changes in this window. When editing this way, you MUST press the Return key to save the data. |
Parts of the Window
| Toolbar / Ribbon Bar | The Projects toolbar / ribbon bar has a number of different selections that do not appear in other windows. Click here For a more detailed description. |
| Tree List | On the left is the treelist. It displays the parts of the project along with their groupings. You can have a hierarchy of tasks, allowing for lists of tasks to be grouped together under a common title. You can change items in the treelist by double-clicking on the text you want to change. Click here for more information on the Tree List. |
| Gnatt Chart | A Gantt chart is a type of bar chart that illustrates a project schedule. Gantt charts illustrate the start and finish dates of the terminal elements and summary elements of a project. Terminal elements and summary elements comprise the work breakdown structure of the project. It displays in a graphical form some of the details for each task in the project, including any temporal (time-related) relationship between tasks, how close it is to completion, etc. Click here for more information on using Facility Management's Gantt Charts. |
| Task Detail Sub-Window | By single clicking on a task in the Gantt chart, you can see a detail subwindow showing the details of the selected task. Click here for more information on how to use the Detail Editing sub-window. |
Project Toolbar / Ribbon Bar

Functions
 |
New | Create a New Project. Click here for information on New Projects. | ||
 |
Open | Opens the current project for editing. Click here for information on editing projects. | ||
 |
Duplicate | Duplicates the entire project. Click here for information on the Duplication Wizard. | ||
 |
Delete | Deletes the current project. | ||
 |
Opens the Gantt Print dialog. Click here for more information. | |||
 |
Calendar | View the project in a calendar. | Copy Gantt | Copies an image of the Gantt chart to your computer's clipboard, then you can paste the calendar into other applications. |
 |
Hours | Shows the time scale of the Gantt Chart in hours. Click here for more information on Gantt Time Periods. | ||
 |
4 Hours | Shows the timescale of the Gantt Chart in 4 hour increments. Click here for more information on Gantt Time Periods. | ||
 |
Days | Shows the time scale in days (default). Click here for more information on Gantt Time Periods. | ||
 |
Weeks | Shows the timescale in weeks. Click here for more information on Gantt Time Periods. | ||
 |
Months | Shows the time scale in Months. Click here for more information on Gantt Time Periods. | ||
 |
Normal | Returns to the Normal view from other views. Click here for more information on the Normal view. | ||
 |
Detail | Opens the Task Detail portion of the window. Cliick here for a detailed exploration of the Detail sub-window. | ||
 | Participants | View the chart broken down by Participant.Click here for more information on the participant view. | ||
 |
Normal | Change the cursor back to the Normal mode in order to cancel creation of a suspension in a task. Click here more information. | ||
 |
Split | Changes the cursor to the Split mode to create a suspension in a task. Click here for more information. |
Normal View
In the Gantt Normal view, each task is displayed under its group. Groups are used to associate tasks with each other. There is no detail subwindow at the bottom.
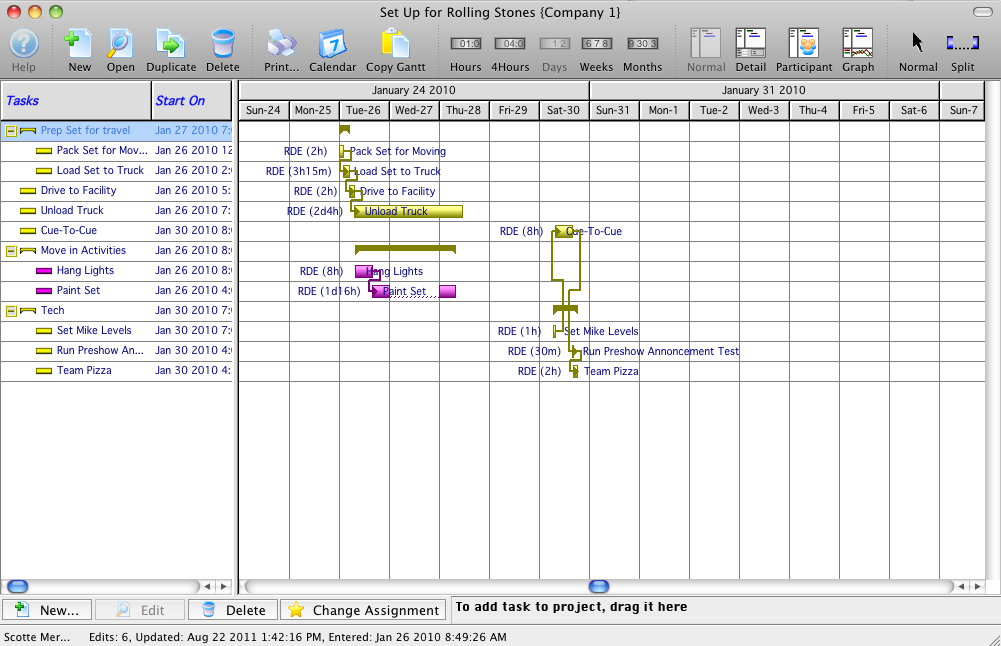
Detail View
In the Gantt Detail view, there is a detail subwindow at the bottom where you can see detail information for each task or group and edit any appropriate portions. The Detail view is applicable for both the Normal and Participant views of the data.
See the Detail Editing Subwindow page for more information.
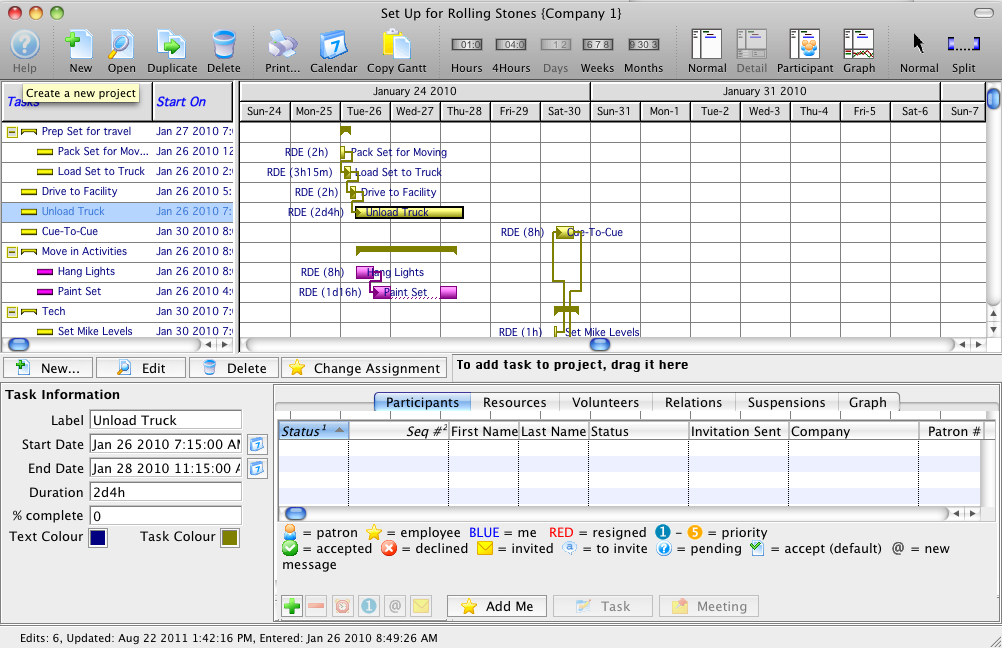
Participant View
In the Gantt Participant view, each participant is displayed on the treelist side of the window with each of their tasks underneath. This may cause some tasks to display multiple times... once under each person who is a participant in this task. At the top may be a participant called "<None>", indicating tasks without any participants.

Printing the Chart
- To start, click the Print button in the Project Detail Toolbar / Ribbon Bar.
Your operating system print dialog opens.

- Click the OK button.
The Gantt Representation of Project Criteria window opens.

Click here for more information on the options available.
- Review and select the appropriate options. When complete, click the Next
 button.
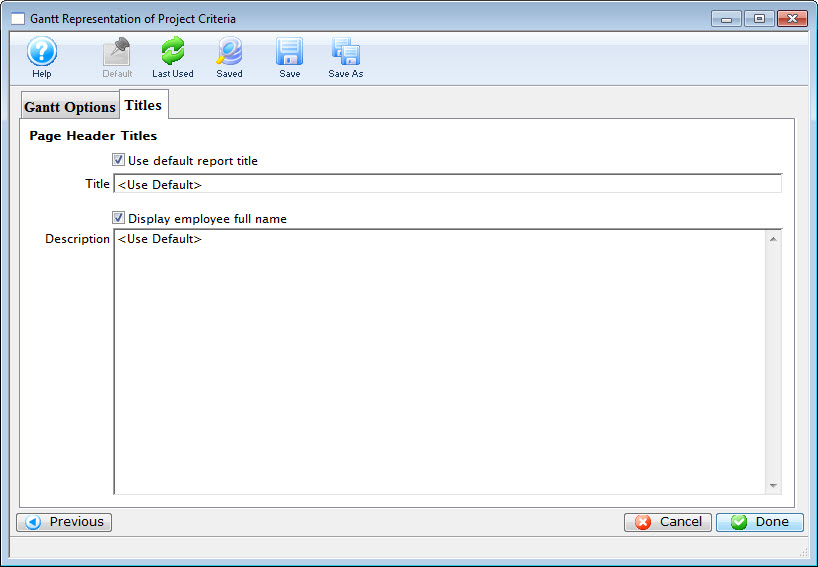
The Title tab opens. Click here for an explanation of this tab.
- Click the Done
 button.
This generates the selected report and opens the Finished Report window.
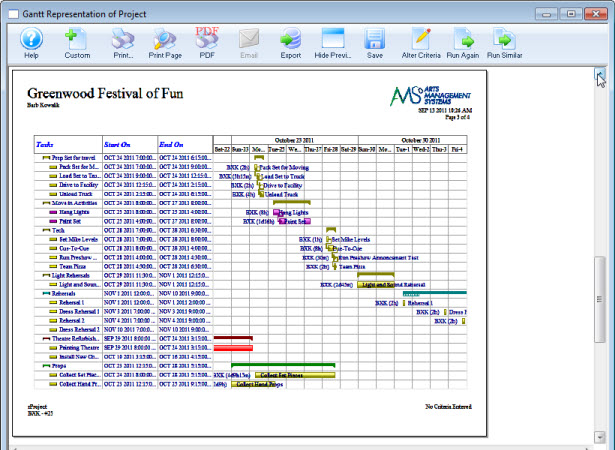
Click here for more information on the Finished Reports window.
Gantt Printing Options
Parts of the Gantt Options Tab
| Gantt Type | You have the option of selecting:
|
| Restrict Date Range | Enter a Date in the From and the To boxes to change the date range. The default is the start and the end dates of the project. |
| Print All Project Selections | The default is to print all of the Groups you have
defined in your project. To print specific groups only,
Disable the checkbox  .
You can then select the groups you want from the list. .
You can then select the groups you want from the list.
|
| Columns to Print | This option diplays the columns you selected in the tree list. You can enable or disable specific columns and you can change the width of the columns. |
| Project Print Options | Disabling and enabling the checkboxes allows you to print:
|
| Chart | Disabling and enabling the checkboxes allows you to printt:
|
 |
Cancels the printing of the report |
 |
Next moves to the Titles tab. |
 - Prints the whole project in 1 hour increments.
 - Prints the whole project in 4 hour increments.
 - Prints the whole project in 1 day increments (Default).
 - Prints the whole project in 1 week increments.
 - Prints the whole project in 1 month increments.
Graph View
Graph view is not currently available
Project Treelist
On the left side of the project window is the treelist. Treelist is very useful in organizing your tasks. The treelist is a table of the tasks in the order they are to be completed. It also allows you to group like tasks under headings. How you organize groups and tasks in the Treelist, organizes them in the Gantt Chart.

You can see two types of lines in the treelist, Groups and Tasks.
- Groups are only used to assemble tasks together. Groups are higher levels of the outline that are used only to group tasks together. Each line indicates the starting and ending times for each task or group.
- Tasks are the individual activities that make up your project. Click here for more information on Tasks and how to set them up.
Right-clicking anywhere in the Treelist will bring up the context menu.
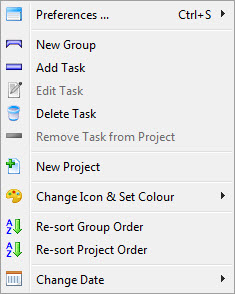
Organizing Tasks in the Treelist
You can drag either groups or tasks inside other groups in order to further indent them. You can also drag a group or task to a different level within the outline.
 |
In this case, we are dragging the Dress rehearsal 1 task inside the Rehearsals group. Notice the arrow on the left side of the bar. It indicates that this dragged item will be dragged inside the group under which it has been dropped. If you attempt to drag inside a task instead of a group, the drag is simply ignored because it is inappropriate. |
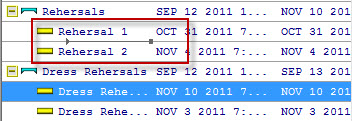 |
In this example, we are going to move the Dress
Rehersal Tasks from the Dress Rehersal Group to the Rehersals Group by
clicking and dragging. In the image the task to be moved has been highlighted and "dragged" to the line of the appropriate spot. Note the line looks like |
 |
Notice the lack of an arrow on the left side of the bar. This indicates that this dragged item will be dragged just below the task (or group) under which it has been dropped. The order things are dragged into is maintained the next time you reopen the project. |
 |
In this picture, the Group Light Rehersals is part of the rehersals group |
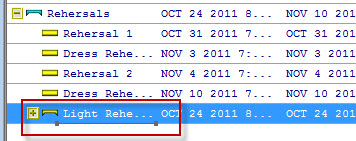 |
We Click and Drag until we see |
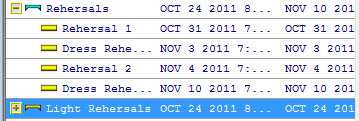 |
When we let go of the button, the Group is no longer part of the Rehersals Group, but is at the same level. |
Editing in the Treelist
Editing the name of a task or a group of tasks and their starting or ending dates is simple in the treelist.
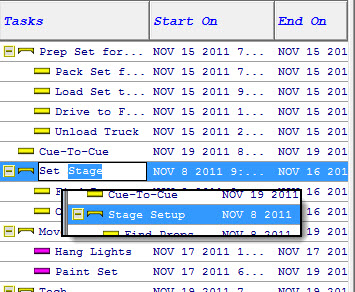
In the treelist, you can edit the name of a task and the Start On and End On dates, by clicking on what you want to change, make the change and press Return.
|
You must press Return rather than clicking out of the field or pressing the Tab key or the changes are not saved. |
Quick Add Tasks in the Treelist
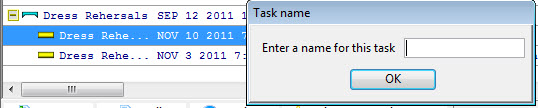
When a line is selected in the treelist, you can go into Quick Add mode by pressing Return. This will display a dialog box allowing you to just enter a task description. It will create a new task at that same level in the outline and save just enough task information to serve as a placeholder in the project. Later you can go back and enter the rest of the task information. This will help you quickly put together the list of the tasks required for your project.
Editing Treelist Columns
You can add and remove columns in the treelist, change the order, and alter the text displayed at the top of each column by right-clicking on the treelist header area.
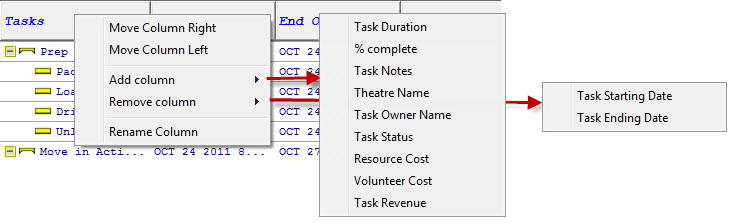
The first column cannot be moved and cannot be removed. Other selections are:
- Move Column Right - moves the selected column to the right.
- Move Column Left - moves the selected column to the left.
- Add Column - the selection brings up a flyout of available columns that are not currently displayed. Selection one will add it to the Treelist display.
- Remove Column - displays a listing of the columns currently being displayed. Selecting one will remove it from the Treelist display.
- Rename Column - allows you to change the text in the header area of the selected column.
Project Gantt Chart
On the right side of the project window is the Gantt chart. It displays in a graphical form some of the details for each task in the project, including any temporal (time-related) relationship between tasks, how close it is to completion, etc.
Views
There are 5 different views of the Gantt chart: Hourly, 4 Hourly, Daily, Weekly, and Monthly.
Hours |
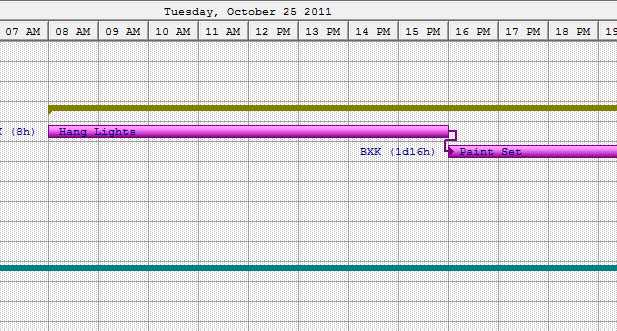 |
4 Hours |
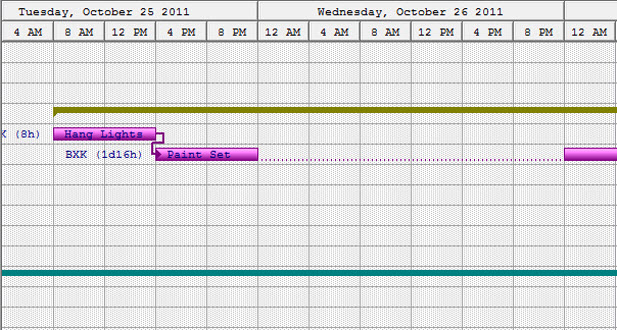 |
Days - This is the Default |
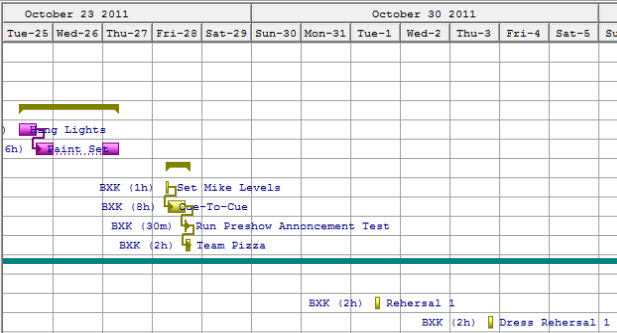 |
Weeks |
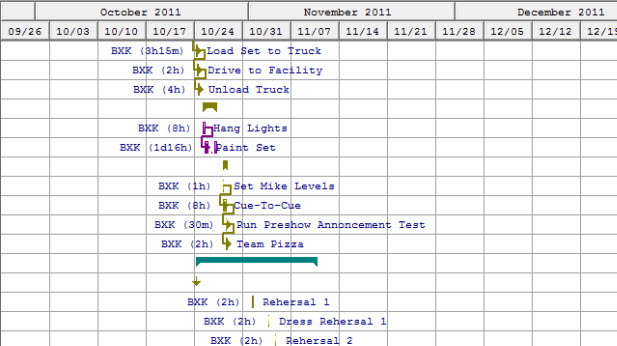 |
Months |
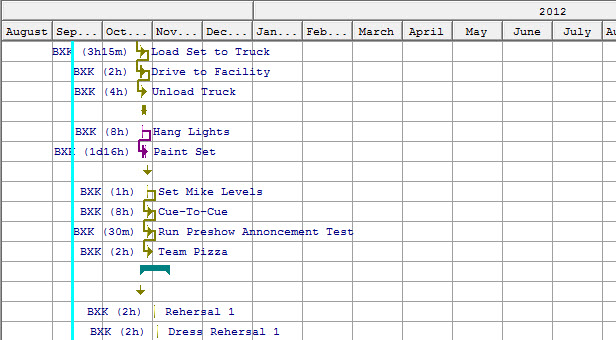 |
Chart Cursor
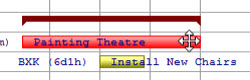 |
When the cursor is above most parts of the task bar it changes to a 4-way arrow. When in this mode you can drag tasks to the right or left to change the starting and ending times of the task. |
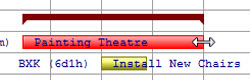 |
When the cursor is on the right end of the task bar it changes to a 2-way arrow. When in this mode you can also grab the end-point of a task and stretch it to the left or right to shorten or expand the length of the task. |
 |
When the cursor is just past the left end of the task bar it changes to a pencil. When in this mode, you can drag across the task bar to fill in a dark area in the middle of the bar to indicate what portion of the task has been completed. When you do this, you will see a series of little squares in the group marker for that group indicating the percentage complete for all the tasks within the group. |
Other Chart Functionality
| Reading the Chart
|
To the left of each Task is displayed the Owner and the length of the task in Days, Hours, Minute (#d#h) format.
On top of each task bar is the description of the task.
Groups are indicated a a bar with angled ends spanning all of the tasks in the group in the Treelist. |
| Changing Colours
|
Different tasks can be given different colours. These can be changed using the Gantt chart context menus. Click here for more information. |
| Suspending Tasks
|
In one of the tasks you can see a gap in the middle of the task bar. This represents a suspension in the task... a time during which no work can be done on it. Click here to go to the Task Suspensions portion of the documentation. At this time, you can only have a single suspension in a given task. If you need more than this, break the task down into multiple tasks. |
| Task Relationships
|
You can also use arrows to connect tasks. These arrows indocate a replationship between the tasks.
Tasks can have the following relationships:
Click here for more information on how to set up relationships between tasks. |
| Detail Subwindow
|
If you click on a task, the detail area will open at the bottom of the window where you can edit information about the task. Click here for more information on the Detail Sub-window.
To Close the Detail Sub-window, click the Normal |
| Create New Task
|
You can create a task in this window by clicking your mouse button and dragging your cursor across a portion of the calendar where there is no task bar.
When you release the mouse button, a create new task window will open with the dates and times you specified by clicking and dragging. Click here for information on adding a task. |

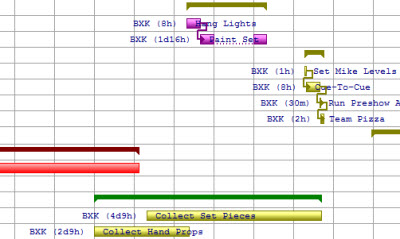

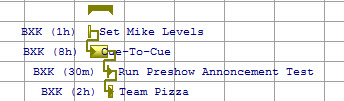
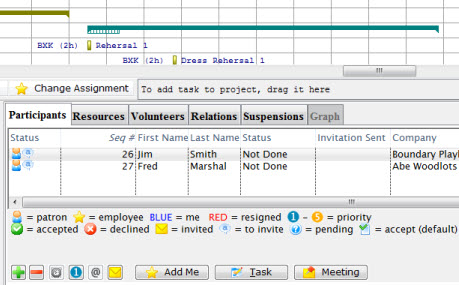
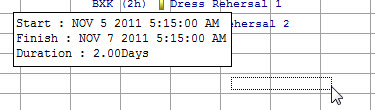
Relationships Between Tasks
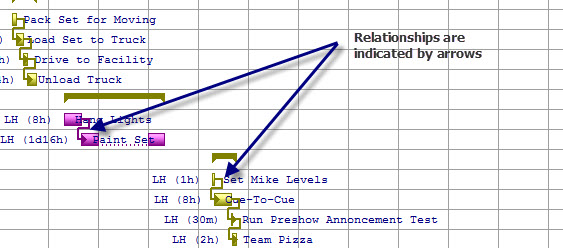
To add a relationship, you would perform the following steps:
- Click on one task and drag from one task to another.
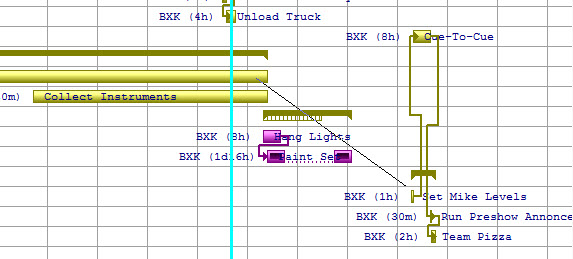
You will see a "string" that connects the two tasks. The Select Relationships Between Two Tasks window opens.
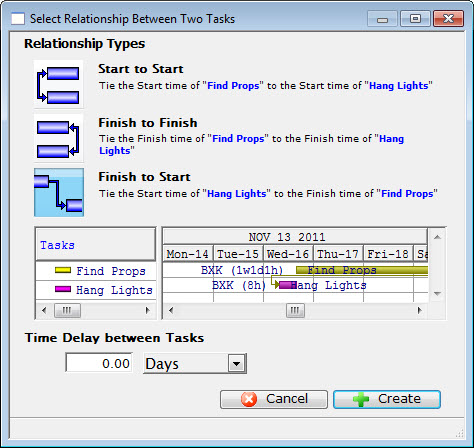
- Make your selection by clicking on the appropriate button:
 - Start to Start - Ties the starting time of the two tasks together.
 - Finish to Finish - Ties the end time of the two tasks together.
 - Start to Finish - Ties the end time of one task to the starting time of the second.
 - If required, you can select a time delay for the relationship. Enter a number and/or select the appropriate time period for the drop down list.
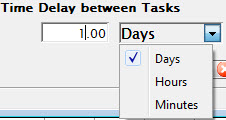
- When your relationship is set up click the Create
 button.
Detail Editing Subwindow
When you click on one of the tasks on the Gantt chart, or click the Detail button on the toolbar, the detail editing subwindow displays at the bottom of the project window.
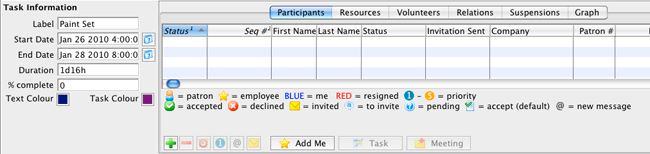
The lower part of the window is divided into two sections. The left side is Task Information.
- Click here for more on Task Information.
The right is made up of six tabs. They are:
- Task Participants - Click here for more information on Task Participants tab.
- Resources - Click here for more information on the Resources tab.
- Volunteers - Click here for more information on the Volunteers tab.
- Relations - Click here for more information on the Relations tab.
- Suspensions - Click here for more information on the Suspensions tab.
- Graph - Click here for more information on the Graph tab. .
Task Information
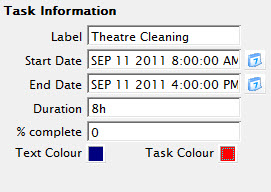
With any items in this window, as soon as you leave a field or make a selection the information is saved and the screen is updated and saved for the task.
In this window you can change:
| Label | The Label given to the Task. |
| Start Date | The starting date/time for the task. Enter the date and time or click on the Calendar button to make any change. |
| End Date | The starting date/time for the task. Enter the date and time or click on the Calendar button to make any change. |
| Duration |
The duration of the task in the format 4w 3d 2h 1m. Adjusts as the starting or ending dates and times are changed. |
| % Complete | Indicates the amount of the task that is complete (as entered here or in the task window). |
| Text Colour | The colour of the text that displays on the task bar in this window. Click the colour box to change the colour. |
| Task Colour | >The Colour of the task bar displayed in this window. Click the colour box to change the colour. |
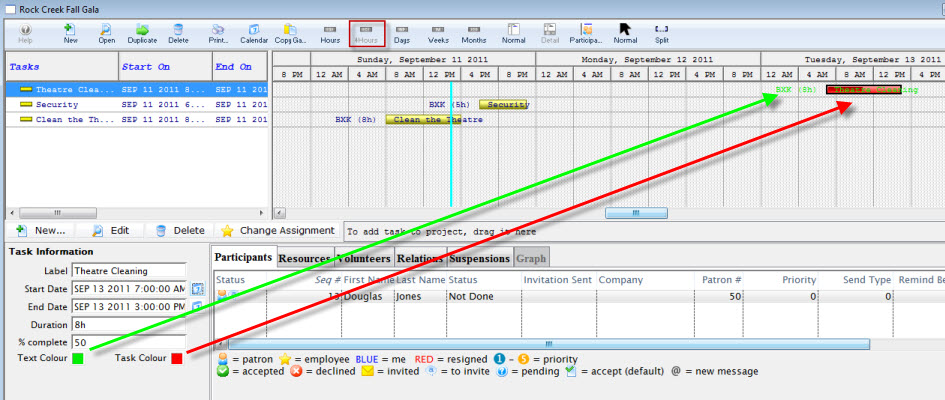
Task Participants
This is the same subwindow used in the Task Detail window. You can attach people to the task and set other information appropriate for the participants in the task.
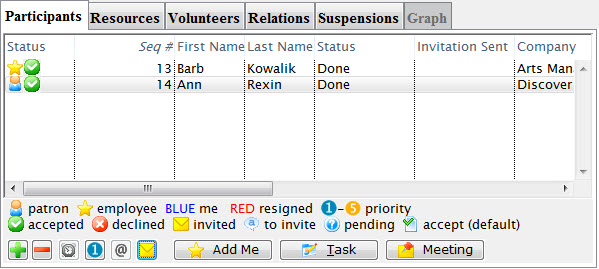
With any items in this window, as soon as you leave a field or make a selection the information is saved and the screen is updated.
Click here for complete information on this window and its funtions.
Resources
This is the same subwindow used in the Task Detail window. You can attach resources to the task and set other information appropriate for the resources in the task.
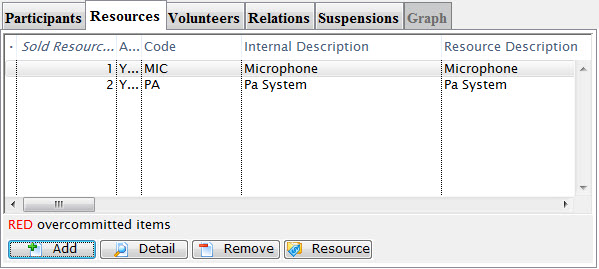
With any items in this window, as soon as you leave a field or make a selection the information is saved and the screen is updated.
Click here for complete information on this window and its funtions.
Volunteers
The Volunteers tab displays volunteers for the currently selected task.
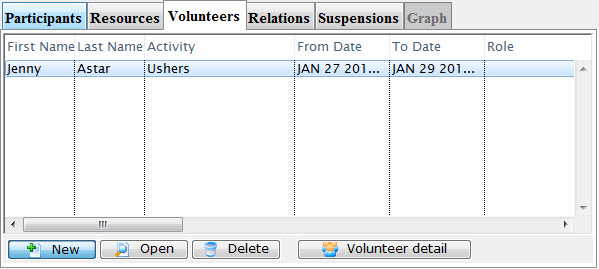
Parts of the Volunteers Tab
|
Click the New button to add a volunteer to the task. Click here for information on adding a volunteer. |
 |
Opens the Activity history window for the selected volunteer. Click here for more information on Activity History. |
|
Clicking the Delete button, deletes the selected volunteer history record. |
 |
Opens the Volunteer History record for the selected volunteer. Click here for more information on the Volunteer History Window. |
In this tab, you can add new or delete volunteers, and view the volunteer record.
With any items in this window, as soon as you leave a field or make a selection the information is saved and the screen is updated.Add a Volunteer
You can add participants to a task in this window. To do so, you perform the following steps:
- In the Volunteers tab, click the New button.
The Volunteer List window opens.
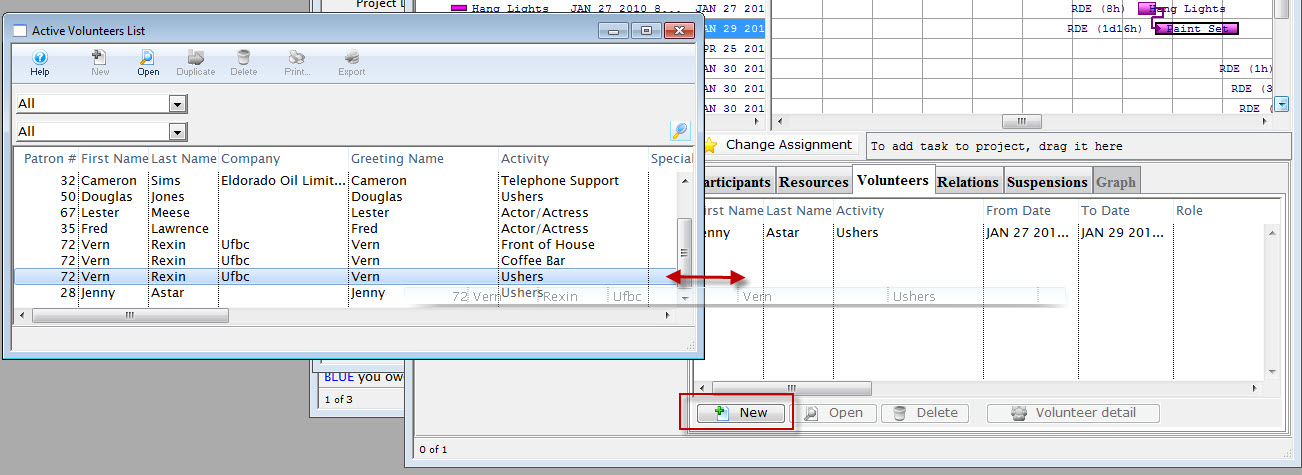
- Choose the volunteer to add to the project task and "drag" and "drop".
With any items in this window, as soon as you leave a field or make a selection the information is saved and the screen is updated.
Relations Tab
This window shows you the relationships between different tasks. In this tab, you can only edit or delete relationships, you cannot add them.
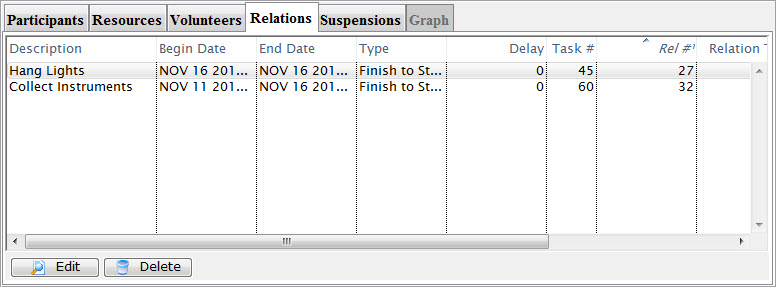
This window displays the types of relationships available between tasks. You can select which type and indicate any delays.
If you select Start to Start, the starting time of one task is tied to the starting time of the other. In other words the starting time of the second task cannot start any earlier than the starting time of the first task.
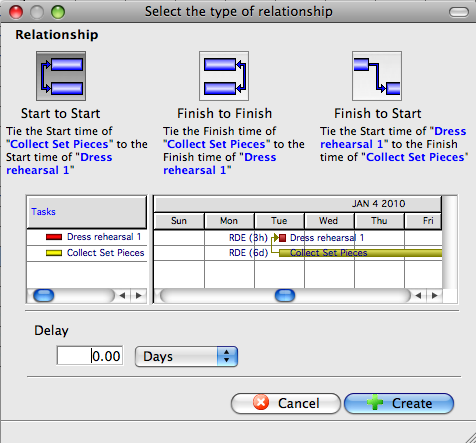
You can also implement a delay such that a certain number of days, hours, or minutes must elapse before the second task begins.
If you select Finish to Finish, the ending time of one task is tied to the ending time of the other. In other words the ending time of the second task cannot start any earlier than the ending time of the first task.
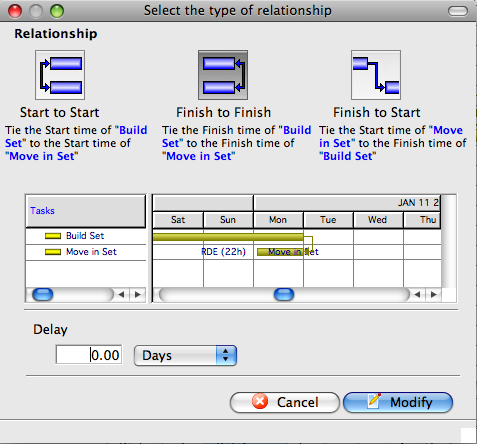
If you select Finish to Start, the starting time of one task is tied to the ending time of the other. In other words the starting time of the second task cannot start any earlier than the ending time of the first task.
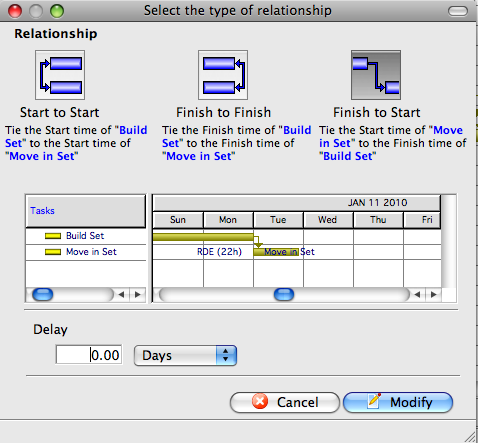
Once these relationships have been set up, as you drag one task or the other in the Gantt chart, the same temporal (time-based) relations are maintained. Moving or changing starting or ending dates of one task may move or change dates on another task, based on the relationships you have set up.
A task can have relationships set up between any number of other tasks, but there can only be one relationship between any two given tasks.
With any items in this window, as soon as you leave a field or make a selection the information is saved and the screen is updated.
Adding and Deleting Task Suspensions
At this time, you can only have a single suspension of a task. If you need more than that, break the task down into multiple tasks.
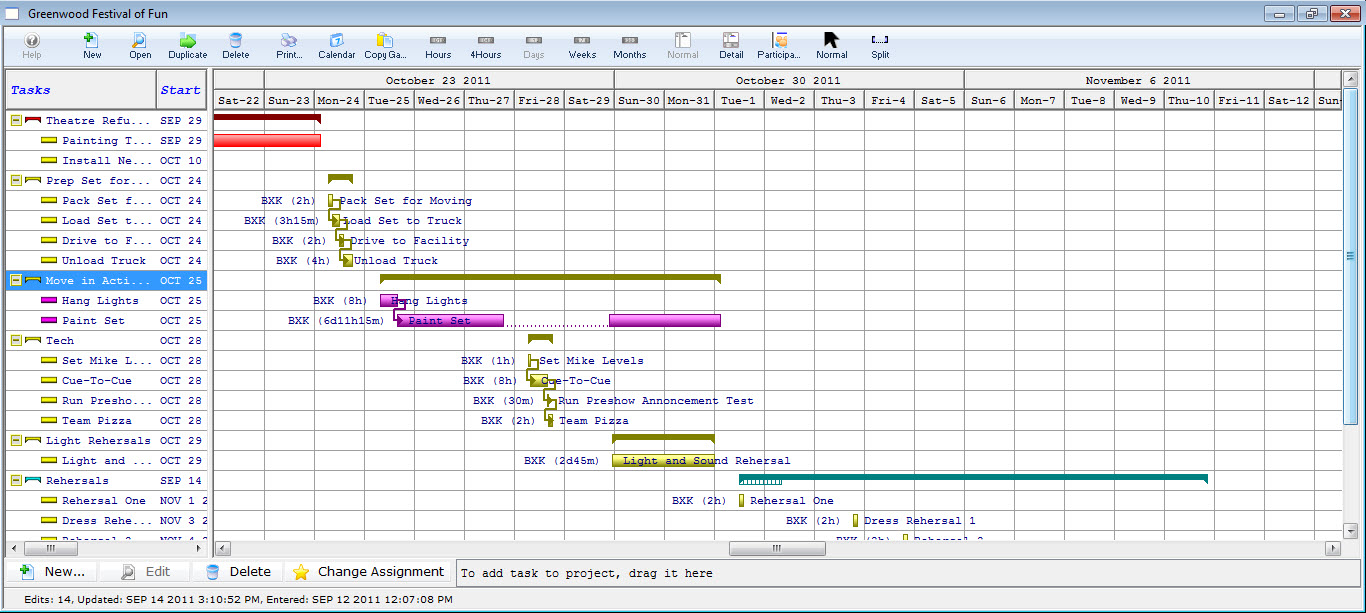
To add a suspension to a task, you perform the following steps:
- Open the project by selecting it from the Project list. Then, in the Project window, click the Gantt button.
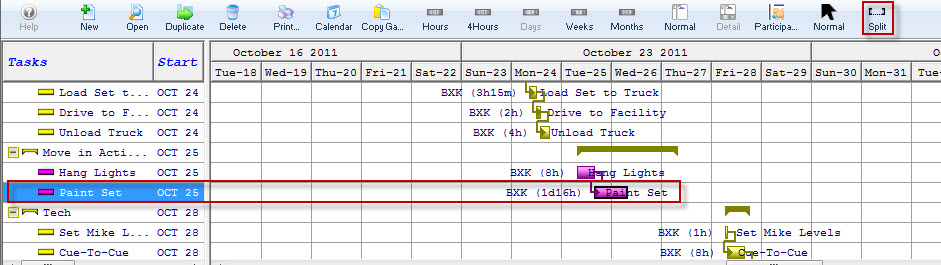
- In the Gantt Chart, highlight the task to be split. Use the right click context menu selection split
 or click the Split
  button on the toolbar / ribbon bar.
The edit details screen opens to the suspension tab.
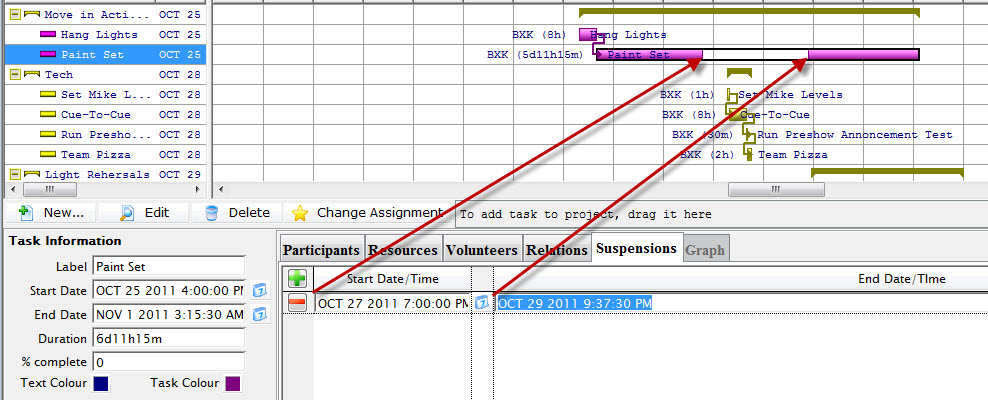
The task information containing the details for the suspension is displayed on the left.
- Make any adjustments.
They are automatically reflected in the Gantt Chart and the date ranges on the left.
You can edit a suspension by editing the date/time for the starting or ending of the suspension or by clicking on the calendar and making your selection. You cannot enter dates/times outside the boundaries of the task itself.
Once a suspension has been created, you can drag the bounds of the suspension from within the Gantt chart.
With any items in this window, as soon as you leave a field or make a selection the information is saved and the screen is updated.
Delete the Suspension
To delete a suspension, you perform the following steps:
- Open the Gantt Chart and click on the suspension you want to delete.
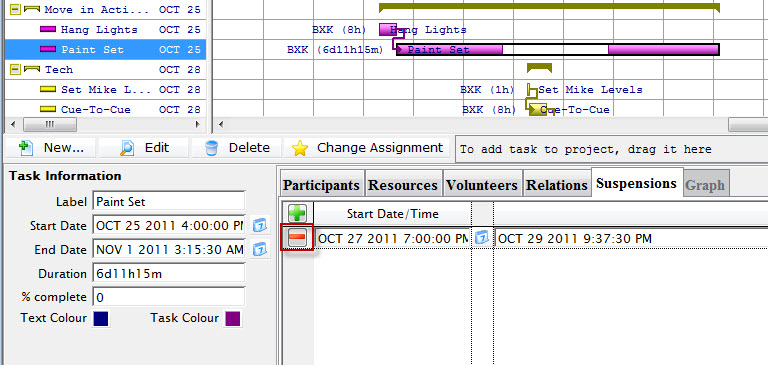
The Detail Editing subwindow opens to the suspension.
- Click the Remove
 button.
A confirmation dialog opens.
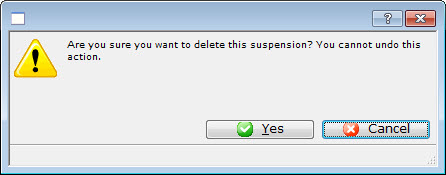
- Click Yes to remiove the suspension.
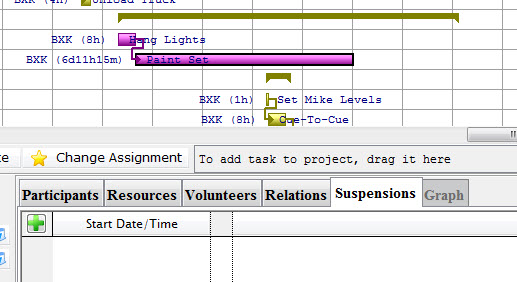
Graph
Graphing is not yet available.
Buttons and Dragging
Below the treelist and Gantt chart are a group of buttons and a drop area for tasks.
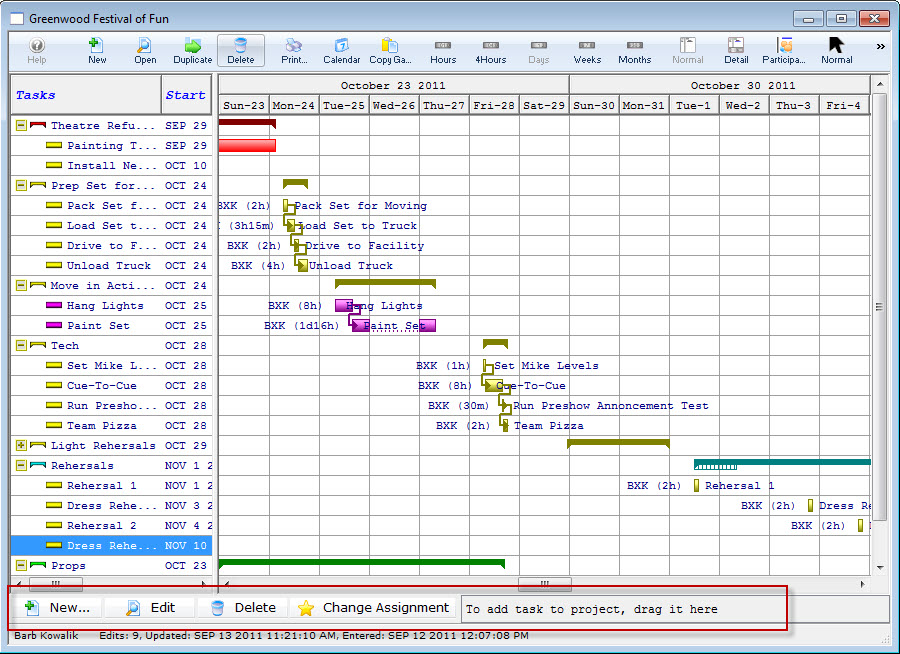
Description of the Button and Dragging Area
 |
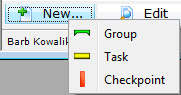 A Flyout menu opens where you can add:
| ||
 |
Edits the name of the task selected. | ||
 |
Removes the task or the group selected.
| ||
 |
Allows you to transfer tasks from one employee to another. Click here for more information. | ||
 |
If you want to add tasks to a project that have already been created elsewhere, you can drag them to the drop area. Click here for more information. |
New Button - Group
To Add a New Group, you perform the following steps:
- In the Projects window, click the New button.
In the example shown, I want to insert the New Group, after the group Rehersals.
- In the New flyout, click Group
 .
.
The Group Name Dialog opens.
Enter the name of your new group and click OK.
- You click and drag to right under the group Rehersals and you see the same ended line
, then let go.
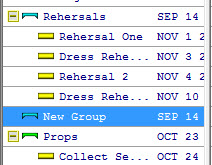
Your new group has been added.
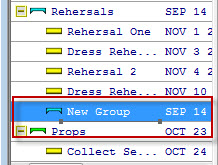
New Group is now a sub-group of rehersals. It needs to be at the same level as Rehersals.
New Button - Task
To Add a New Task, you perform the following steps:
- In the Projects window, click the New button.
In the example shown, I want to insert a New Task in the group New Group.
- In the New flyout, click Group
 .
.
The Group New Task window opens.
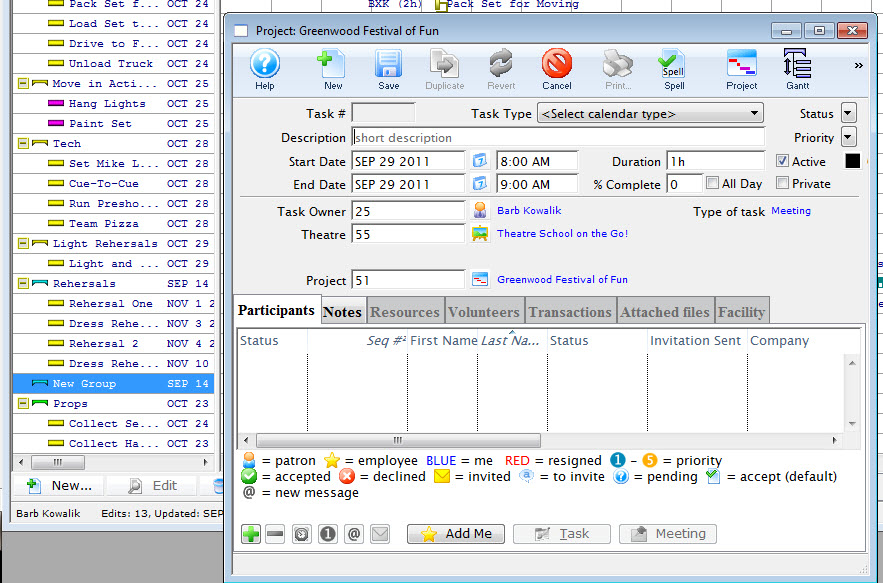
Click here to go to the Add New Task page.
Right Click Context Menus
Both the Treelist and Gantt chart areas have context menus associated with them. Right-click on the appropriate area to see it's context menu.
Treelist Context Menu

Click here for a description of all of the functions of the Treelist Context menu.
Gantt Chart Context Menu
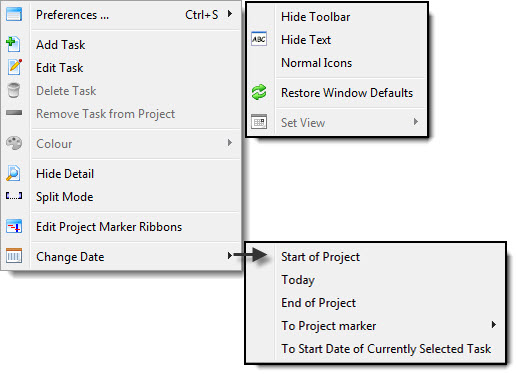
Treelist Context Menu
Functions
| Preferences |
Hide / Show Toolbar - Toggles the Project window toolbar / ribbon bar Hide Toolbar / Show Toolbar - Toggles between displaying and hding the Calendar window toolbar. Hide Text / Show Text - Toggles between showing and hiding the text underneth the icons in the Calendar window toolbar. Small Icons / Normal Icons - Toggles between showing large or small icons in the Calendar window toolbar Retore Window Defaults - If you have moved any of the columns or changed the menu set up, Restore Defaults removes all your changes Set View - Not yet available |
| New Group | Groups are used to assemble tasks together. Click this Item to add a new group. |
| Add Task | Tasks are the activities for your project. Click here for more information on adding tasks. |
| Edit Task | Opens the Task Detail window of the selected task for edititng. Click here for more information on editing tasks. |
| Delete Task | Deletes the selected task. |
| Remove Task from Project | Removes the selected task from the project, but not from the database. You can then add this task to another project. |
| New Project | Opens the new project inserting window. Click here for more information on setting up a new project. |
| Change Icon Set and Colour |  Allows you to change the color of the Icon for the selected group or task.
 |
| Re-sort Group Order | Re-sorts in date order, the items in the selected group. |
| Re-sort Project Order | Re-sorts all items in the project, in date order within their groups |
| Change Date | 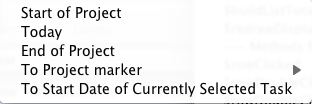 Change date lets you change the date within the Gantt chart. Choices are: Change date lets you change the date within the Gantt chart. Choices are:
|
Gantt Context Menu
The right click context menu provides shortcuts to the most used tasks you perform in the Gantt Chart.
To view a description of all of the functions of the left side of the window - Tree List context menu - click here.
| Preferences |
Hide / Show Toolbar - Toggles the Project window toolbar / ribbon bar Hide Toolbar / Show Toolbar - Toggles between displaying and hding the Calendar window toolbar. Hide Text / Show Text - Toggles between showing and hiding the text underneth the icons in the Calendar window toolbar. Small Icons / Normal Icons - Toggles between showing large or small icons in the Calendar window toolbar Retore Window Defaults - If you have moved any of the columns or changed the menu set up, Restore Defaults removes all your changes Set View - Not yet available |
| Add Task | Tasks are the activities for your project. Click here for more information on adding tasks |
| Edit Task | Opens the Task Detail window of the selected task for edititng. |
| Delete Task | Deletes the selected task. |
| Remove Task from Project | Removes the selected task from the project but not from the database. You can then add this task to another project. |
| Colour | Allows you to change the color of the Icon for this group or task |
| Show / Hide Detail | Hiding the detail is the same as clicking on the Normal
window
icon on the toolbar and hides the detail task window below the treelist
and Gantt chart. |
| Split Mode | Split mode is the same as clicking on the Split
icon on the
toolbar and changes the cursor to Split mode. When in Split mode, click on
a task to create a suspension at that point. Click here for more information on adding suspensions. |
| Edit Project Marker Ribbons |
Displays a list of the current project markers, or checkpoint ribbons. These ribbons display a vertical ribbon on the Gantt chart at a given date/time and in a colour of your choosing. From the list you can add, open, duplicate, or delete a ribbon. Click here for more information on Project Marker Ribbons. |
| Change Date | Change date lets you change the date
within the Gantt chart. Choices are:
|
Project Markers
You can move to the Start of Project, Today, End of Project, To Project marker (project markers will be listed in a submenu), or To Start Date of Currently Selected Task.
You can also Edit Project Marker Ribbons. This displays a list of the current project markers, or checkpoint ribbons. These ribbons display a vertical ribbon on the Gantt chart at a given date/time and in a colour of your choosing. From the list you can add, open, duplicate, or delete a ribbon.

When you add or open a ribbon, the detail screen opens where you can enter a description and date (both required) and select a colour and width for the ribbon.
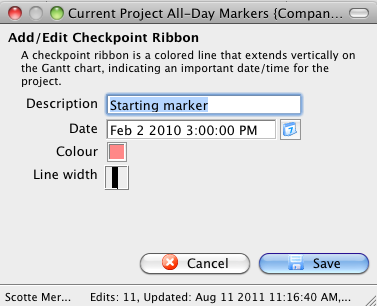 Page in process of being updated
Billing and Accounting
When you use projects, you can create estimates, orders and bill for the tasks grouped in the project all under one order.

Once you have completed all the tasks, you can invoice the customer at that detailed level or use a higher summary level as part of the invoicing.
As it can take more than one person to complete the tasks to complete the project, plus any additional resources (people and things) add to the price and all can be billed to the customer.
Facility Management allows you to keep track of what the estimate was versus what the final billing cost. Simply:- Task = From this time to that time, somebody is doing x as related to the project.
- Project = The collection of tasks, as they relate to each other.
- Billing = When you ask for the $$ for doing all the tasks in the project.
Billing in a Project
There are 3 billing types you can select. These are:
- Estimate (default) - Estimated amounts will be used and printed while billing is set to estimate. The project itself can have an estimate, or if you enter estimates on the individual tasks, those estimates are used instead.
- Invoice - the project will begin creating transactions that will appear in end of day for posting to the G/L.
- Cancelled - If "Cancelled" is selected, all existing transactions are reversed and running end of day will cause reversing G/L entries to be created.
On the Project Detail Accounting tab, the Actuals and Costs areas are calculated based on the tasks associated with the project and the resources and volunteers associated with each task. The project window just shows the roll-up of all the individual task windows.

Changing the Project Billing Type
When Invoice is selected, the project is set up end-of-day processing to create transactions. You can choose Invoice from the drop down list when you add a new project, or you can choose Invoice after a project has been setup. Some rules are:
- An order number is required for billing.
- Printing an invoice estimate will cause an order to be created.
- You can associate the project to an existing order (an order can have multiple projects).

To start, you perform the following steps:
- the project window, click the Billing drop down list and choose Invoice.
The Change Order dialog opens.
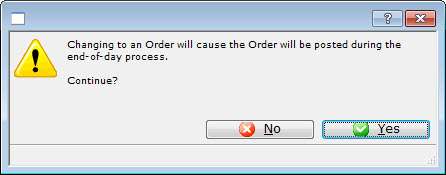
- Click the Yes
 button.
The Select Patron For This Order dialog opens.
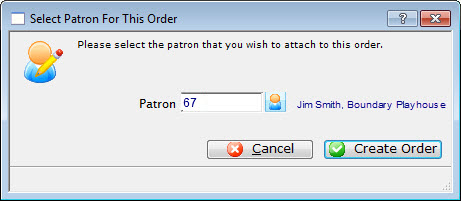
- Enter the Patron number for the patron you want to attach to this order.
You can open the Patron List window and search for the patron by clicking the
 button.
 - Once you have selected the Patron, click the Create Order
 button.
The Order is created and you are returned to the Project window.
Click the Accounting tab.
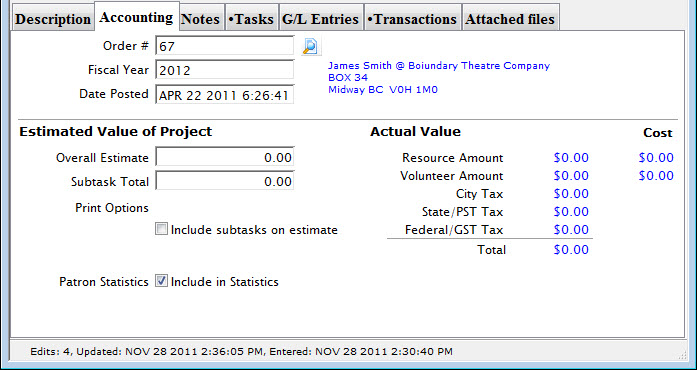
Once the tasks have been entered, the Volunteers, Personnel and Resources assigned, the amounts entered per hour for volunteers, personnel and resources will be displayed on the Accounting tab.
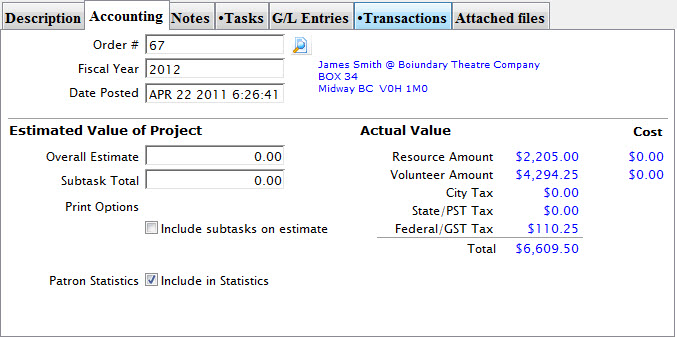
The Actuals and Costs are calculated based on the tasks associated with the project and all the resources and volunteers assocuated with each task. This tab displays the roll up of the tasks.

Paying an Invoice
Facility Management uses the familiar Theatre Management Order and Payment Management windows for taking an invoice payment. To pay for an invoice, you perform the following steps:
- Click the Order
button in the Project window ribbon bar / toolbar.
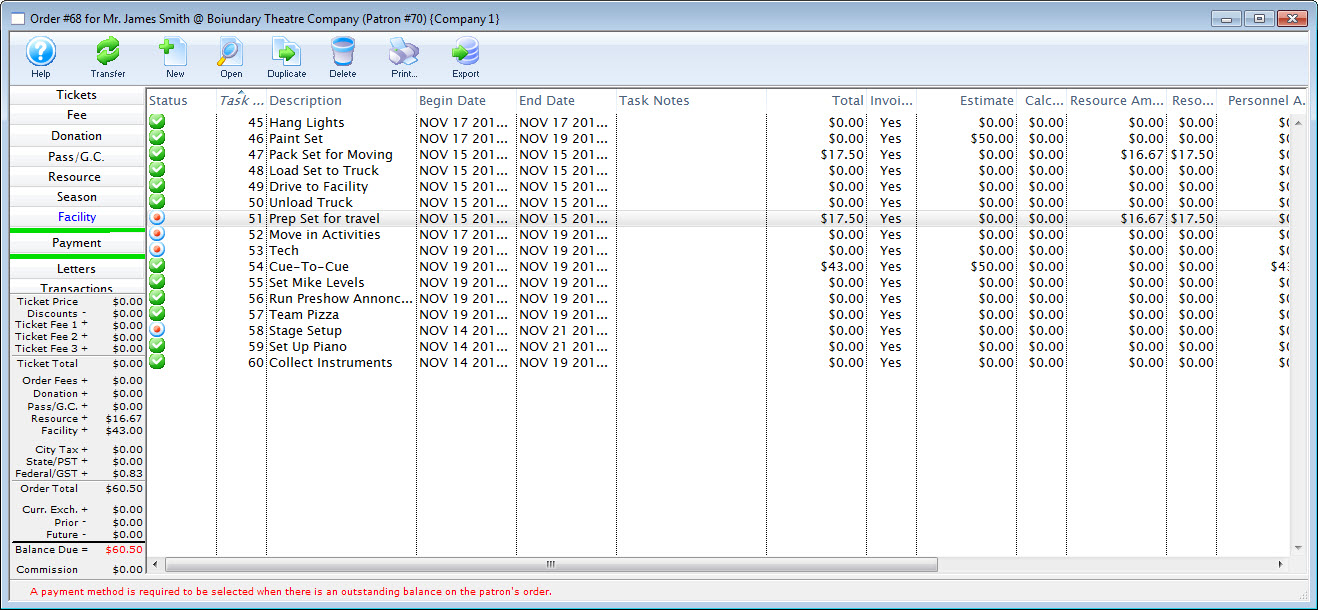
The Order window opens to the Facility page. Here you can review all of the tasks and their associated costs.
To view the Resources, click the Resource
 button. The resource page also applies to Facility management and shows any resources that have been added to the Tasks in the Project.
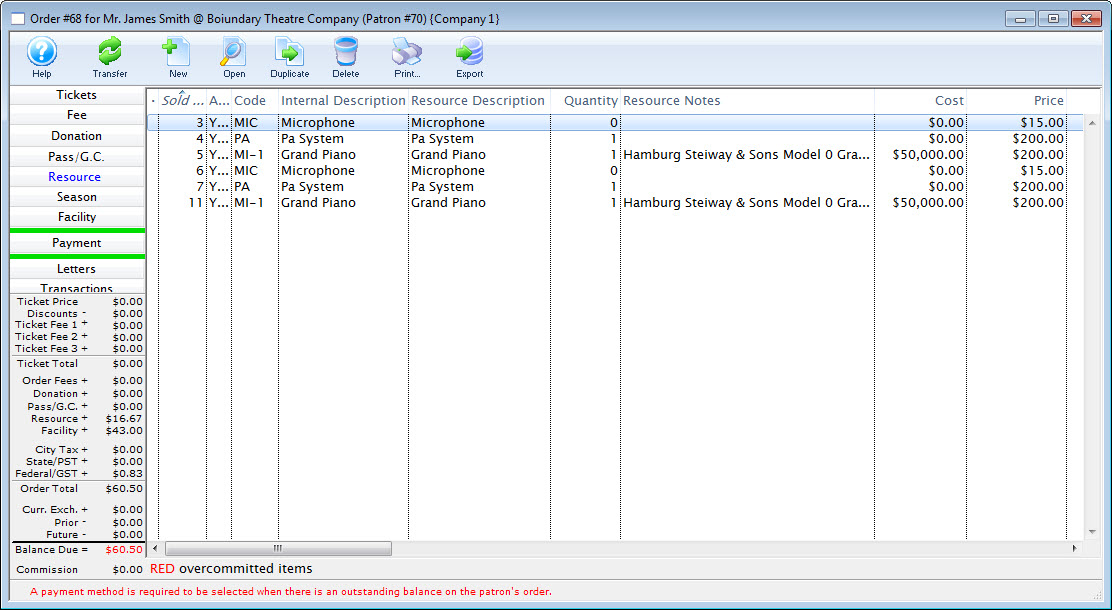
- Click the Payment
 button.
The Payments page opens. Click here for more information on the Payments page, how to create a payment, or a post dated payment, transferring a payment, etc.
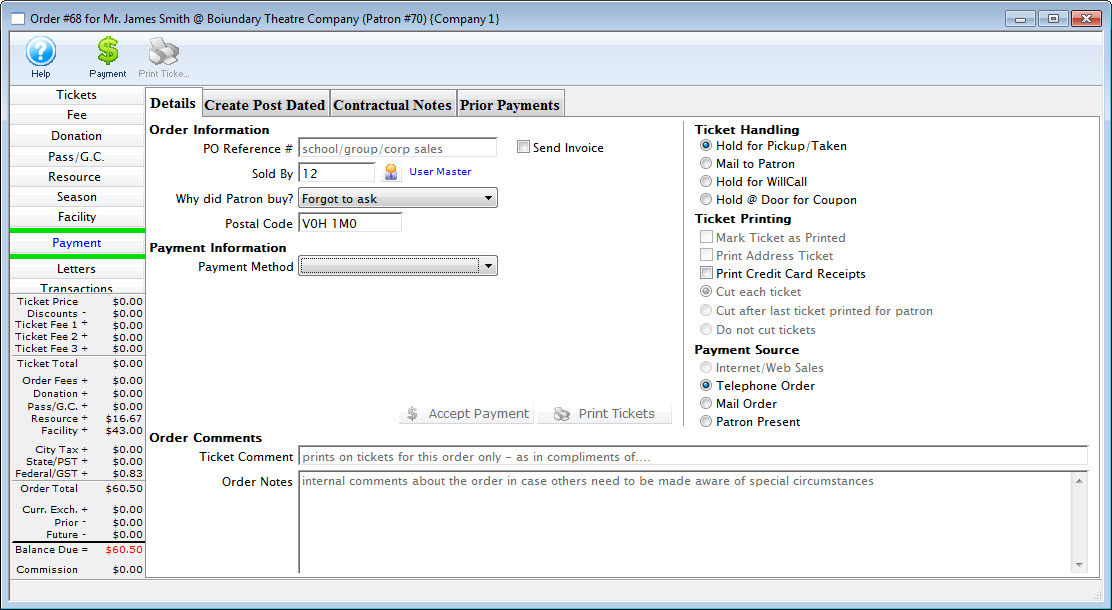
Once you have completed your payment, you are returned to the Project window.
Printing an Invoice
Printing an invoice is similar to printing an Estimate.
To print an invoice, you perform the following steps:

- In the Project window, click the Billing drop down and choose Invoice.
The Estimate button in the Project window ribbon bar / toolbar changes to Invoice.
A dialog opens, stating that changing to an order causes the Order to be posted during the end of day process and asks if you want to continue.

- Click the Yes to continue.
You are returned to the Project window.
- Click the Invoice
 button.
The Print Invoice Criteria window opens.
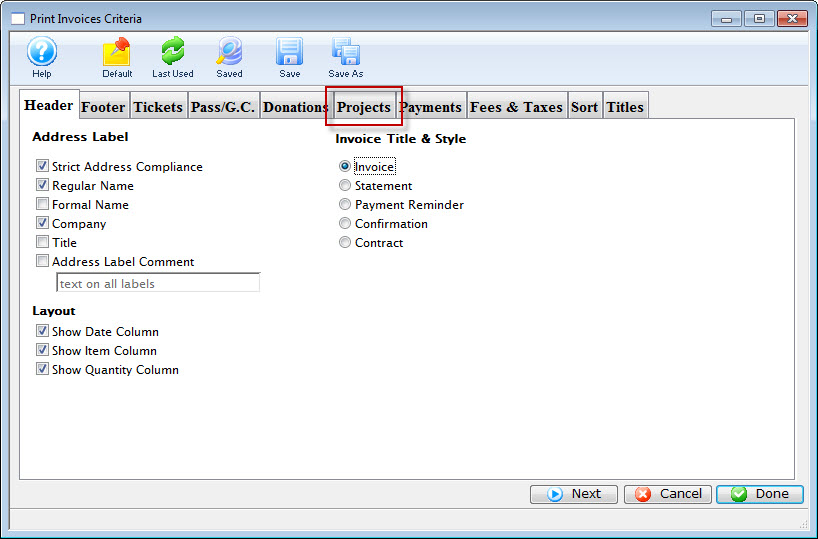
Review the information on the tab to ensure that the information you want printed on the invoice is selected.
- Click the Projects tab.
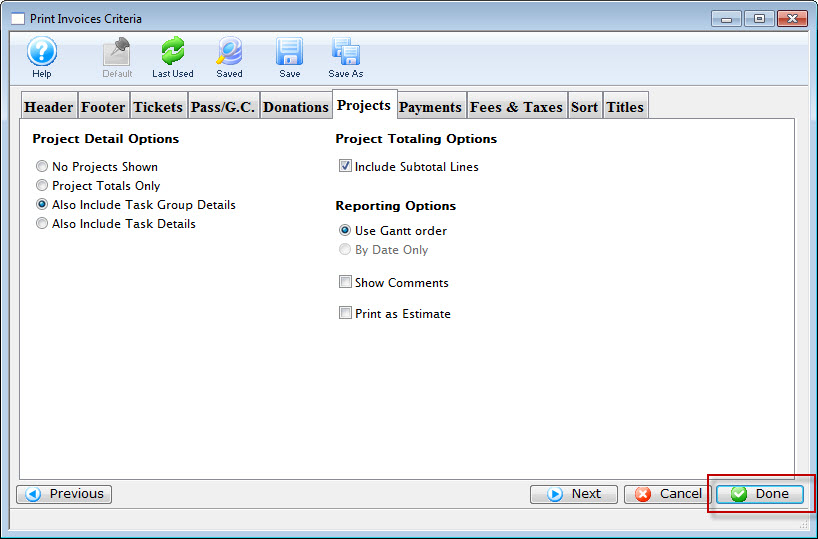
Review the information on the tab to ensure that the information you want printed on the invoice is selected.
- Click the Done
 button.
The Estimate prints.

Click here for more information on the Finished Report window.
You can review the other tabs as necessary.
Printing an Estimate
You can print estimates of a project or the invoice from the Reports window:

Or from the Reports window.
- Click the Estimate
 button in the Project toolbar / ribbon bar.
The Print Invoices dialog opens.
- Click the Projects tab and ensure the Print as Estimate checkbox is enabled.
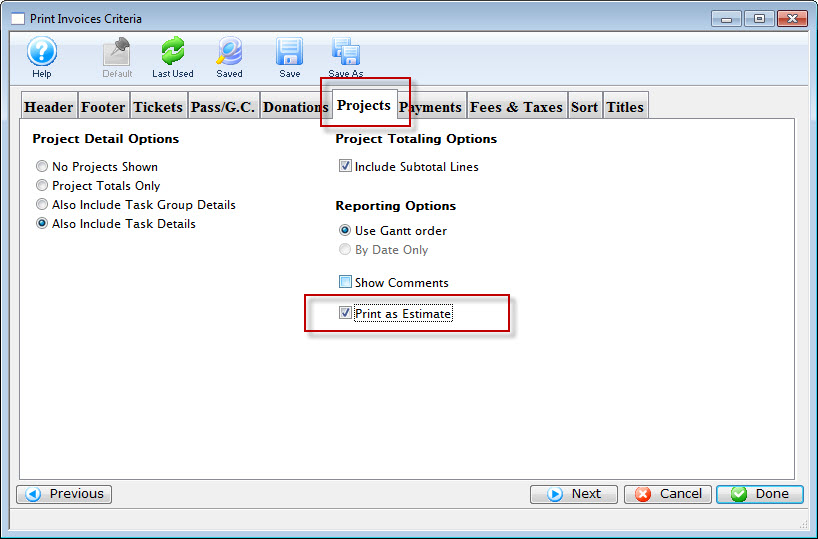
You can review the other tabs as necessary.
- Click the Done button.
The Estimate prints.
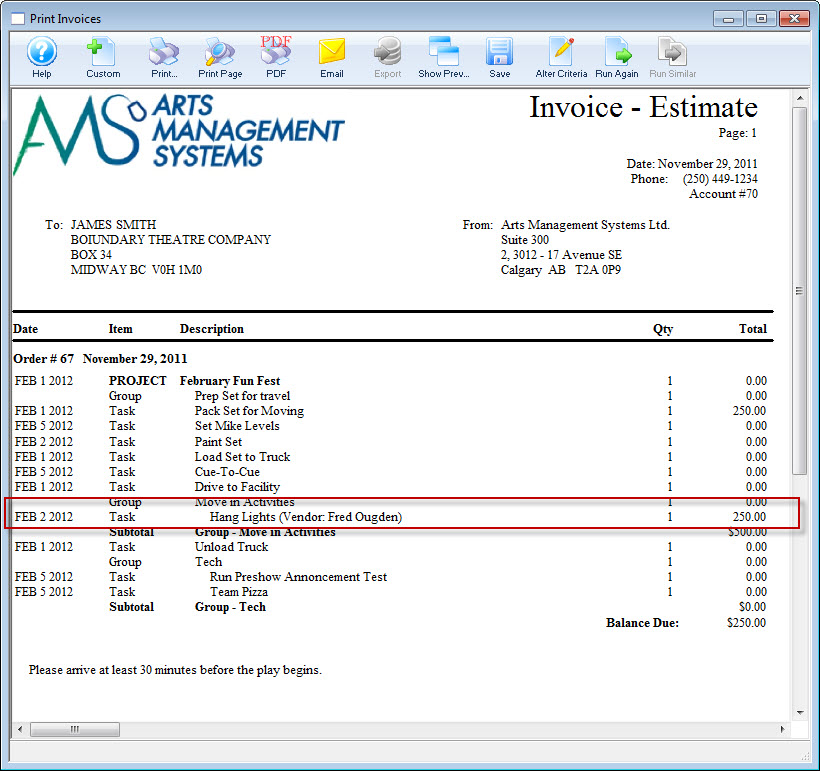
Click here for more information on the Finished Report window.
Where did the highlighted amount come from?
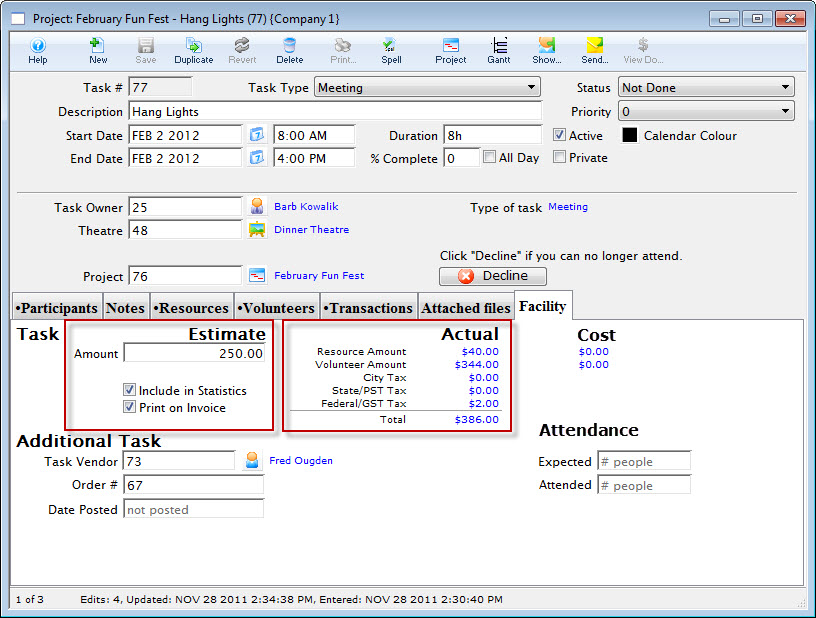
The Facility tab of the task listed in the Estimate. Click here for more information on the Task Facility tab.

To print an estimate, you perform the following steps:
Notifications
When you look at the Calendar, they show the time, task title & participant(s), and they show the participant status.

Status can be set by the user (that is, you talk to the person and they confirm) or the task can be sent to the patron via email.
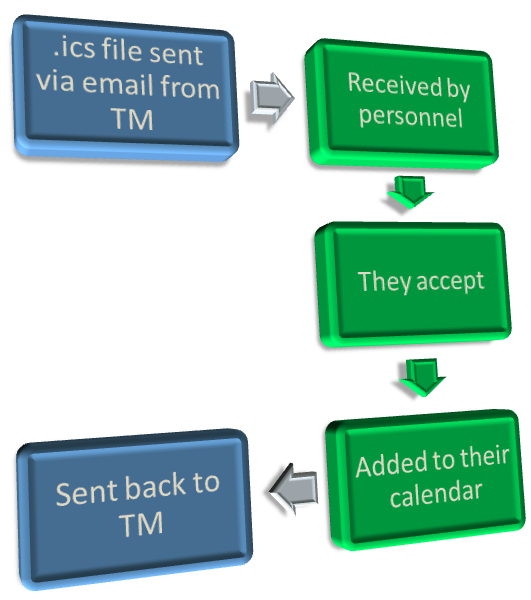 |
|
You can open the Notification window any time via Patron Sales >> Pending Notifications. There are other circumstances detailed below that may cause the Notification window to be displayed.
|
Some of the items below may also appear in macOS Notification Centre as well (if enabled in preferences). |
The Notifications window displays 4 types of information:
| Startup Warnings |
At startup, several warnings can display, including whether backups
have been running properly, whether the credit card server can be
connected to, whether there are Email responses back from volunteers or
task participants that need to be responded to, and if there are important Theatre Manager
software updates that should be reviewed. Except for the line
indicating that there are Email responses waiting, these only display when
logging in.
Click here for more information on General Startup Warnings. |
| Information about tasks assigned to you |
The Notification window will also tell you when certain events occur
relating to your association with a task. If you have been included as a
task participant in some task and you have not responded.
Click here for more information on Tasks Assigned to you. |
| Letters or Emails |
The notification window displays the information about:
Click here for a full description of how Notifications can tell you more about Letters or emails. |
| Information about volunteers you have scheduled or are working on scheduling. |
There are a number of different notifications around volunteers. These
include:
Click here for a full description of Volunteer Notifications. |
How Notificiations Go To And From Theatre Manager and Recipients
How do the notifications go from theatre Manager to the staff member, volunteer or patron in the database?
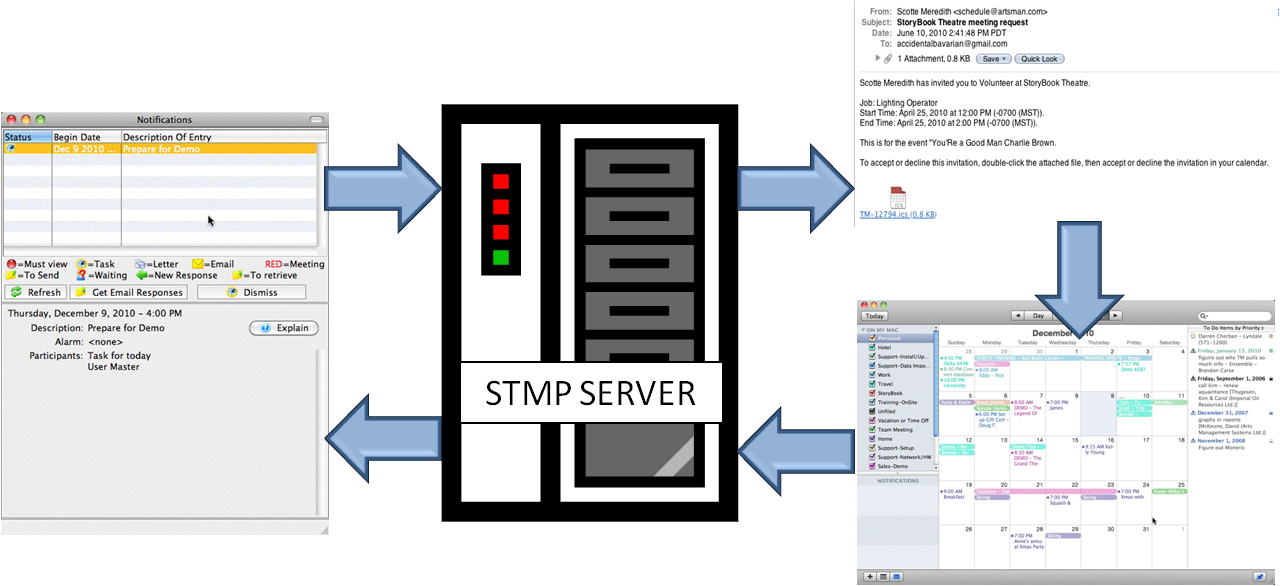
- Notifications are sent from Theatre Manager to the STMP server set up for this in the company preferences using a .ics format. Click here for more information on setting this up.
The .ics file iCalendar is a computer file format which allows Internet users to send meeting requests and tasks to other Internet users, via email, or sharing files with an extension of .ics. Recipients of the iCalendar data file (with supporting software, such as an email client or calendar application) can respond to the sender easily or counter propose another meeting date/time. iCalendar is used and supported by a large number of products, including Apple iCal® and by Microsoft Outlook®.
- The .ics formated file is recieved by the participant.
- The patron then opens the file to add to their calendar.
- Their response is then returned to the STMP server.
- Theatre Manager then recieves a notice in the scheduling inbox and will update the correct meeting with the attend/decline status.
Startup Notifications
- Some Notifications pertain to the Facility Management module.
- Some are alarms that have been set for tasks for yourself to remind you to do something.
- Others are System Notifications and should be addressed as soon as possible.

|
The window cannot be closed without reviewing each of the System Notifications (indicated by a red dot). When highlighted the Notification details will appear at the bottom of the window along with an Explain button. This button will open a web page indicating how to resolve the issue. |
- Backup Warnings - Should the size of the backup shrink or the backup script has not run, Theatre Manager will list the warning in this window. This can lead to loss of data. The backup process should be reviewed before moving forward.
- Theatre Manager Application Updates - Theatre Manager provides a notification each time an updated version has been installed.
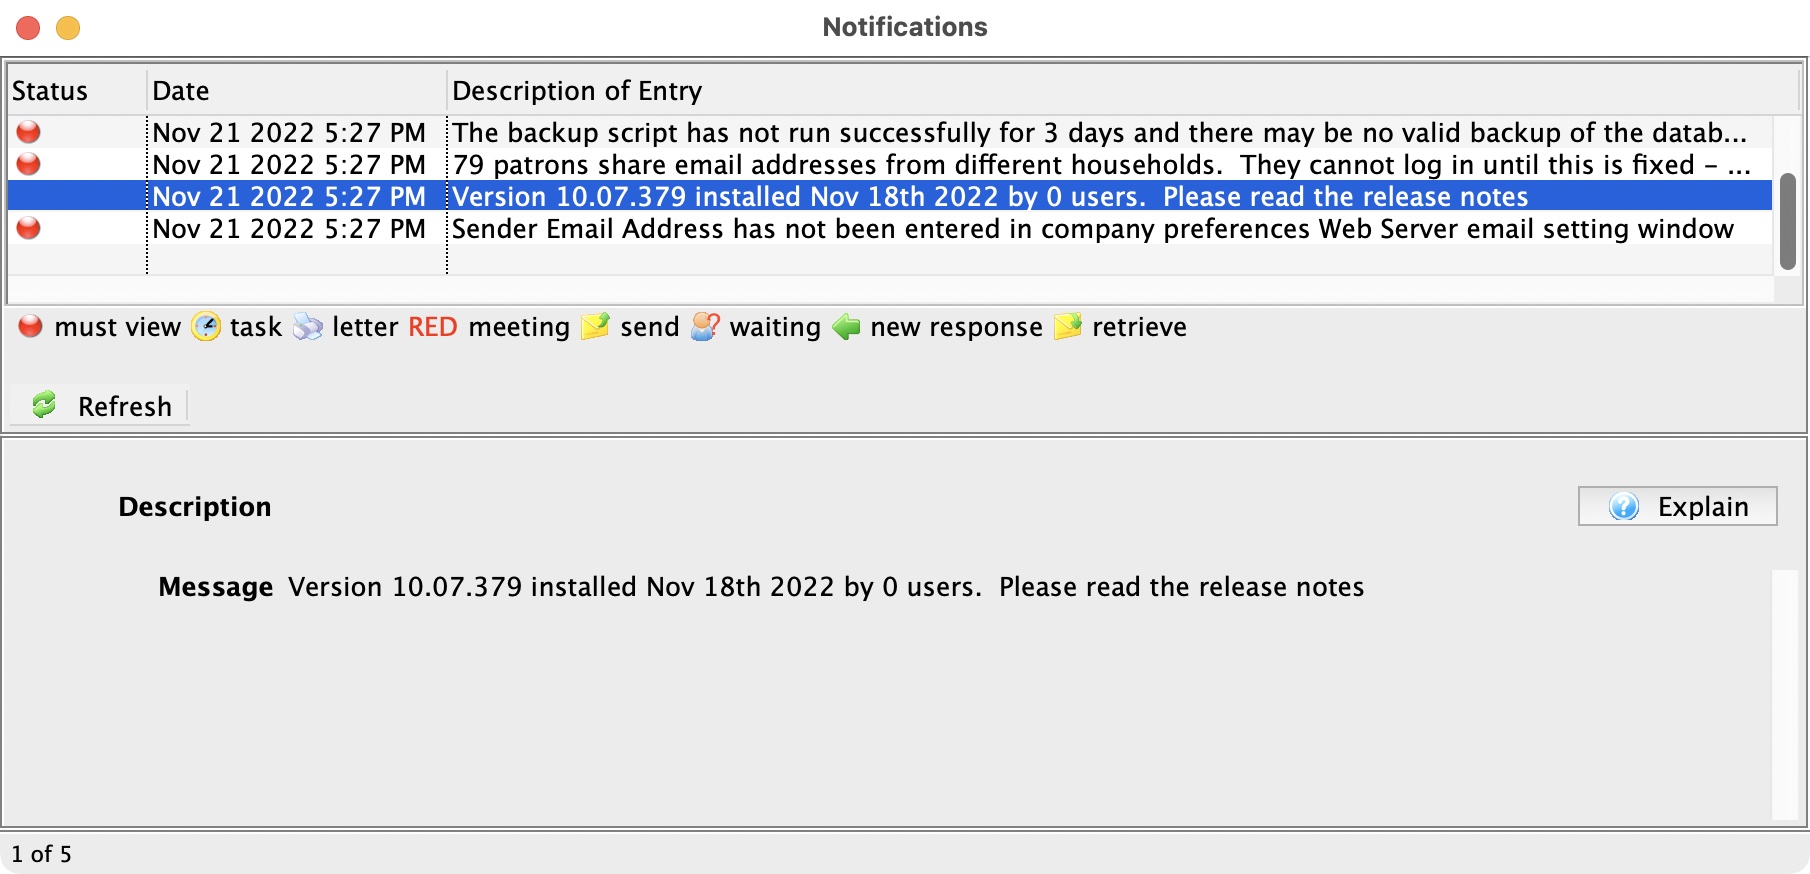
Clicking the "Explain" button will take you to the Release Version History allowing a review of the new features added into the application.
- SMTP Email Errors - Emails may not be sending. This will prevent patrons from resetting their passwords to gain access to web sales or from receiving confirmations of their online purchases.
- Shared Email Addresses - A patron's email address is used to log in to the online sales. An email address can be shared among multiple patrons within the same household. Should the email address belong to multiple people not within the same household, a notification will appear.
Tasks Assigned to You
The Notification window will also tell you when certain events occur relating to your association with a task. If you have been included as a task participant in some task and you have not responded by indicating whether you have accepted, declined, or indicated tentative acceptance, the line will show in red  , indicating there is some response necessary by you. Any tasks for today will be displayed, as well as tasks for which an alarm will go off sometime today
  . And any tasks you have created that other task participants have responded to and you have not yet acknowledged
  . If an alarm goes off and has not been acknowledged, it will also display in the window.
Letters or Emails
The Notification window will display any letters  or Emails
  you have set up for future printing that now need to be sent. Once you have sent them, they will no longer display.
|
Email Responses Waiting
|
The detail section shows you how many messages are awaiting pickup in the scheduling Email account. To pick up these messages and process them so that the appropriate task participant records are updated with responses, click the Get Email Responses button. If some messages cannot be processed (they do not contain a valid iCalendar attachment) they will be deleted, so only scheduling responses should be directed to this account. When the responses are picked up, the appropriate task participant records are updated with the information returned. |
|
Letter to Send
|
From this detail window you can view the letter detail, see the patron, modify the information, and print the letter. |
|
Email to Send
|
From this detail window you can view the Email detail, see the patron, modify the information, and send the Email. |
|
Multiple Letters or Emails to Send
|
When multiple letters or Emails are selected, you only have the option of printing or Emailing all the selected items now. |
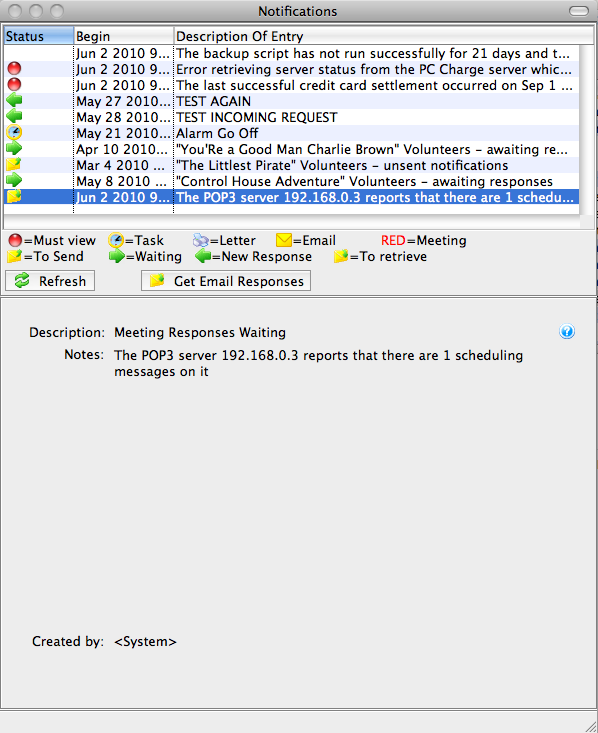
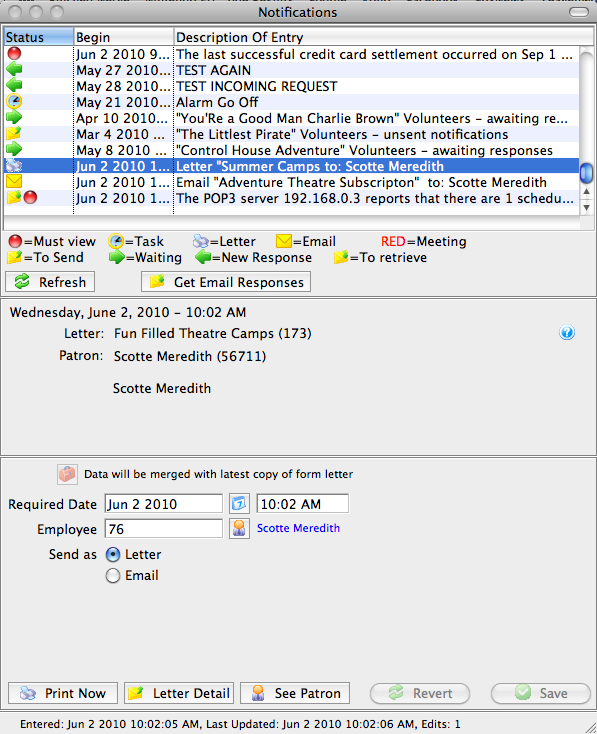
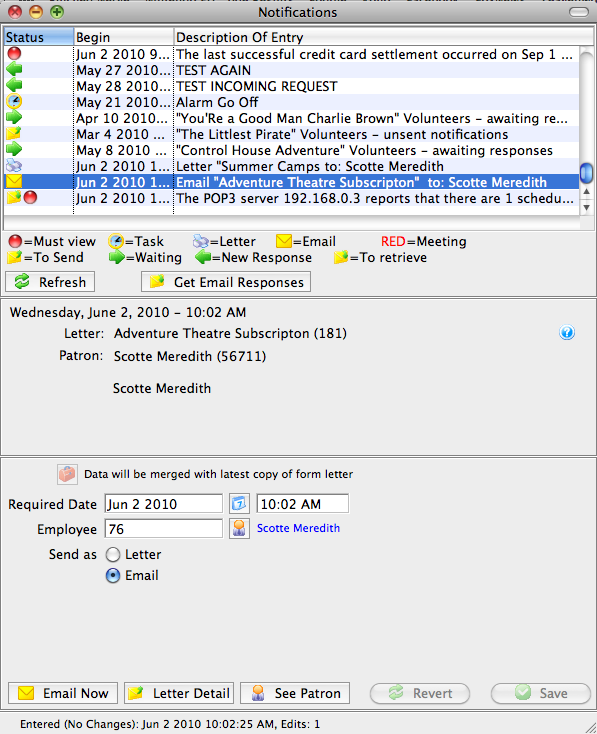
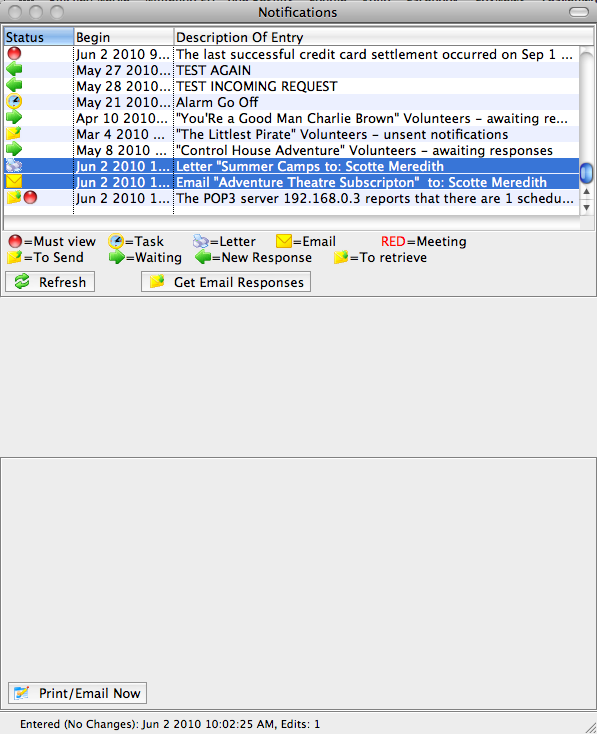
Volunteer Tasks and Notifications
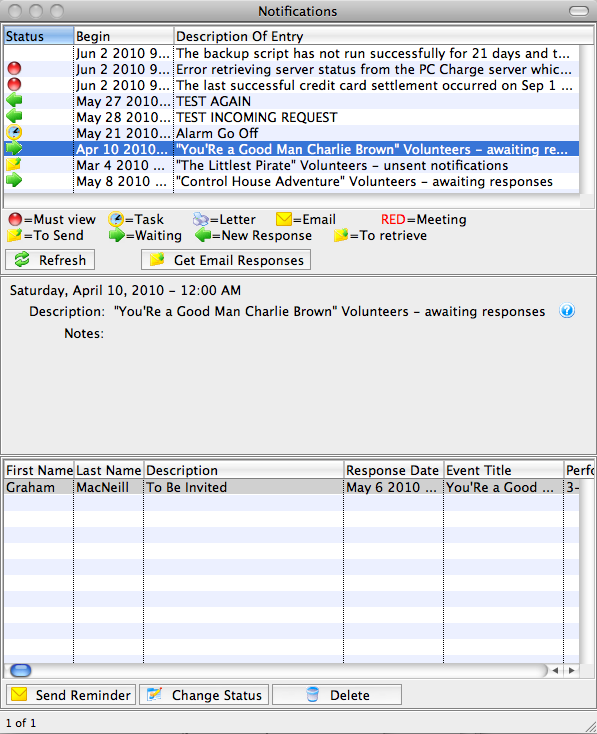
The Notification Process
| Action | System | Outside TM |
| You schedule volunteers for an event / play or other activity | A record is created indicating whether they respond by email. | |
| Needs an invitiation - An email invitiation is sent out | Don't ever invite - You are using some means other than email to let them know about the volunteer opportunity and an email is not sent | |
| The email invitiation is sent out | When the email is sent, it includes an industry-standard iCalendar attachment along with information on the volunteer opportunity and instructions for responding. | |
| Notifications | In the Notifications window, if the email has not gone out, you will see a line
for each volunteer opportunity.
When you select the Unsent Notifications line, you have the option at the bottom to send a reminder to each of the selected volunteers |
|
| The email is received by volunteer | When the volunteer receives their email and double-clicks on the
attachment, their default calendar application will open and the event /
play is added to their calendar. It then gives them the opportunity to:
|
|
| The volunteer responds | After the volunteer makes their selection, their calendar will send an Email response back to Theatre Manager. | |
| Theatre Manager updates the database when the Get Email Responses button in the Notification window is clicked. | ||
| Awaiting responses | When an Awaiting Response line is selected, you have the option at the bottom to send a reminder to each of the selected volunteers. | If you receive a phone call or other indication of their response to the volunteer opportunity, you can change their status here. Or you can delete a person from the list of volunteers for this activity. |
Multiple Volunteer Selection
When you select multiple volunteer-associated lines, you do not see the description of each individual volunteer opportunity, but you can send reminders, change statuses or delete volunteers in the list and they will be changed for the appropriate volunteers for each volunteer opportunity.
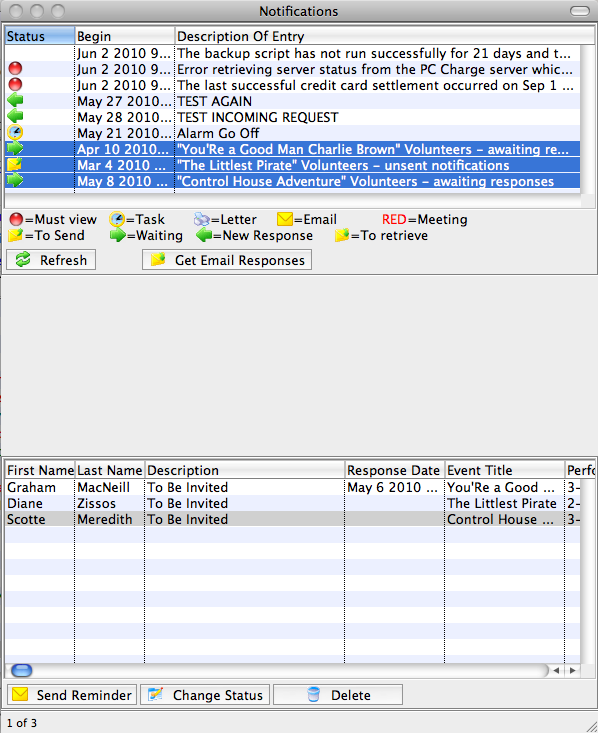
Task Notification
In the Notifications window, you see a line for each task indicating that there are unsent Emails if they have not yet gone out.
When a task line is selected, the lower section gives detailed information about the task, including a list of the participants of this task. From there you can perform all the same functions that can be done from the detailed task window.
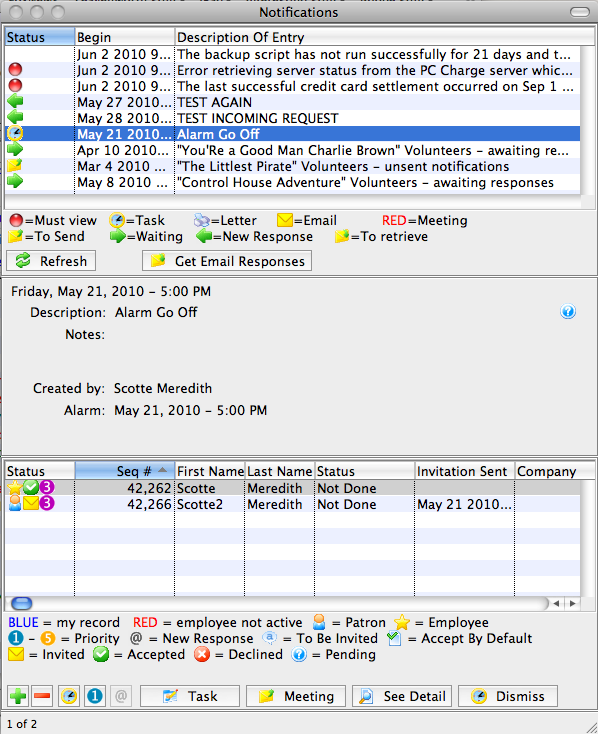
New Response
The person who created the task will want to know when people respond rather than have to go into each task they've created and check for responses. The Notification window does that. When a task has been responded to, the task participant's record is marked as having responded. You can see this with the @ sign in the Status column of the task participants list. To clear this flag, indicating that you have seen this response, select the line(s) and click the @ button.
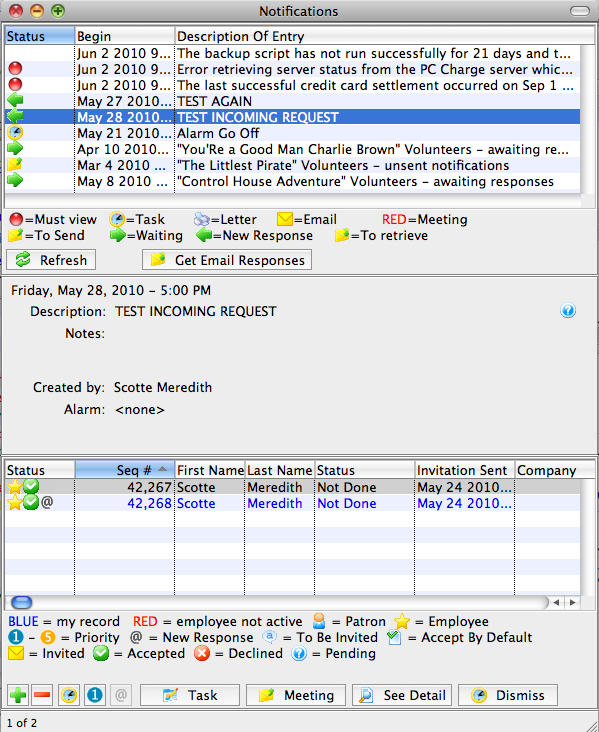
Selecting Multiple Tasks
When multiple task lines are selected, the detail section no longer displays, but the list at the bottom shows all participants attached to each of the selected tasks. You can use any of the buttons at the bottom to make changes to the associated records.
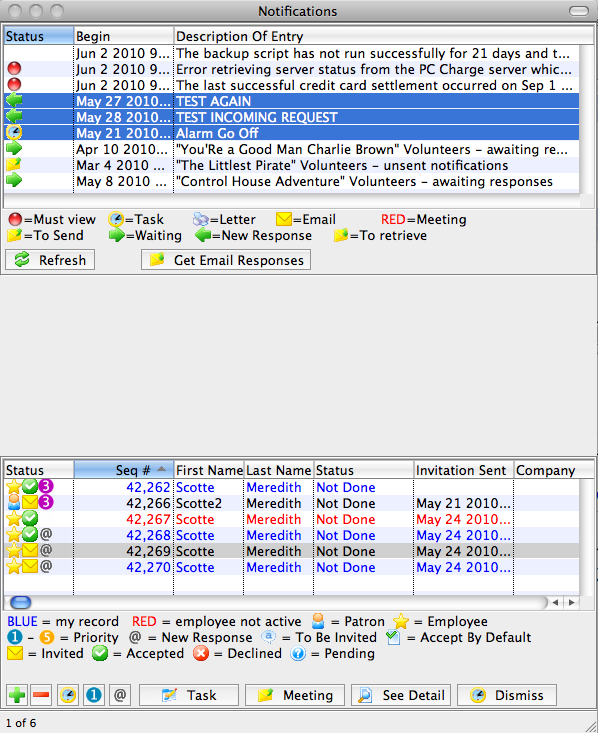
Manage Volunteers
When a volunteer is scheduled for an event / play or other activity, a record is created showing if they have responded or not. Responses have an initial status, you set up under Setup>>Company Preferences - Meeting Server : Default Acceptance Status for Invitations.

Values you can choose are:
- Needs invitation - an Email invitation is expected to go out.
- Don't ever invite - you are using some means other than Email to let them know about the volunteer opportunity and Email will not be sent.
Click here for more information on the Meeting Server.
When an Email is sent, it includes an industry-standard iCalendar attachment along with the information on the volunteer opportunity and instructions for responding.
When the recipient double-clicks on the attachment, their default calendar application opens and the event added to their calendar. It then give them the opportunity to:
- Accept
- Decline
- Mark the appointment as tentative
When they make their selection, their calendar sends an Email response back to Theatre Manager that updates the database.
To open the Manage Volunteer window, select menu item Patron Sales>>Manage Volunteers.

In the Manage Volunteers window you can view all states of outstanding volunteer activities and manage reminders and statuses.

Manage Incoming and Outgoing Volunteer Email Responses
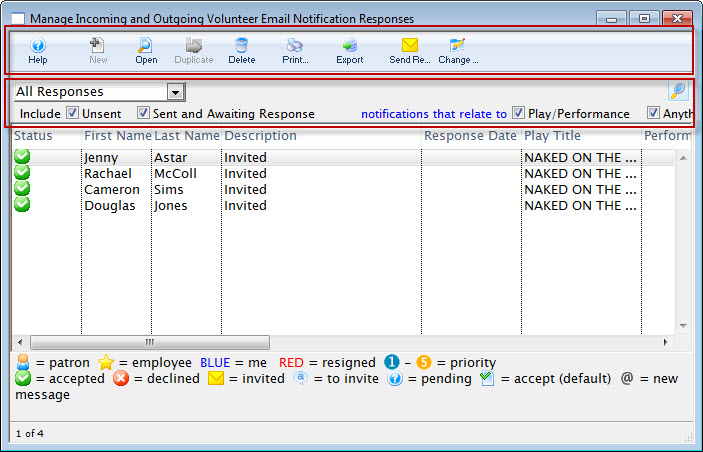
Parts of the Incoming and Outgoing Email Responses Window
 Toolbar / Ribbon Bar Toolbar / Ribbon Bar | |
 |
When clicked, goes to the online help page for the current window. |
 |
Opens a new record. |
 |
Open the activity window for the currently selected volunteer. |
 |
Duplicates the currently selected record. |
 |
Deletes the volunteer history record. |
 |
Clicking the Print button, opens the selection "List As Shown"  . Choosing List as Shown prints the list as a Report. . Choosing List as Shown prints the list as a Report.
|
 |
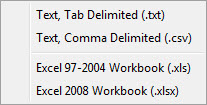 Clicking Export allows you to choose the format to export the current list. |
 |
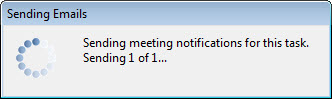 Click the Send Recieve button to send reminders to list. Click the Send Recieve button to send reminders to list. |
 |
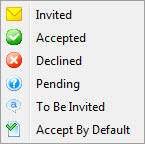 Clicking the Change Status button opens a list of the statuses you can change the currently selected record to. Clicking the Change Status button opens a list of the statuses you can change the currently selected record to. |
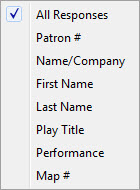 |
Choosing a selection from the drop down list, allows you to refine the list of displayed volunteers. Choices are:
|
 |
|
| Check Boxes |
The check boxes allow you to further refine the list. You can Include:
You can also enable or disable notifications that relate to: |
 |
Click the Search button to display the list of Volunteers. |